Trusted by:
Updated: January 20, 2026
9 min read
How to Combine First and Last Name in Excel?
Excel isn't just for number crunching. When you know how to use it, it makes tedious tasks a lot easier. In this tutorial, we're tackling a handy trick – how to combine first and last name in Excel. We'll also show you how to prep your Excel spreadsheet so that everything clicks into place when you start automating tasks like certification. Ready to make Excel work for yourself? Read on.
For big tasks like sending out a massive mailing list or generating certificates in bulk, you need a well-organized Excel spreadsheet. A key technique is learning how to combine first and last name in Excel.
If the data's off, you might find yourself sorting out mismatched or incomplete entries, which is a headache no one wants.
So, let’s cut to the chase. If your data has first names in one column and last names in another, mastering how to merge first name and last name in Excel can save your day. Ready to tidy up your data and keep your project on track?
In this guide, you'll find how to combine first and last name in Excel (each tailored to different needs and Excel versions):
01 CONCATENATE function
02 CONCAT function
03 Ampersand (&) operator
04 TEXTJOIN function
05 Proper function for capitalization
👋 Hey! If you’re here because you need to prepare the spreadsheet for certification, we can help. These methods will show you how to make a single name field to automatically generate certificates and upload the data to the certificate generator from Excel without any errors. If you still have first and last names in separate cells – you'll need to merge them.
Method 01: CONCATENATE function
The CONCATENATE function is a traditional tool in Excel for joining text from different cells. This function is straightforward and reliable for creating a single output from multiple inputs.
Why use CONCATENATE?
Ideal for older versions of Excel that don't support newer functions.
Simple syntax that’s easy to remember and use.
Steps on how to combine first and last name in Excel with a space using CONCATENATE formula:
01 Choose your destination.
02 Enter the CONCATENATE formula.
03 Submit with enter.
01 Choose your destination. Click on the cell where you want the combined name to show up. We added a new column next to the existing entries.
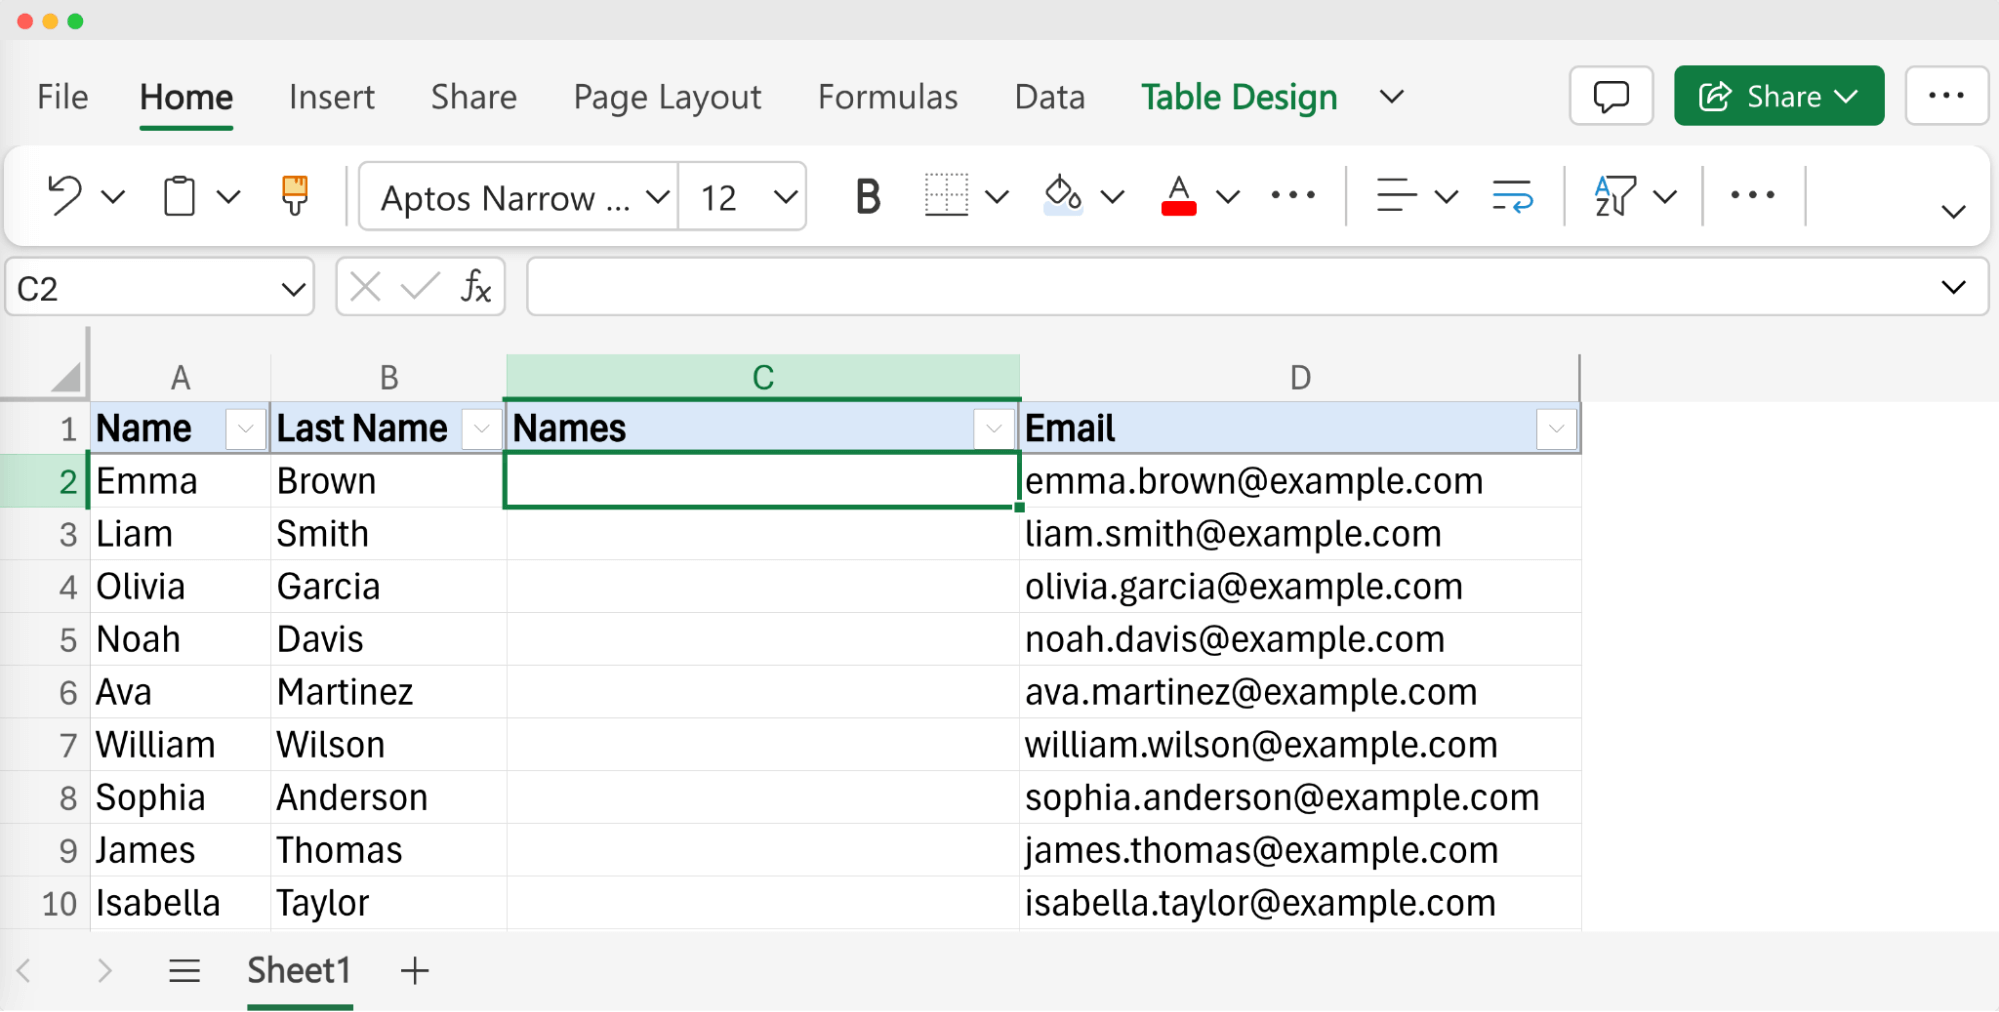
02 Enter the CONCATENATE formula. In the formula bar, type in the following function: =CONCATENATE(A2, " ", B2). In this formula, A2 and B2 are your cell references for the first and last names, respectively, and the " " (a space character).
⚠️ Make sure to include a space between the cell references when you're combining them in Excel. If you skip this step, you'll end up with names sticking together – like "EmmaBrown" instead of "Emma Brown." A simple space keeps everything clear and legible.
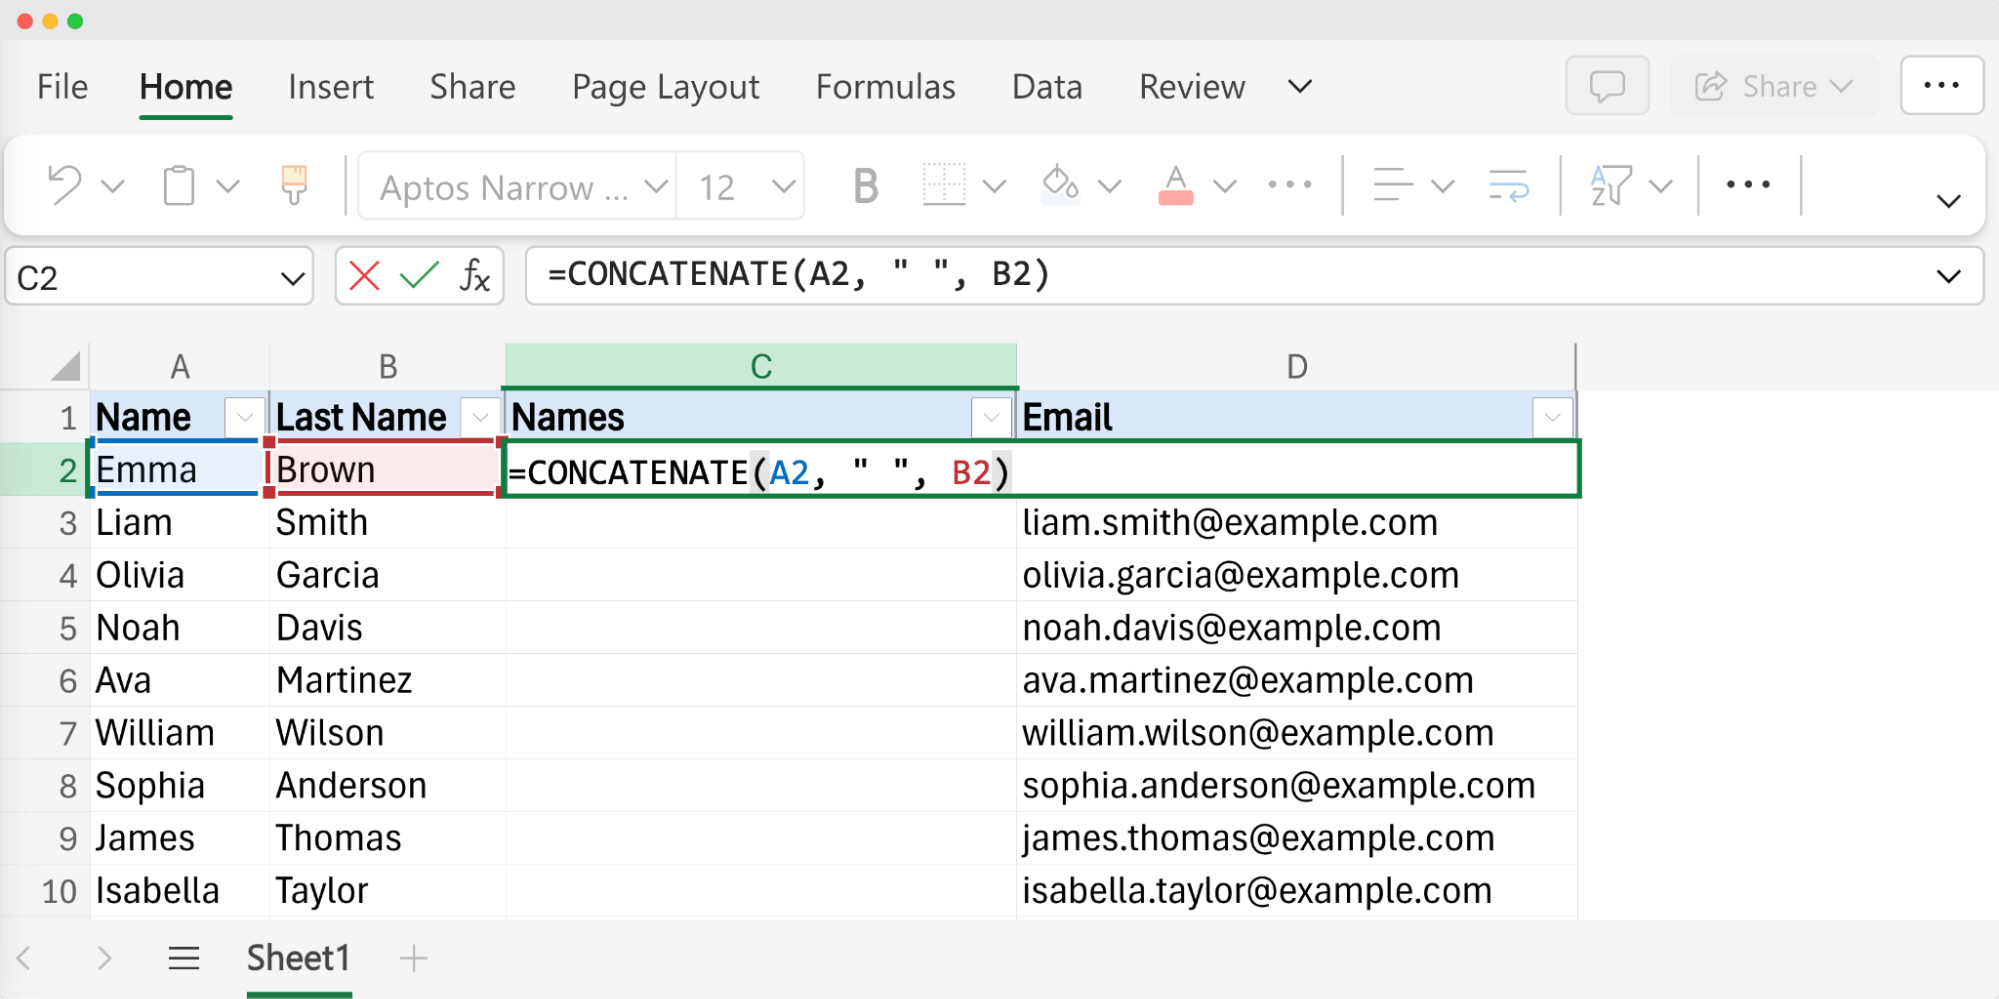
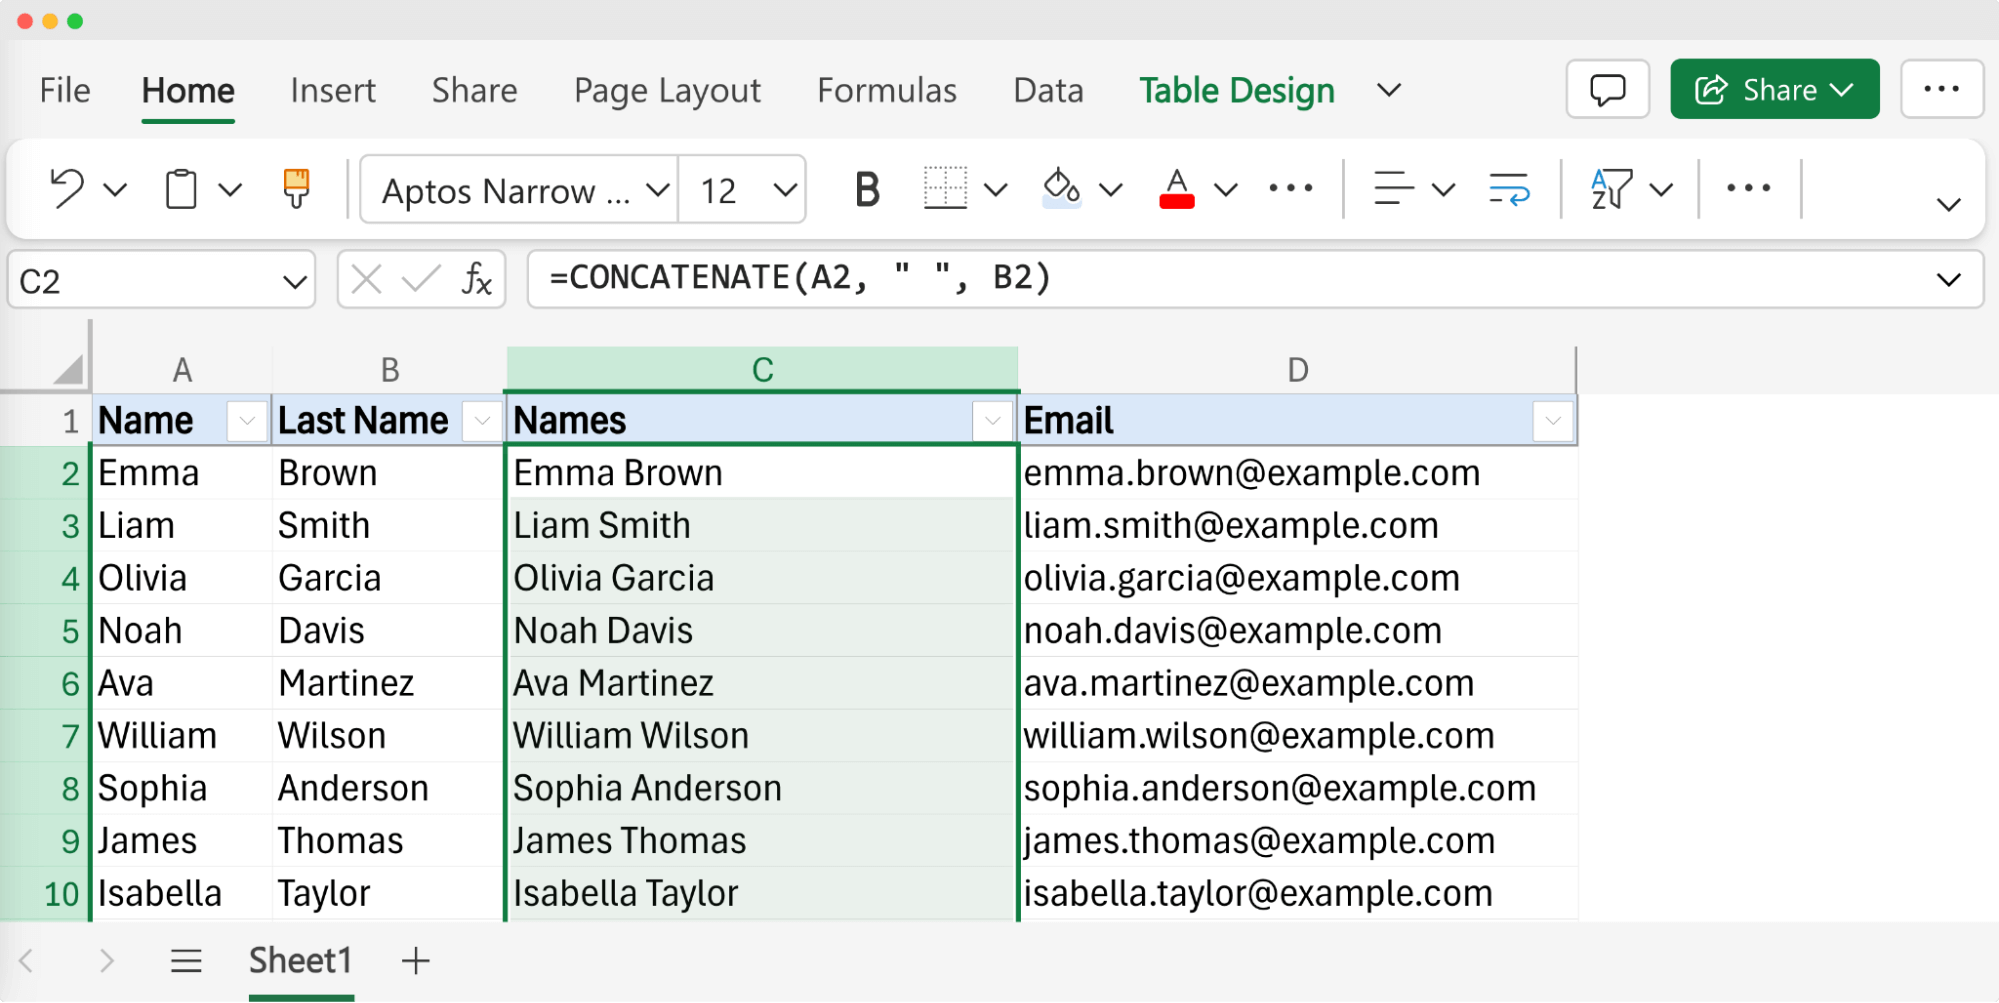
03 Submit with enter. After pressing Enter, watch as the contents of the two columns blend smoothly into one in the adjacent column.
Method 02: CONCAT function
The CONCAT function, introduced in Microsoft Excel 2016, offers a more flexible and streamlined approach to text concatenation than its previous version.
Why choose CONCAT?
Automatically excludes empty cells if they are part of the referenced range.
Simpler syntax and better performance with large ranges of cells.
How to merge first name and last name in Excel using CONCAT:
01 Select your cell.
02 Input the CONCAT formula.
03 Merge with Enter.
01 Select your cell. Navigate to the cell where you’d like the merged name to appear.

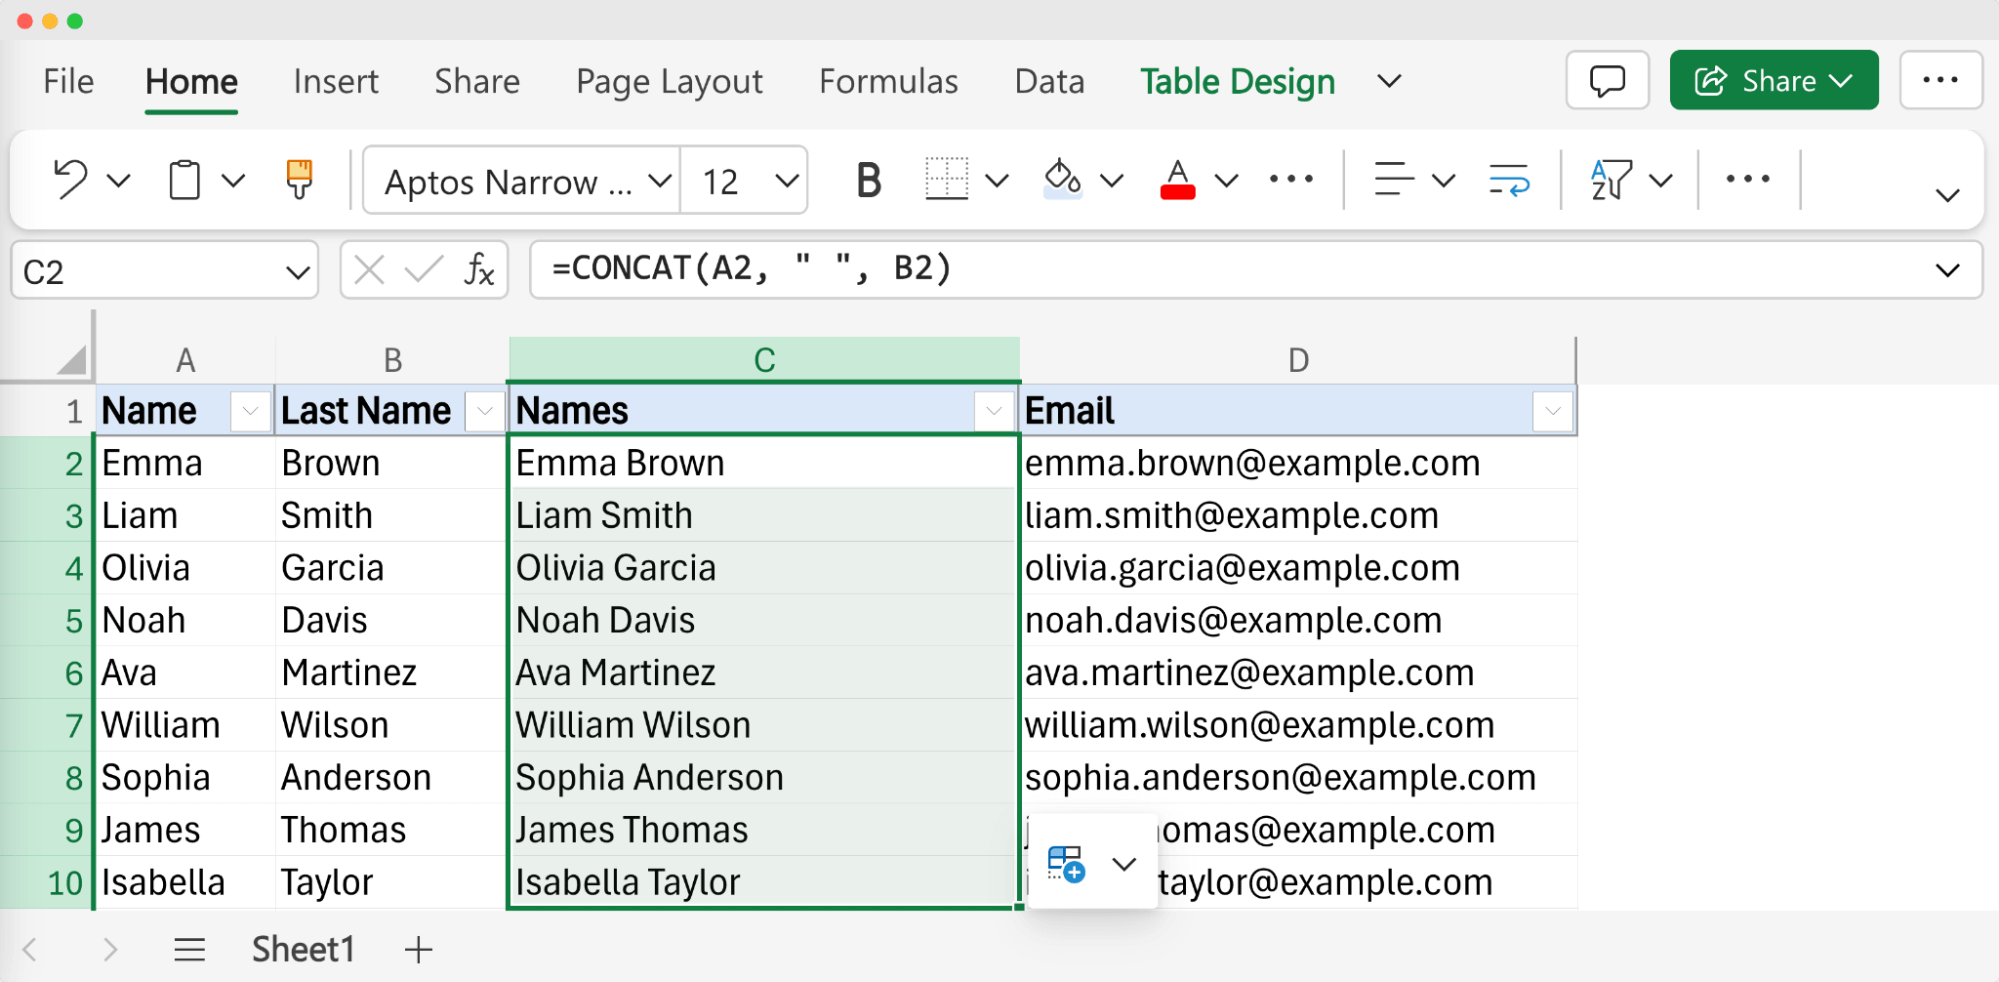
02 Input the CONCAT formula. Simply type =CONCAT(A2, " ", B2) into the formula bar.
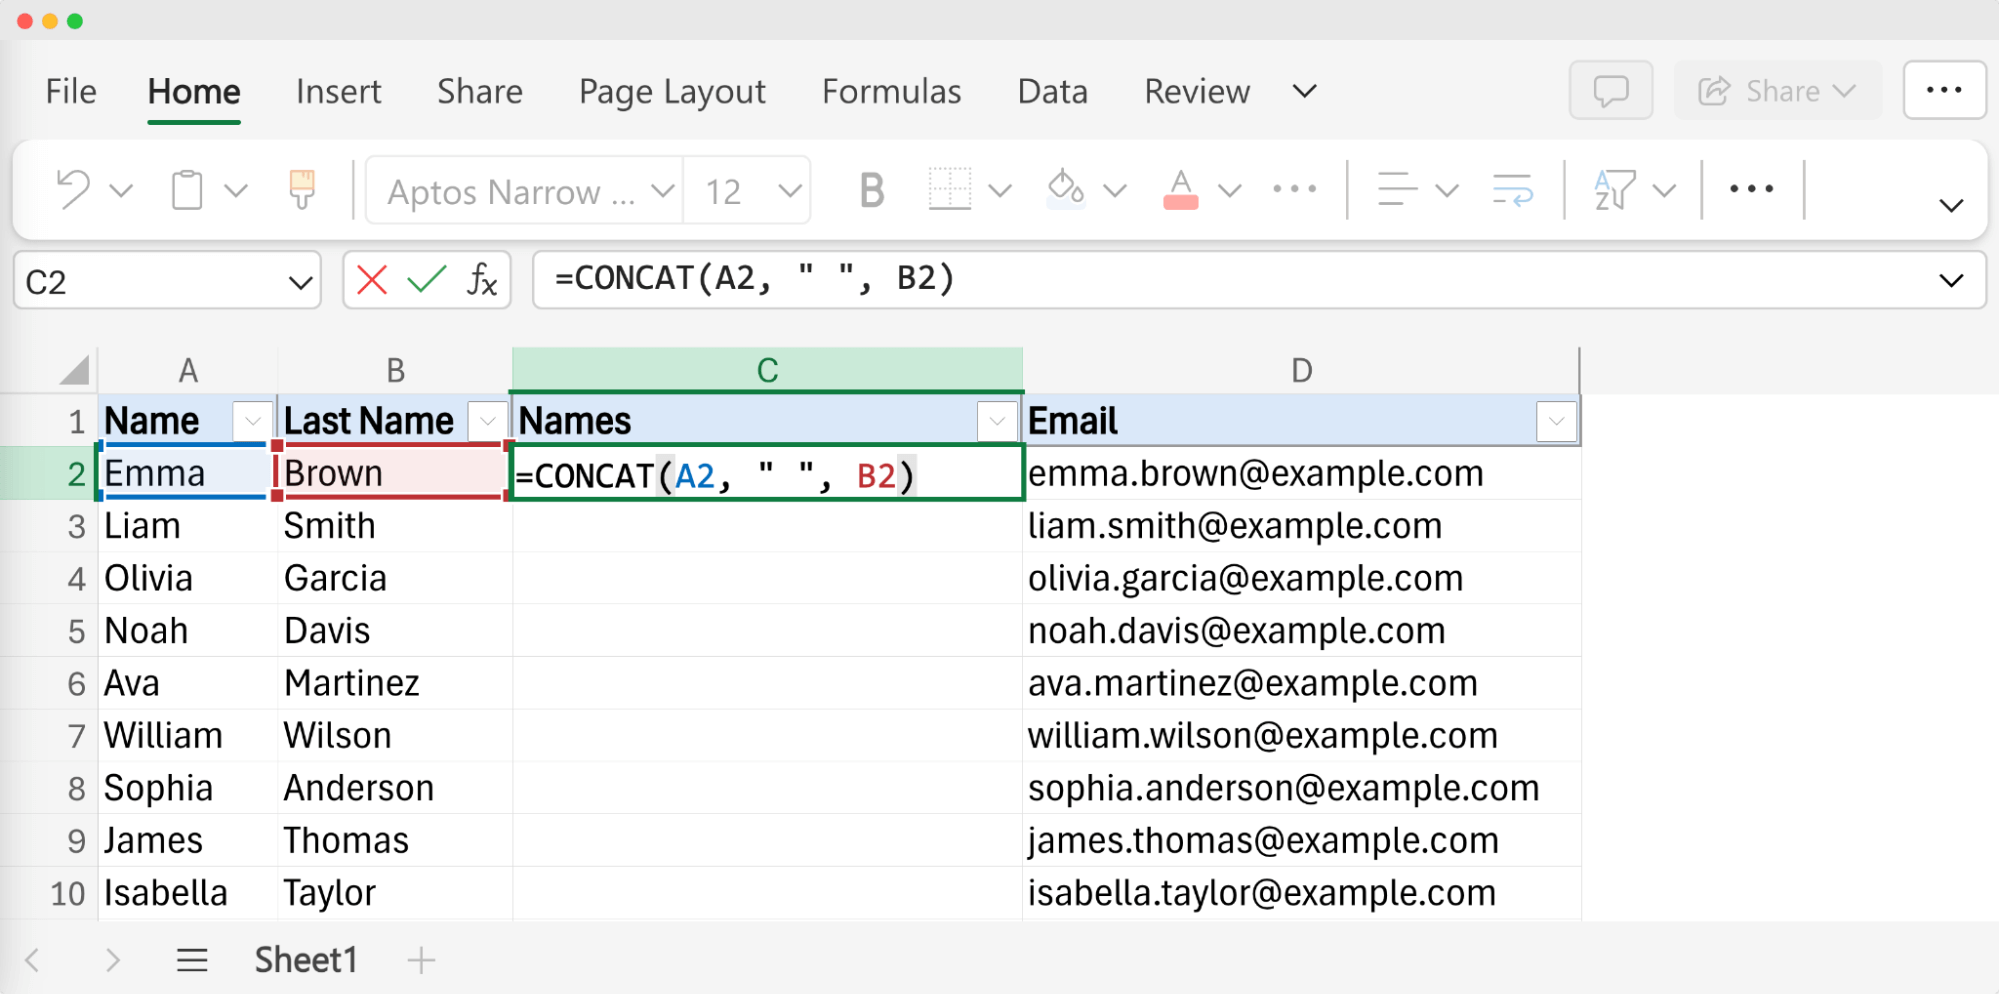
03 Merge with Enter. Hit Enter to submit the above formula, and the two cells seamlessly combine into one, separated by a space. You can drag the formula across the entire column.
Method 03: Ampersand (&) operator
The Ampersand (&) operator provides a quick way to connect strings in Excel, making it perfect for combining names with minimal fuss.
Advantages of using the Ampersand operator:
Speed and directness in formulas.
Easy to adapt for various text-combining tasks beyond just names.
Using the Ampersand operator to combine first and last name in Excel:
01 Position yourself.
02 Type using Ampersand.
03 Finalize with Enter.
01 Position yourself. Click in the cell where you want the new, merged name.

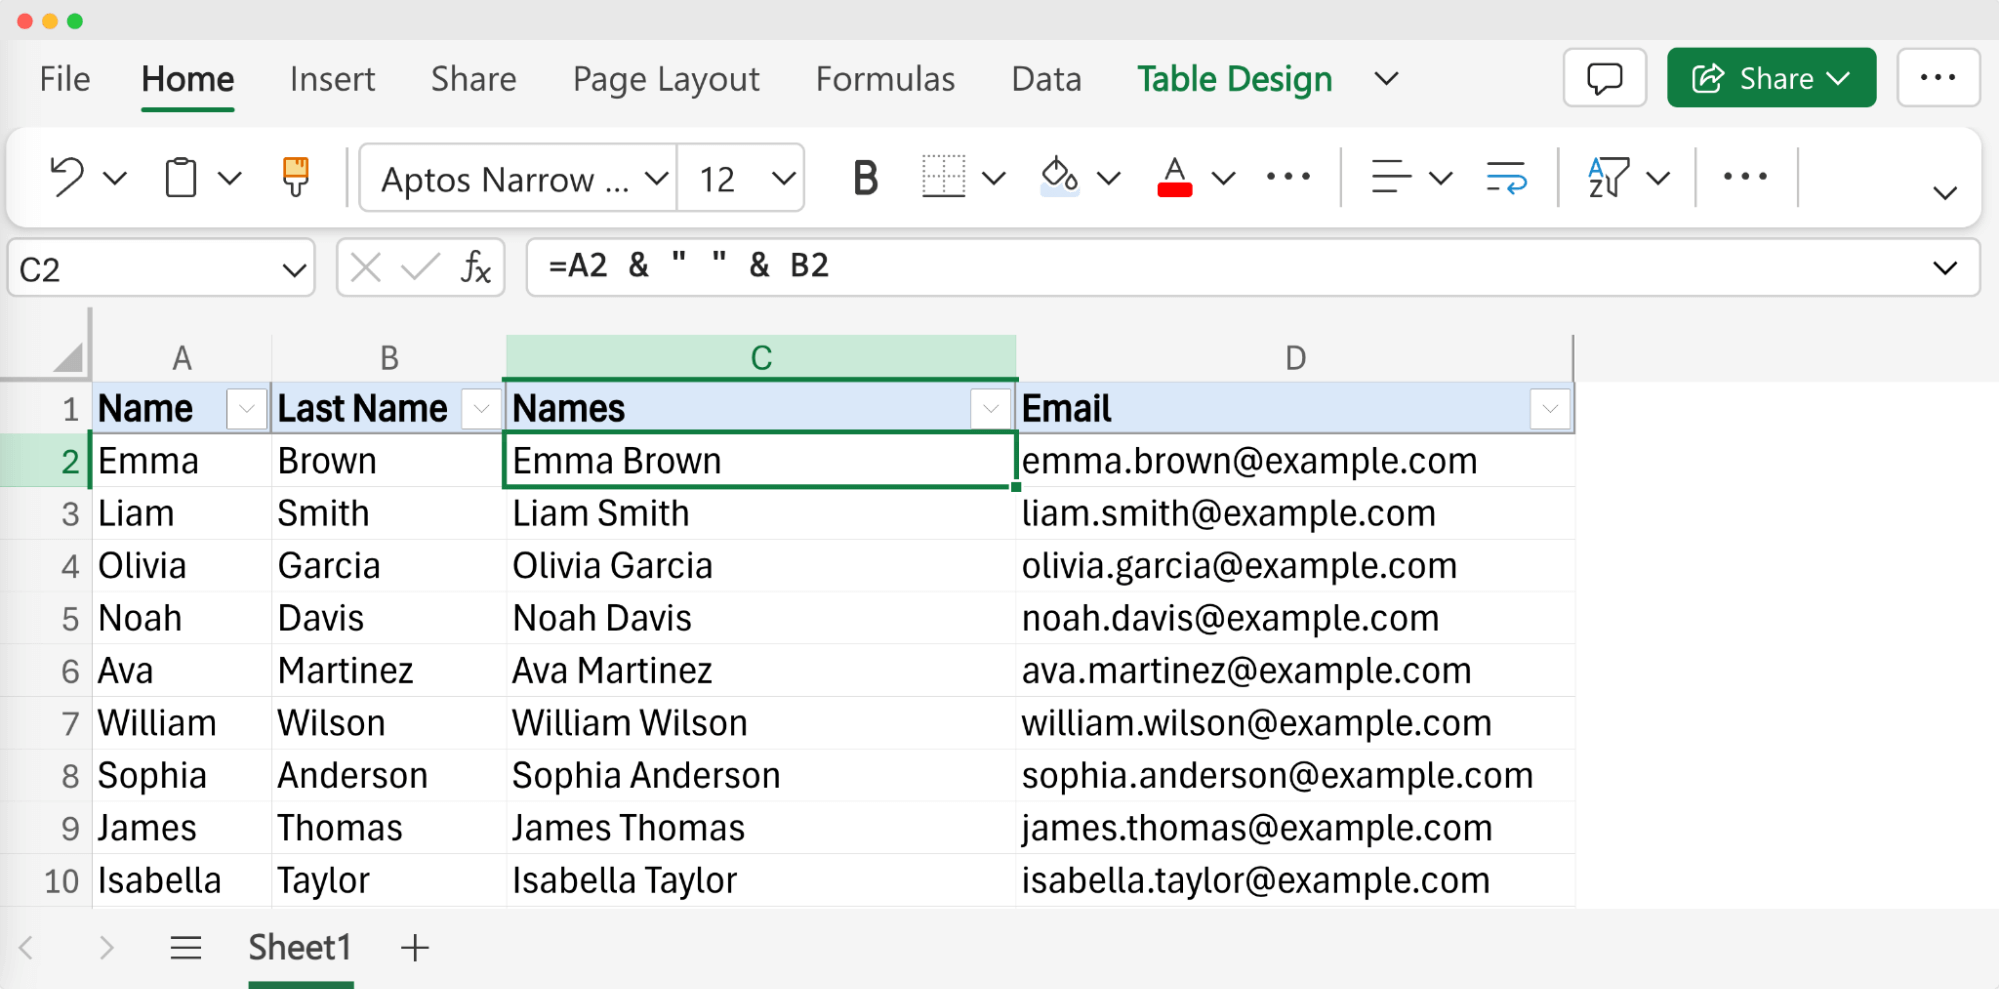
02 Type using Ampersand. Input the formula =A2 & " " & B2. Remember, the sequence of cell values matters.
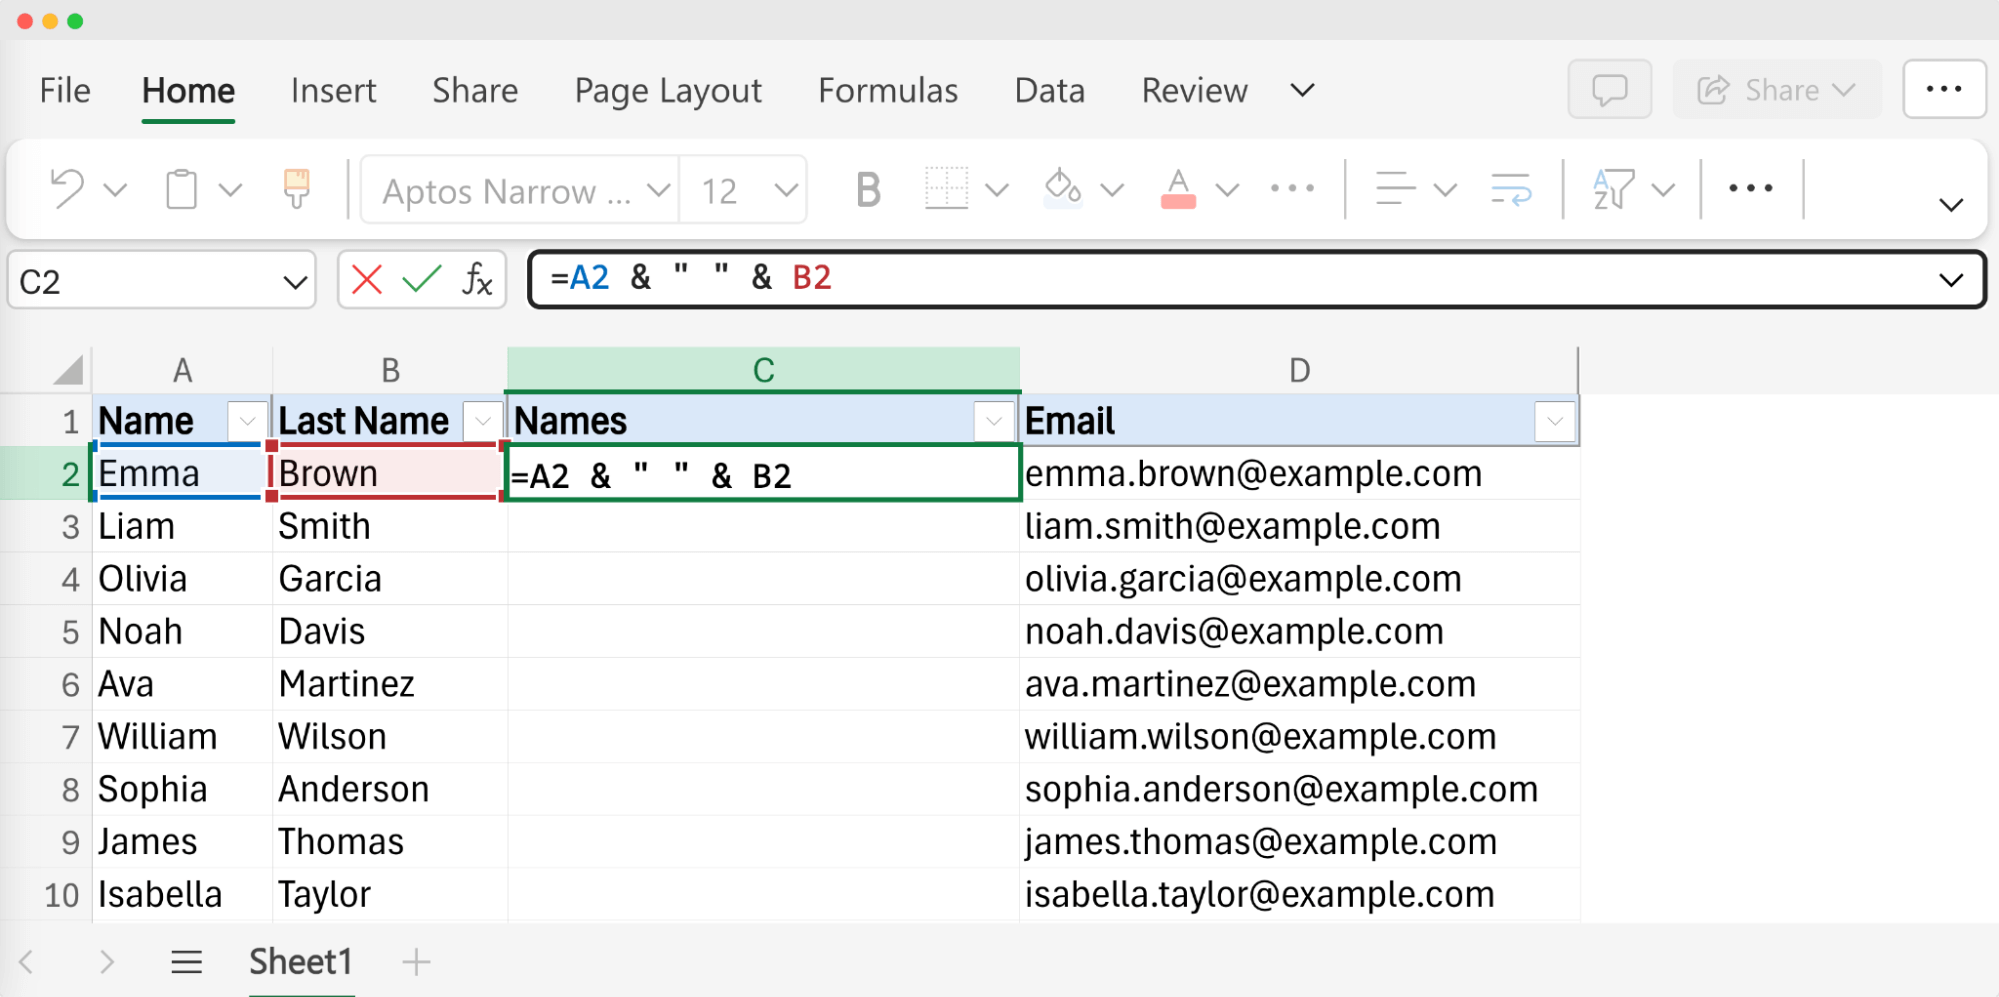
⚠️ You can use different characters or even none when combining names in Excel. For example, to display "Emma" and "Brown" as "Emma, Brown," modify the formula like this: =B2 & ", " & A2. This combines the last name, a comma, and the first name. For another format, say "Emma-Brown," use: =A2 & "-" & B2.
03 Finalize with Enter. Press Enter to see the first and last names from two separate columns come together right before your eyes.
Method 04: TEXTJOIN Function
The TEXTJOIN function is a powerful tool for joining multiple data sets with a specified separator. It gracefully handles empty cells.
Please note: TEXTJOIN might not work for you when you want a different separator between values.
Why TEXTJOIN?
Flexibility in skipping or including empty cells.
Supports a delimiter, which can be a space, comma, or any other character.
Steps on how to merge first name and last name in Excel with TEXTJOIN:
01 Start in the new column.
02 Apply the TEXTJOIN formula.
03 Combine and view.
01 Start in the new column. Click on the cell where you want the combined names.
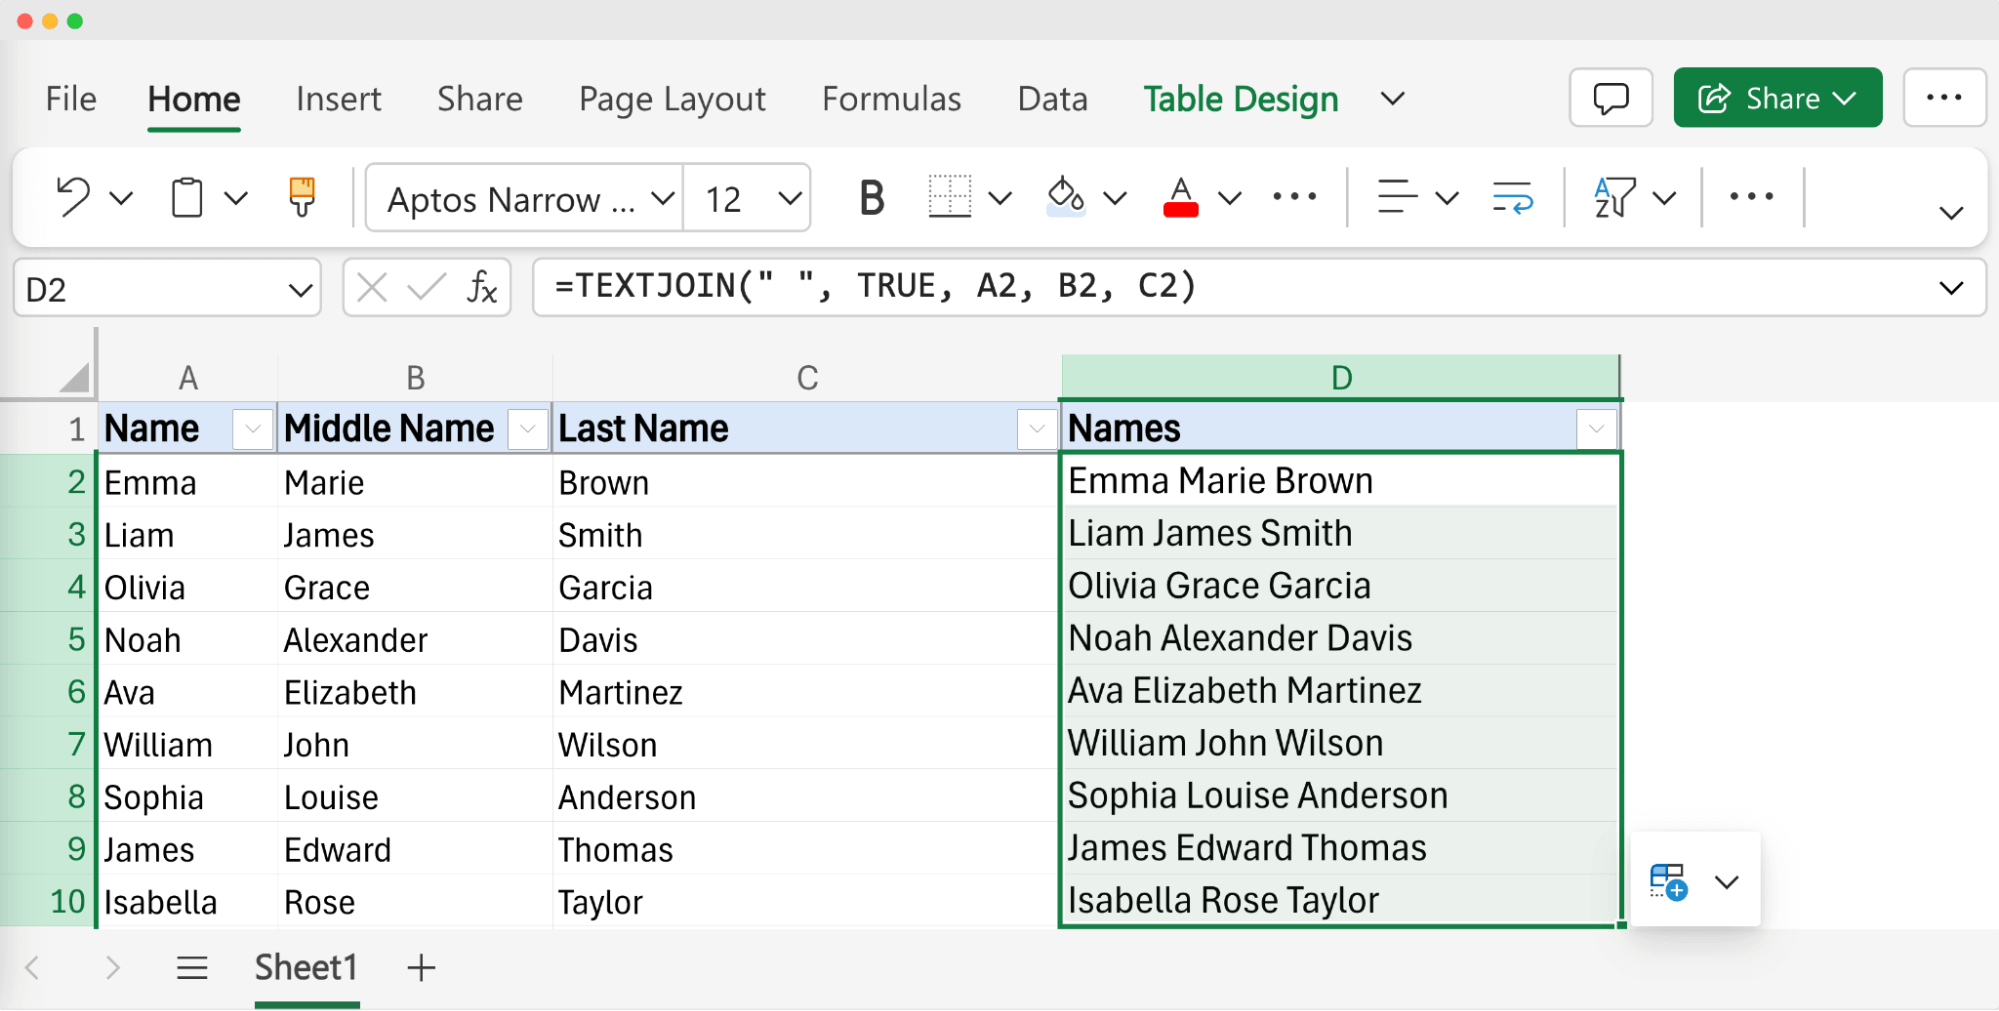
🙋♀️ How to combine first, middle and last name in Excel? All the formulas remain the same, you just need to add the middle name into the mix. But to make things clear, this example will show you this in practice.
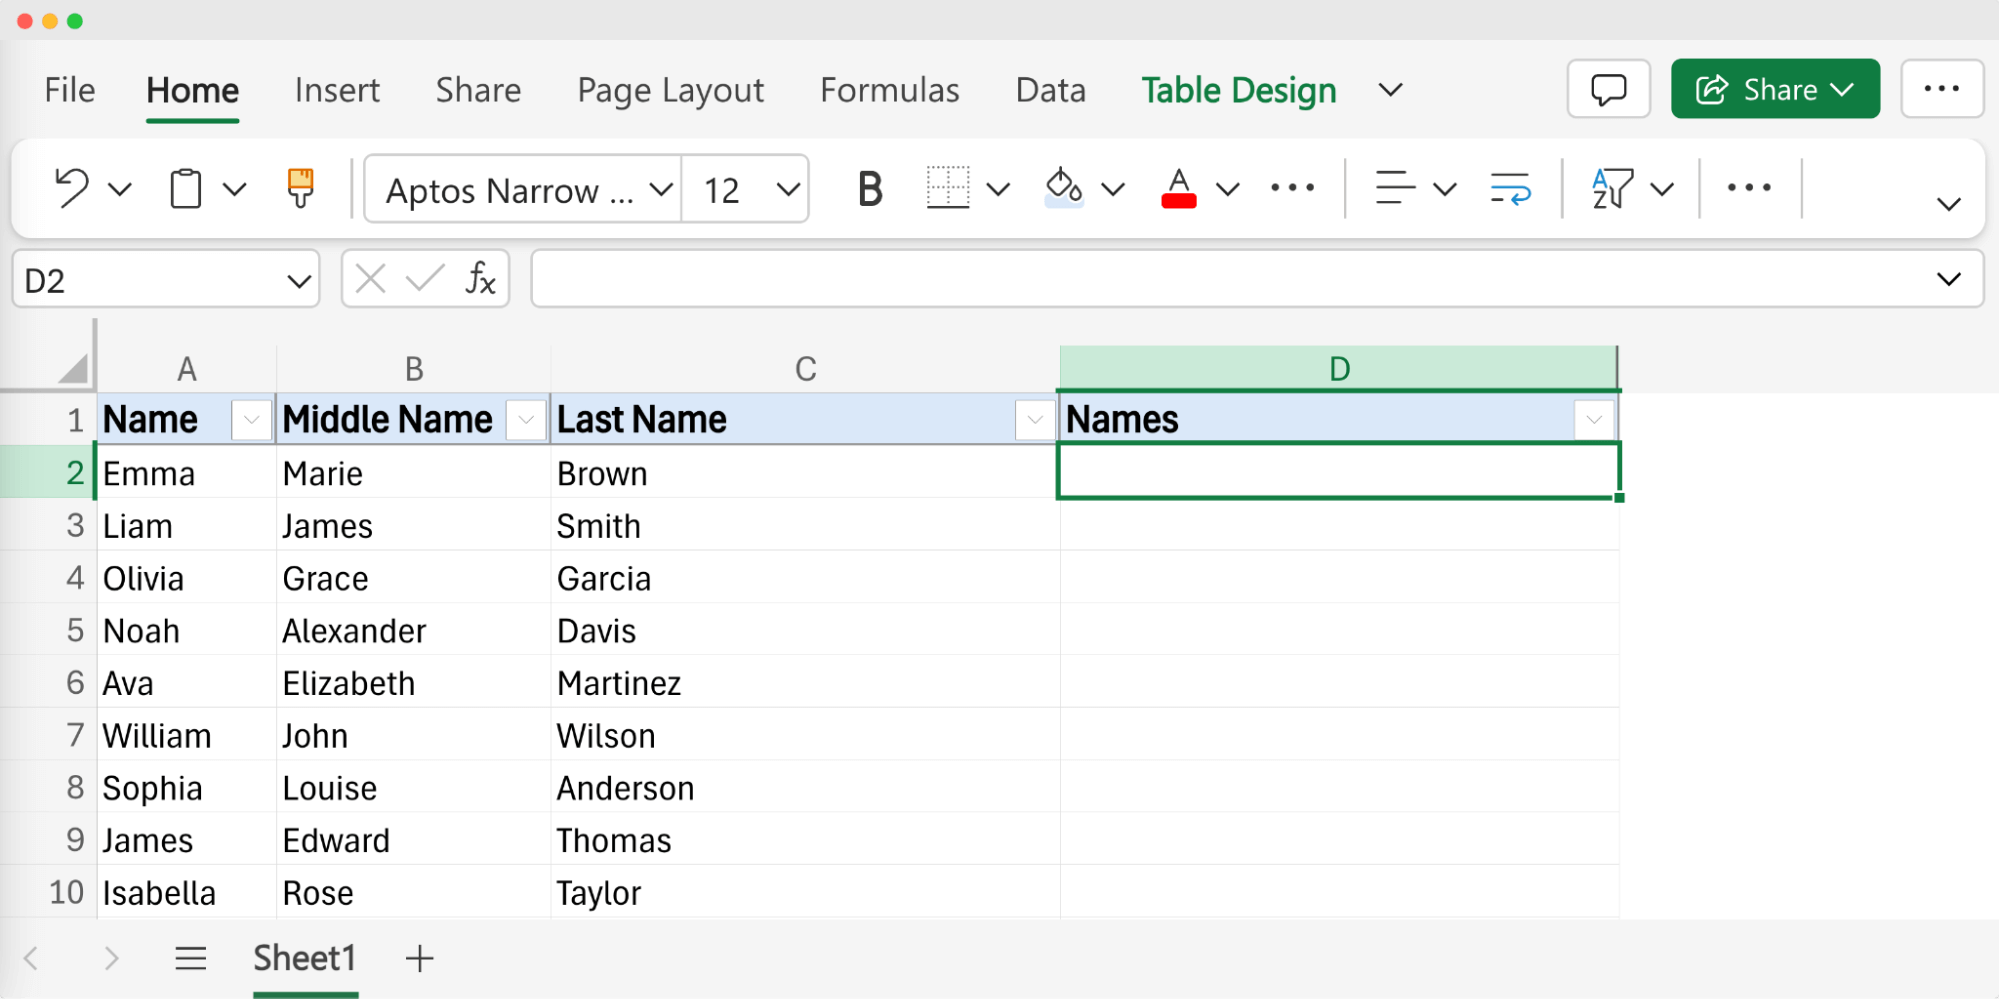
02 Apply the TEXTJOIN formula. Type =TEXTJOIN(" ", TRUE, A2, B2, C2). The TRUE in this formula tells Excel to ignore any empty cells automatically.
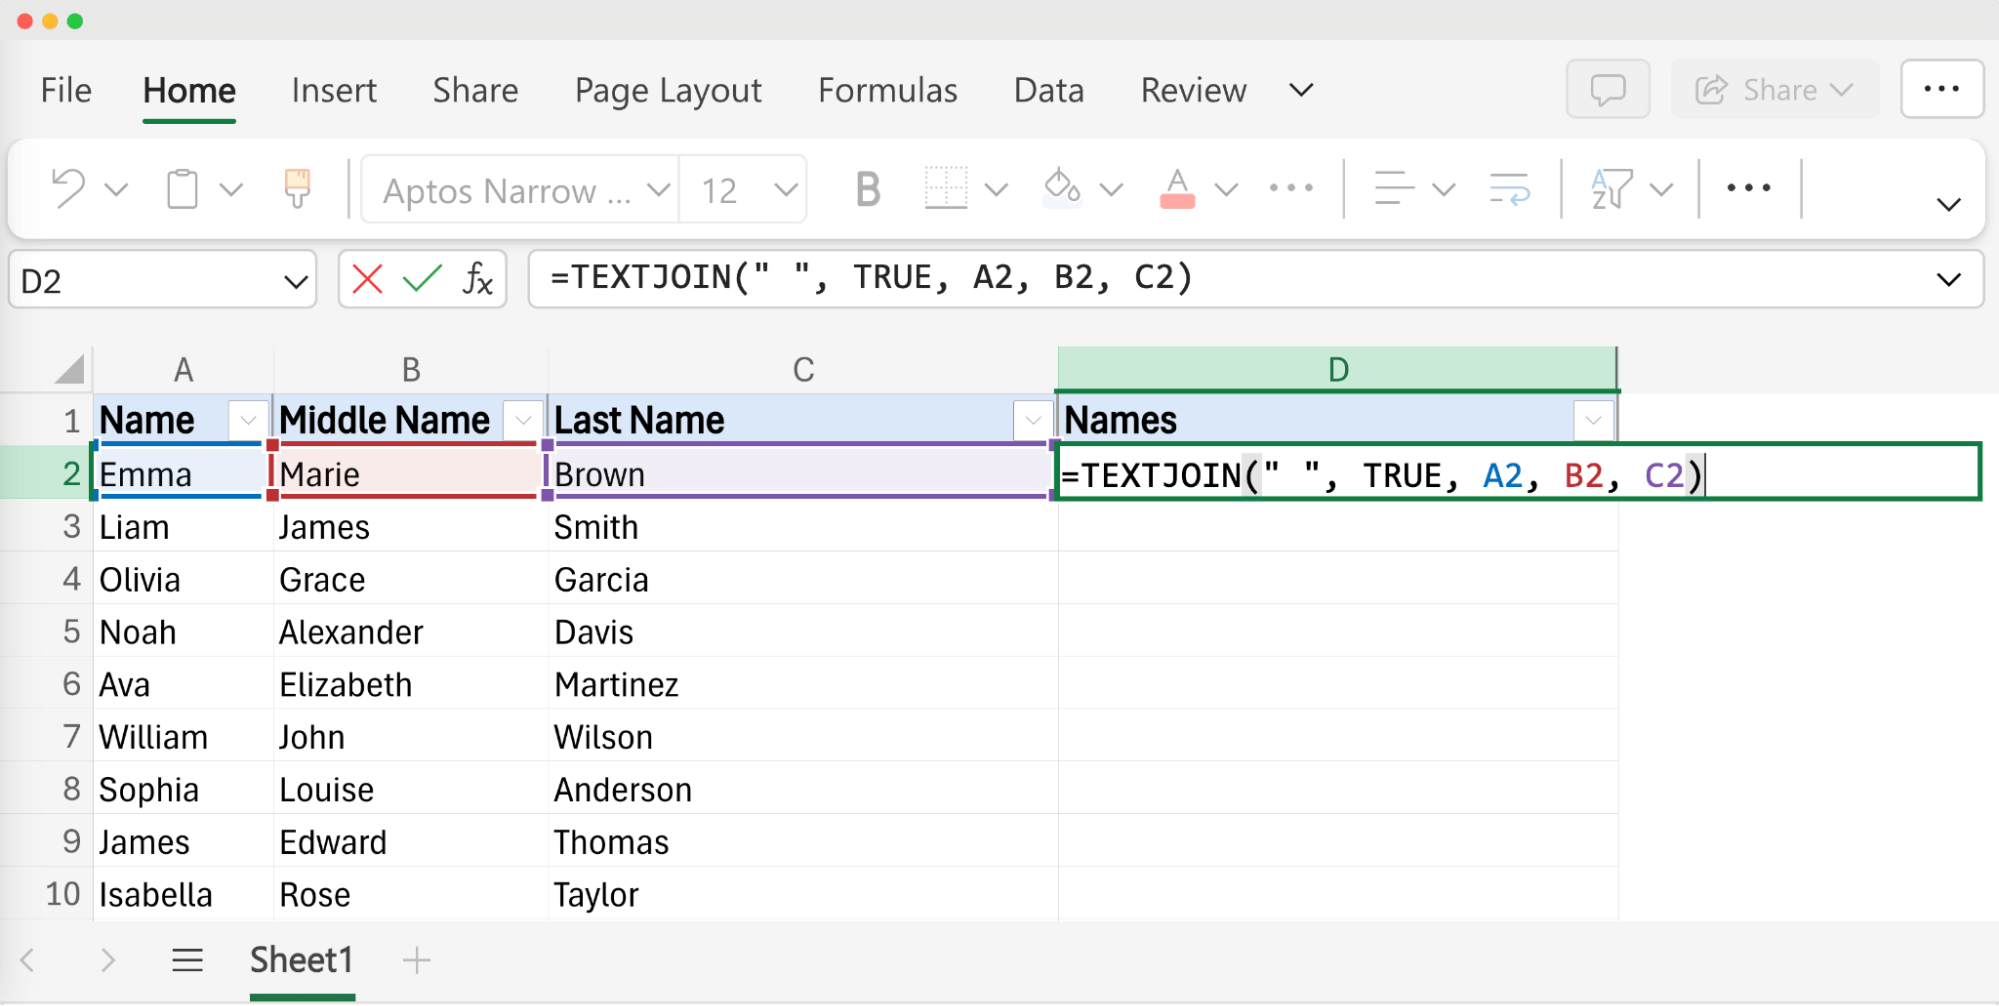
03 Combine and view. Press Enter, and Excel will automatically merge names (even if some cells are empty).
Method 05: Proper function for capitalization
When combining names, it's important to present them uniformly. For instance, if you're collecting recipient information from forms, you might find some names start with a lowercase letter while others begin with a capital. Using the Proper function to combine first and last name in Excel ensures that each part of the name is displayed correctly.
Benefits of using Proper Function:
You don’t have to create a new worksheet to maintain consistency in capitalization across the same dataset.
Combines well with other functions for a polished result.
Steps on how to combine first and last name in Excel with Proper Capitalization:
01 Choose the target cell.
02 Combine with Proper Case.
03 Complete the merge.
01 Choose the target cell. Select where you want the neatly capitalized name to appear.

02 Combine with Proper Case: Type the following formula =PROPER(TEXTJOIN(" ", TRUE, A2, B2)).
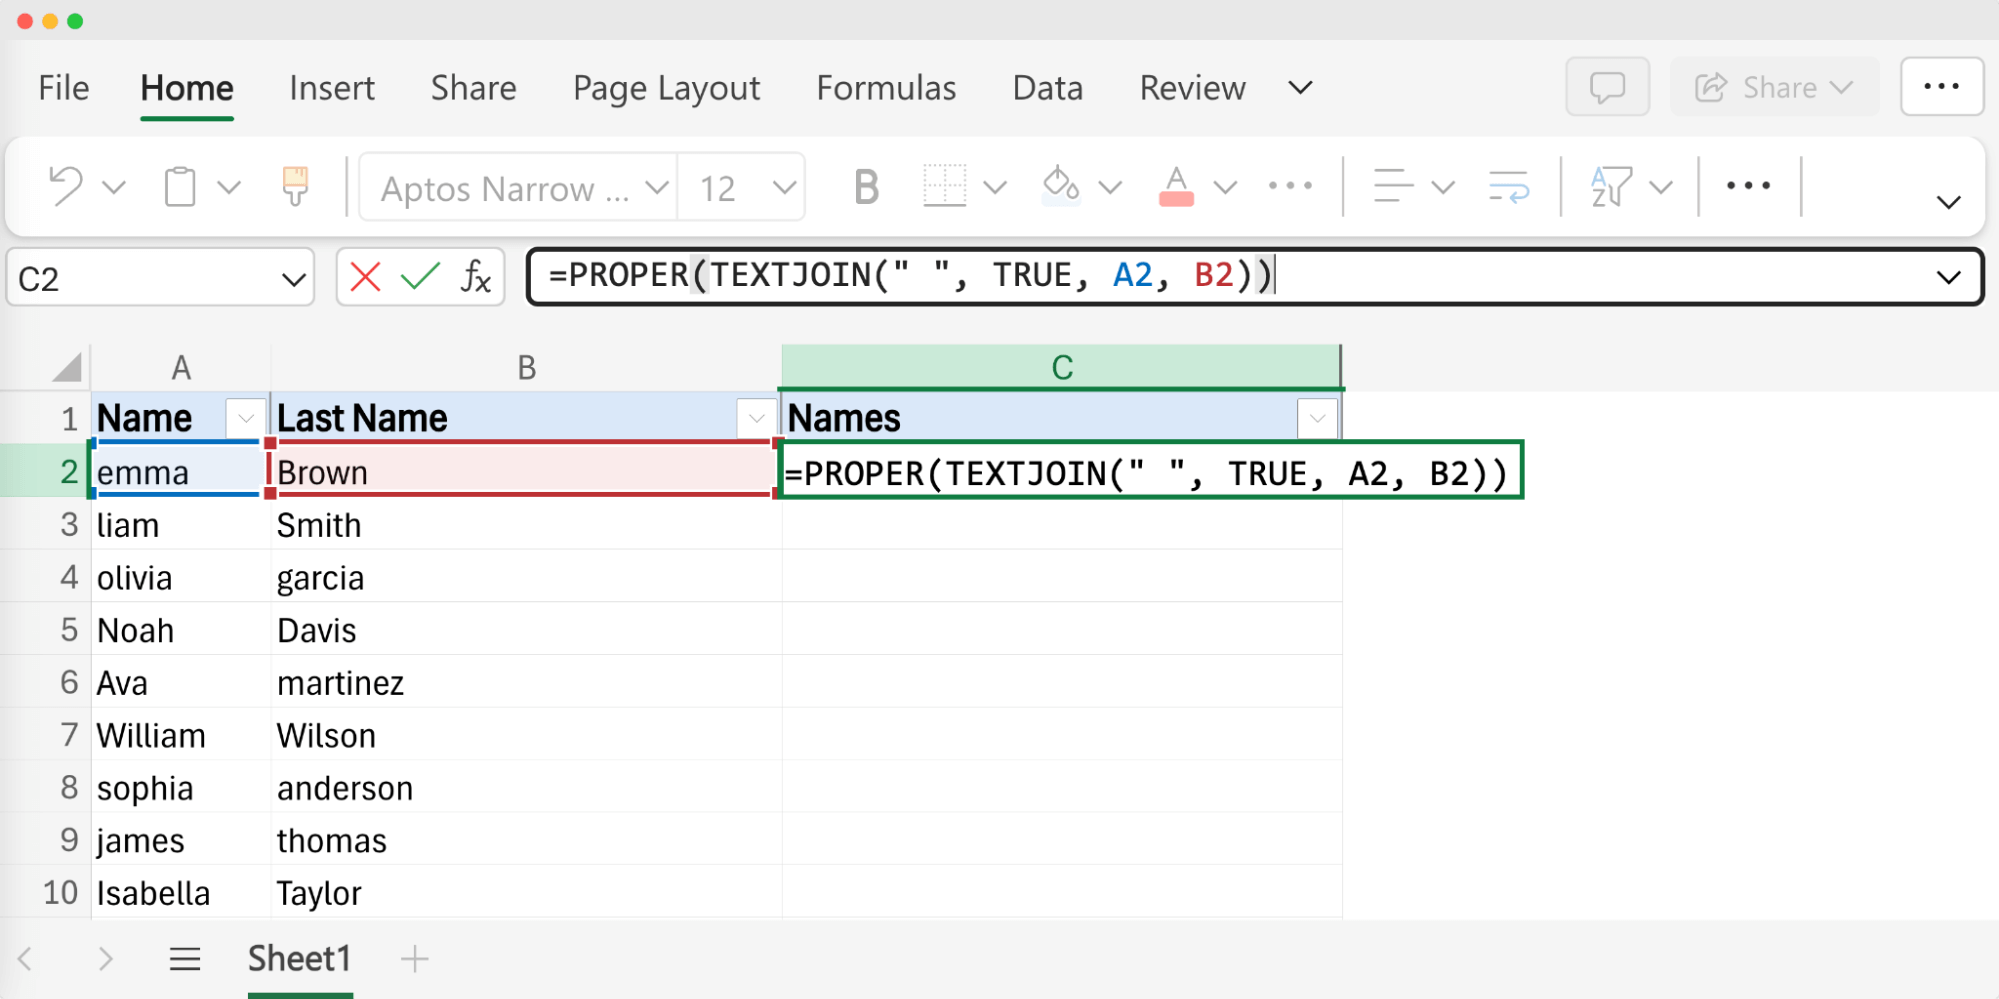
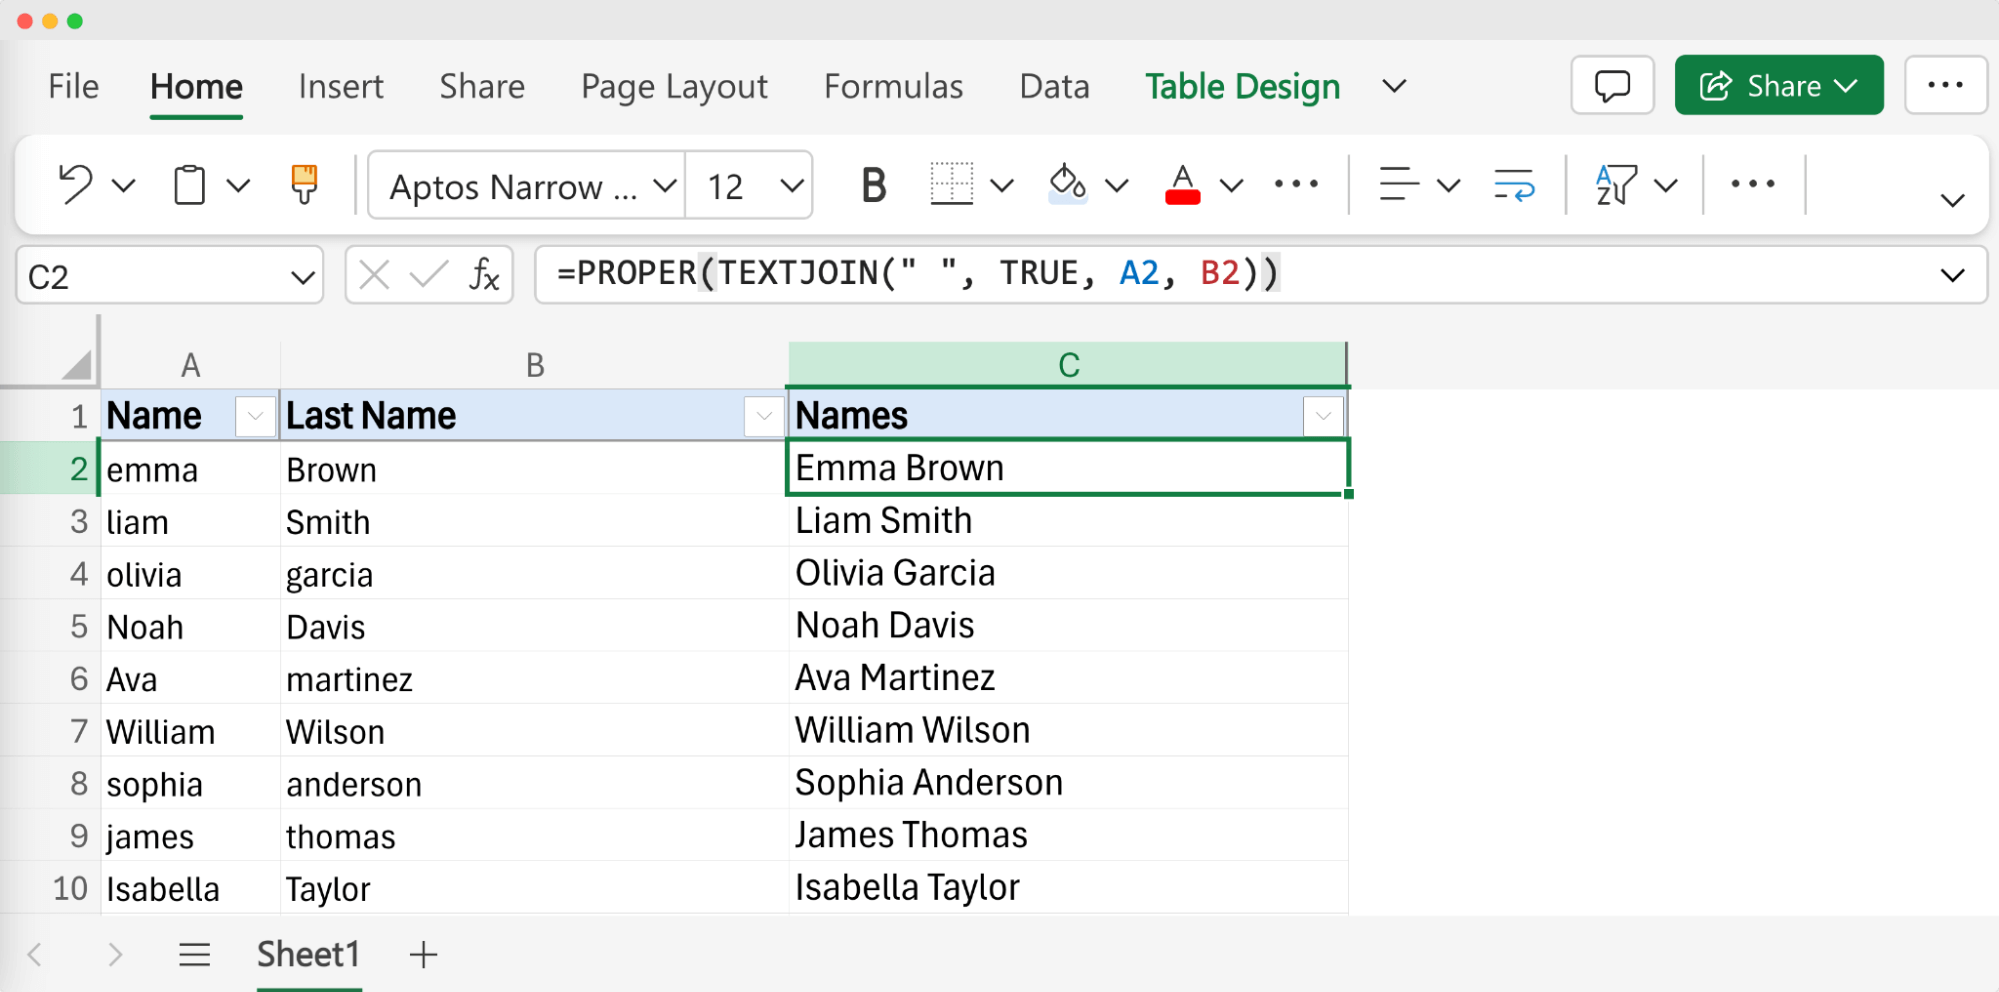
03 Complete the merge. After hitting Enter, Excel automatically combines names and capitalizes each cell reference correctly, ensuring a polished look.
📊 Do you use Sheets in Google and want to know how the process looks there? Check out how to combine first and last name in Google Sheets guide.
Create and Send Digital Credentials

How to combine first and last name in Excel using Flash Fill?
Flash Fill in Excel is a smart and efficient tool for automatically filling in data based on the patterns you provide. It's especially useful when you need to combine first and last names quickly without setting up formulas. There's a good chance you didn't even know you used it before.
Here's how you can use Flash Fill to merge first and last name in Excel:
01 Prepare your data. Ensure that your first names are in one column, e.g., A, and last names are in another column B.
02 Start the pattern. Click on the next empty column where you want the combined names to appear, let’s say column C.

In the first cell of that column (C2), manually type the combined name of the first entry as you want it to appear (e.g., "Emma Brown" if "Emma" is in A2 and "Brown" is in B2).
03 Activate Flash Fill. After typing the first combined name, press Enter to move to the next cell down (C2).
Start typing the second combined name based on the same pattern. As you type, Excel should automatically display a preview of the combined names for the rest of the list using Flash Fill.
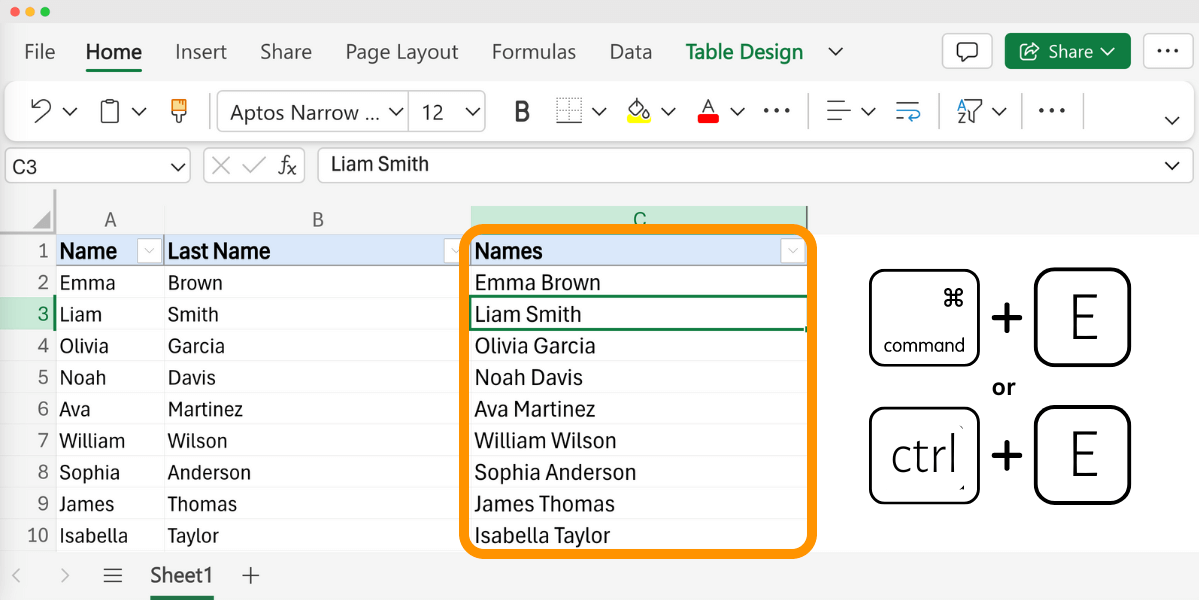
⚠️ If Excel doesn't automatically show the Flash Fill suggestions, press Ctrl + E (Mac: command + E) to trigger it manually.
04 Apply Flash Fill. Once you see the correct preview, press Enter to accept Flash Fill’s suggestions. Excel will fill in the rest of the cells in Column C with combined names following the same pattern.
Please note: If the Flash Fill results aren't perfect (maybe your data isn't consistent), you can manually adjust the entries. Excel will attempt to reapply the pattern based on your corrections.
Pros of using Flash Fill to merge first and last name in Excel
Flash Fill is much faster than manually typing each combined name or setting up formulas, especially in large datasets.
Excel detects and follows the pattern you start and reduces the chance of errors common with manual entry.
If you don’t know how to combine first and last name in Excel with comma, you can use Flash Fill to do that, e.g., if you want to reverse the order (e.g., "Brown, Emma"). Simply start the pattern in that format, and Excel will do the rest with names automatically.
Handy tips to combine first and last name in Excel
It's simple to merge first and last names in Excel, but there's a knack to getting it just right (especially when you're working with large datasets or need to include middle names too).
Here’s how to navigate through some of the most useful tricks and tips to combine first and last name in Excel.
Trim extra spaces
Data imported from external sources often contains unnecessary spaces that can clutter your dataset and make it difficult to sort and search. The TRIM function in Excel efficiently removes these unnecessary spaces. Apply =PROPER(TRIM(A2) & " " & TRIM(B2)) to not only merge the names but also to get the final output is tidy and professional-looking, free from any unwanted spaces.
Convert formulas to values and remove original columns
It's often a good idea to convert formula-based entries into static values after merging names.
Why? This prevents accidental data modifications if the source data changes. In addition, it reduces the processing load on big datasets, if you, e.g., make multiple certificates with different names in Excel.
Right-click the column and choose Paste Special, then select Values Only. As a result, you can delete the original columns without losing essential information, thereby decluttering your worksheet.

Speaking of certificates – remember that you can always integrate the Certifier tool to handle Google Excel certification automatically. You can manage and distribute certificates directly from your spreadsheet!
Tip: If you’re comparing options, reviewing Credly pricing can give you a useful reference point when evaluating certificate platforms alongside Certifier.
Define spaces with question marks
To avoid run-on errors, you should clearly define where spaces should go. Your formulas need quotation marks to control this. For instance, =A2 & " " & B2 effectively places a space between the first and last names. Omitting the quotation marks could result in names glued together that are hard to separate later.
Merge first and last name in Excel once and for all
Mastering all these methods on how to combine first and last name in Excel allows you to seamlessly merge names for any project. Each technique offers unique advantages, so select the one that perfectly matches your requirements.
Consider integrating Excel with Certifier to automate and simplify the certification process directly from the spreadsheet. Ready to boost your productivity? Explore how Certifier can transform your Excel tasks today. Enjoy Certifier for free.
FAQ on how to merge first and last name in Excel table
Do you have some concerns? Here’s the list of the most common questions on how to combine first and last name in Excel.


