From cells in Excel to certificate generation
Certifier now connects directly with Google Sheets and Microsoft Excel. That means no more file uploads, no more Zapier workarounds. Every time a new row appears in your sheet, Certifier instantly transforms that data into a certificate and sends it out — fully automated and hands-off.
Powerful certificate generator from Excel to create credentials based on spreadsheets and Google Sheets file


How to auto generate certificate from Excel sheet?
You won't have to go through each credential separately – because with Certifier you can auto generate certificates from Excel. Each recipient's unique details are automatically added to your certificate. How to make certificate in Excel? Follow the steps below to create certificates using the spreadsheet (Google Sheets and Excel file included).
The steps below work perfectly if you only need to generate certificates from spreadsheets occasionally, for example, after a webinar or training program ends. However, if you’d like an automated workflow where certificates are issued the moment new data appears in your sheet (continuously, daily, without any manual uploads), there’s a better solution: Certifier’s native integrations with Google Sheets and Microsoft Excel.
You’ll find this alternative method explained at the end of this page. Feel free to skip ahead if that’s what you’re after.
Step 01: Prepare the spreadsheet file
Firstly, let's prepare the spreadsheet from which Certfier will take all the data needed to generate certificates. You don't need to create a new file or clean anything in your original spreadsheet. If you’re using Zoom/Microsoft Teams or LMS (Kajabi, Teachable, etc.) you can download recipients’ data directly from the tool without the need to create a spreadsheet from scratch.
Be sure to include all the essential information you want in your certificate. The two must-haves are recipient name and recipient email – these bits are crucial to automatically generate certificate from Excel and guarantee it’s personalized for the right person. When you're choosing which columns to use, think about what's going on in the certificate. Name and email are a given, but if you've got extra data points, like grades, make sure to include those columns too.
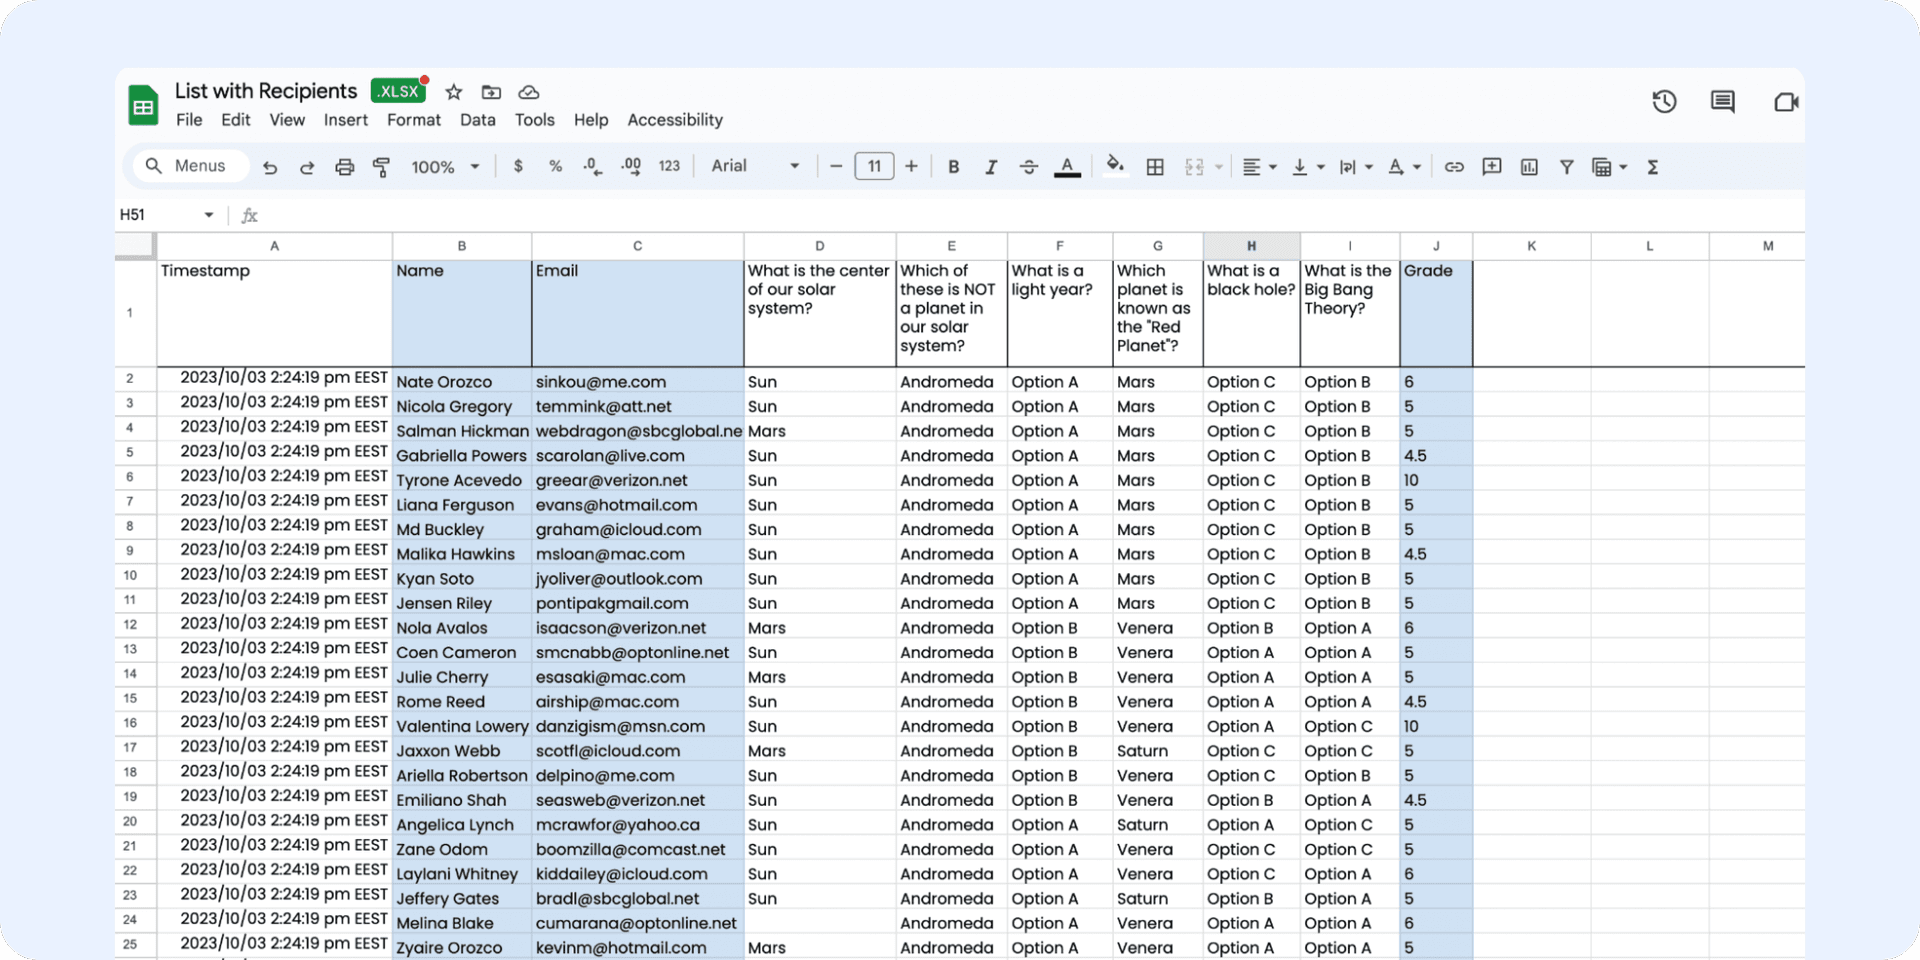
Save your spreadsheet in a format Certifier likes (CSV, XLS, or XLSX are all good to go).
Does your spreadsheet look more like this? With first name and last name being in separate columns?
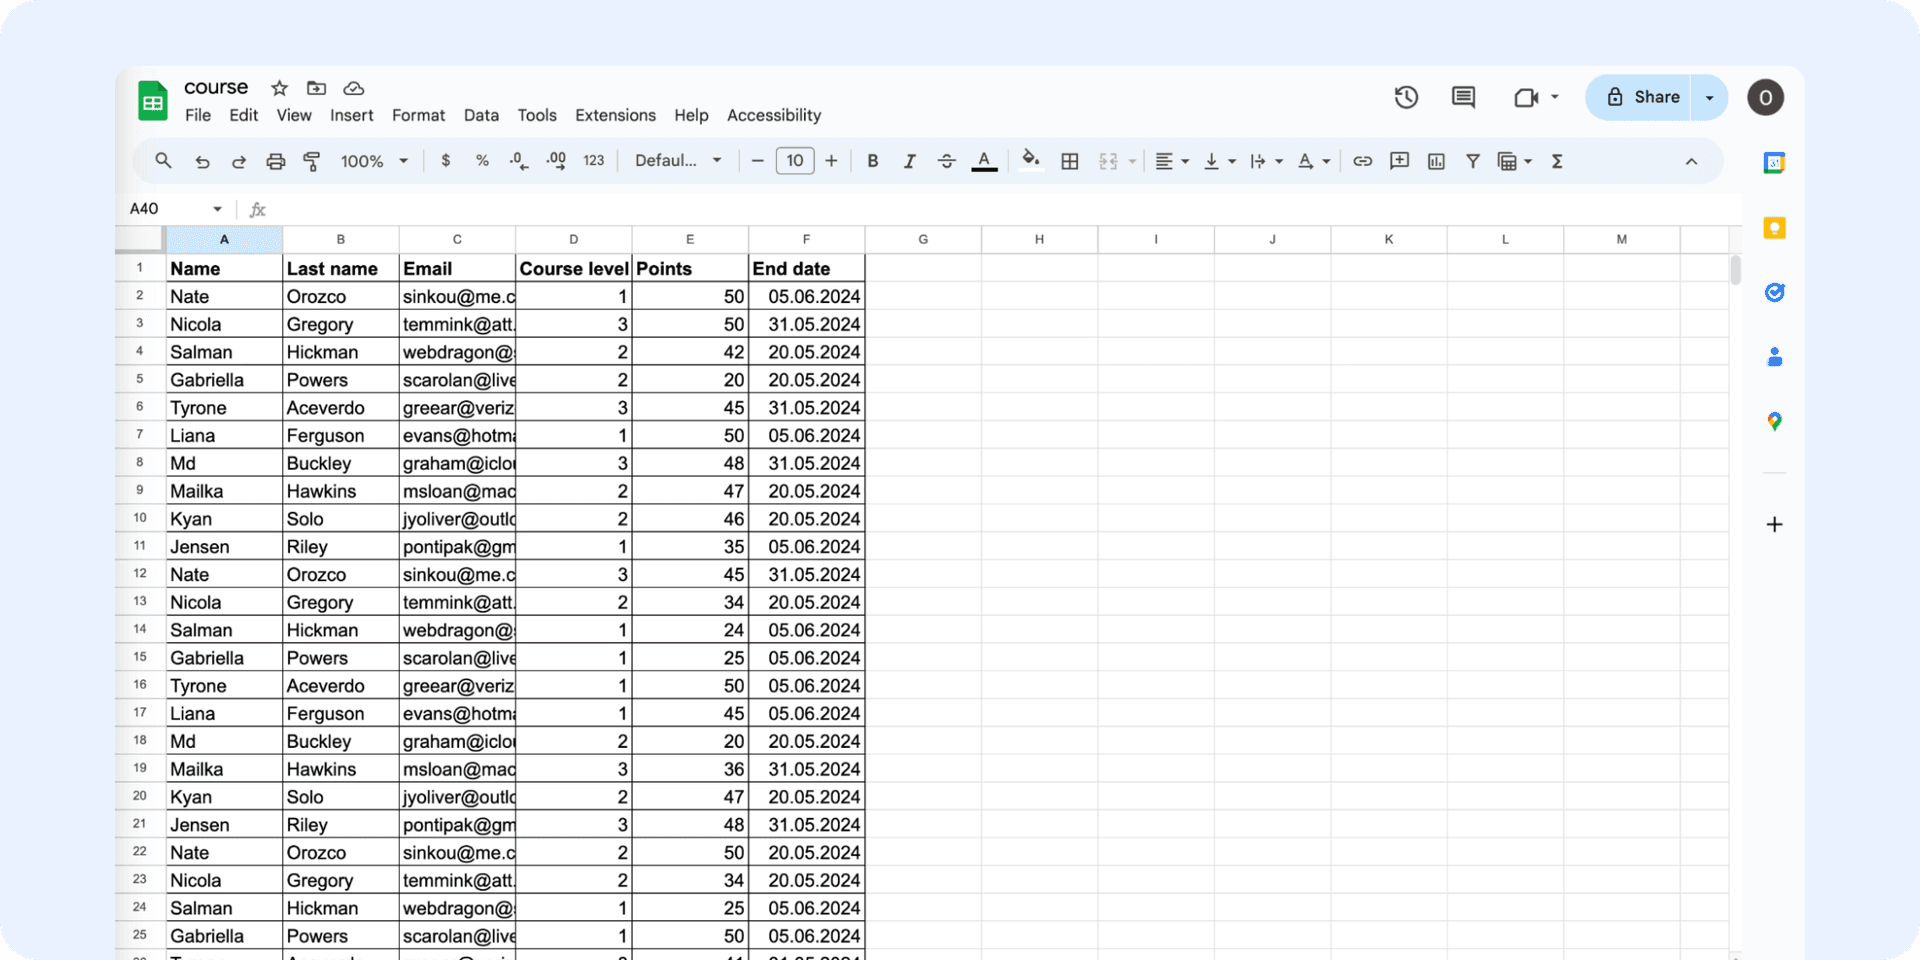
Don’t worry, you don’t have to do much. The most vital point is to combine first and last names together as they appear in the recipient's name section on the certification. If you need some help here, download our spreadsheet template to be sure that all the data are well-prepared.
You can also read more about how to combine first and last name in Excel.
Step 02: Prepare a certificate with dynamic attributes
This is how you make your data from the spreadsheet show up looking sharp on the certificate. Certifier provides dynamic attributes – the text box that allows you to insert personalized content to each certificate based on the data from the spreadsheet. Thanks to that, you can create one certificate template to generate multiple certificates with different names, grades, etc.
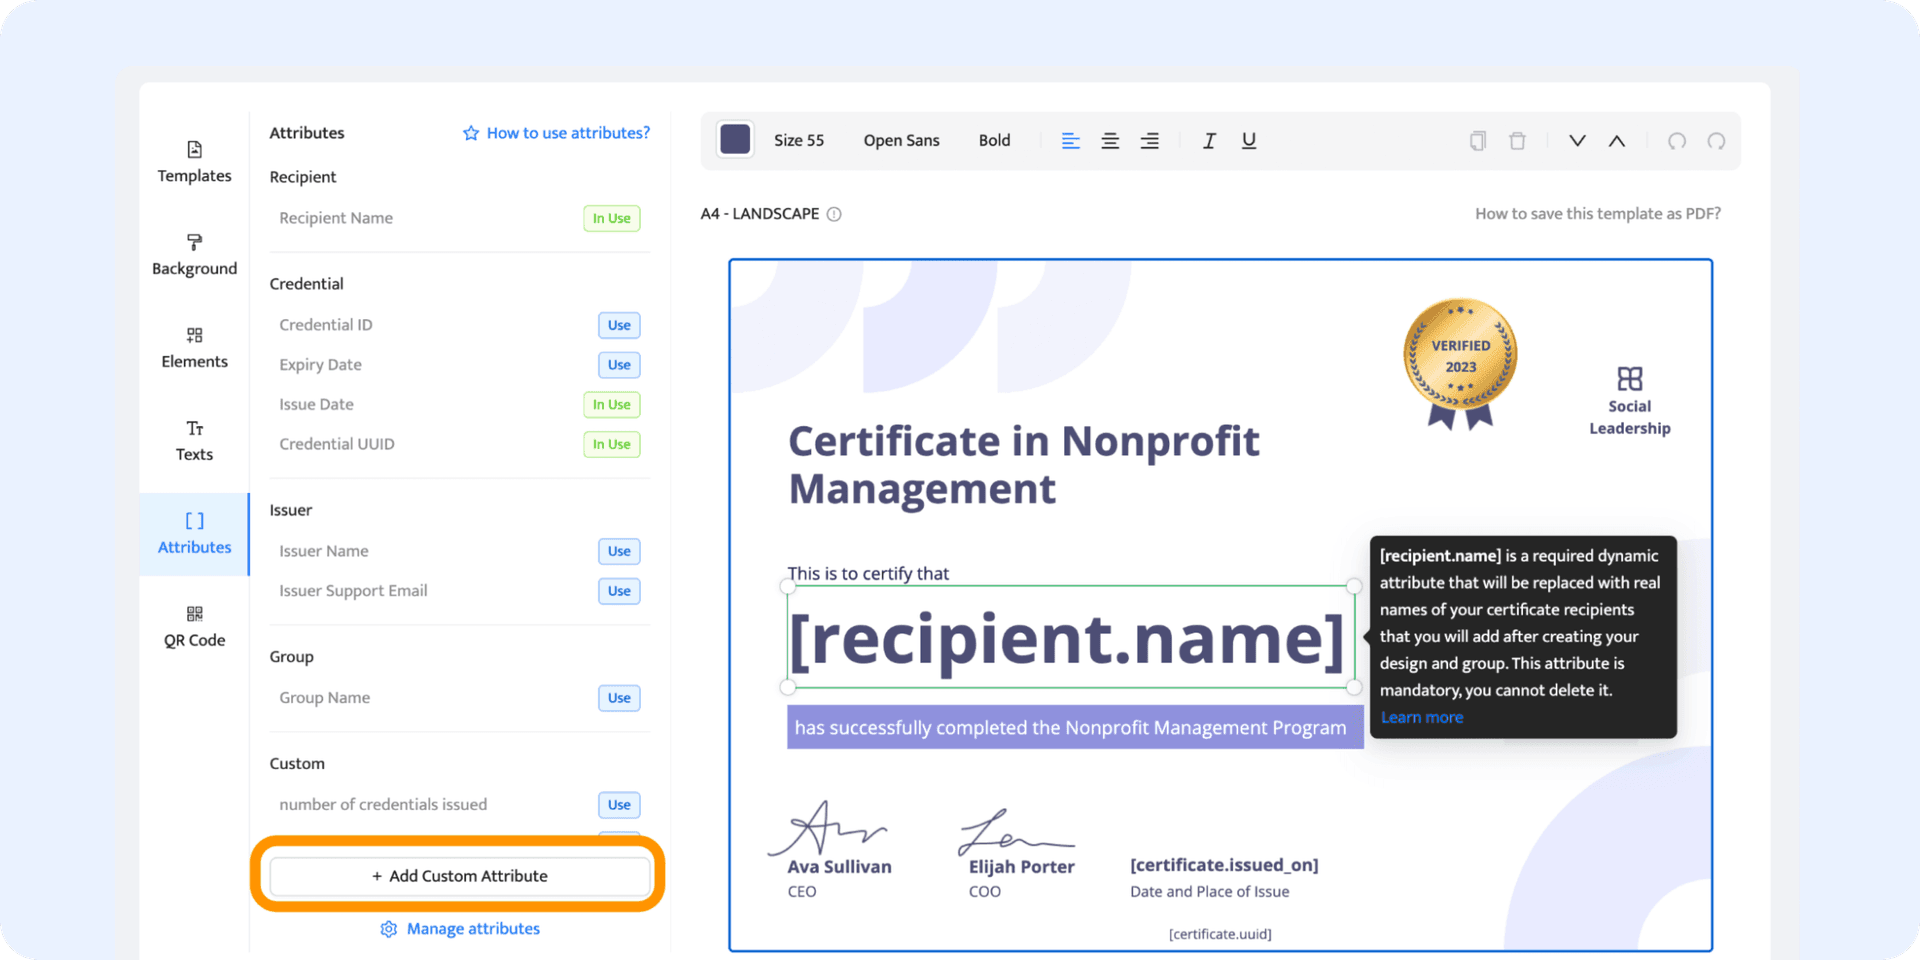
In Certifier, go to the Designs dashboard, create a new certificate design, choose a template, and go to the Attributes tab. From there, you can manage all your attributes – remove and add the ones you need. If you would like to add content other than the defaults, e.g., grade, you can do that via custom attributes.
Click the Add Custom Attribute button.
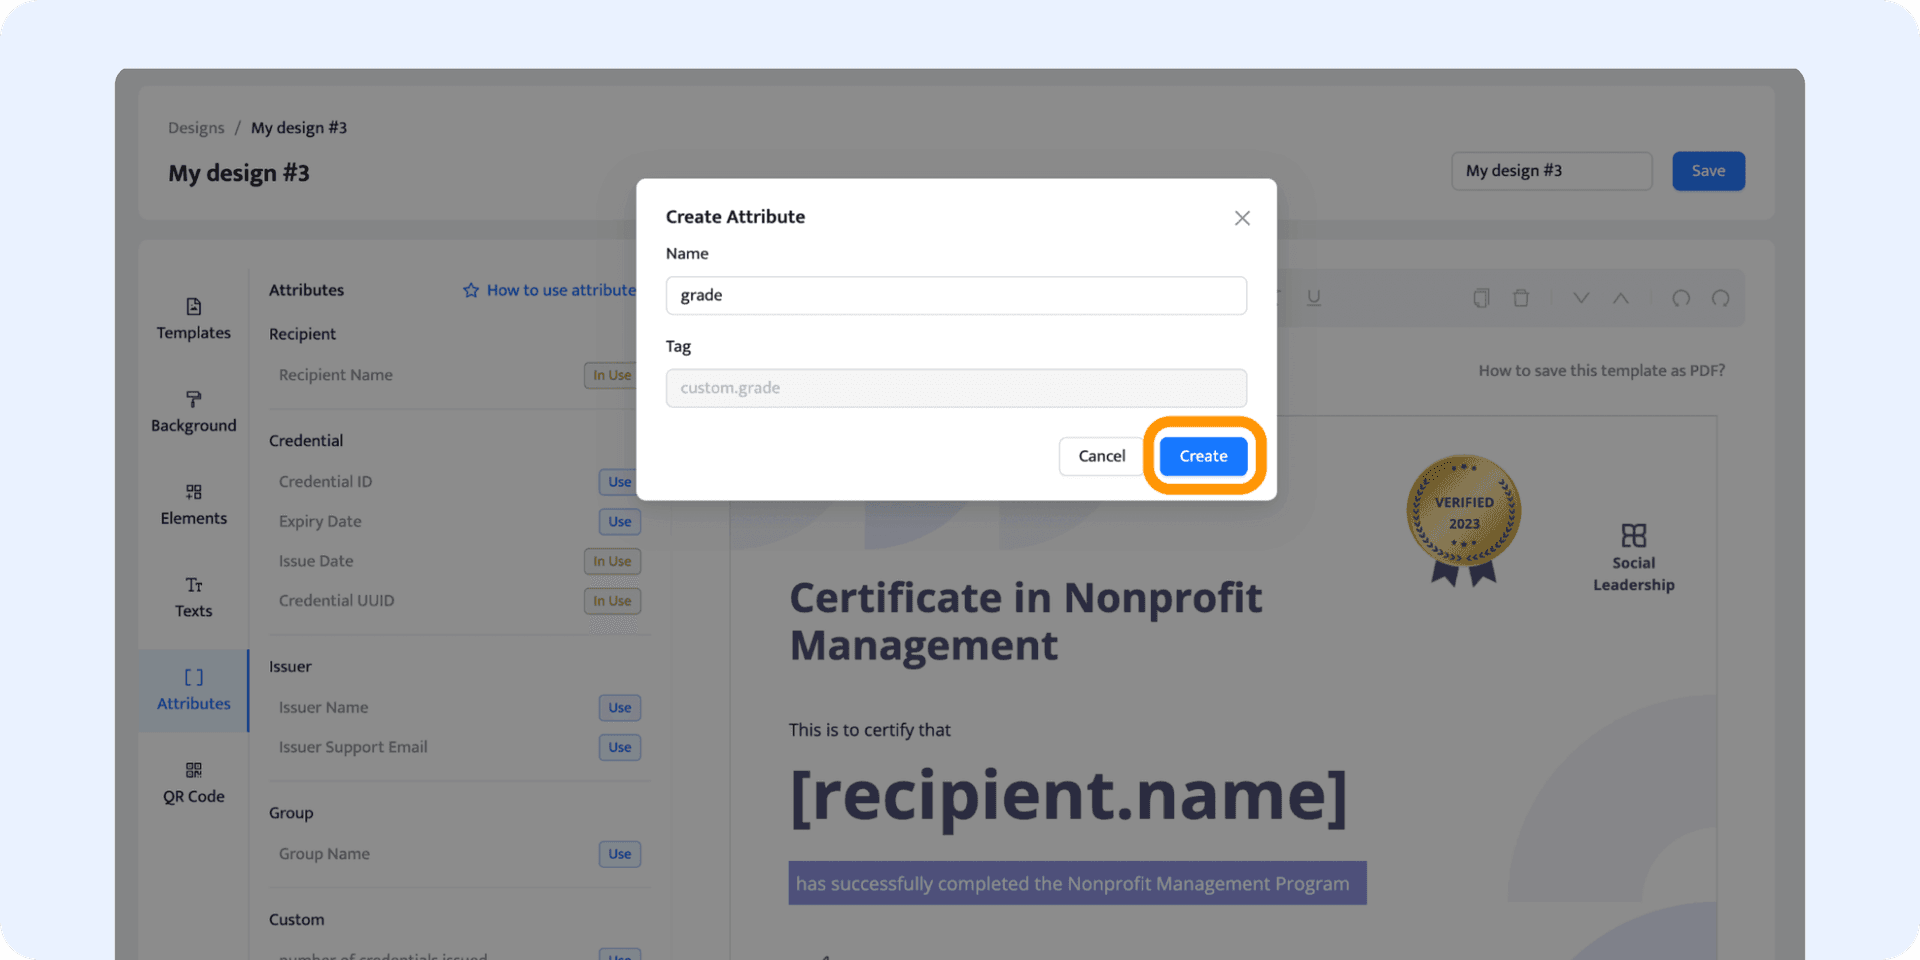
Name the attribute and press Create.
Choose by clicking on the Use next to the right attribute or type in the attribute tag. A placed attribute will change to In Use status.
Keep your attribute design consistent – colors, fonts, sizes should all be in harmony with the certificate design. You can upload new elements, change fonts and colors, the sky is the limit here.
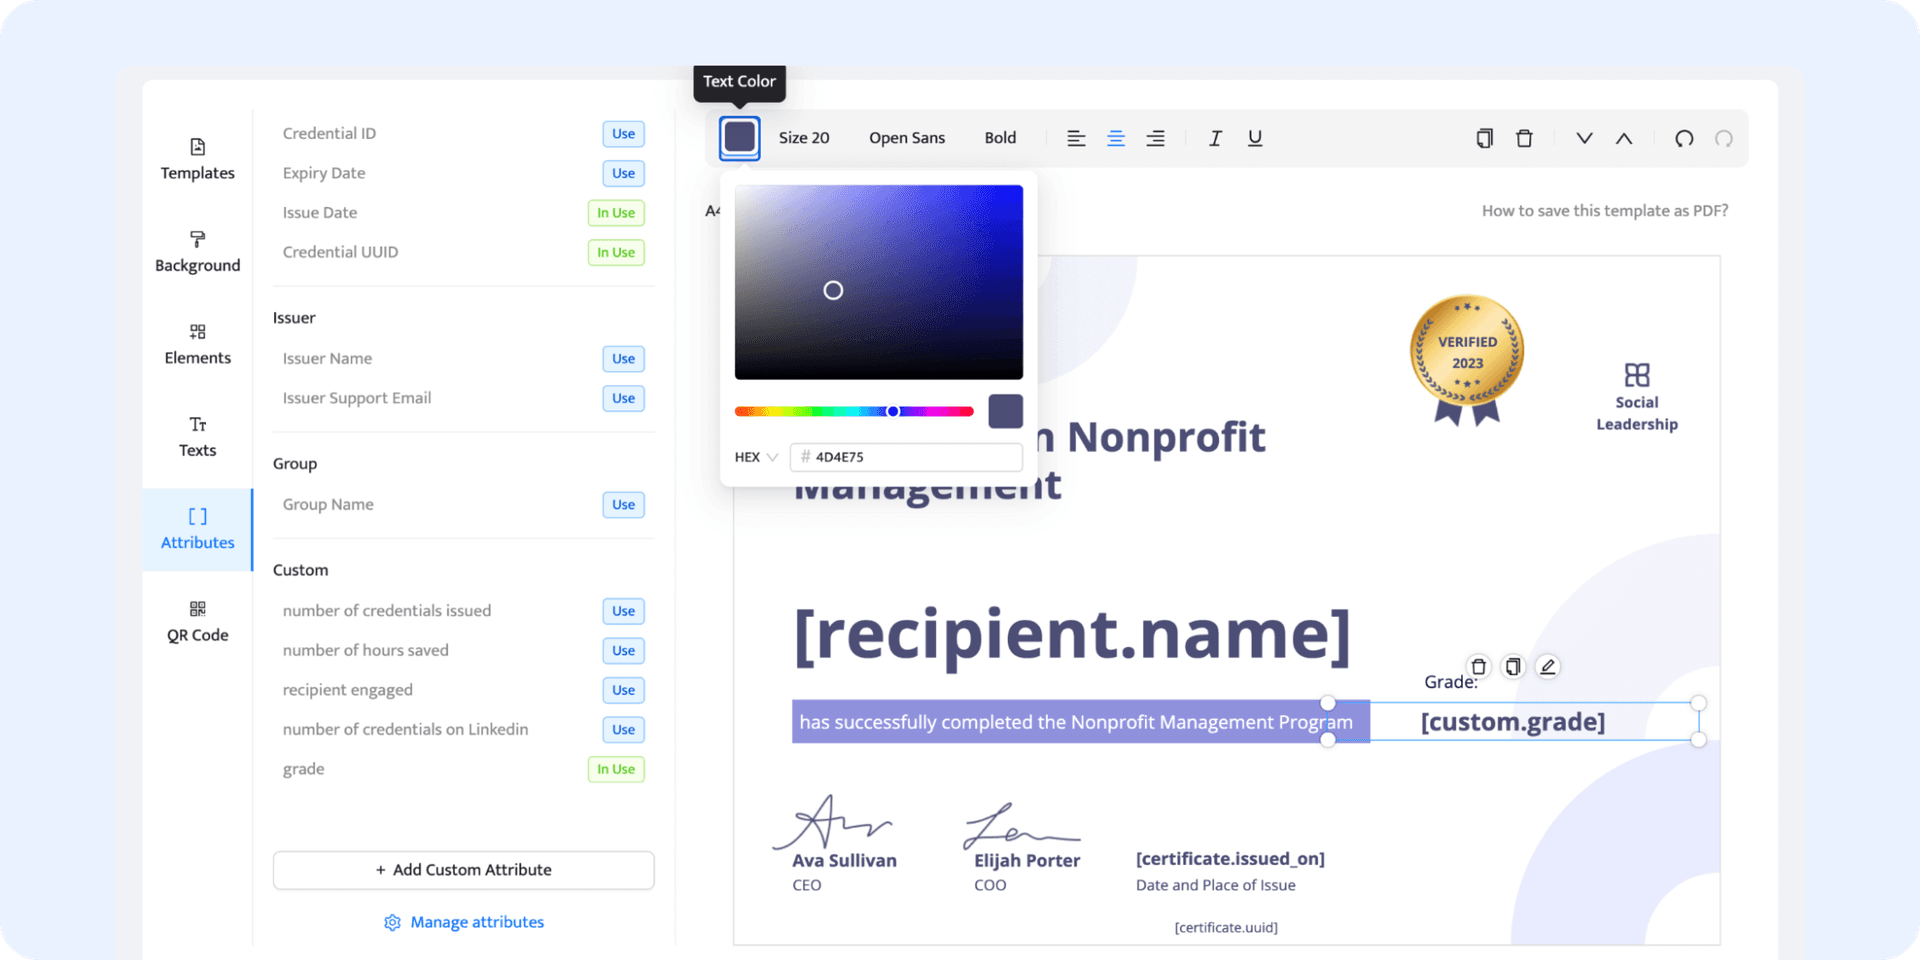
You can also generate a QR code, which leads readers to the digital wallet with the option to share, manage, and download the template. Or, if you want to, you can create a QR code that leads to the custom URL, e.g., your website.
Once you’re happy with the design, save the template.
Step 03: Upload recipients’ data
Alright, time to upload the spreadsheet into Certifier – online certificate generator from Excel. When you click Save, a window with uploading data will pop up.
If it’s not your first certificate design, you can manage your recipients' data from the Credentials dashboard. Name the certificate group and choose Via spreadsheet upload. Select the prepared file and add the recipients.

Pick the columns you want to take data from.
👉 If you’re organizing an event and collecting your recipients' data via forms, it’s possible to generate certificates based Google Form’s responses. Read our article on how to generate certificate from Google form!
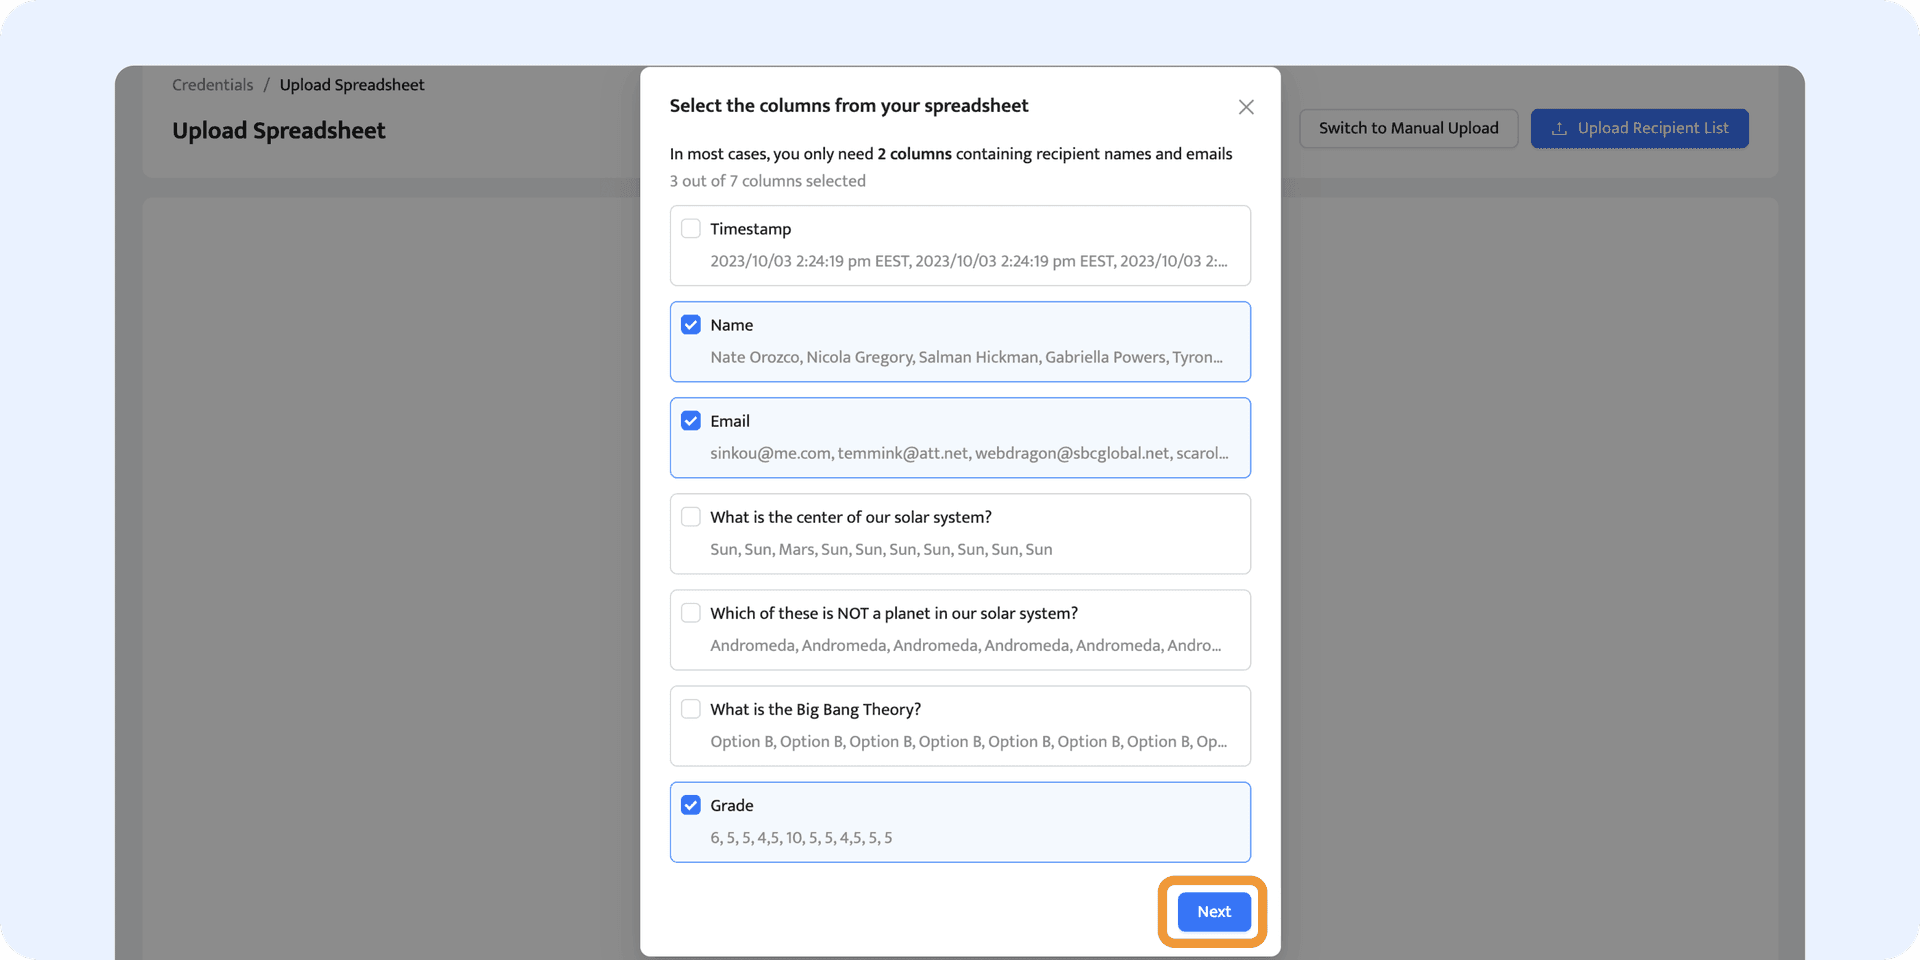
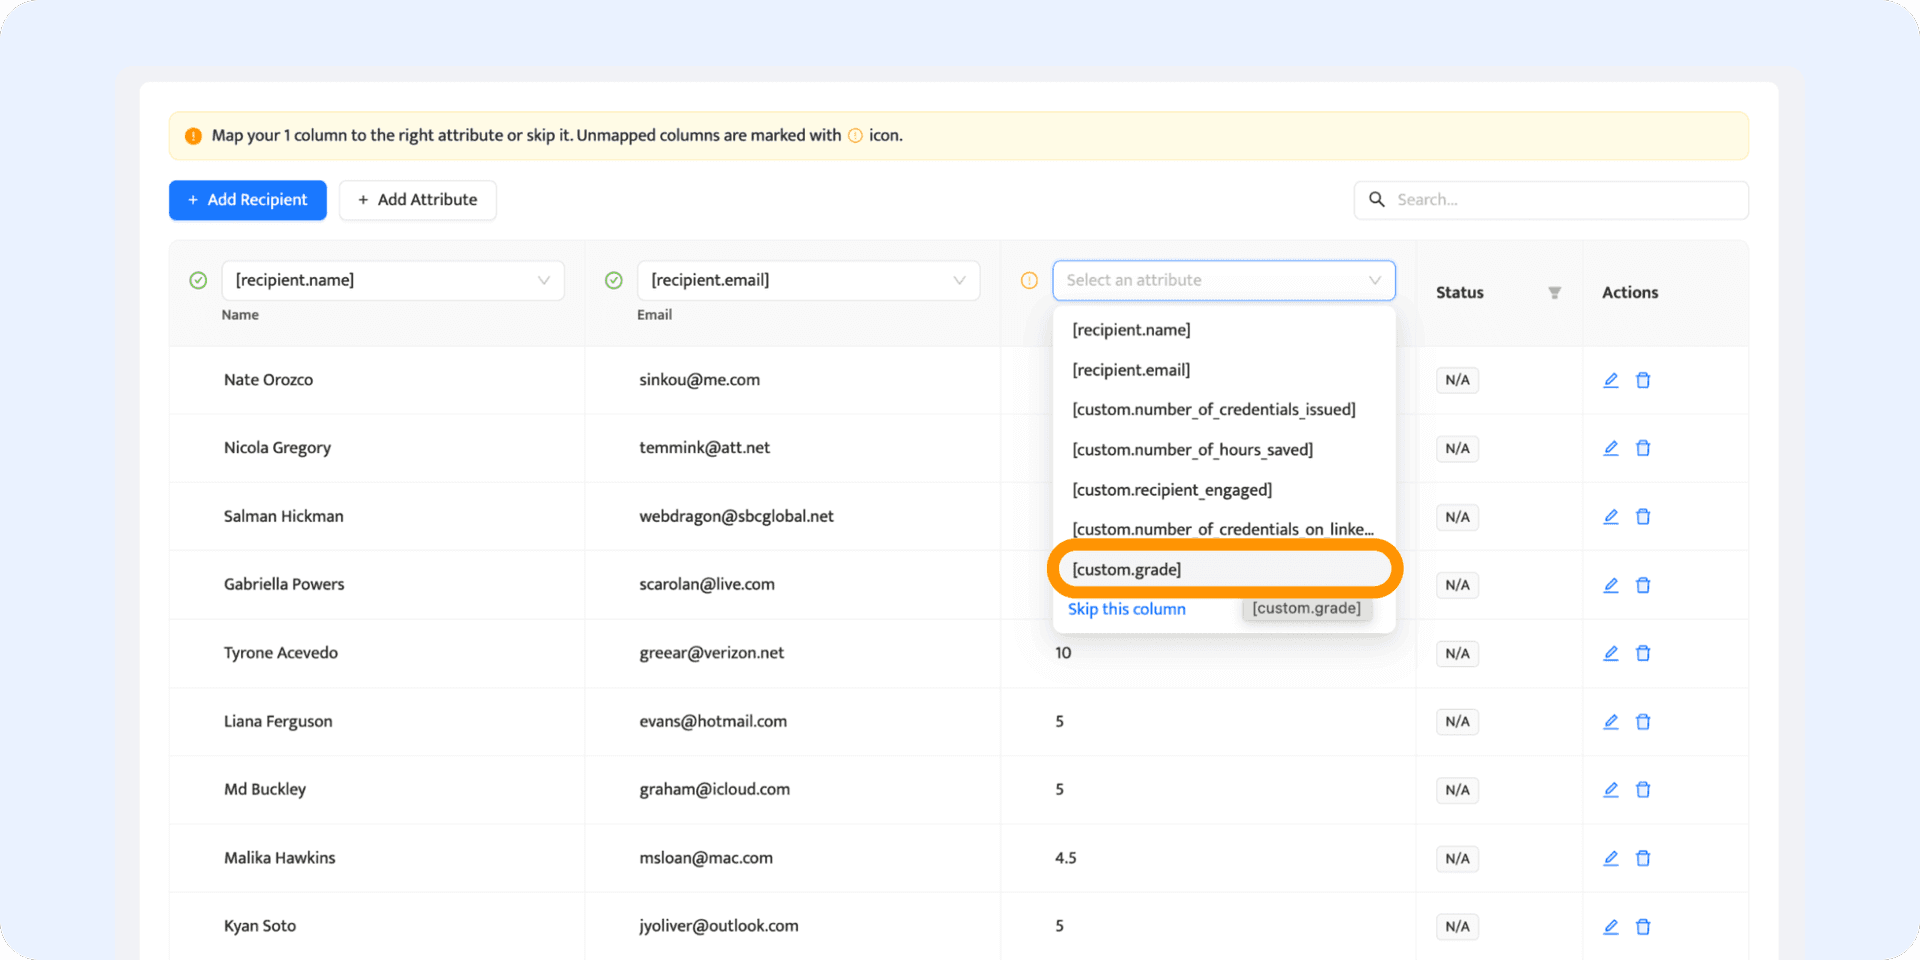
Step 04: Map the attributes to the spreadsheet columns
Certifier is pretty smart – it'll help you map your spreadsheet columns to the right places, so names go with names, emails go with emails, and grades go with grades. Map each column to its attribute. When you see a column that you don't want to include, just click the skip column. Double-check to verify everything is in order.
And if there's a hiccup, like a typo in an email, Certifier got your back and will help you fix it. Towards the top, you'll see a yellow notification bar that indicates what's wrong. Filter your records using the Show invalid rows option.
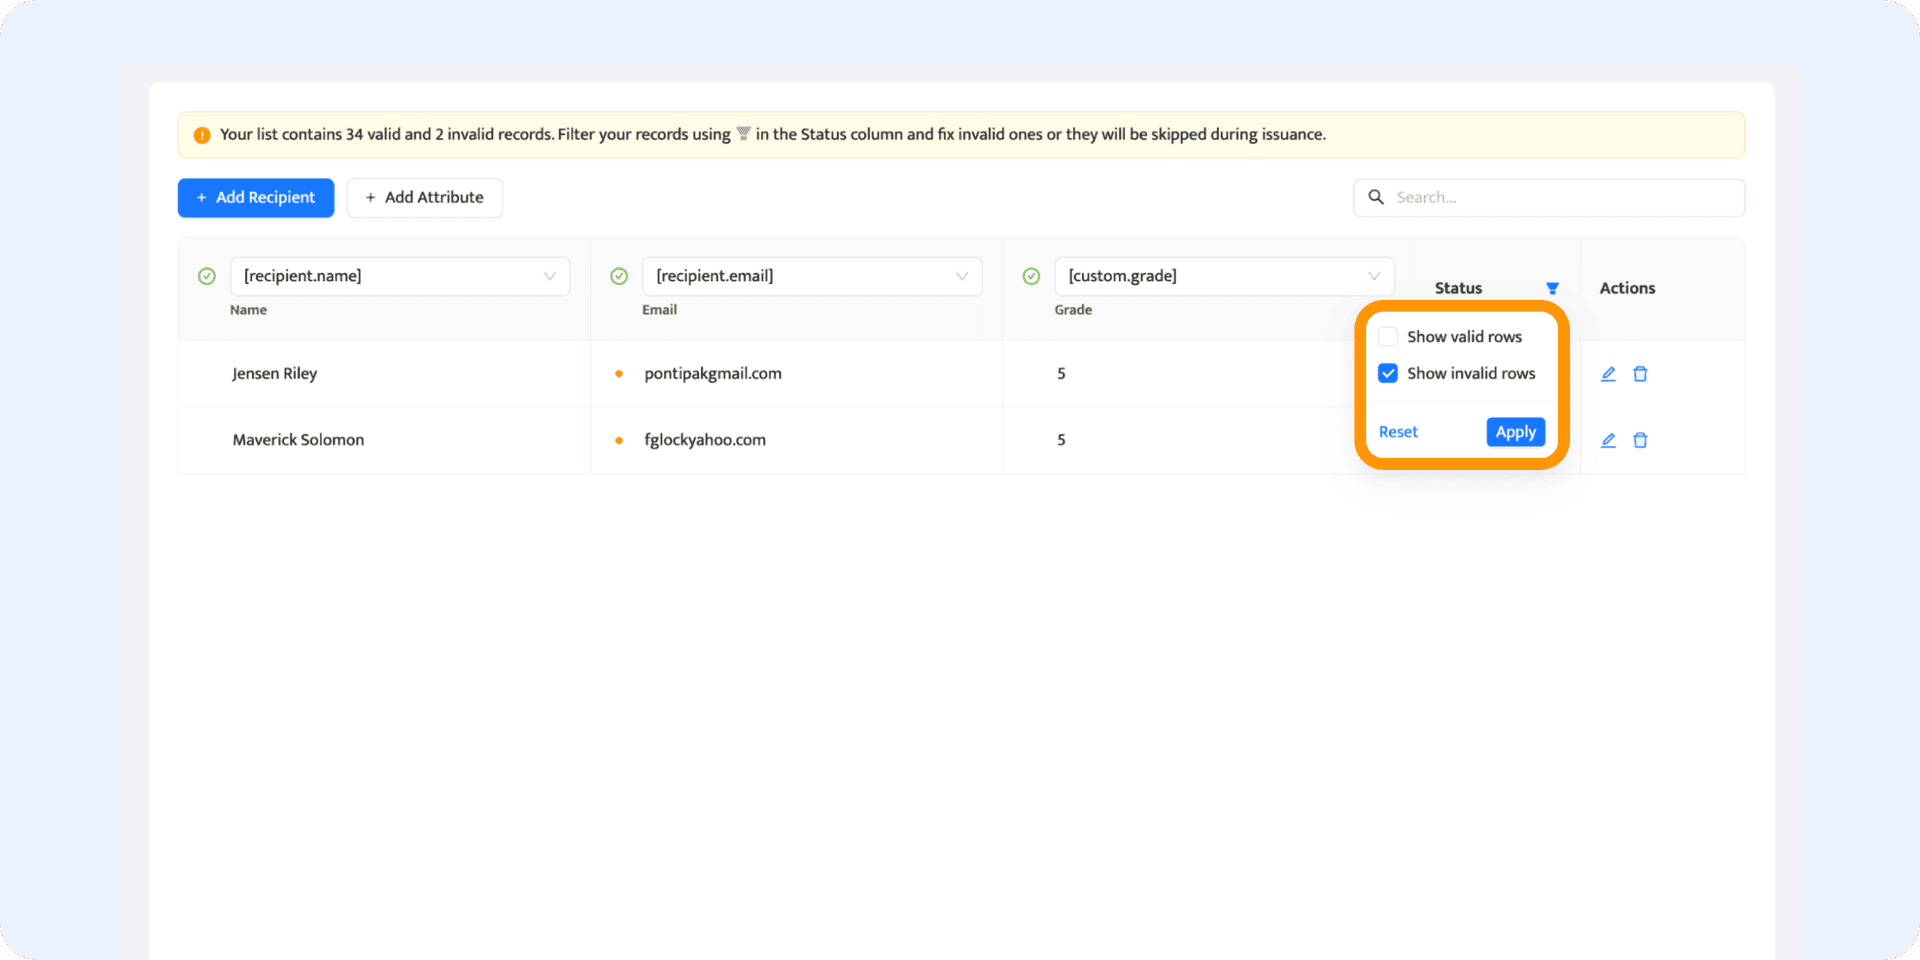
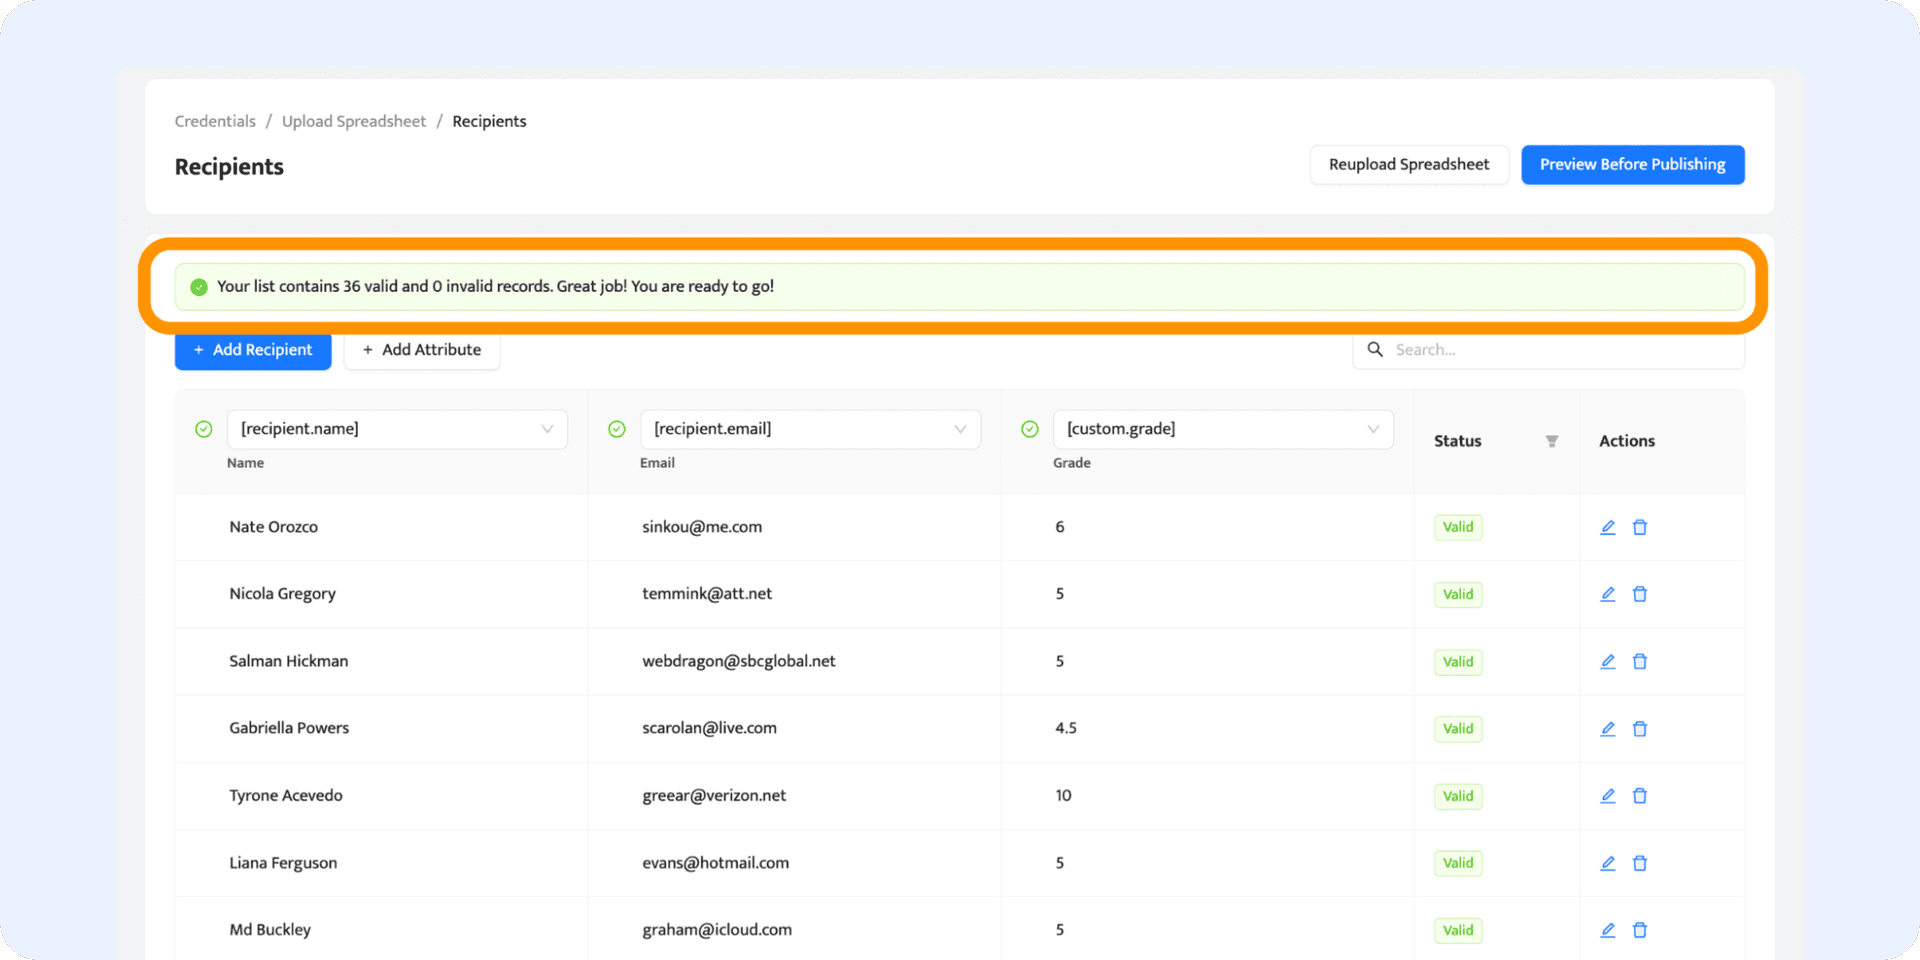
Click the edit option in the Actions column. Fix the errors until you see the green notification bar saying: “Great job. You are ready to go!”.
Step 05: Preview and publish
You're almost at the finish line! Before you auto generate certificates from Excel, take a moment to preview your certificates by clicking Preview Before Publishing. You can easily switch between certificates with the dropdown list: Preview for.
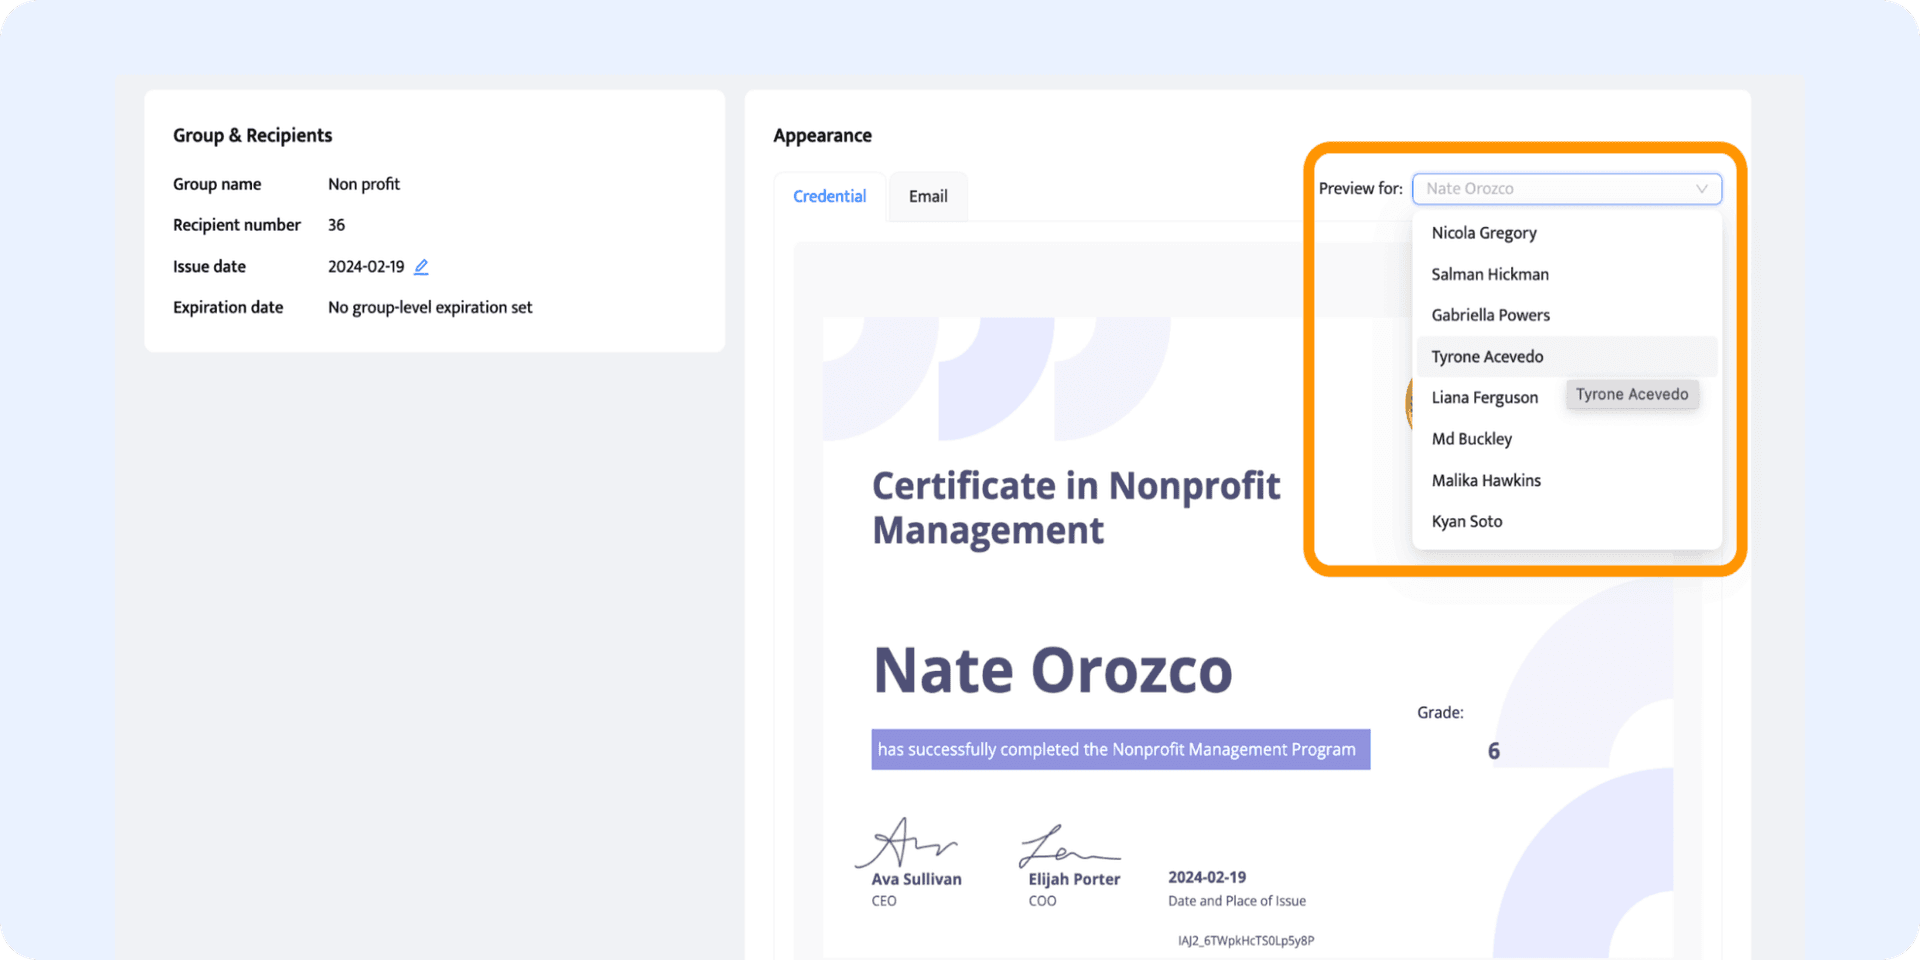
This is your chance to make sure everything looks perfect. Check that all the custom attributes are showing up right and that there's no problem with the design in the certificate editing app. Once you're happy with how everything looks, go ahead and publish.
Step 06: Monitor and track the performance
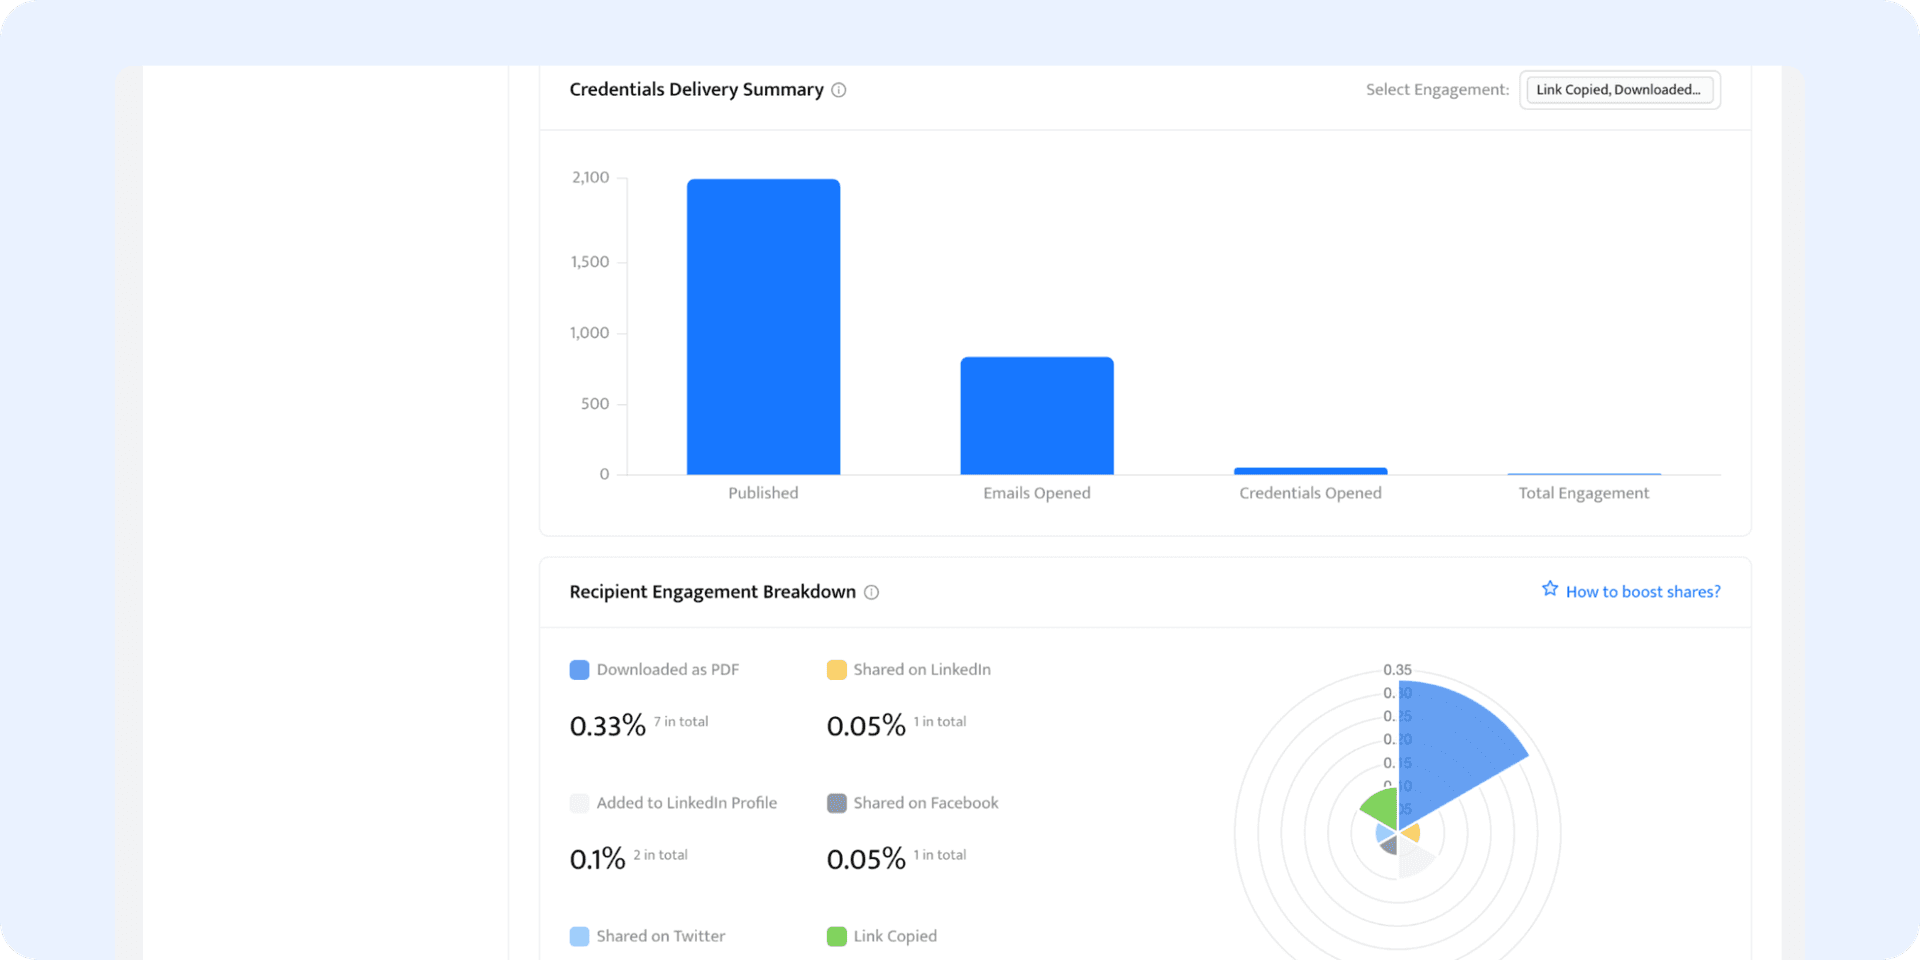
Now you can review and verify how your recipients engage with certificates. Check certificate status (delivered, shared, unopened), track engagement metrics, and download reports.
For example, you can easily notice that somebody didn’t open an email or forgot to share their certificate on LinkedIn and react quickly to reach out to them again.

The Certifier e certificate generator from Excel also provides a more detailed Analytics dashboard which can be used to your advantage. They will tell you how to plan your future campaigns, how many people download the credentials as PDFs, or how the engagement is spread across particular social media platforms.
Step 07: Engage the recipients again if needed
Once you’ve explored the engagement metrics, you will know whether or not you need to resend your certificates. Luckily, Certifier offers such a function, and you can easily remind your recipients about their certificates with just one click.
Certifier has three types of customizable automatic emails:
Delivery message with the certificate and a link to a digital wallet
Expiration date reminder
Final email about the certificate’s expiry
You can export all the credentials as a ZIP file with PDFs or as a spreadsheet with all the data, digital wallet links, engagement, and more.
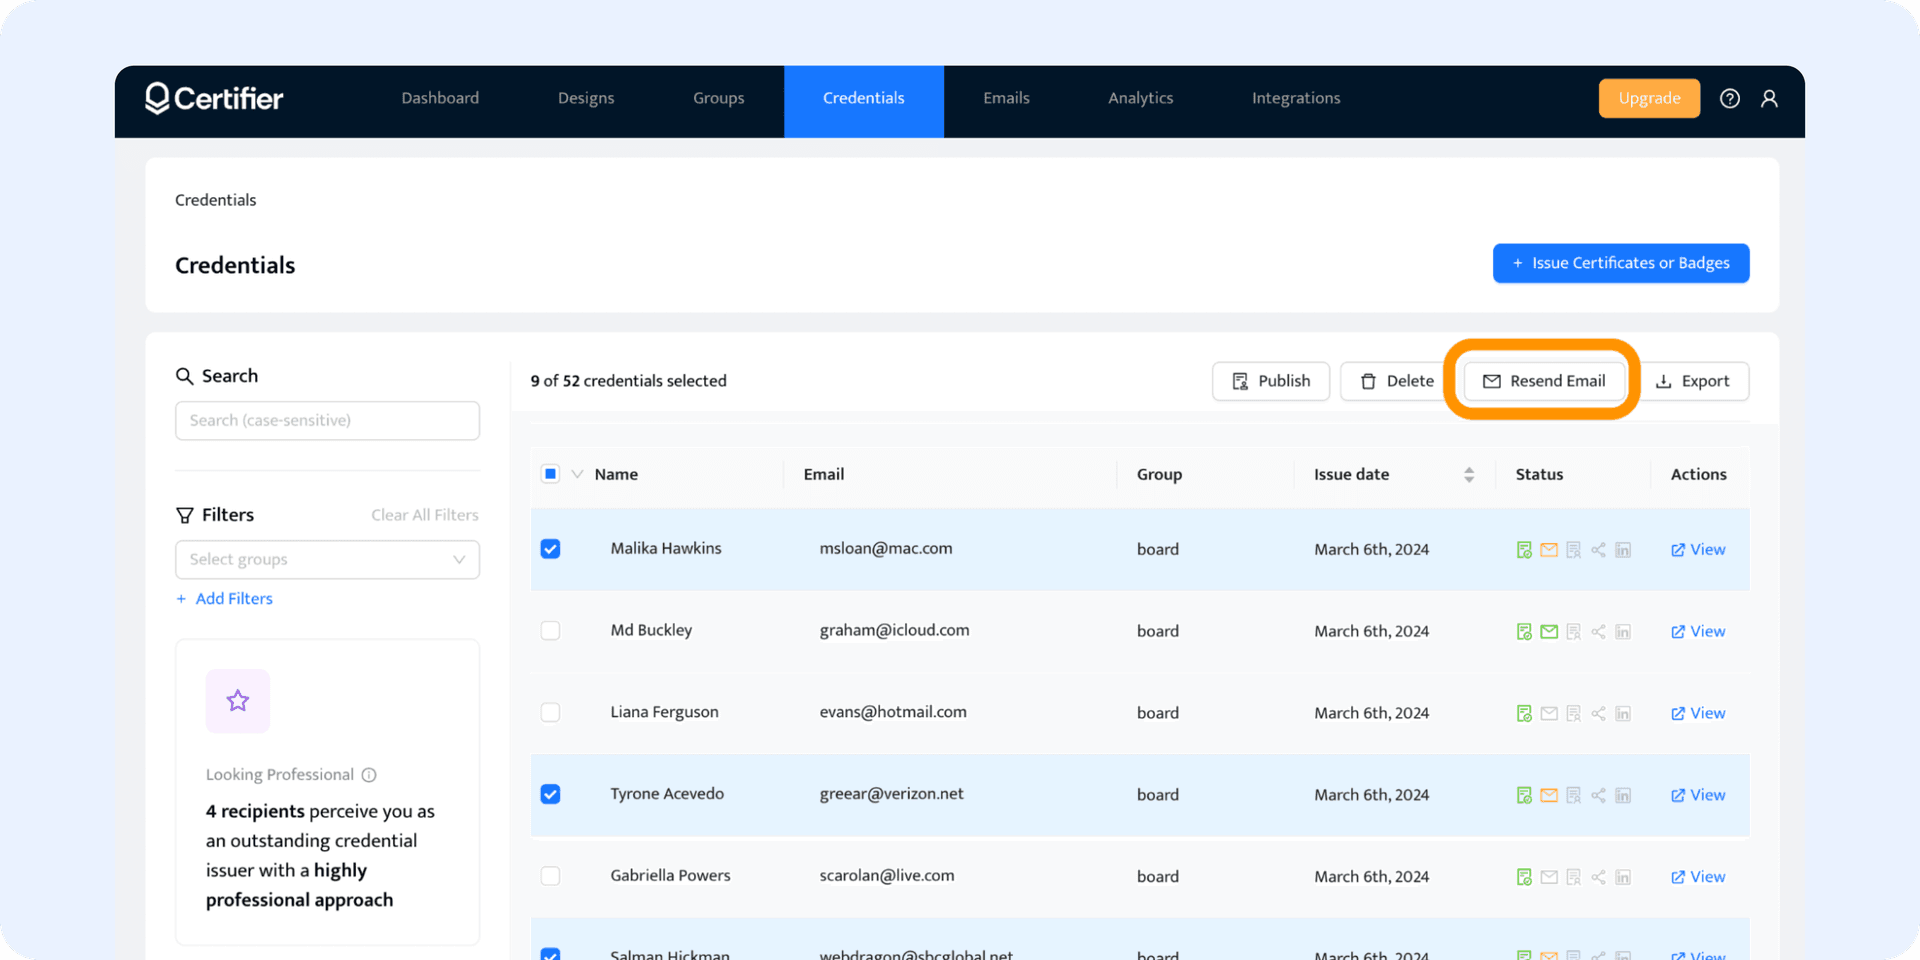
Go to the Credentials tab, choose the certificates you want to resend, and click the Resend button. Now, your recipients will no longer be able to resist your credentials.
Good to know: Each certificate email design can be adjusted to your branding. You can add your own company’s logo and colors, change the message, and edit the CTA button. Go to the Emails tab and make the magic happen!
Alternative way: Integrate directly with Certifier
If you’d rather not prepare spreadsheets manually and upload them every time, you can set up an automation instead. Certifier’s native integrations with Google Sheets and Microsoft Excel let you issue certificates continuously in the background.
Certifier Automations follow a simple “trigger → action” system:
Trigger: A new row is added to your spreadsheet (Google Sheets or Microsoft Excel).
Action: Certifier reads the row’s data and issues a credential.
You can set it up in just a few steps:
Step 1: In Certifier, go to Automations → +Create Automation.
Step 2: Select Google Sheets or Microsoft Excel and connect your account securely via OAuth.

Step 3: Choose the spreadsheet and the worksheet you want Certifier to monitor (e.g., the Live Sheet).
Step 4: Map your columns to certificate fields — for example, Recipient Name → column A, Email → column B.
If you store first and last names separately, you can combine them in the mapping.
Step 5: Configure whether you want certificates to be issued and emailed automatically or saved as drafts for manual publishing.
Step 6: Save and activate the automation.
In Google Sheets, new rows trigger credential issuance almost instantly.
In Microsoft Excel, Certifier checks for new rows roughly every 15 minutes.
Rules to remember:
Add recipient rows only after activation. Existing rows won’t be processed (Excel) or will be processed immediately (Google Sheets).
Don’t rename files or tabs, reorder sheets, or move/insert columns after setup, as this will break the automation.
Certifier always starts from the next unprocessed row and ignores edits to already processed rows.
Need a deeper walkthrough? Check out our Knowledge Base articles for step-by-step guides:
How to create an automation in Certifier
Certifier is their favorite tool to generate certificate from Excel
Certifier helps with issuing digital credentials easily. A customer success manager walked me through creating my first badge and certificate. Very helpful!

Adam Van Auken
Director of Technology
Easiest way to send certificates to webinar attendees! Easy to navigate, could import CSV files of attendees, send them a personalized certificate. Provided choice of multiple templates...

Jay Patel
Product Manager
Certifier is a fantastic option for automating certification processes! User-friendly, learned to use it within 30 minutes. Responsive customer service team, provided a branded email template.

Madison Lokke
Marketing Specialist
Online certificate generator from Excel and Google Sheets
Make certificates based on Microsoft Excel, Google Sheets, or even Google Form answers. Then, prepare email templates and send them all with a click (or download as PDF for printing).
Turn Excel rows and columns into beautiful certificates

Work with your favorite spreadsheets
Work effortlessly with the spreadsheet formats you know – XLS, CSV, XLSX. No need to start from scratch or transfer data. Simply upload your spreadsheets directly into Certifier. This saves you time, effort, and resources. Plus, your data is always up-to-date and accurate. Our online certificate generator from Excel file makes managing your spreadsheet workflows easier than ever before.

Recipients data right from your current toolkit
Effortlessly leverage recipient data from tools you're already using. If you've hosted webinars, courses or have existing databases, there's no need to rebuild lists from scratch. Certifier integrates seamlessly by allowing the direct export of recipient details from your CRM, LMS, or other platforms. Simply bring this data into our system and generate certificate from Excel, diresctly.

Smart attribute mapping, zero hassle
No more manual sorting or aligning – our intelligent system automatically maps data attributes to corresponding fields in your spreadsheets. Just upload your files, and Certifier will handle the rest. Precise text field matching eliminates the risk of errors and provides you with complete peace of mind. Certifier's smart technology does the heavy lifting, which allows you to focus on what matters most.

Personalize with unique recipient’s details
Make each credential truly unique by adding a personalized touch. Go beyond just names by incorporating custom certificate attributes like grades, issue dates, and more to add distinctive flair. Certifier e certificate generator from Excel allows you to fully customize these text fields and dynamically integrate them into your certificate designs. Tailor attributes to highlight specific details or achievements, creating a one-of-a-kind keepsake.

Start for free, upgrade as you grow
Experience the power of Certifier with our generous forever-free plan. Auto-generate certificates from Excel up to 250 annually at no cost – a perfect way to streamline recognition from day one. You'll be amazed at how seamlessly Certifier integrates with your existing spreadsheet data and toolset to create polished, professional credentials. It's an effortless first step toward improving your credentialing process.

Quick PDF creation, ready for printing
Transform your spreadsheet data into professional PDF form certificates effortlessly with just a few clicks. Certifier's online certificate generator from Excel provides a straight path from raw data to polished, print-ready credentials. Our intuitive platform is designed with efficiency in mind, which allows you to craft visually stunning certificates using thousands of our templates.
The #1 automatic certificate generator using Excel based on G2 reviews


Did you know?
If you're using any software like Zoom, Microsoft Teams, Thinkific, Teachable, or a CRM like Salesforce for webinars or courses, you've already got a goldmine of recipient data ready to use. When you use Certifier with it, you can save as much as 6 hours each week. There's no need to start from scratch with a new spreadsheet. Simply export the data from these platforms, and you're all set to generate certificates. This process might give you a lengthy file with various details, but don't worry – Certifier guides you to map them properly.
Excel to certificate generation in a matter of minutes
A tool that goes beyond design. Certifier provides features to generate, distribute and track. All within one intuitive dashboard.

How to make certificate in Excel: Foolproof strategies for perfect upload
Use clear column headings
Use clear column headings to auto generate certificates from Excel seamlessly. Label columns with straightforward titles like "Name," "Email," "Issue Date" – this clarity guides Certifier's data mapping. Consistent, descriptive headings act as a roadmap and eliminate confusion about where details should populate.Thoughtful setup with clear labels lays the foundation for polished, personalized credentials. Don't underestimate the impact of this simple practice – it improves accuracy and efficiency for professional results.
Verify that mandatory fields are included
Include mandatory fields like recipient name and email address columns. These core details are essential for Excel to certificate generation and direct delivery to recipients' inboxes. Verify your data source has dedicated columns clearly labeled with headings such as "Full Name" and "Email." Certifier relies on mapping these fields to dynamically populate credentials with accurate recipient information. Prioritize incorporating these fundamental columns in your spreadsheet from the start.
Add custom data for personalization
Add custom columns like "Final Grade," “Credit Hours,” or "Course Name" to personalize certificates. Certifier online certificate generator from Excel maps this data dynamically onto each credential design through attribute fields. Academic scores and training titles can be incorporated into generic certificates as unique details with dedicated columns. Highlight individual achievements with prestige. Don't settle for basic credentials. Unlock meaningful personalization – a few extra custom columns empower you to craft distinctive, achievement-focused certificates for each recipient.
Combine first and last name together
Combine first and last names in sheets fields into one unified "Full Name" column and prevent potential errors during data mapping. Certifier’s Excel to certificate generation relies on your spreadsheet structure to populate details correctly. Having split name fields increases the risk of mistakes like names appearing incomplete or out of order on issued credentials. A simple merge avoids these preventable issues. Certifier can then map the complete "Full Name" column without ambiguity. This extra step confirms consistency across all personalized credentials.
Split text to columns
Easily convert comma-separated values into organized columns with just a few clicks. For Google Sheets, highlight the relevant rows and navigate to Data > Split text to columns. In Microsoft Excel, select the fields containing comma-delimited data and go to Data > Text to Columns. This handy feature streamlines spreadsheet formatting, transforming messy, combined entries into neatly separated columns. Perfect for cleaning up imported lists or prepping data for Certifier's attribute mapping.
React if Certifier detects any errors
Stay vigilant and react swiftly if Certifier free bulk certificate generator Excel detects any errors during the creation process. A proactive approach helps you maintain the highest standards for your credentials without issues. Common flags may include typos in recipient details, inactive e-mail addresses, or missing data fields. Don't let these minor errors slip through – they can tarnish an otherwise polished credential. A simple typo fix or email update means smooth sailing ahead without any blemishes on your awards.
Schedule distribution
Certifier automatic certificate generator allows you to schedule when your DIY certificates will be automatically distributed to recipients. Instead of manually sending out credentials, you can set a future date and time for Certifier to handle delivery. Simply upload your recipient data spreadsheet, design the document, then schedule the distribution for a specific date and time. Certifier will queue up the send and automatically email out all the personalized certificates to each recipient at the scheduled moment.
Track your certificates
Certifier bulk certificate generator Excel provides powerful analytics to track the status and engagement of issued certificates. Within your dashboard, you can monitor valuable metrics like delivery stats, pen rates, view counts, and credential sharing. You get to gauge the performance of your Google or Excel certification programs. Identify any dropoff points in the recipient journey from delivery to engagement. Use this data to optimize your credential designs, messaging, and distribution strategies.
Have a question? We’re here to help!
Curious on how to auto generate certificate from Excel sheet with Certifier? Check out our top questions and answers for more details. And if you still need a bit more guidance, we're just a message away.
You get more with Certifier e certificate generator from Excel
Export & download credentials in PDF
Allow your recipients to one-click export and download their credentials in PDF format for easy sharing and printing.

Personalize certificates with dynamic attributes
Personalize multiple certificates at once with unique information like the recipient’s name or grades automatically.

Generate diplomas in bulk
Generate personalized diplomas for hundreds of recipients instantly with just one click.
One spreadsheet, hundreds of certificates
Start making batch of certificates with Certifier! Click here and see how to auto generate certificate from Excel sheet.