Trusted by:
Updated: September 15, 2025
15 min read
How to Make DIY Certificates in 15 Minutes?
Do you have an event taking place tomorrow, and you completely forgot about making DIY certificates? You don’t have to spend hours creating homemade certificates. We show you how to create beautiful DIY certificates in 15 minutes (or even less).
The logic says paying someone to create certificates for you will be faster than making DIY certificates. But what if, with the right tools, homemade certificates are the clear winners?
15 minutes is enough to create, personalize for each recipient, and send (!) a professional DIY certificate template with Certifier. This guide will show you how to make these certificates quickly and easily. It covers the whole workflow – from design to distribution.
You can put a timer on.
What makes Certifier so fast? { What makes Certifier so fast? }
Certifier is a professional certificate generator (many say the best one) that gives countless certification possibilities. With just a few clicks, you can choose the template, customize it, generate, and send any kind of bulk certificate to your attendees. It is very easy and free to use. The Certifier handles every detail of the certification process:
Creation – provides more than 1,000 free DIY certificate templates.
Customization – has an intuitive, drag-and-drop editor.
Generation – adjusts content to each certificate recipient, automatically.
Distribution – sends certificates to all email addresses at once.
Ready to see it in action? Let’s cut to the chase and show you how to make DIY certificates in 15 minutes, step by step.
Create and Send Digital Credentials

Step 1: Choose DIY certificate template
Start with creating a free Certifier account. It only takes you a few seconds to set up the profile and make it ready to create homemade certificates.
Then, you’re ready to begin digital certificate creation process. With Certifier certificate creator, the design experience is an enjoyable process. You can create the certificate as you like. The design you create can be saved for future certification programs. Have fun!
Let’s get started. Go to the Designs tab and click on Create Design. Choose Certificate Design (yes, Certifier provides an option to create digital badges as well).
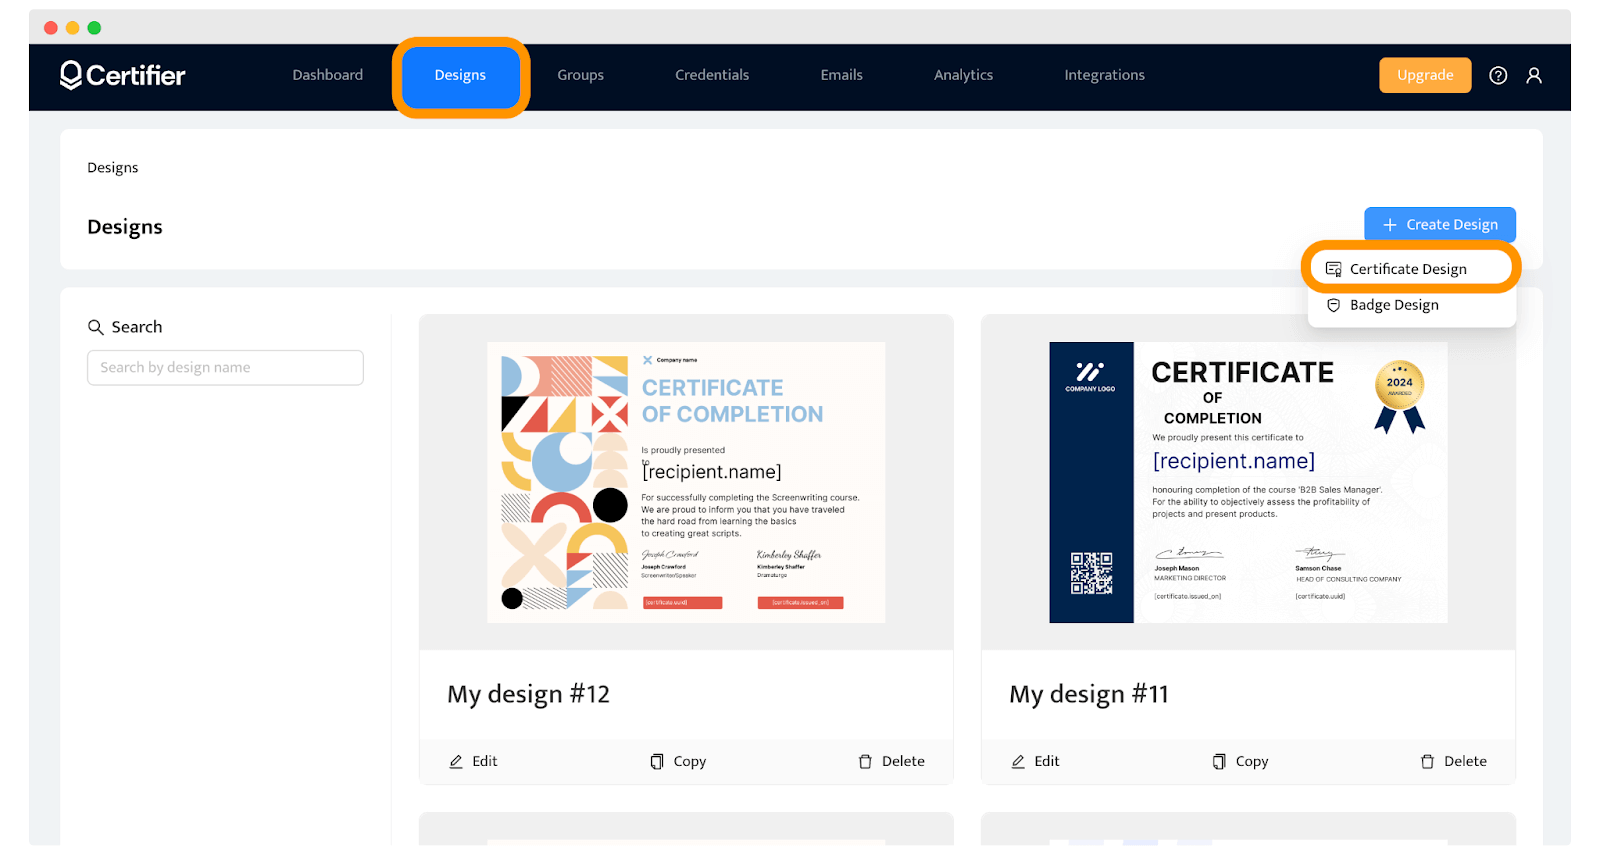
Choose the DIY certificate template. There are many options that you can tweak so use filters to narrow down the choice. The topic of the event doesn’t matter much now. So, for example, if you are about to hold a marketing workshop, you can choose a universal certificate design template and change it to fit later on.
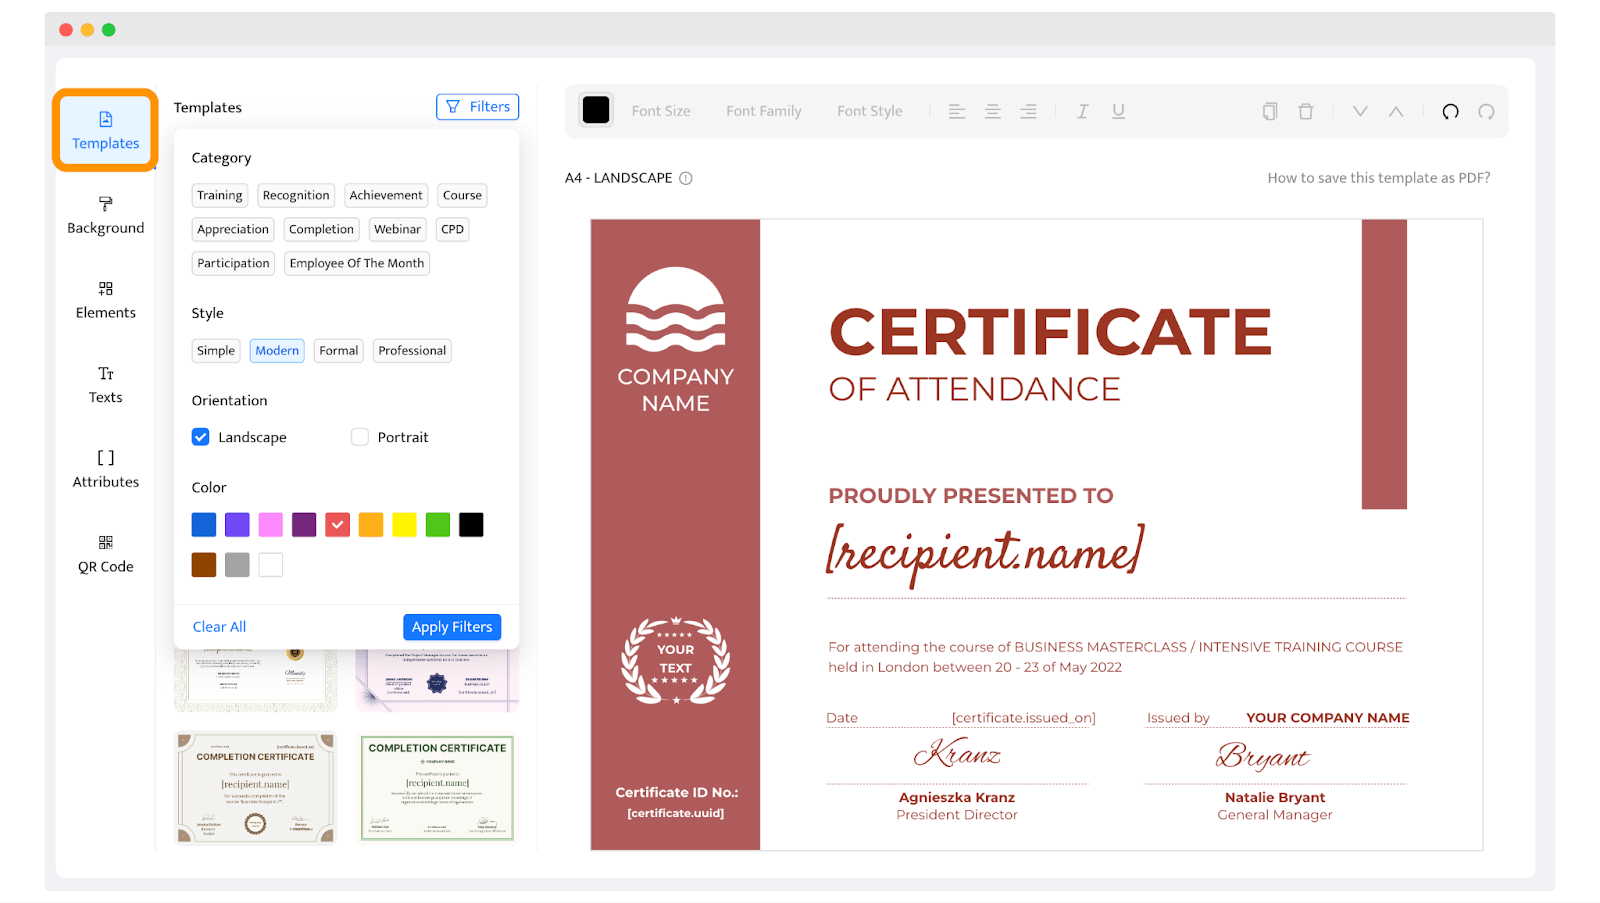
To make your certificate DIY choice slightly easier, stick to this rule about color palettes and certificate category: for modern DIY certificates, look for brighter colors; if you need more professional ones – pick more toned down.
If you don’t want to start with a template, Certifier also offers a free AI Certificate Generator. Just type in a short prompt (like the recipient’s name, event, and achievement), and the AI will create a polished certificate layout and wording for you. If you like the result, you can open a free (or paid) Certifier account and take things further: brand the certificate, turn it into a reusable template, and bulk-issue.
Step 2: Tailor certificate design with customization options
Now you can make the magic with your homemade certificate template. Just click on the element you want to modify and change its color, position, or remove it if you don’t need it.
Change the certificate wording as you like to fit the purpose of your DIY certificates. Decide on the branded font – its size, type, and color theme. Italics? In bold? Underlined? It is all up to you.
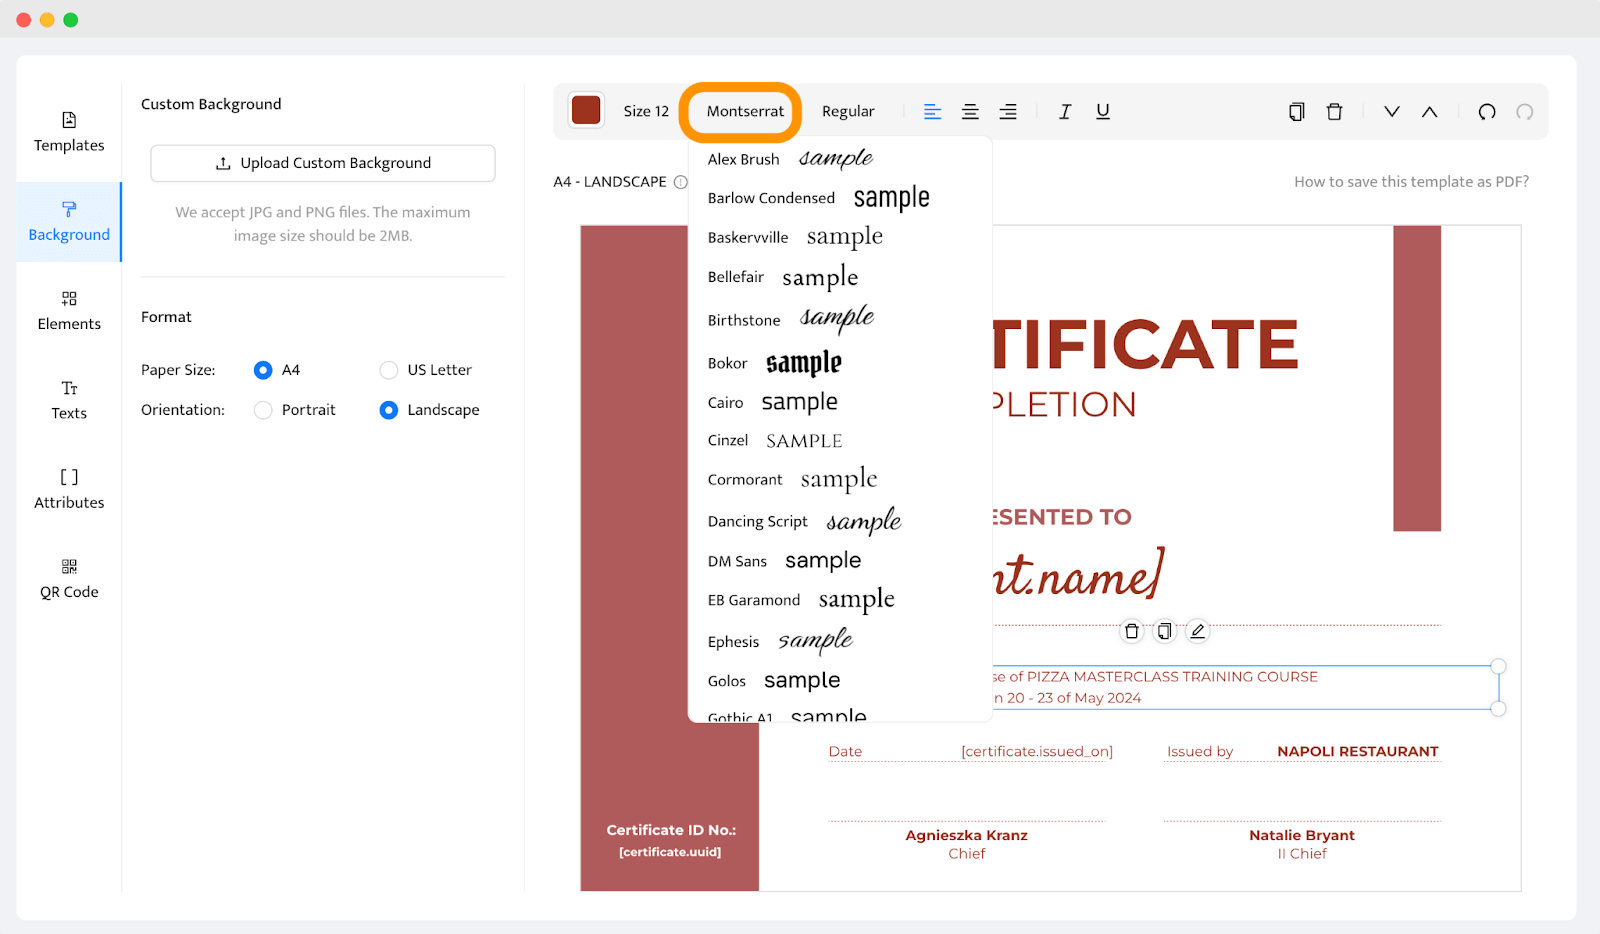
🛟 Need more tips on how to choose the beautiful fonts for certificate DIY? Here’s the certificate fonts guide, ready to help!
While placing, you don’t have to worry that something is placed wrong or the gaps between the texts are irregular. If you align the text according to the guiding lines, the text will appear in the right place.
Do you want to know more about how to make certificates DIY? Check out this guide for tips and tricks on custom certificates.
Step 3: Add company branding elements like logo and signatures
Now that you've got the basic layout of your DIY certificate, it’s time to make it as tailored for your event. Adding branded elements like your company’s logo and signatures boosts the professional look and strengthens the credibility of the document.
To upload the company's logo, simply click on the Elements tab and Add Image to select your logo file. You can upload JPEG, PNG, or SVG (for badges). The maximum size should be 2MB.
Position the logo prominently at the top or bottom of your certificate for a polished, official look. It should be visible yet not conflict with other design elements. Remember, the logo is a key element that reinforces your brand identity.
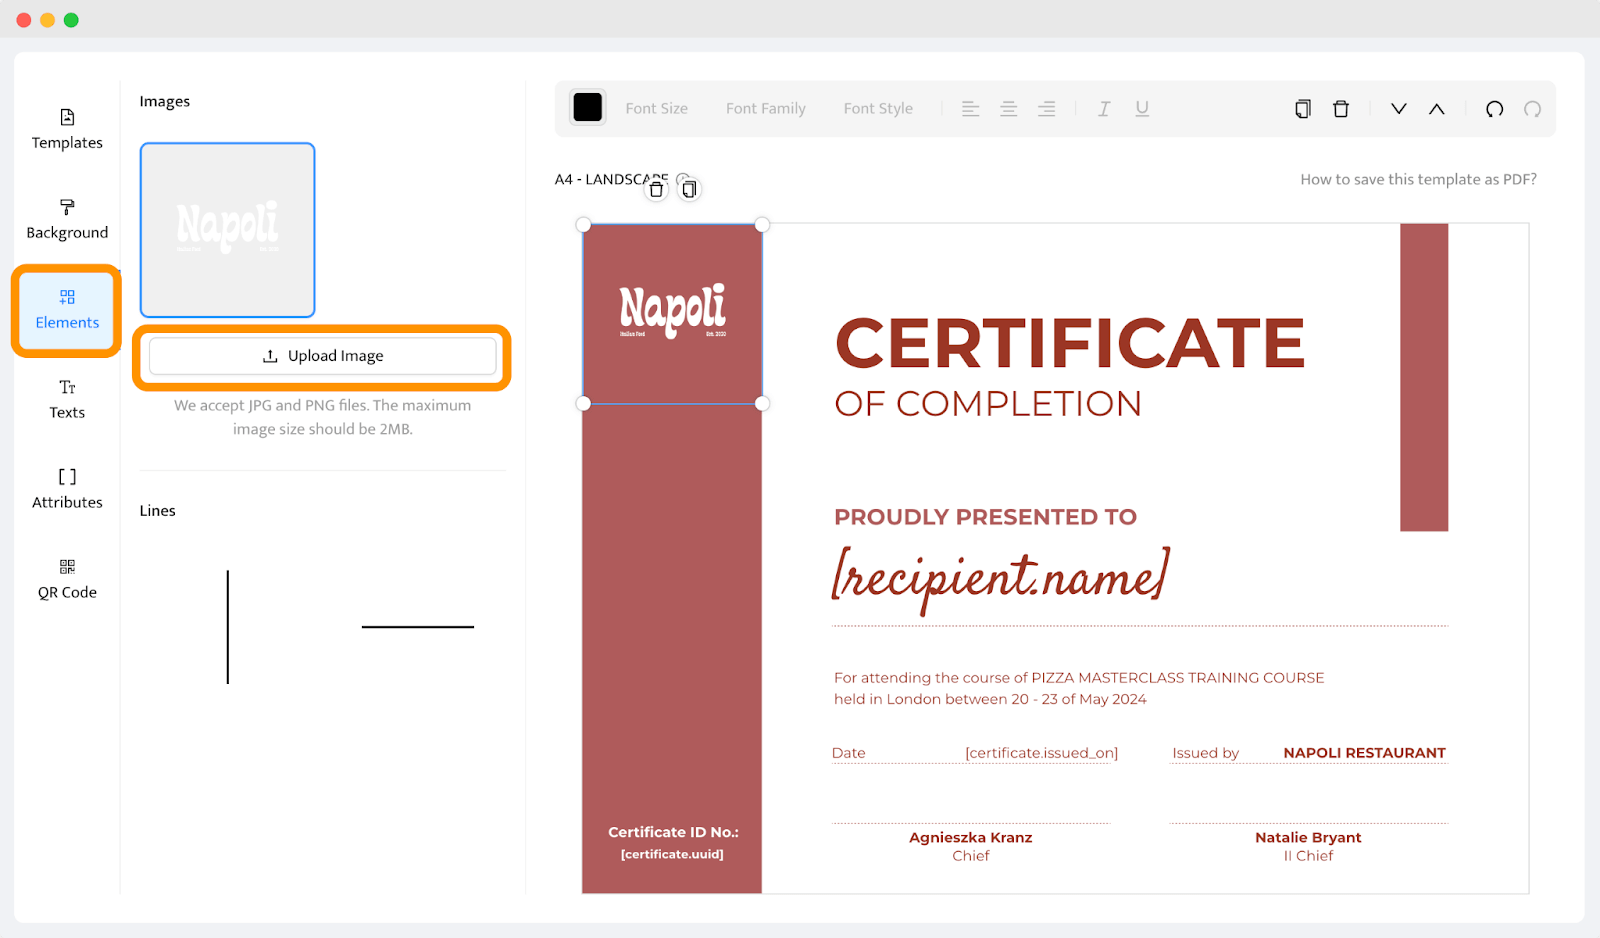
You can upload signatures as a digital scan the same way or choose fonts that look like signatures. The Certifier provides many options that give an authentic and professional look. And they’re much faster to implement.
Step 4: Generate QR code for better experience
The cherry on top? Adding a QR code to your DIY gift certificate template. Besides enhancing credibility, it offers instant verification too. With Certifier, this step is simple and quick (and you don’t have to use any external QR code generators).
Choose the QR code tab from the left-hand menu.
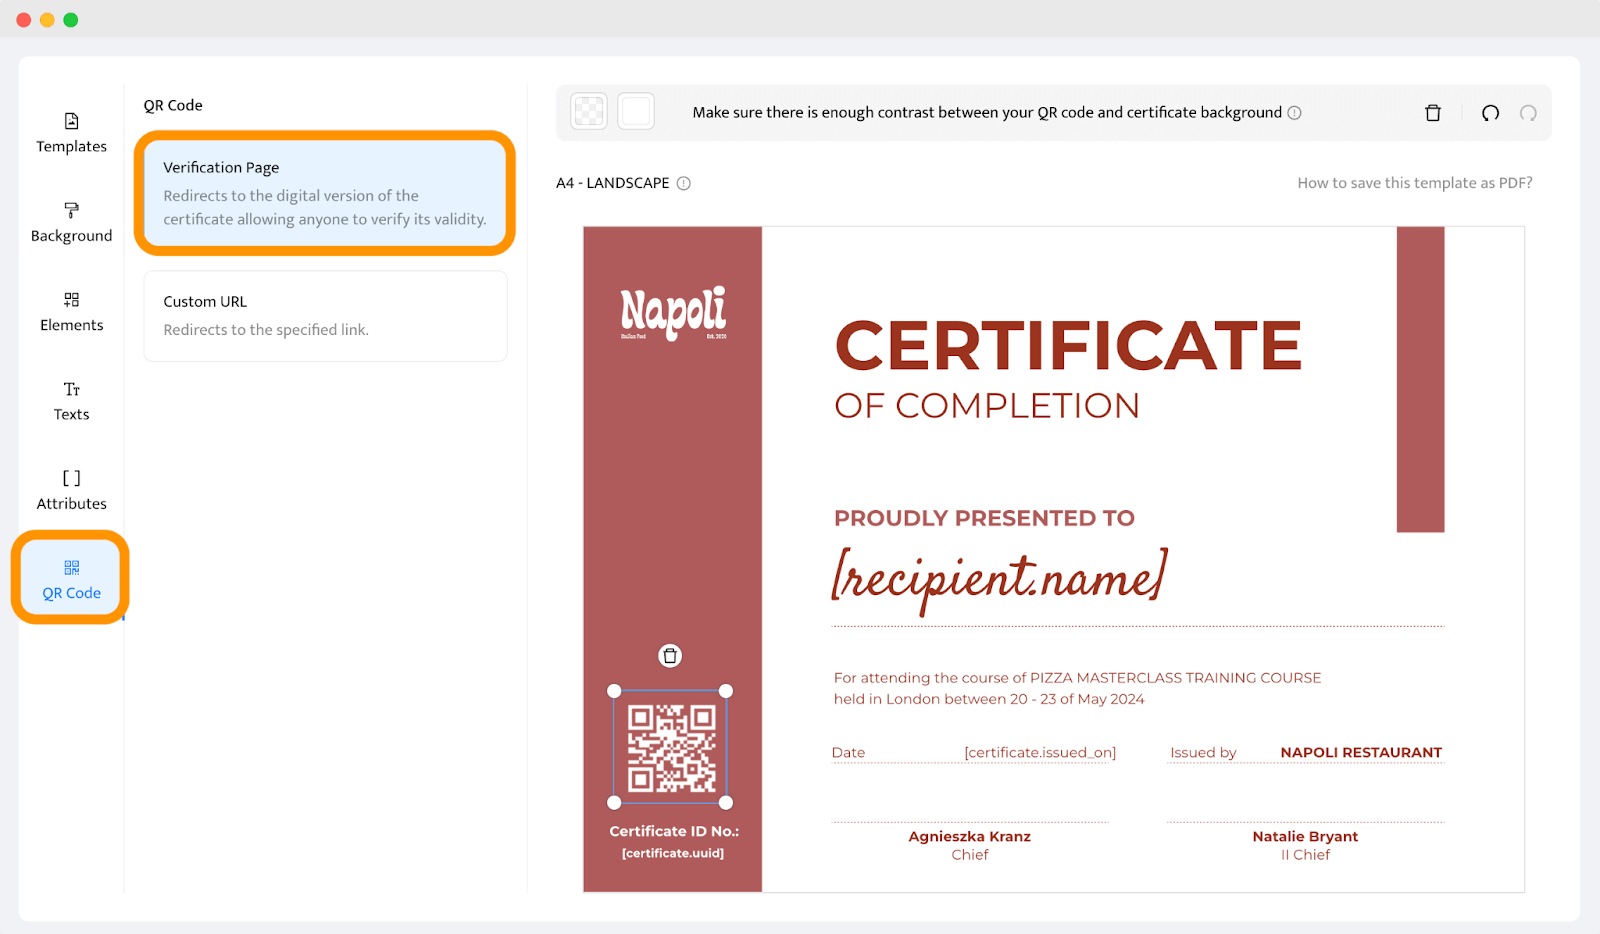
You can select between two types of QR codes: the Verification Page option or a Custom URL.
#1 Verification Page (recommended): This links the QR code to a digital version of the certificate with 24/7 access. It supports social media sharing, PDF file downloads, and direct links to your website. It’s trackable, so you can see how often your QR codes are scanned.
#2 Custom URL: This redirects to a specified URL, such as your website or a landing page. Note: This option is less reliable as issues with the domain or server can make the QR code unscannable.
Select your preferred option and generate the code for certificate DIY. Position the QR code on your certificate. The best spots are typically the corners or areas with clean background graphics to facilitate scanning.
Adjust the QR code color to match your certificate’s design. Make sure there’s enough contrast between the code and the background.
🤳 Tip! Before finalizing, scan the QR code with your phone to check that it works correctly. When you see the yellow notification that your QR code is scannable, you can rest assured everything is working as it should.
Step 5: Create dynamic attributes for DIY certificates
Dynamic content is key to creating personalized DIY certificates. You'll be surprised at how fast they can accelerate certification.
What are the dynamic attributes? Dynamic attributes are elements that automatically personalize certificates for specific information, such as the recipient's name, directly from an uploaded CSV file. So, no matter if you generate 20 or 2,000 certificates, it will take you the same amount of time.
Go to the Attributes tab to add and remove them from the homemade certificate. If you want to, you can also create some custom ones.
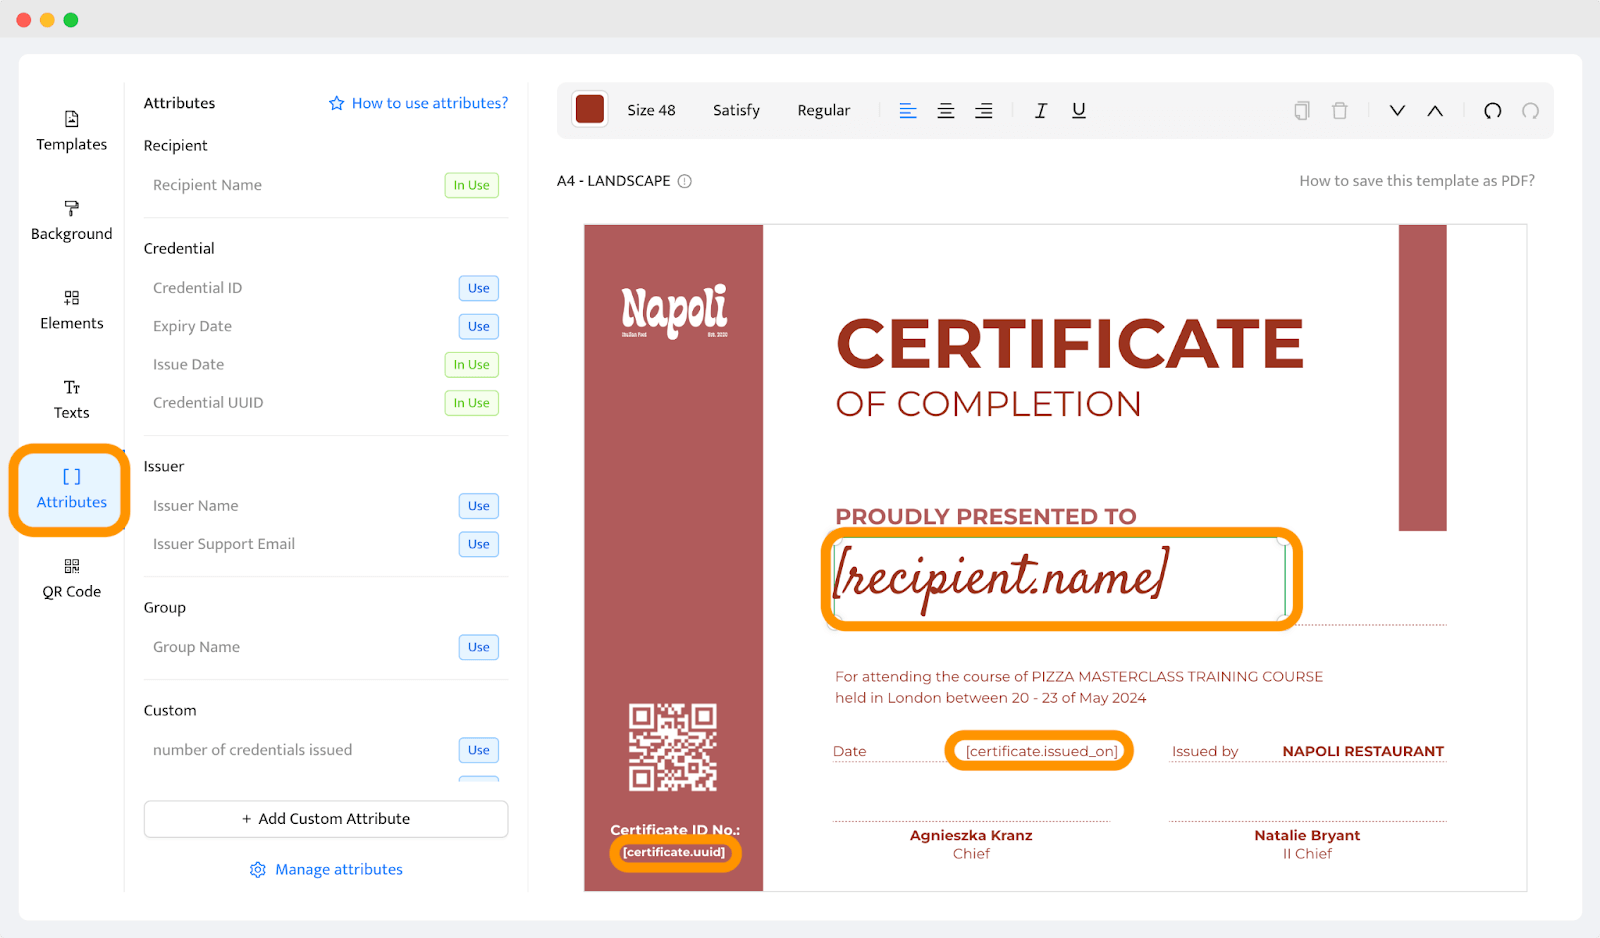
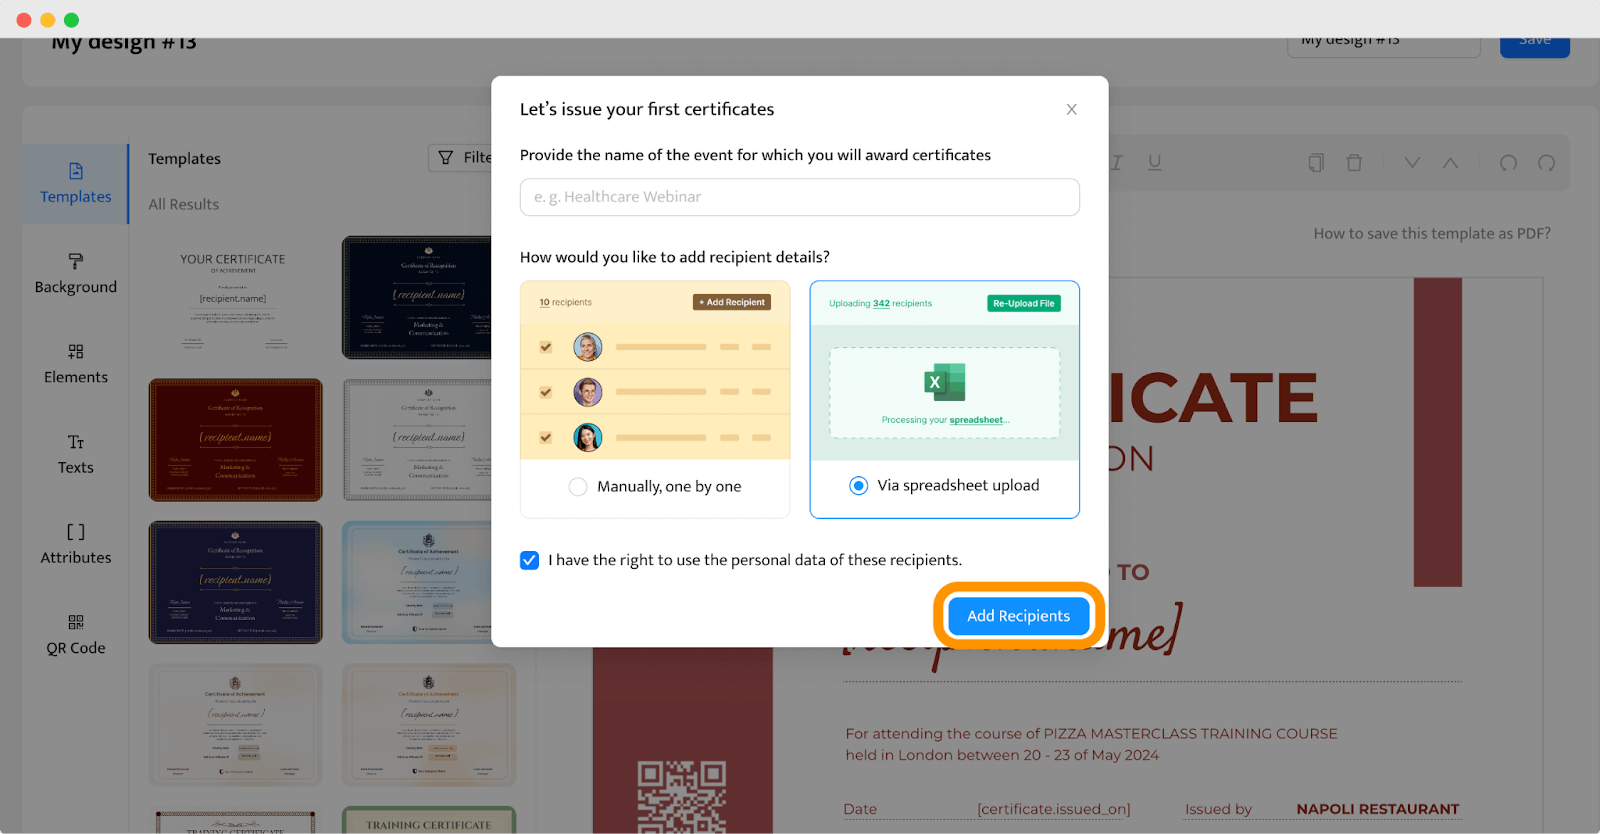
Once it’s ready, click Create Certificate Design. This will trigger a pop-up window that allows you to upload the data.
🚨 Please note: If it’s not your first time with designing certificates, you can upload the recipients’ data via the Credentials in the menu. Remember to make the group first and choose the DIY certificate template you’ve just created.
Step 6: Generate DIY certificates in bulk
Start by preparing a CSV file (or use our free CSV template) with your participants' names and email addresses. Organize everything in two columns – one for the name and the second for the email. Usually it’s enough, but if you have some other elements that are variable, add the appropriate column to the spreadsheet.
Now, come back to the window with uploading data. Choose the file. Manual upload is also an option if you wish.
Next, you need to map the attribute with the column from the spreadsheet. Once it’s ready, you’ll see the green banner at the top. Then, click Preview Before Issuing to see if the DIY certificates look as they should.
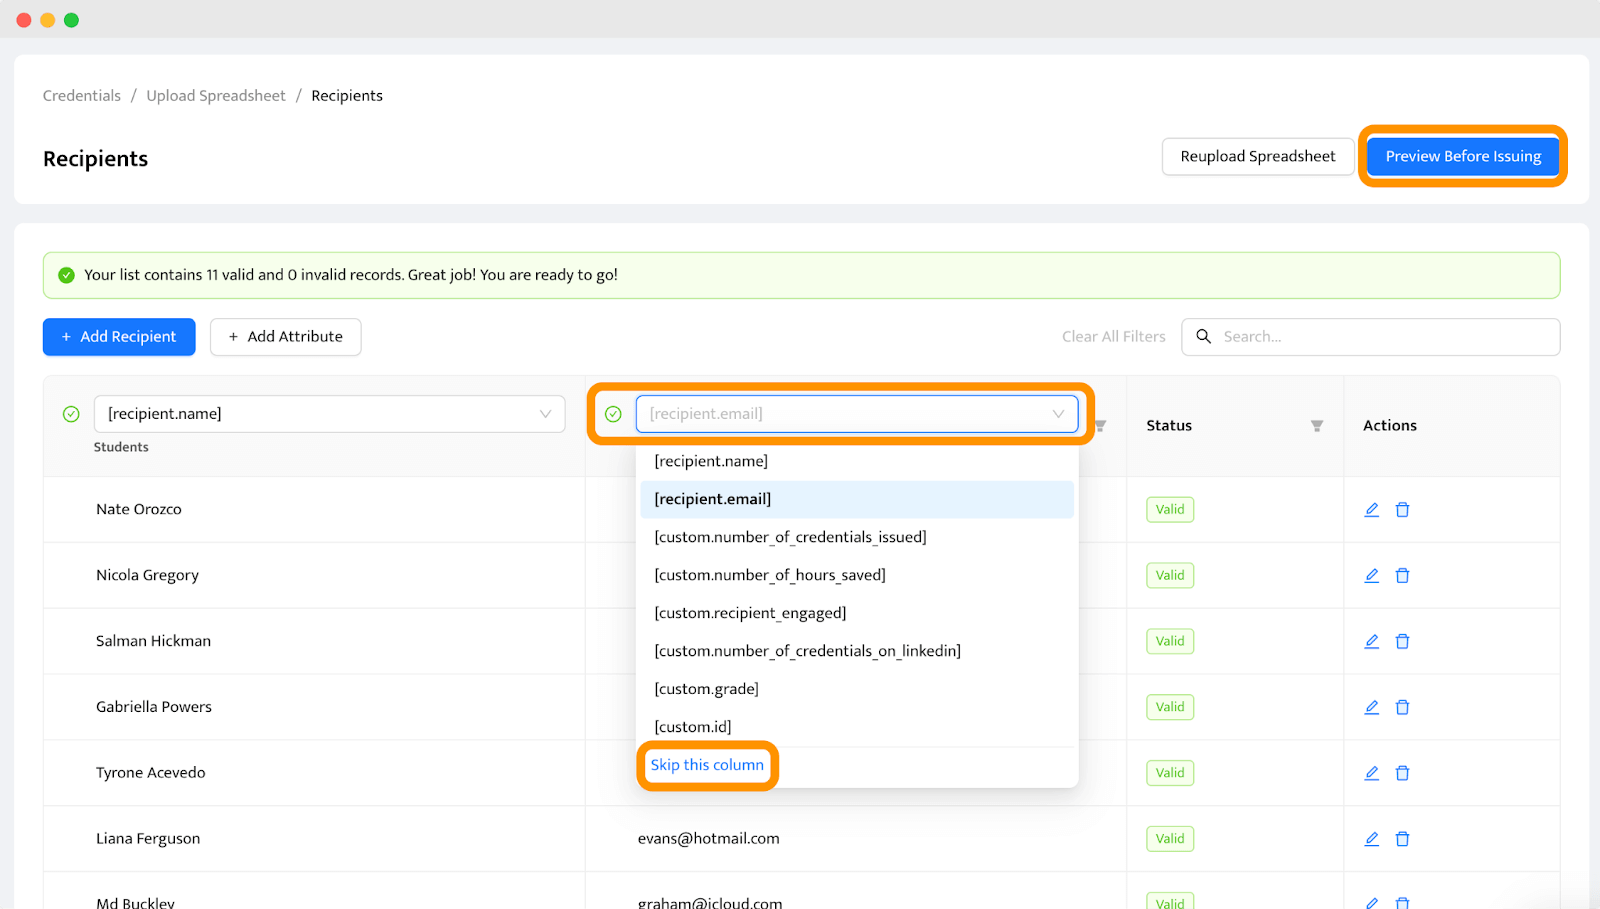
🚨 Please note: In the next step, if you prefer to download and choose printable certificate templates instead of sending their digital versions, click the Skip the column button.
Step 7: Send or download and print your DIY certificates
Everything is almost ready. All you need to do is to send the certificates (or download them to print). No worries, everything happens automatically. You upload recipients’ data, and Certifier handles the rest.
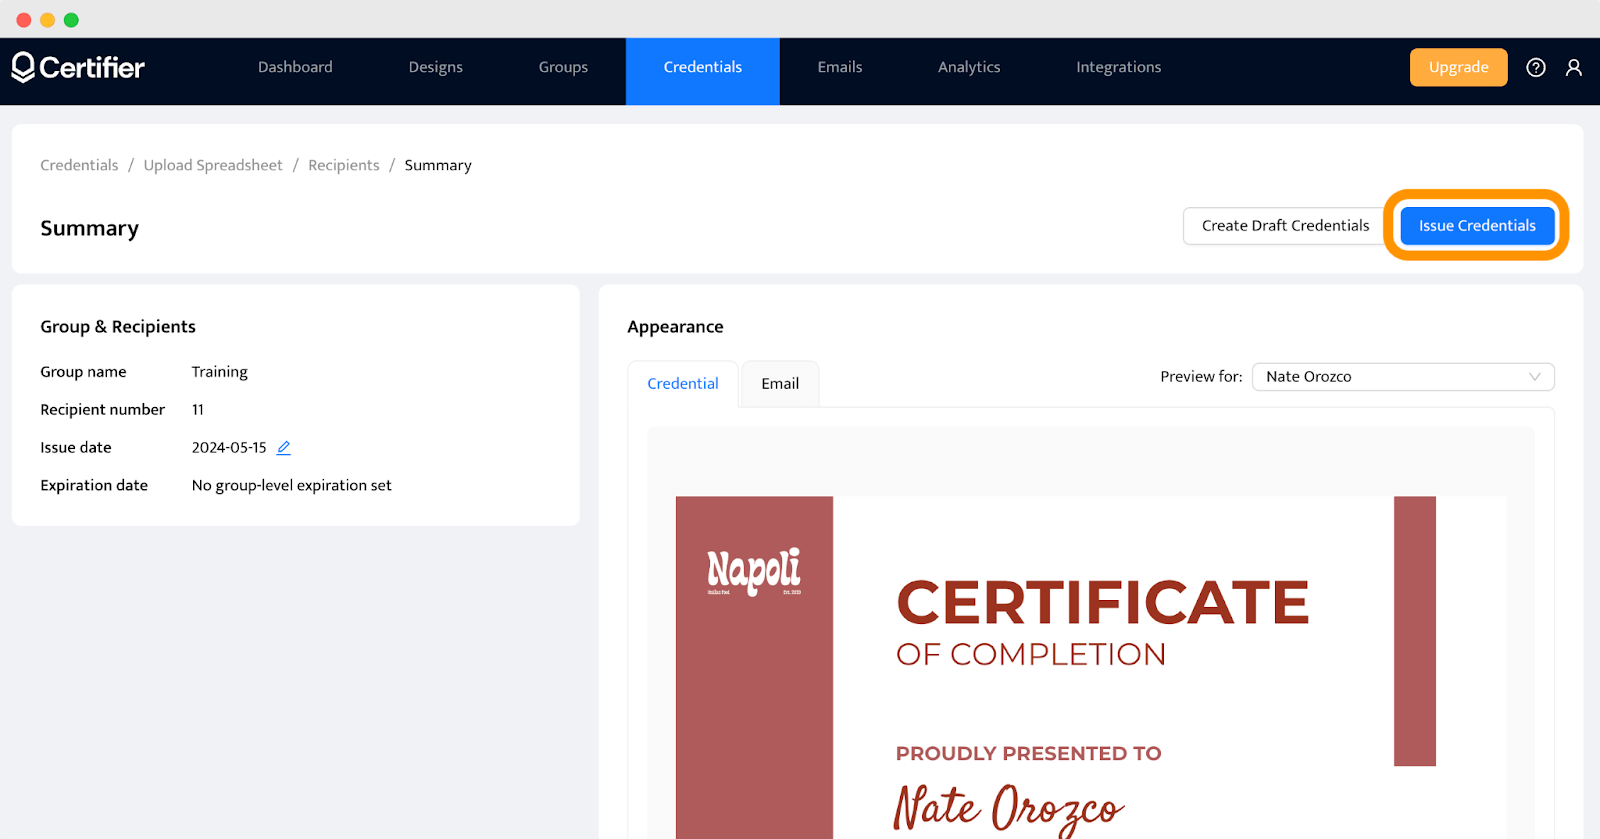
Click Issue Credentials and let the magic happen. The certificates are in attendees’ inboxes or ready for certificate PDF download and printing. It is possible to schedule certificate issuance for a later date (e.g. after the course ends).
Why do we recommend digital DIY certificates? You might not think about it at this moment, but you should have it in mind. Digital certification give you three more options than printable ones.
Promotion – allows recipients to share certificates on social media via the certificate link so you can boost the course engagement.
Management – gives 24/7 access to the certificates for issuers and recipients, so you make your course more secure and verifiable.
Tracking – provides analytics to check the engagement statistics so that you can improve results in the future and react to reengage attendees.
Useful checklist for managing digital DIY certificates even faster
If you are in a hurry, here is a list of what you should pay attention to while creating beautiful certificates. See how to design certificate and make process as short as possible.
Simplify change requests and updates
Did you make a mistake after issuing your digital DIY certificate of appreciation? No problem! Certifier is a professional certificate maker and allows you to edit already published certificates with just a few clicks with all its editing tools, without the need to resend them. The recipient will see the change automatically.
Go to the Certificates tab.
Choose the certificates you want to edit.
Make any necessary changes.
Click on Update.
Manage problem inquiries easily
The Certifier’s verification page (also known as the digital wallet) boosts the integrity and credibility of your DIY certificates. But it also simplifies managing inquiries related to certificates.
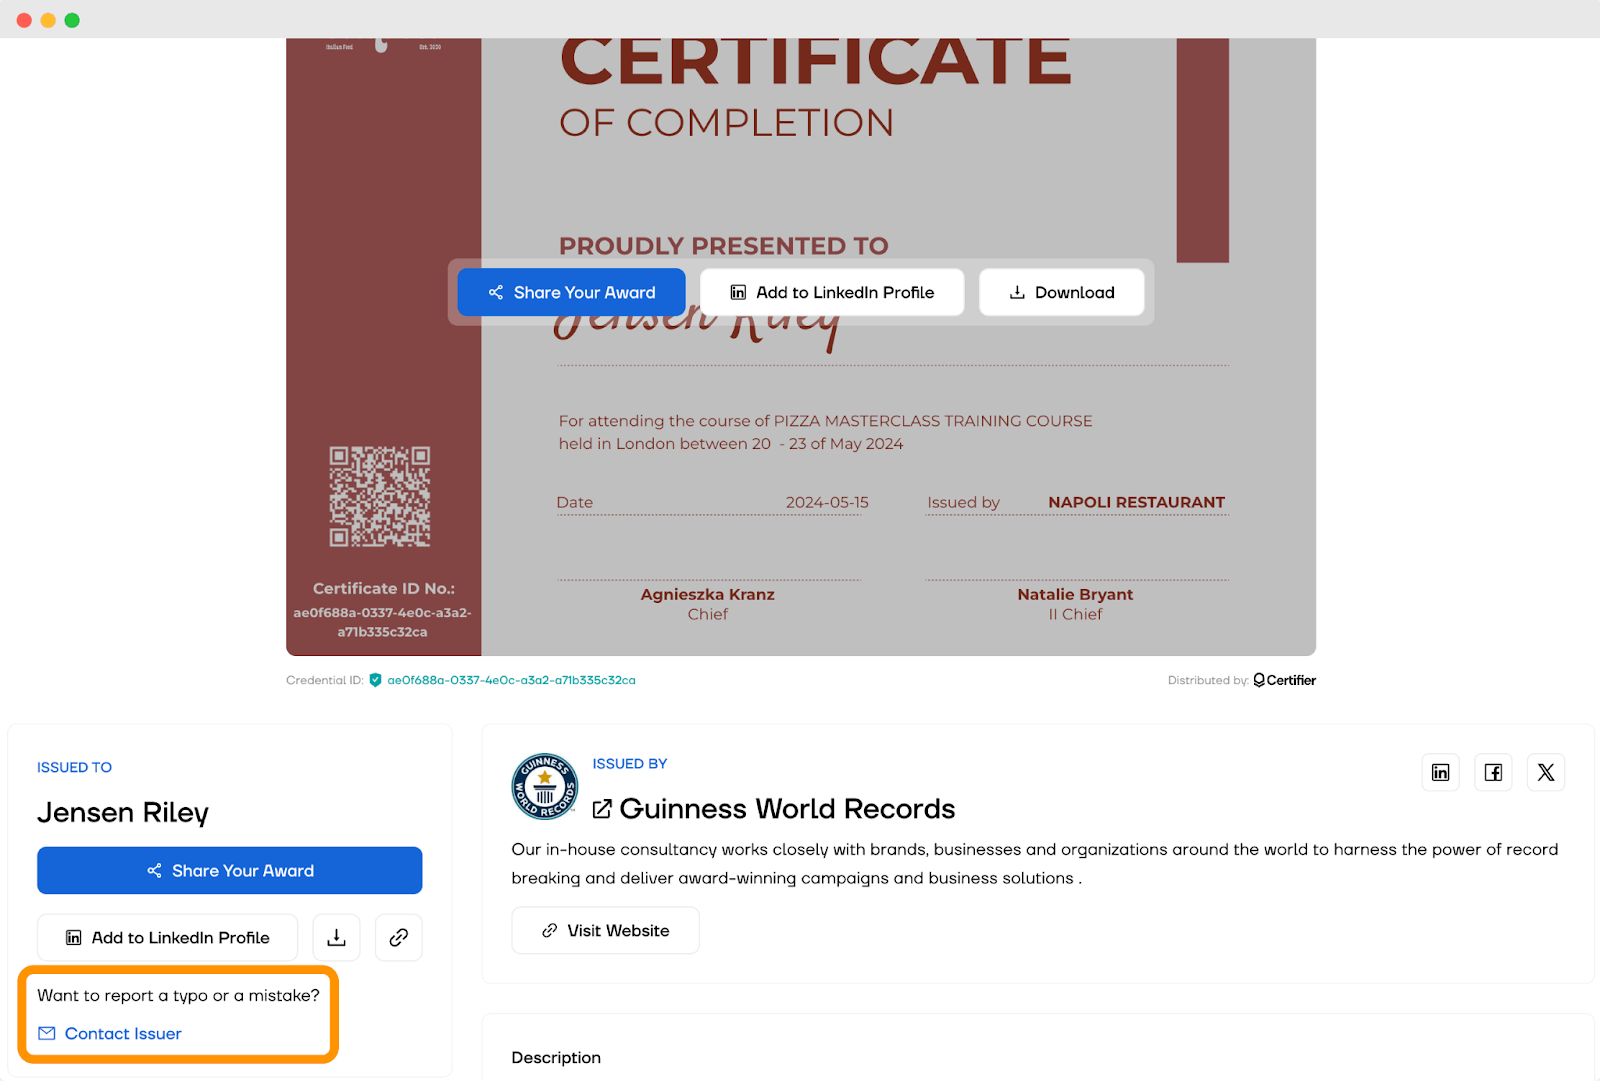
So, for example, if your recipient notices a misspelling or typo in their name, they can report the problem via the digital wallet, write what has happened, and you will see that inquiry immediately within the Certifier dashboard. Besides building trust with your audience, this transparency streamlines the process of addressing errors.
Boost LinkedIn sharing
Sharing achievements is something people love to do. That’s why we made it easy for your participants. After receiving their digital DIY certification, they can share it on social media, e.g., LinkedIn. That’s great for you as an organizer because the shared online certification can generate new leads. Digital certificates work as a reward for attendees, and they also promote your business. (Don’t forget to add these leads to your CRM software to make sure these prospects don’t go stale.)
Keep track of engagement
Use Certifier to gather valuable marketing data by monitoring how certificates are shared and interacted with online. You can check a number of shared certificates, open rates of sent certificates, or the accuracy of recipient email addresses. These insights help refine your marketing strategies and drive informed decisions.
DIY certificates on every occasion
Creating DIY certificates doesn't have to be an overwhelming task, even when you're short on time. With the right tools and tips, you can design professional customizable certificate templates efficiently (and create certificates in minutes).
Certifier streamlines the entire process, from designing to editing to distributing and tracking. Whether you’re crafting a DIY gift certificate template, a DIY award completion certificate template, or any other type of handmade certificate, Certifier makes it easy to create personalized certificates that leave a lasting impression.
DIY certificates FAQ
Here’s the list of the most popular questions related to the certificate DIY. See how to make a good certificate with Certifier.

