Trusted by:
Updated: February 13, 2026
18 min read
How to Generate Certificates with Google Forms?
If you want to know how to generate a certificate from Google Forms, here’s the article for you. Read on to learn how to set up the process and use Certifier to auto-generate e-certificate from Google Form outcomes.
Google Forms is perfect for collecting quiz results, course feedback, and webinar registrations. But the moment you need to generate certificate from Google Form responses, things get messy. Spreadsheets. Manual edits. Copy-paste errors. Follow-up emails.
There’s a better way to handle Google Form certificate creation.
With Certifier, you can turn form responses into an automatic certificate from Google Form—fully branded, personalized and sent by email. Whether you want to auto generate certificate from Google Form responses instantly thanks to our native integration, upload a CSV for a finished cohort or build advanced automations with Zapier, this guide walks you through all three methods.
If you’ve been wondering how to create certificate from Google Form without manual admin work, you’re in the right place, so read on!
TL;DR
The fastest way to auto generate certificate from Google Form is Certifier’s native Google Forms integration (via Sheets-powered automation).
You can also export responses and upload a CSV to generate certificates in bulk.
Use Zapier for advanced workflows like issuing certificates on conditional logic or multi-step triggers.
Clean data (Recipient Name + Recipient Email) is essential for smooth e certificate generation through Google Form.
How to generate certificate from Google Forms automatically (native integration)
If you want to know how to automatically generate certificate in Google Form, the answer is simple: connect Google Forms to Certifier once and let the automation run.
Certifier uses a Sheets-powered system:

Google Forms → Google Sheets → Certifier
Every new form submission creates a row in a connected spreadsheet. Certifier monitors that sheet and issues a credential for each new row. That’s your automatic certificate from Google Form.
This is ideal for:
Online quizzes and exams
Webinar registrations
Course completion forms
Event attendance confirmations
Ongoing student programs
If your goal is to automatically send certificates via Google Form, this is the cleanest setup.
Step 1: Prepare your Google Form correctly
Create a form with at least two required questions:
Recipient Name
Recipient Email
These are mandatory for any certificate generator Google Forms workflow.
Important: Start with a fresh form or clear old responses before activating automation. Existing rows in the connected sheet will be processed immediately.
Step 2: Link Google Forms to Google Sheets
Open your form → go to Responses → click Link to Sheets.

Choose Create a new spreadsheet.
Every submission now appears as a new row in that sheet. This sheet acts as the bridge for Google Form to generate certificates automatically.
Step 3: Create the automation in Certifier
Now you’ll connect that response spreadsheet to Certifier, so every new Google Form submission can trigger automatic certificate from Google Form issuance.
Log into your Certifier account and go to Automations → + Create Automation.
Select the Google Forms template, then click Use Template → Connect via Google Sheets. (Google Forms flows through Sheets, so this step is always part of the setup.)
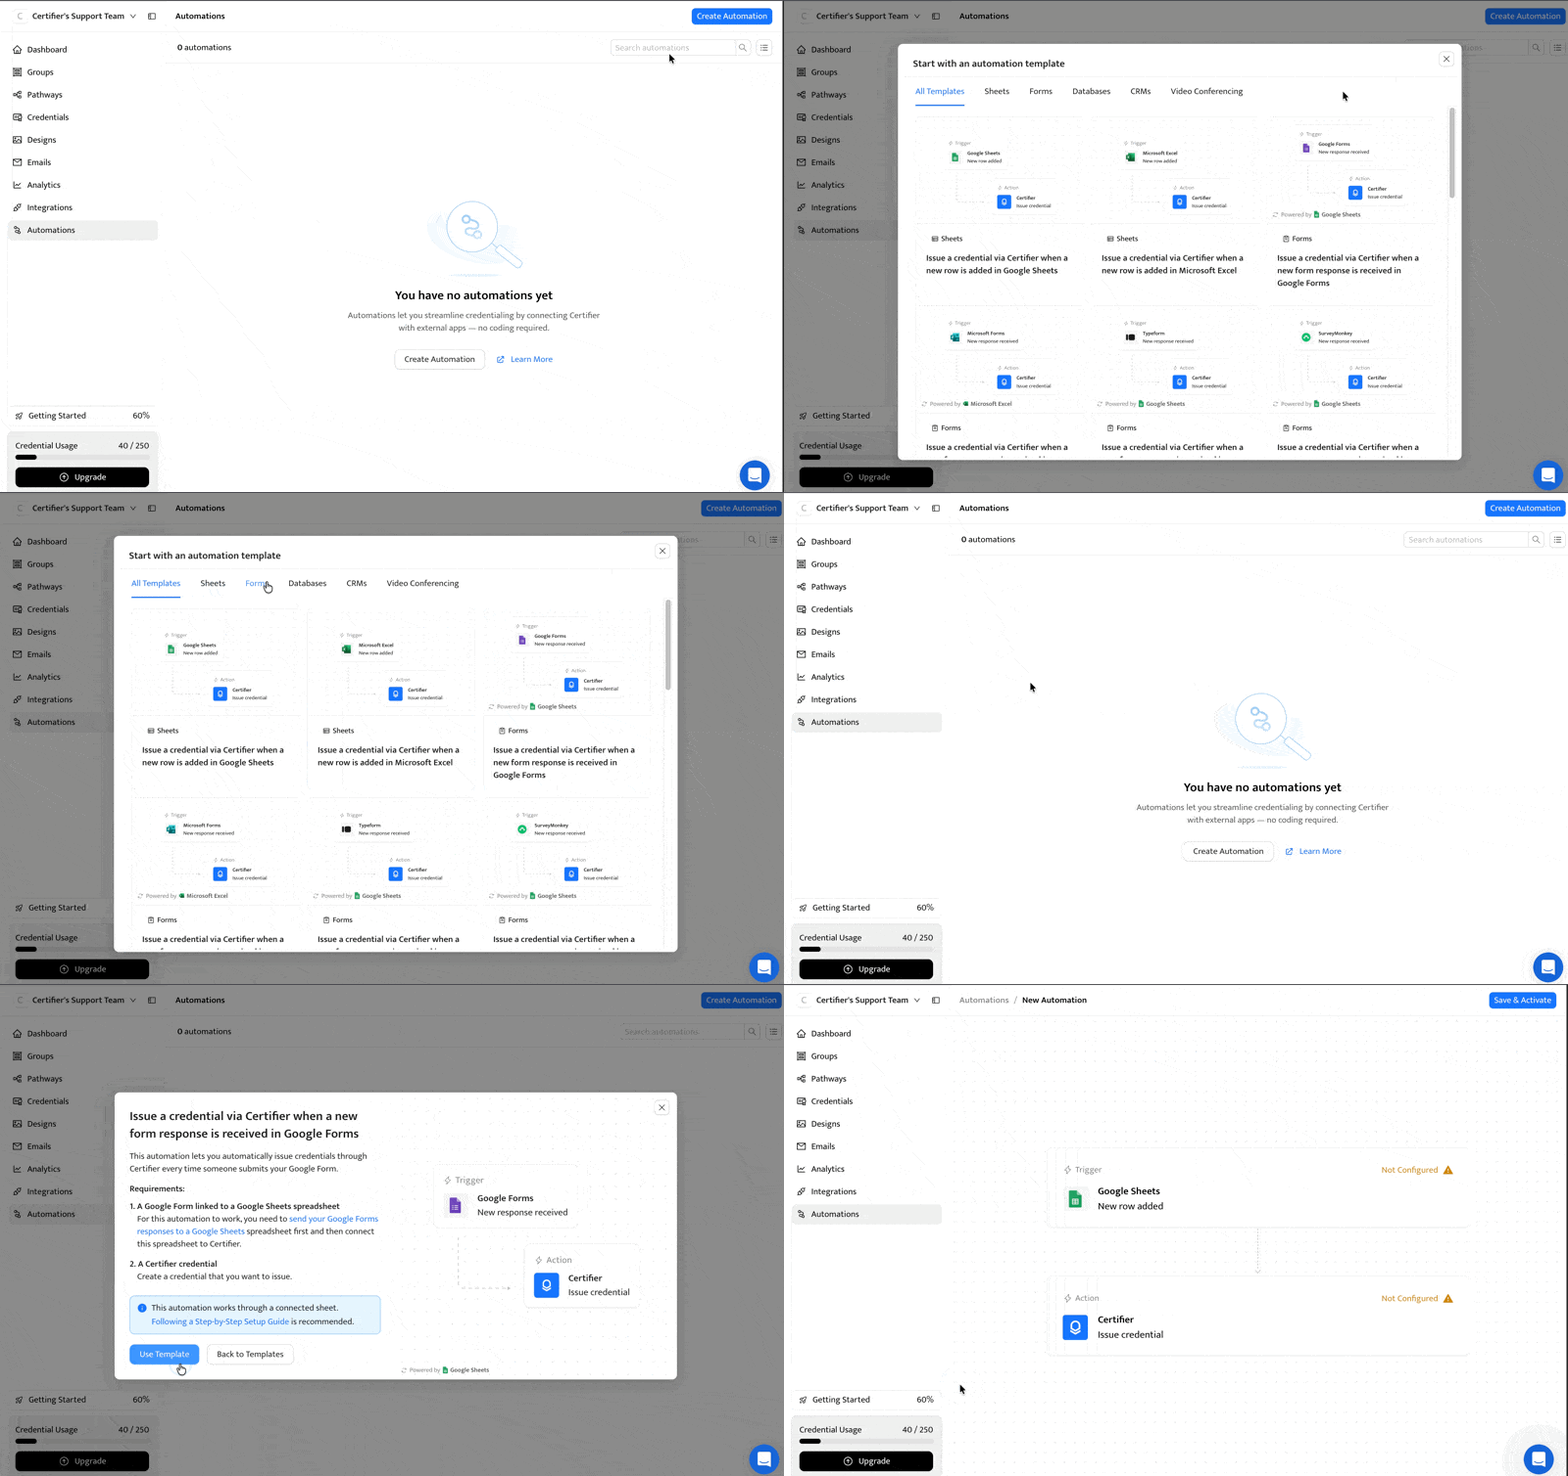
From here, you’ll configure the trigger Certifier uses to detect new responses:
01Click the Trigger card to open configuration.
02Connect your Google account via secure OAuth (click Connect Google Sheets, then Continue and Allow).
03In Spreadsheet ID, select the spreadsheet that Google Forms created in Step 2.
04In Worksheet IDs, choose the sheet tab where responses appear (usually the default responses tab created by Forms).
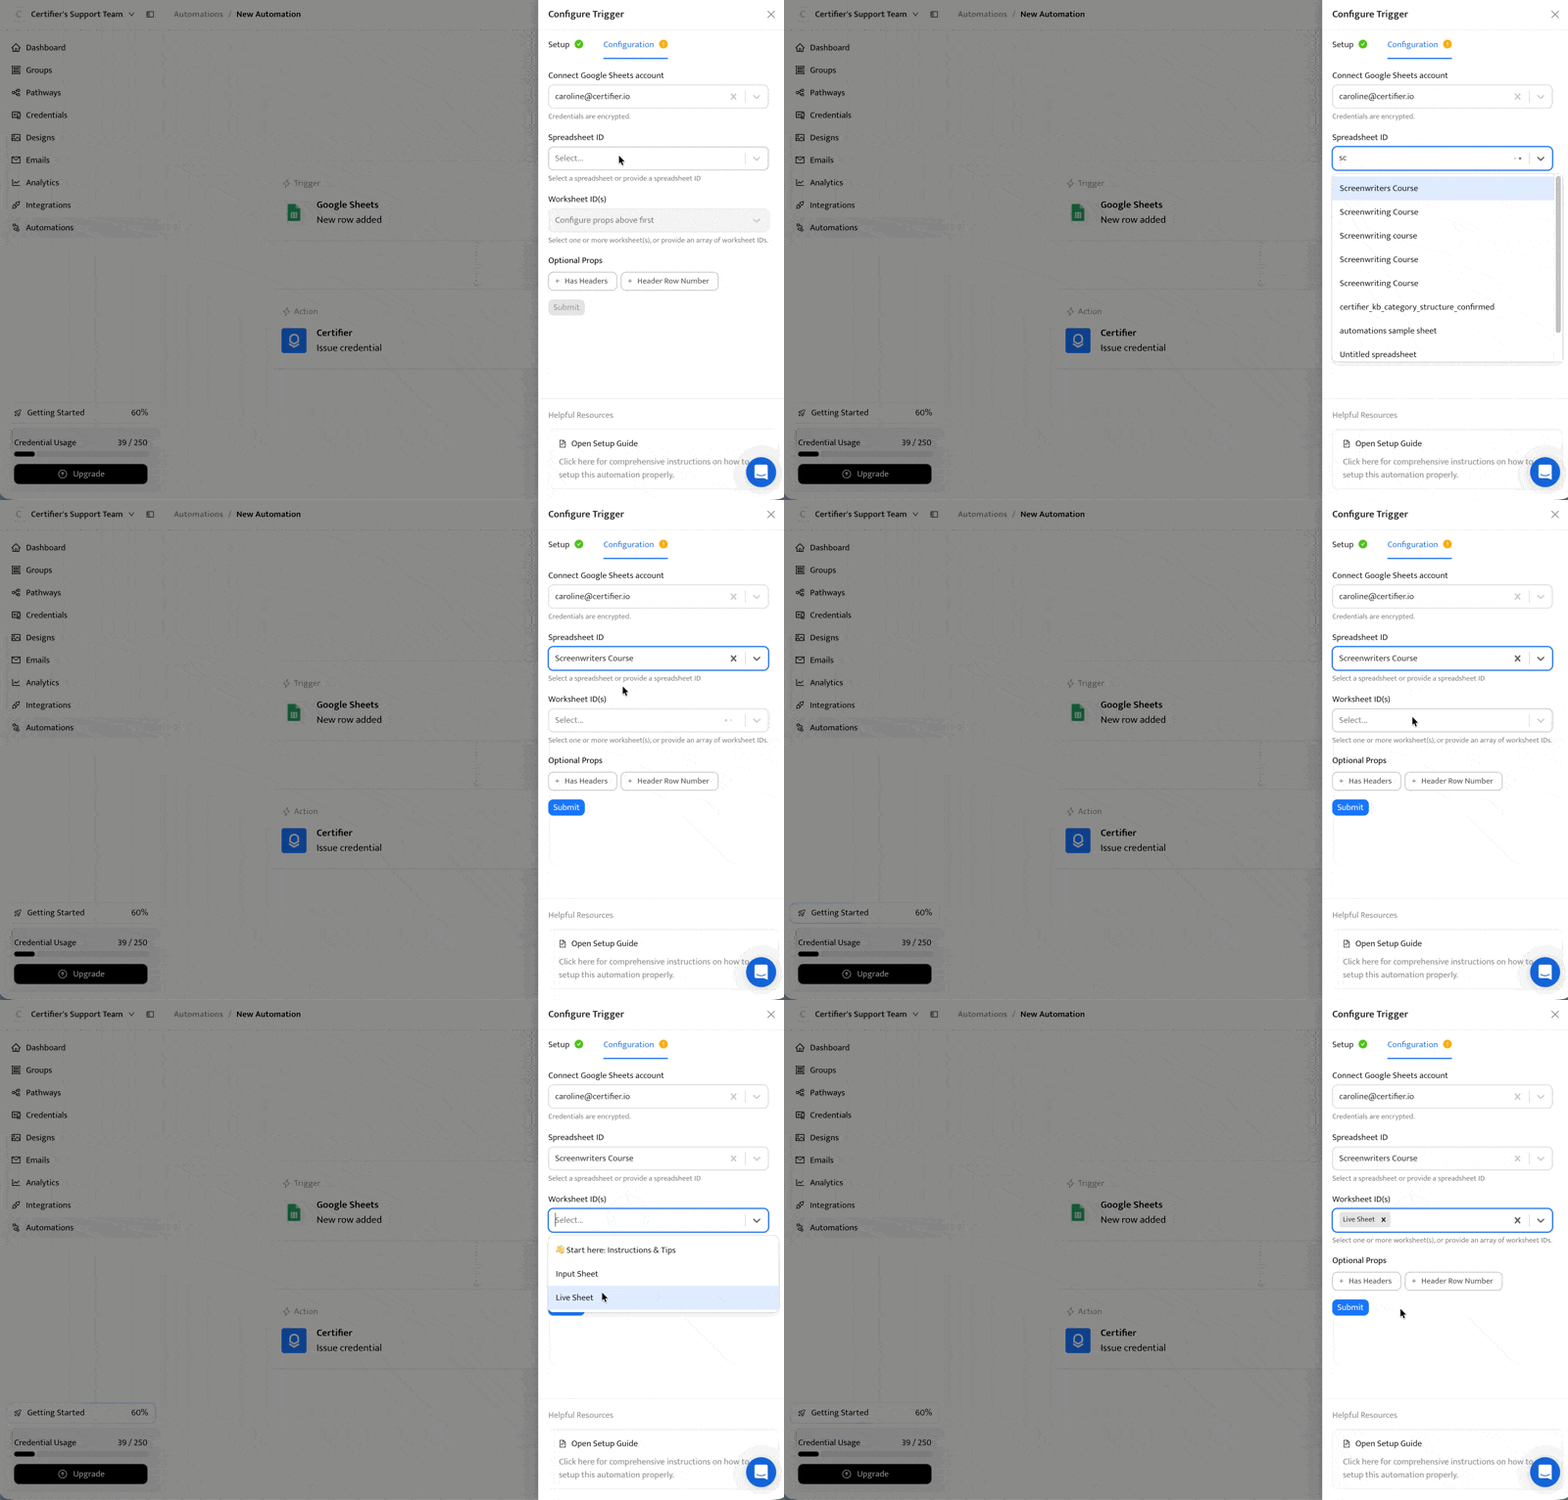
Click Submit to save the trigger.
At this point, Certifier is watching the sheet for new rows. Every new form response becomes the next candidate for issuing a credential, which is exactly what you want when you’re setting up e certificate generation through Google Form.
Step 4: Configure the Issue Credential action to get an automatic certificate from Google Form
Now you’ll tell Certifier what to do when a new form response appears.
Click on the Action card in the automation builder and choose:
App: Certifier
Event: Issue Credential
Press Continue to move to configuration.
First, select the Group.
This is important: A Group in Certifier contains your certificate design. If you haven’t created one yet, you’ll need to design your certificate first (logo, layout, dynamic attributes, etc.), then return to this step.
Next, map the required fields:
Recipient Name → connect it to the column that stores full names
Recipient Email → connect it to the email column
Both fields are mandatory. Without them, the automation won’t issue certificates.
Tip: You can also map optional fields such as course name, score, issue date, expiration date (use YYYY-MM-DD format), or any custom attributes you’ve created.
Finally, decide how certificates should be handled:
Issue immediately or create as drafts
Send automatically by email or publish without email
Tip: If you’re testing the workflow, set issuance to draft mode first. Once you confirm everything works, switch to automatic sending.
Click Submit, then move on to activation.
Need more detailed explanations? Check out our Help Center “How to Connect Google Forms to Certifier via Google Sheets to Automatically Issue Credentials” guide or watch this step-by-step video tutorial:
How to generate certificates from Google Forms via CSV upload
If you don’t need ongoing automation, CSV upload is the quickest way to generate certificate from Google Form responses in one controlled batch. It’s a solid option when you run a one-time quiz, a short training or a single webinar and want to review the list before sending anything.
Use this method if you:
want to issue certificates only after you’ve checked the responses
have a fixed set of recipients (no new submissions coming in)
need to generate certificates for a past form
prefer a straightforward, manual workflow.
Here’s how to auto generate certificate from Google Form responses using a CSV file.
Step 1: Prepare the answers to auto-generate certificate from Google Forms
Google Forms automatically stores responses in a Google Sheet. Open that sheet and clean it up before you export anything.
Keep the essentials:
Recipient Name
Recipient Email
You can also keep extra columns for certificate personalization, such as grade, teacher name, number of hours or issue date—anything you want printed on the certificate.
Tip: Exported response sheets often contain unnecessary columns. Delete anything you won’t use. Cleaner data makes Google Form certificate creation faster and reduces mapping errors later.
Step 2: Download the data as a CSV
In your response spreadsheet, go to File → Download → Comma-separated values (.CSV).
Now you have a file ready for e certificate generation through Google Form data—just without the ongoing automation.
Step 3: Log in to your Certifier account
Log into Certifier (or sign up for free if you don’t have an account yet).
You’ll generate and send certificates from a Group, so the next step is choosing the design you’ll reuse for the batch.
Step 4: Choose a certificate template (or make one from scratch)
Pick a certificate template from Certifier’s library and customize it with your logo, colors, signatures and any dynamic fields you want to populate from the form responses.
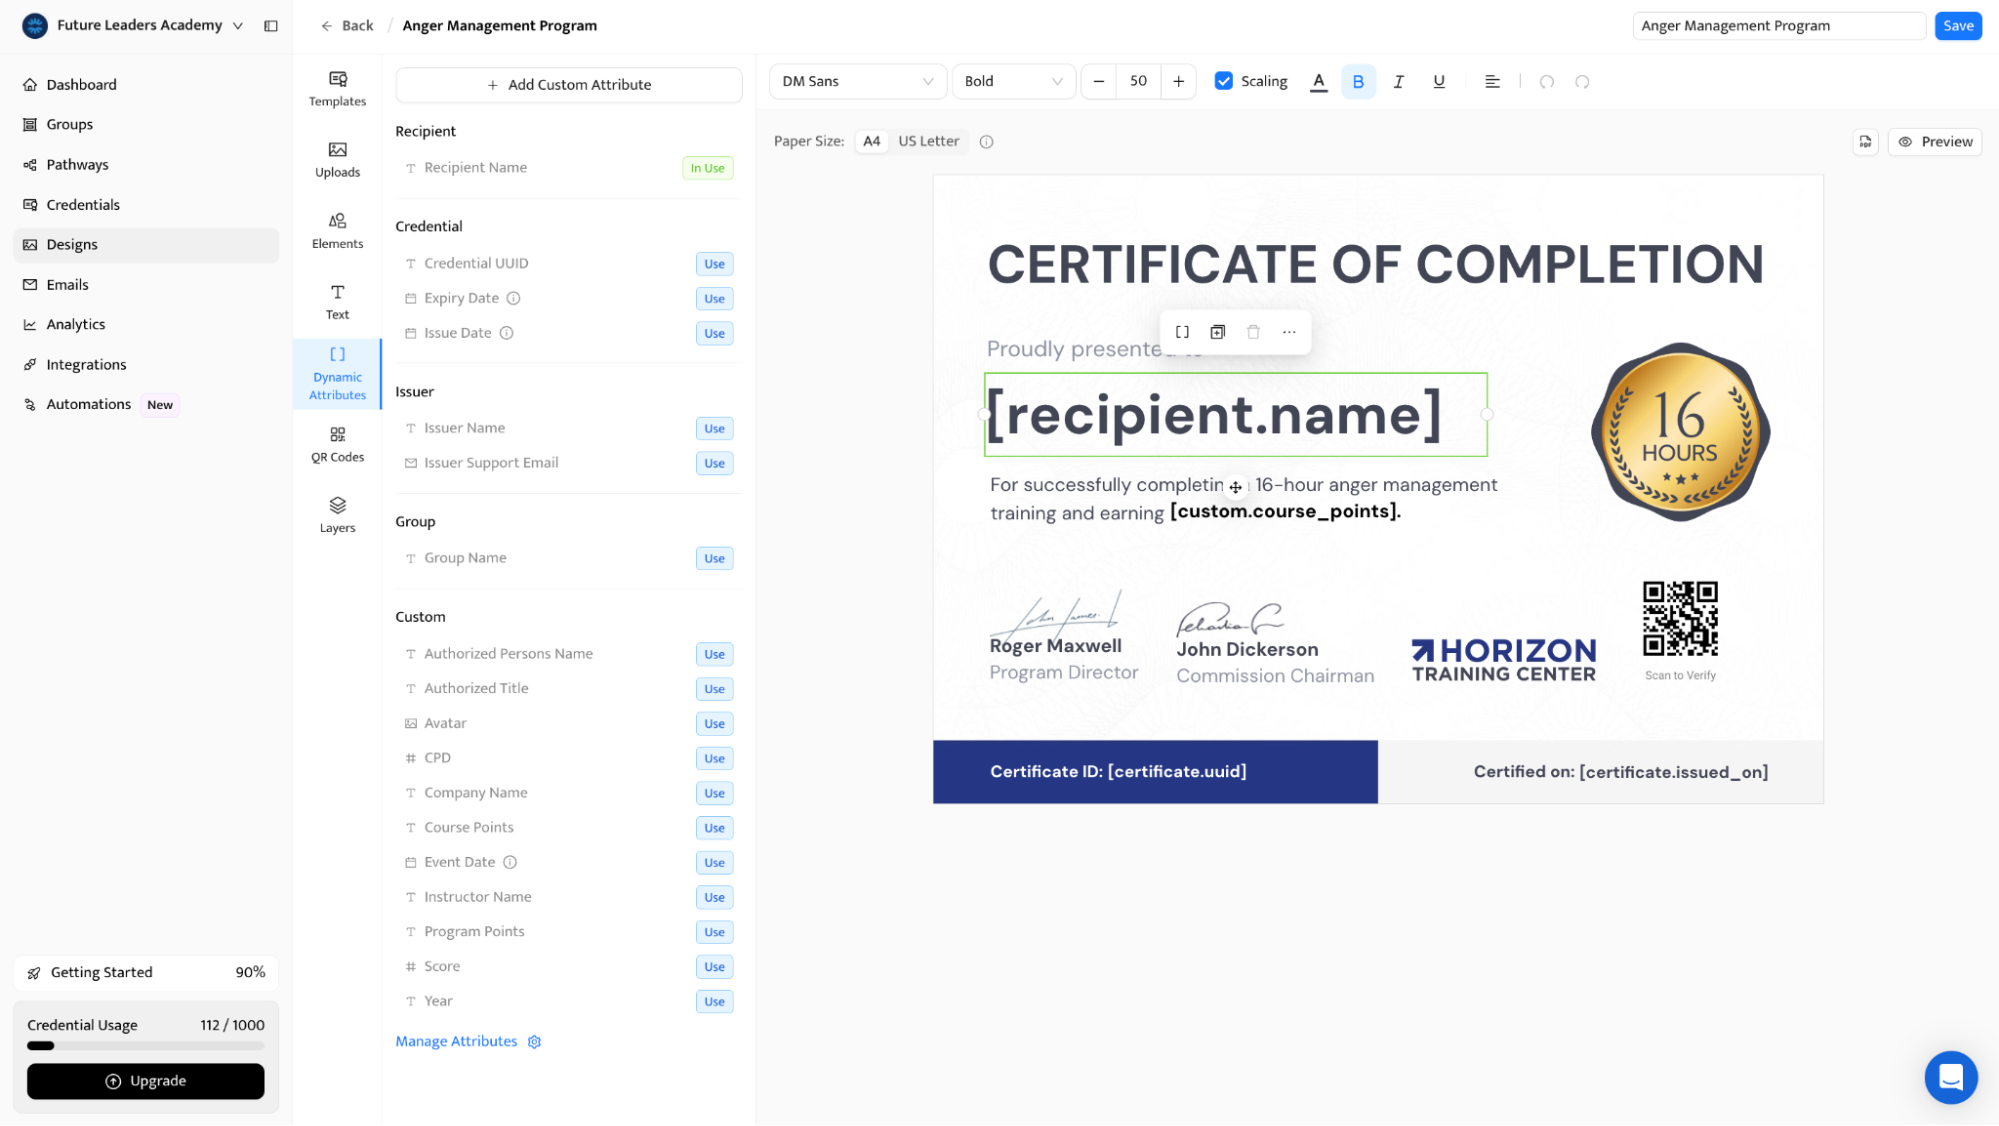
This is where Google Form to generate certificate becomes practical: you design once, then Certifier fills in recipient details automatically from your CSV.
Step 5: Upload the CSV list to auto generate certificates
Go to Create a group in Certifier, name it, select your template and create the group. Click on Issue Credentials, select your group and choose Upload via spreadsheet.
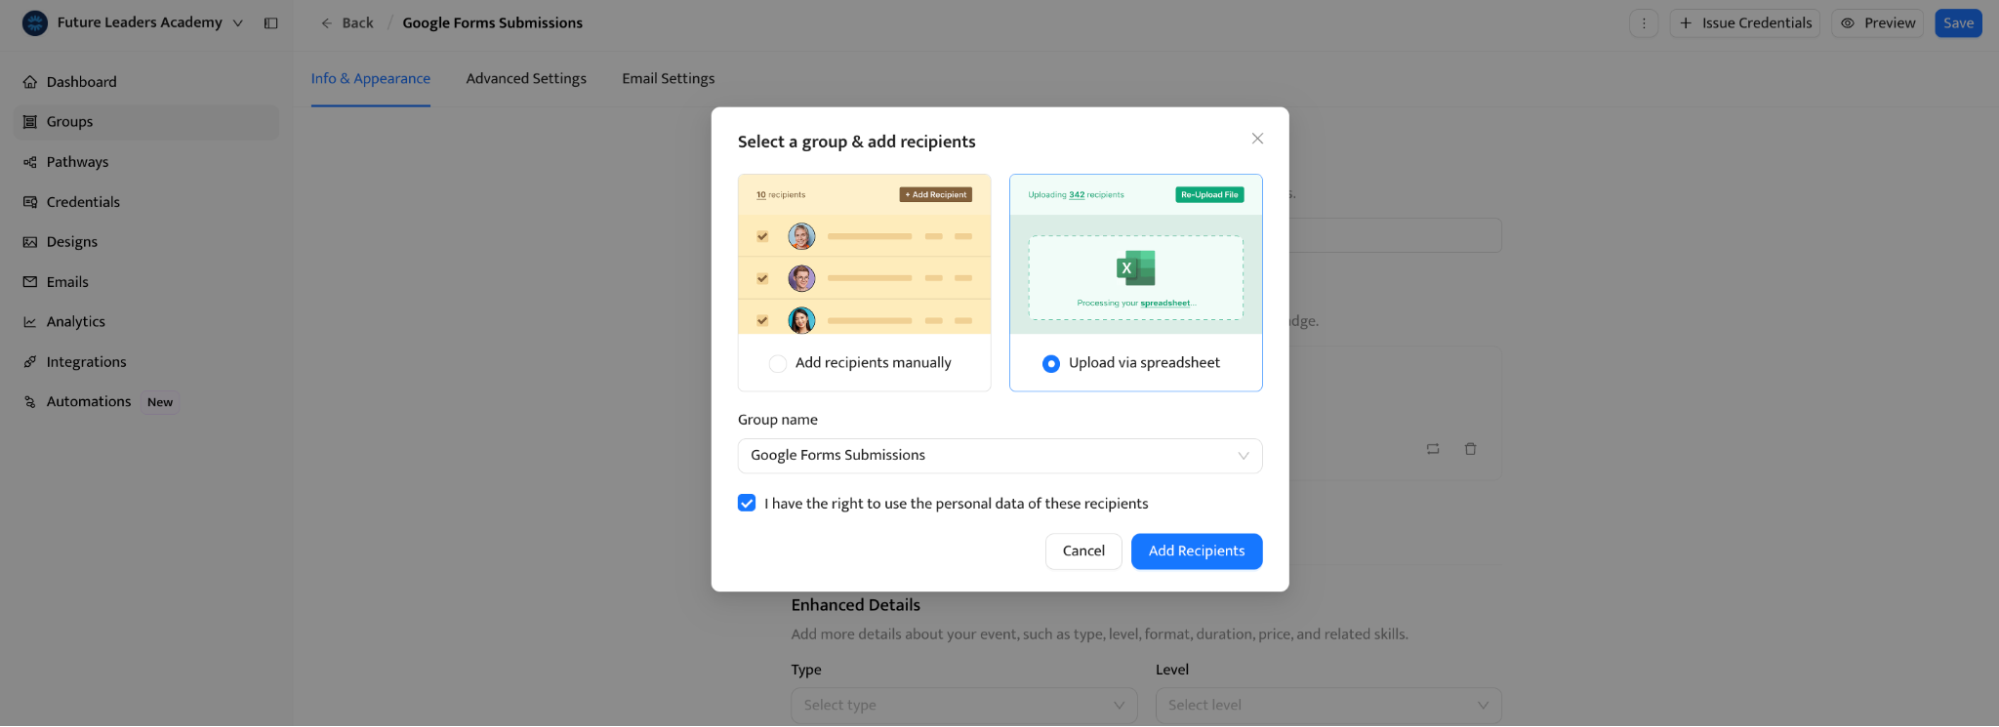
From there, you can upload your CSV file and map spreadsheet columns to certificate fields. Make sure name and email are mapped correctly—those two fields determine whether certificates can be issued and delivered.
Step 6: Send certificates to the recipients
As the final step in how to create e certificate from Google Form, click Save and Publish Certificates. Certifier will send certificates by email automatically, and you can customize your email template with your own branding.
That’s it. CSV upload is the simplest way to how to generate certificate from Google Form responses when you want batch control—without setting up an automated flow.
Would rather follow a video tutorial instead? Watch this short YouTube video to see the process step-by-step:
How to automate generating personalized certificates with Google Form and Zapier
The native integration covers most use cases. But sometimes you need more control.
Maybe you only want to generate certificate from Google Form if the student scored at least 80%. Maybe certificates should be issued only after payment clears in Stripe. Or perhaps form submissions need to update a CRM, notify your team in Slack, and then trigger certificate delivery.
That’s where Zapier makes sense.
Zapier integration with Certifier lets you build multi-step workflows around your Google Form certificate creation process. Instead of “new response → issue certificate,” you can create logic like:
New form submission → check score → issue credential only if passed
New submission → wait for admin approval → issue certificate
New submission → process payment → issue certificate
New submission → issue certificate → add recipient to email sequence
If you’re wondering how to create automatic certificate in Google Form with conditional logic, this is your answer.
You’ll need:
A Google account
A Certifier account
A Zapier account
Here’s how to set it up.
Step 1: Create a Zap with Google Forms as the trigger
In Zapier, click Create Zap.
Choose Google Forms as the trigger app and select New Response as the event. Connect your Google account and test the trigger to make sure Zapier pulls recent submissions correctly.
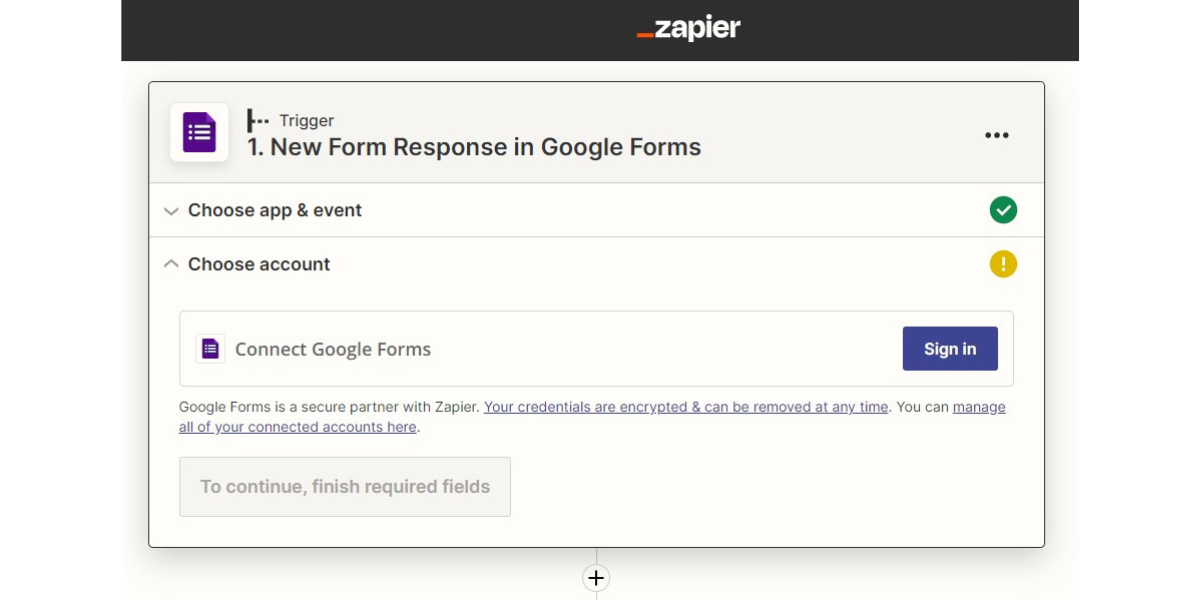
This tells Zapier when a new form response should enter your automation.
Step 2: Add Certifier as the action
For the action step, choose:
App: Certifier
Event: Issue Credential
Connect your Certifier account using your access token.
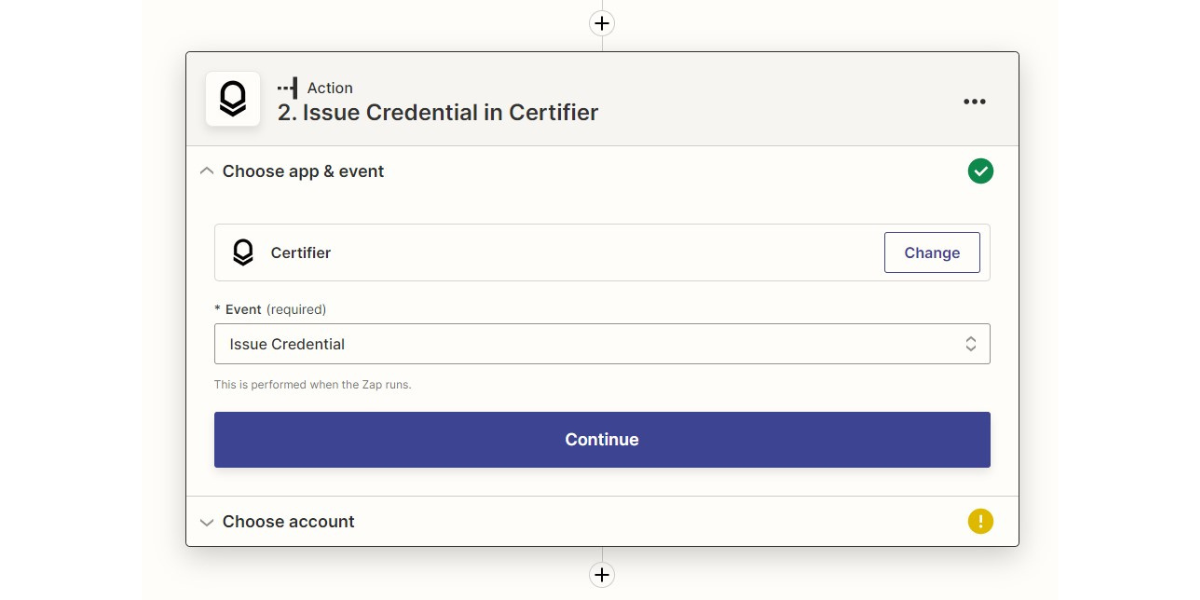
Map:
Group (your certificate design)
Recipient Name
Recipient Email
Any custom attributes (score, course title, date, etc.)
Tip: If needed, add filters or additional steps between the trigger and the action. This is what transforms a simple submission into structured e certificate generation through Google Form logic.
Run a test. If the test certificate appears in your Certifier dashboard, turn the Zap on.
From then on, your workflow handles submissions exactly the way you defined it. This is the most flexible way to automatically generate certificate in Google Form when your process goes beyond “every submission gets a certificate.”
Would rather use Pipedream or Make? Certifier integrates with those connector apps, too—so you can build advanced automated Google Form certification workflows using the usual software.
Deliver individual certificates in minutes with Certifier
Now you know how to generate certificate from Google Form using three methods:
Native Sheets-powered automation (best for continuous issuance)
CSV upload (best for one-time batches)
Zapier integration (best for advanced workflows)
If your goal was to learn how to auto generate certificate from Google Form without spreadsheet chaos, the native integration is the most efficient route.
Set it up once. Collect responses. Let Certifier issue the credentials automatically.
Sign up to Certifier for free and turn Google Forms submissions into professional digital certificates in minutes.
FAQ: Generate certificates with Google Forms
Here are the most frequently asked questions on how to generate e certificate from Google Form.


