


Trusted by:
University of Southern California
Warner Bros.
Volvo
Amazon
Stanford University
Updated: April 21, 2026
13 min read
Don’t put your artwork in question! Are you an artist who wants to secure their work? Issue a certificate of authenticity, and sleep soundly, knowing that nobody can fake your masterpiece. Or maybe you are a collector? Don’t wait, protect your art in 8 easy steps.
Research with AI:
Experts estimate that around 50% of works on the market are fake. With so much art that isn't what it seems, how can artists and collectors ensure authenticity?
A certificate of authenticity (COA) is the answer.
It proves an artwork's authenticity and value over time. Let's explore why every piece of artwork needs a COA, and we will show you how to create a certificate of authenticity to protect and verify your art.
A certificate of authenticity, often called a COA, is a must-have for any artist or collector. It's an official document that confirms authenticity. When somebody buys a piece of art, this certificate serves as proof that the art was created by a certain artist.
As you now know, it is said that half of the art is faked. A COA sets your mind at ease. Both the value and authenticity of the art are then maintained, and it keeps trust between artists and buyers.
Many elements make a COA valid: the name of the artwork, the artist’s name, when and how it was made, the type of canvas, its size, the QR code, the certificate ID, and more. Artists frequently use certificate templates to ensure they don't miss any important details that are crucial for certificate validation.
Scroll down for a handy checklist of what elements must be included to create certificate of authenticity.
🧑🎓 Interesting fact: The problem of faking documents is also common in the academic world. Check out how to verify a degree in a few easy steps.
This certificate is going to be your official mark of authenticity, so make sure it’s all buttoned up. We will help you to walk through the whole process so you’re not left alone in the dark on how to create a certificate of authenticity.
Creating a certificate of authenticity begins with picking the right template.
Certifier has plenty of templates that you can customize for different types of certificates. Each template upholds all standards of high-quality printing, keeping in mind that you might want to attach a printed statement of authenticity with your art print when you ship it.
Your certificate of authenticity can look just like this:

With our design builder, you can freely change the position of the elements, and also alter color, fonts, and more. The layout is all up to you.
To start, sign up to Certifier, and pick your template, you can tailor it to suit your artwork. With us, your certificate not only looks good but is also ready to accompany any piece of art you're planning to sell or ship.
Choose one of the authenticity certificate templates and adjust the layout as you wish.
Customization is optional, but why not add some sparks to them? Make a certificate of authenticity truly yours. Add your company’s logo or your signature – you can go with digital one, use a font that look like a signature or upload a scanned version of the signature in PNG format. It's a great way to make each custom certificate of authenticity feel even more personal.
The signature on a certificate of authenticity isn’t just a formality – it’s a personal touch that reflects the artist's identity. It stands as a stamp of approval and authenticity from the creators themselves. That's why we encourage you to make the most of this feature.

Also, make sure all the elements, such as logos and text, are visible and arranged nicely on your certificate. If you seek for more guidance, check out how to design a certificate step by step.
🖨️ If you’re planning to send the physical copy and find a regular printer paper boring or unsuitable, go for a non-standard paper option. But be careful. Make some samples before to check the final look of your printed copy. Also, double-check if your type of printer accepts the paperweight of your choice. And don’t forget to sign the certificate before sending it.
Do you want to sign your certificate? Certifier gives you the option to include a digital signature. You can scan your handwritten signature and add it to the COA, or you can choose among the fonts that resemble handwriting.
Dynamic attributes are placeholders that automatically fill with specific information for each certificate.
At Certifier, you can easily create special attributes for artist's name or the artwork title. Bur before adding them, choose your template, and adjust it, so you’re happy with the design. Then, in the Designs tab, select Attributes and click + Add Custom Attribute. Create those that you need, for example:
[custom.artwork_title] [custom.artist_name] [custom.artist_signature]
Also, add the common attributes like:
[credential.issued_on]
[certificate.id]
[certificate.uuid]
This is where the dynamic attributes can be found:

A quick checklist of the custom attributes you may want to create for your COA:
Artist’s name – use [custom.artist_name] to automatically include the name of the artist who created the artwork.
Artwork title – [custom.artwork_title] can automatically pull in the official name of the artwork from your data file.
Date of creation – [custom.creation_date] specifies when the artwork was created.
Medium used – with [custom.medium_used], brokers can see what materials were used to create the artwork.
Dimensions of artwork – [custom.dimensions] lets you specify the size of the artwork.
Signature of the artist – [custom.artist_signature] holds a digital image of the artist’s signature.
Certifier helps you easily input these details into your certificate template. You only need to set up these custom attributes once. After that, every time you upload a new CSV file with the artwork details, Certifier automatically places the right information into each certificate.
🎨 TIP: The [recipient.name] attribute (a mandatory one) can be used to insert the name of the art owner or the title of the artwork if you prefer not to name the owner directly.
Don’t forget to add a unique certificate ID attribute. The certificate’s special number makes it unique and helps art dealers and collectors confirm that the artwork is an original piece.
So, instead of spending hours filling in or copy-pasting the details, you set all the attributes with the necessary details once, and they’re ready to go.
It's easy to add a QR code to your COA certificate process using Certifier. It takes only four steps.

Pick a template that fits the professional look you're aiming for.
Use the design tools to add a QR code to the certificate. You can position it wherever you like, just make sure it’s not over any text or busy backgrounds to keep it easily scannable.
You have options to change the color of the QR code to match your branding.
The QR code can link to a page that verifies the certificate. It could be a simple verification page or any other page that provides further details about the authenticity of the artwork.
📱 QR code certificate verification makes it very fast to verify the authenticity. When someone scans the QR code with their smartphone, they will be redirected to a webpage that confirms the certificate's validity in a few seconds – it takes only one click.
This is how it looks:
 05 Prepare for certification
Before the recipients get the authentic certificates, prepare a new credential template in Certifier, adding the people for whom you want to issue certificates. Then, create a spreadsheet with recipients’ details like names, emails, and any other relevant information.

Once your data is uploaded, map your recipients' data to the dynamic attributes in your certificate template.
Even if you're not using Certifier’s automatic distribution feature, you can still download the certificates directly. Just skip the column while mapping out the attributes for bulk sending and start downloading right away.
Next, you can preview the certificates to ensure everything looks right.
Not a must, but worth considering.
Why?
Having an expiration date on your beautiful certificate can help manage the validity of the certificates over time. However, even after a COA expires, it remains accessible via a unique certificate link that you can share online. COA will indicate that the art is no longer valid, but the business details and links to your website or social media pages will still be visible to all visitors.
📅 Please note: The expiry date may turn every COA into a lasting promotional tool. If a buyer shares their expired COA on social media, it can be used as a marketing tool for you as an artist, collector, agent, or broker.
Having expired works displayed online keeps your business in the public eye and can attract new potential buyers long after the original COA has expired.
To access this feature, the only thing you need to do is to use the toggle switch as shown below. Go to the Credential Templates and you’ll find the option right after you open the settings.
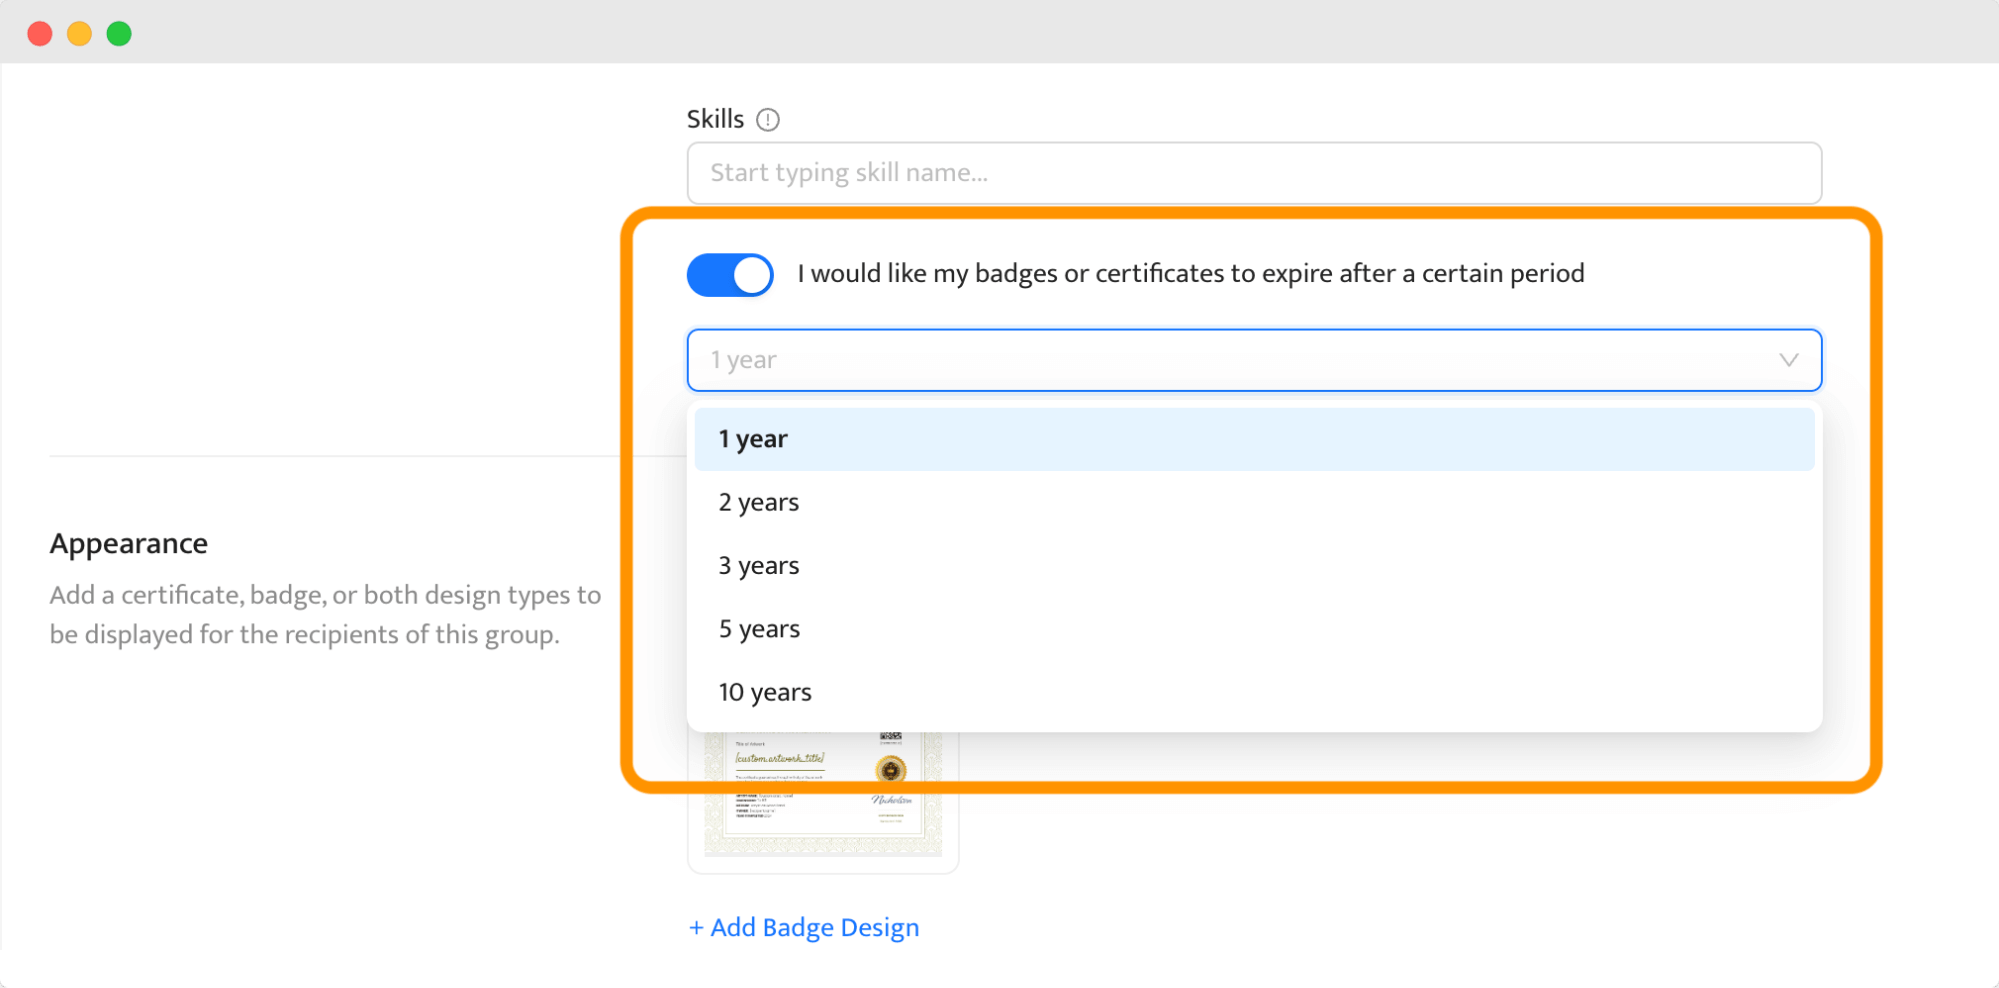 Once you choose the period, it’s possible to set up an automatic email two weeks before it expires to remind buyers about it. They will get a message on the expiration day as well.
Certifier allows you to personalize not only the certificate itself but also the email template in which it is sent.
You can customize the email to match the specific art piece or the buyer's preferences. Personalized emails add an extra layer of prestige for high-end, exclusive artwork. It creates a concierge-like premium experience for anyone purchasing your artwork.

As an art creator or art connoisseur, you know that details are something that matter. And when talking about how to create a certificate of authenticity, the personalized email is just as important.
This process may feel overwhelming at first, but it becomes easier if you use the right tools. For example, Certifier helps you manage both distribution and result tracking.
First, decide if you want to provide a printed certificate of authenticity along with the artwork. Many collectors appreciate having a physical document. If you opt for the digital credentials as well, set up Certifier to send the digital COA directly to the buyer’s email once the package arrives.
After you distribute the COA, use Certifier’s tracking tools. You can see when the COA was delivered and when it was opened by the buyer. Then, you see the records and provide follow-up if needed.
📊 Please note: Tracking helps you understand how buyers interact with their digital certificate of authenticity, so you can improve customer service and follow-up strategies based on that.
If you are a professional artist, collector, agent, or broker, then absolutely yes. It proves that the art is genuine. And good news is that you can make your own certificate of authenticity with the tools available.
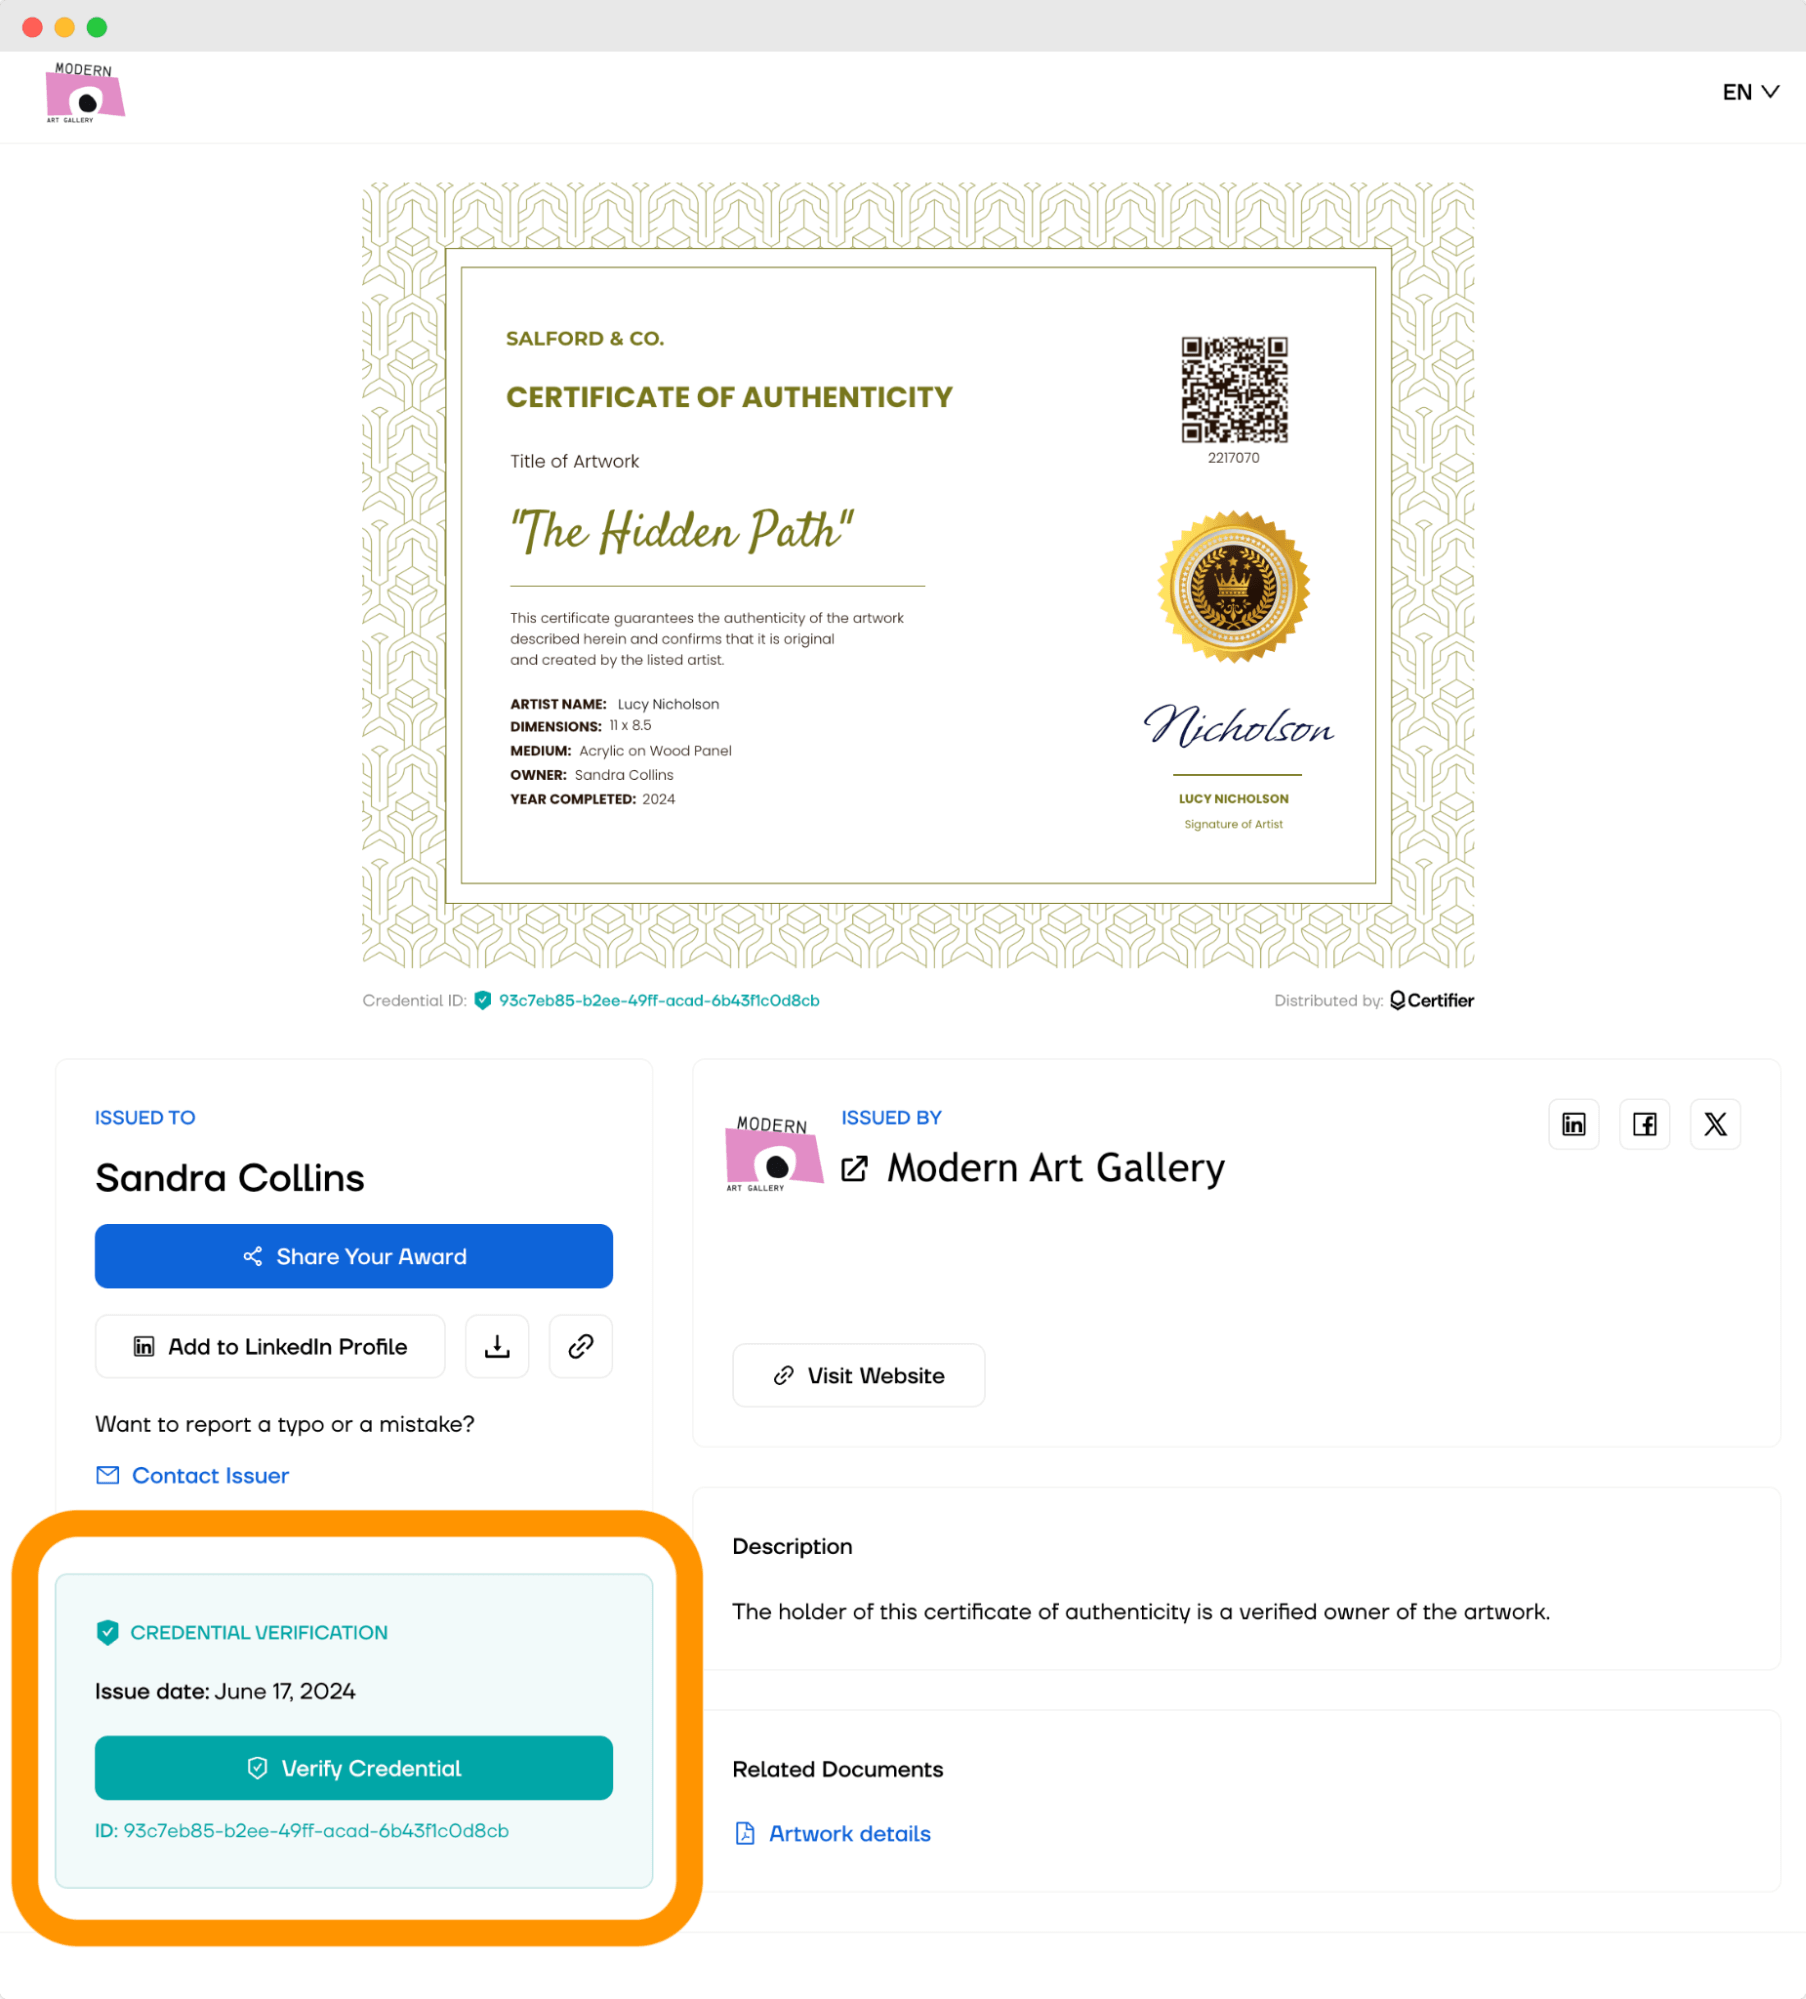
You can verify your custom certificate of authenticity with just a single click to check issuer status and credential validity. It’s a super handy way of doing it.
Certifier does exactly this. You click once and see the status. You can find this option in Certifier’s digital wallet, a secure place for storing documents. Users are redirected to the wallet after scanning a QR code on the COA. Then, they see the verification button (1), just as below:
 Certifier’s digital wallet comes with:
One-click verification. Each certificate stored in the digital wallet comes with a unique link or a QR code. Anyone wishing to verify the certificate can simply click on the link or scan the QR code. It takes them directly to a verification page that confirms the authenticity of the certificate.
Personalization. You can customize how the wallet looks, including adding links to your website or social media pages. At the same time, the customization makes the wallet a powerful tool for promoting your work or business even after the certificate has been issued.
Easy access and shares. The digital wallet is accessible 24/7 from anywhere. Recipients can download their certificates in various formats, such as PNG or PDF, and share them directly on social media, for example, LinkedIn using a social media button. The credentials are viewed in the preferred language.
PDF attachments. In Certifier's digital wallet, you can include some essential documents that accompany the artwork. The recipient can then easily download them from the wallet whenever needed.
Problems report. If there are any problems with the certificate of authenticity, the artwork owner can easily let you know. Then, you can handle the inquiry within the Certifier dashboard.
And top of that, the digital wallet goes with safe hosting. Certificates are hosted on a secure SSL-protected platform, and both the data and access remain protected against unauthorized use. Issuers can even host credentials on their own branded portal or domain.
When you issue a certificate of authenticity, here's what you should always include to make sure it's a genuine certificate. Use this checklist whenever you issue COA:
Artist's name – who created the artwork
Title of the artwork – the official name of the piece
Date of creation – when the artwork was made
Artwork dimensions – size of the piece
Medium used – materials used in the artwork
Edition number if applicable – for prints or limited editions
Signature of the artist – authenticates the document
Additional information – such as location of creation or unique identifiers
Contact details – how to contact the artist or gallery
Credential ID – the unique identifier that provides a high standard of security. The unique code helps verify each certificate's authenticity (especially when generating thousands of credentials). At Certifier, each COA has its own unique certificate ID, its own QR code, and its own digital wallet. Everything is secure and traceable.
Choose only the ones that apply to you and the art (the ID code is a must, though). Including all of them may make your certification cluttered and hard to read. And don't forget to take advantage of dynamic attributes.
Now you know how to make a certificate of authenticity to protect your masterpiece. Use it to tell everyone who is interested that the artwork is real and protected from being copied unfairly.
Also, it brings additional value to the buyers.
So take your time, check out Certifier, and ensure that every art piece you sell has a certificate offering proof of its authenticity!
Got a question on how to make certificate of authenticity? We just might have all the answers.

Content designer. At Certifier, Ola crafts user-friendly content that makes complex information easy to grasp.