Trusted by:
Updated: January 19, 2026
9 min read
How to Create Certificates in Google Docs
Discover the quickest way to create certificates in Google Docs (and not lose all your patience). Here’s the guide.
Google Docs might not be the top choice for creating online certificates. Yet, its accessibility and user-friendly interface make it a popular choice for many. If you are loyal to one tool but still value your time, we guide you on how to create certificates in Google Docs in less than 10 minutes. Come along.
What if there is a faster method?
Google Docs became a daily necessity for work tasks. But when it comes to certificate creation, imagine a tool designed specifically for that purpose. Without taking away Google Docs' good points, Certifier streamlines the process and provides a super intuitive certificate editor. Try an amazing tool – Certifier and see if it boosts your certificate-making experience (we're sure it does!).
Create and Send Digital Credentials

5 Simple steps to create certificates in Google Docs
So, you've decided to create a simple certificate using Google Docs from scratch? Our simple guide helps you along the way.
See how to make a certificate in Google Docs:
Step 1: Set the base
Step 2: Create a certificate border
Step 3: Fill out the certificate with content
Step 4: Add signatures
Step 5: Finish with logo
Before you begin, take a moment to look for inspiration to create a Google Docs certificate. A quick Google image search for "certificate designs" can provide a variety of options. Pick a few that resonate with you and keep them handy. Keep in mind that the goal is to capture the occasion and the recipient's accomplishment.
Tip: If you want to use a certificate template, you can choose one from the Certifier gallery. There are hundreds of professionally designed templates (fully customizable) to download. With a Google account, you have access to Google Slides as well. Download the template in this format. Here is the guide on how to do certificates in minutes.
Step 1: Set the base
Open Google Docs. Start with a brand-new Blank document.

Click on the title in the upper left corner to give your document a descriptive name. It’ll be easier to identify later on.
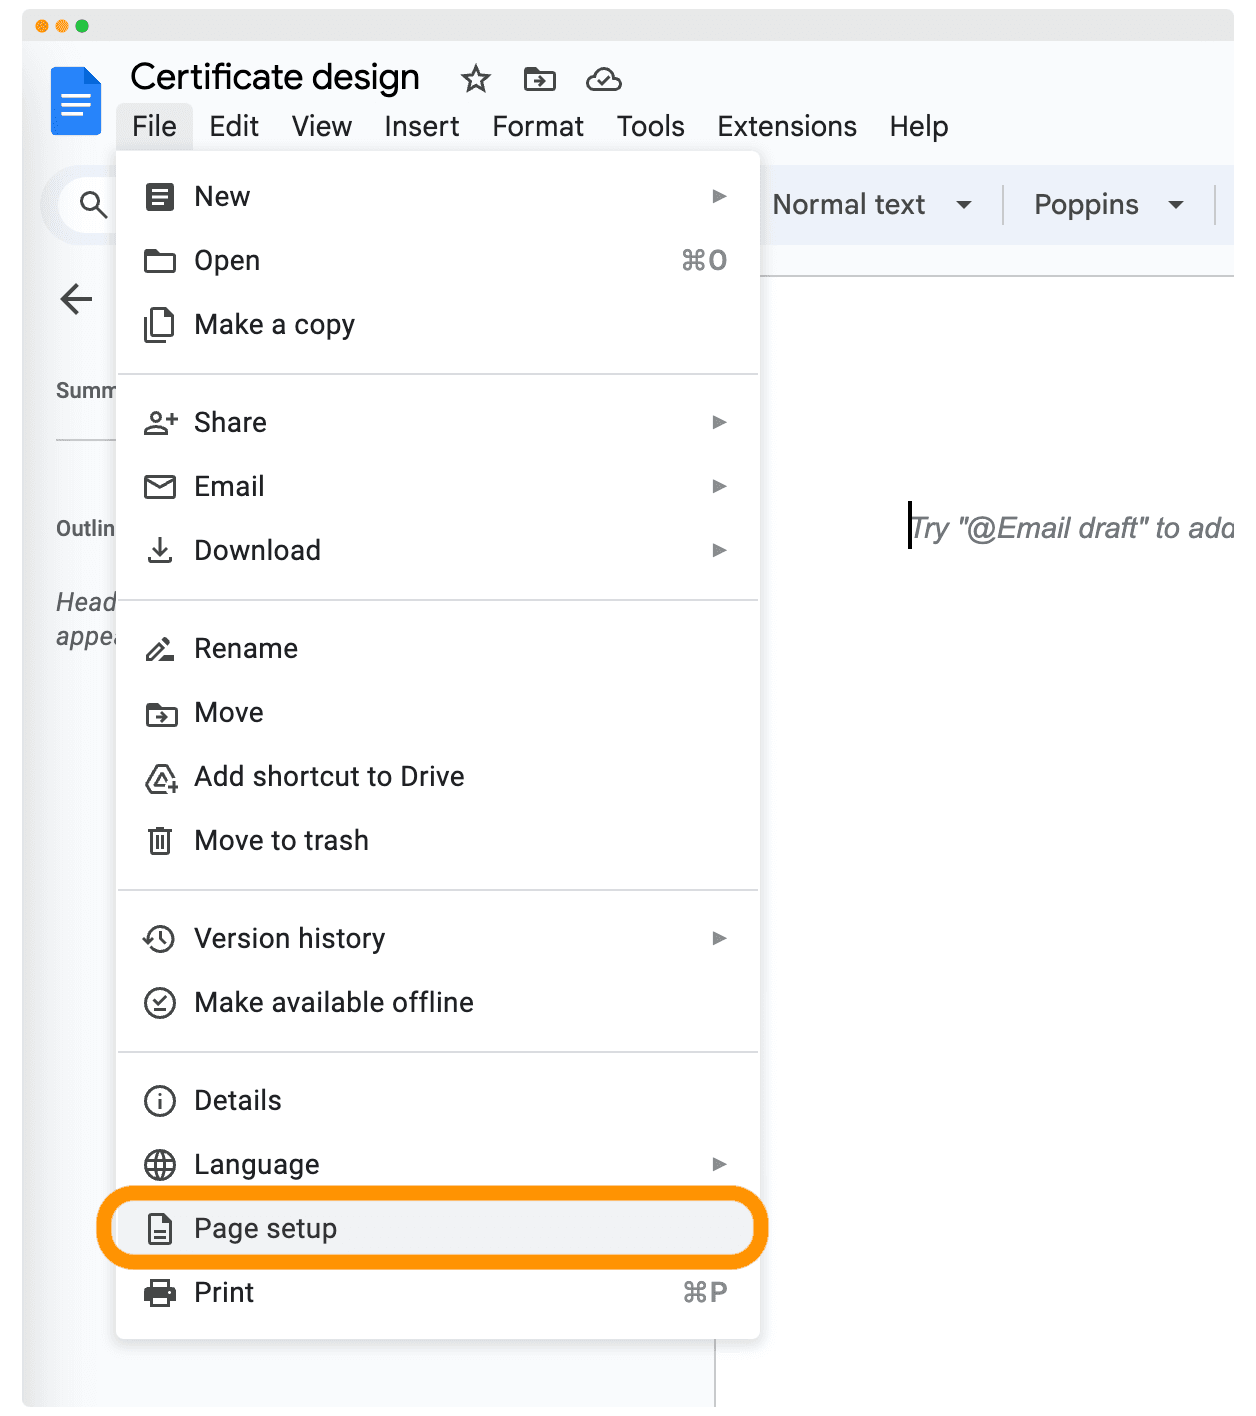
Most professional design certificates are in landscape mode. To switch, go to the menu bar and click File > Page setup.
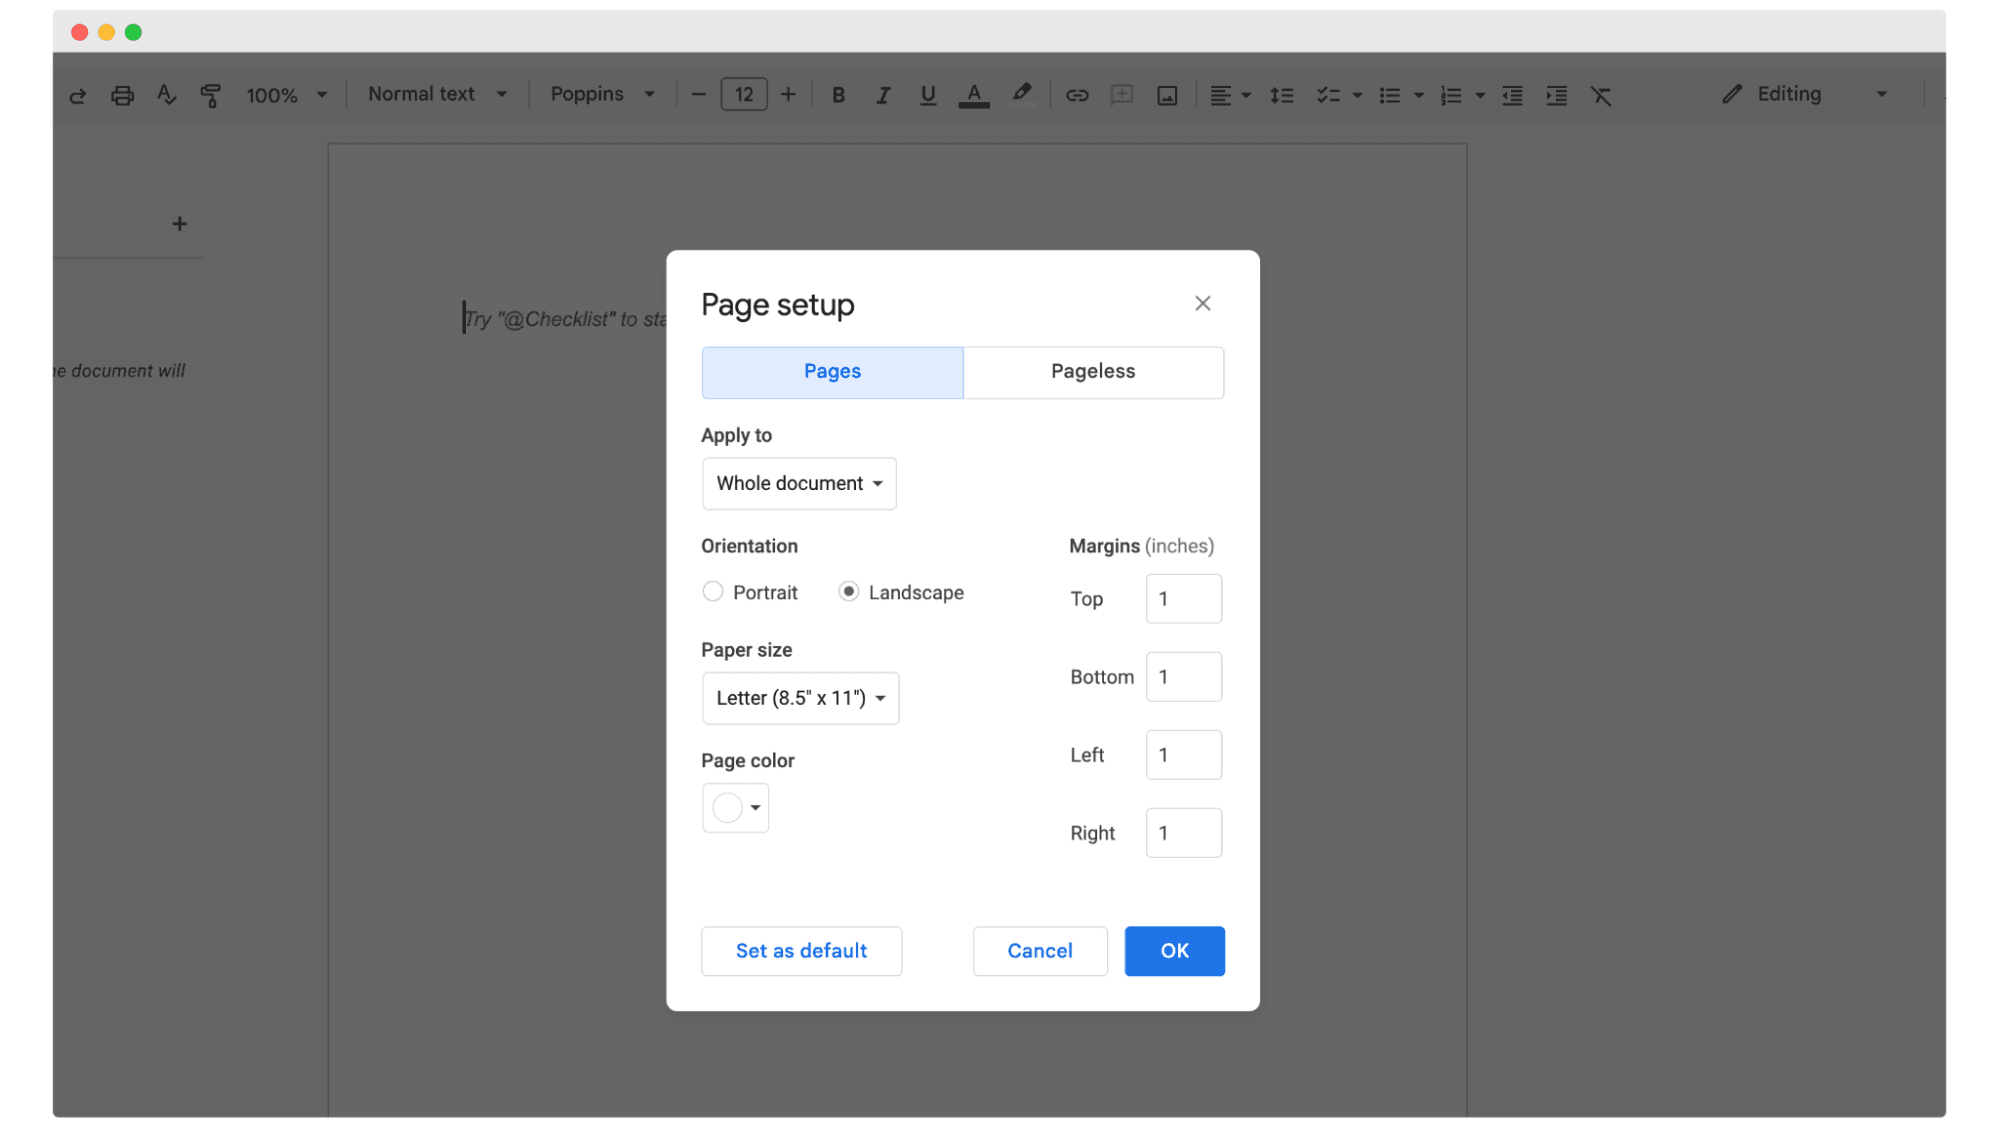
Select Landscape. Select the certificate size according to whether you want a Letter (US) or A4 (Europe) certificate. While you're there, you can also adjust margins if needed.
Step 2: Create a certificate border
A certificate without a border is like a cake without icing. Here's how to add that essential frame. Google Docs do not have a strong point for intricate borders, but there is a way to make some.
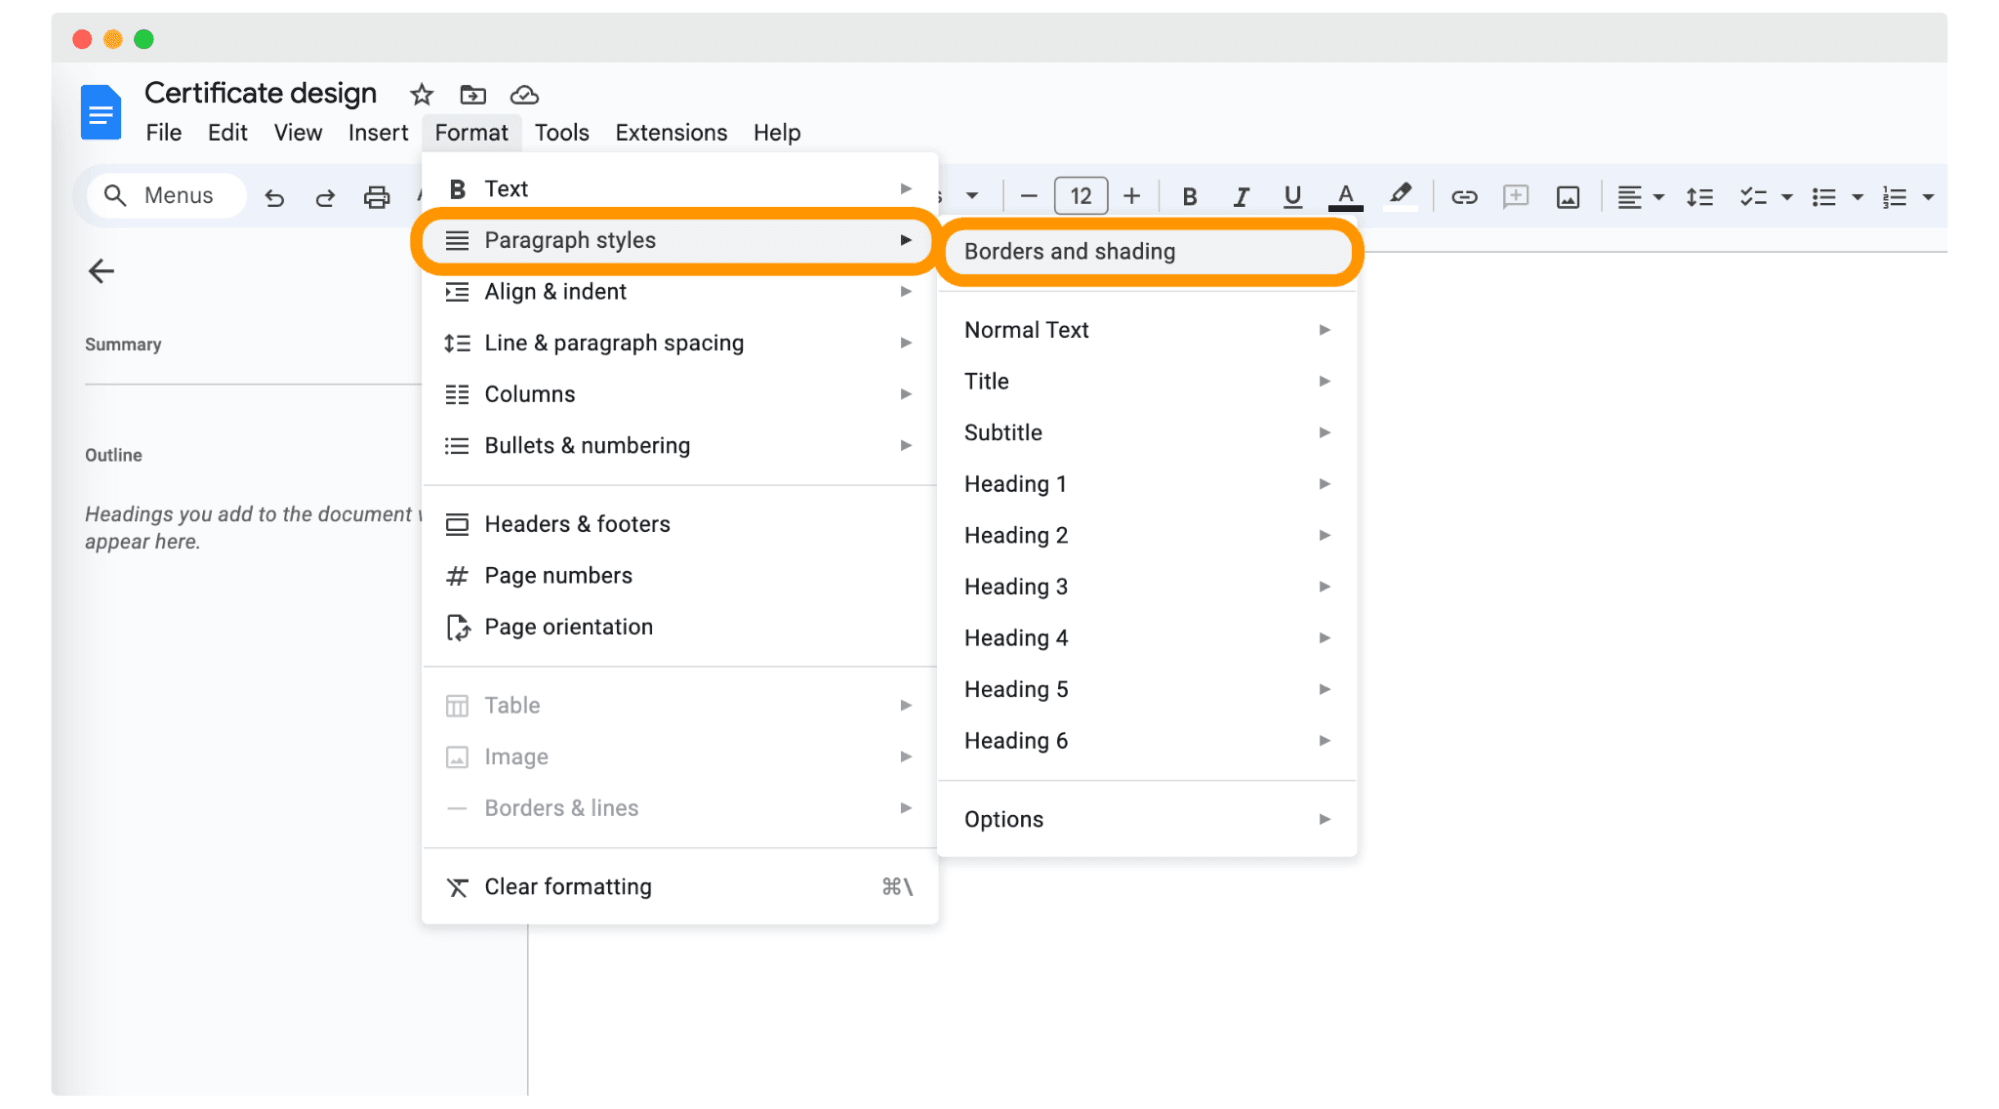
Click Format > Paragraph styles > Borders and shading. A pop-up window with border options will appear.
Choose the border width, color, and background color.
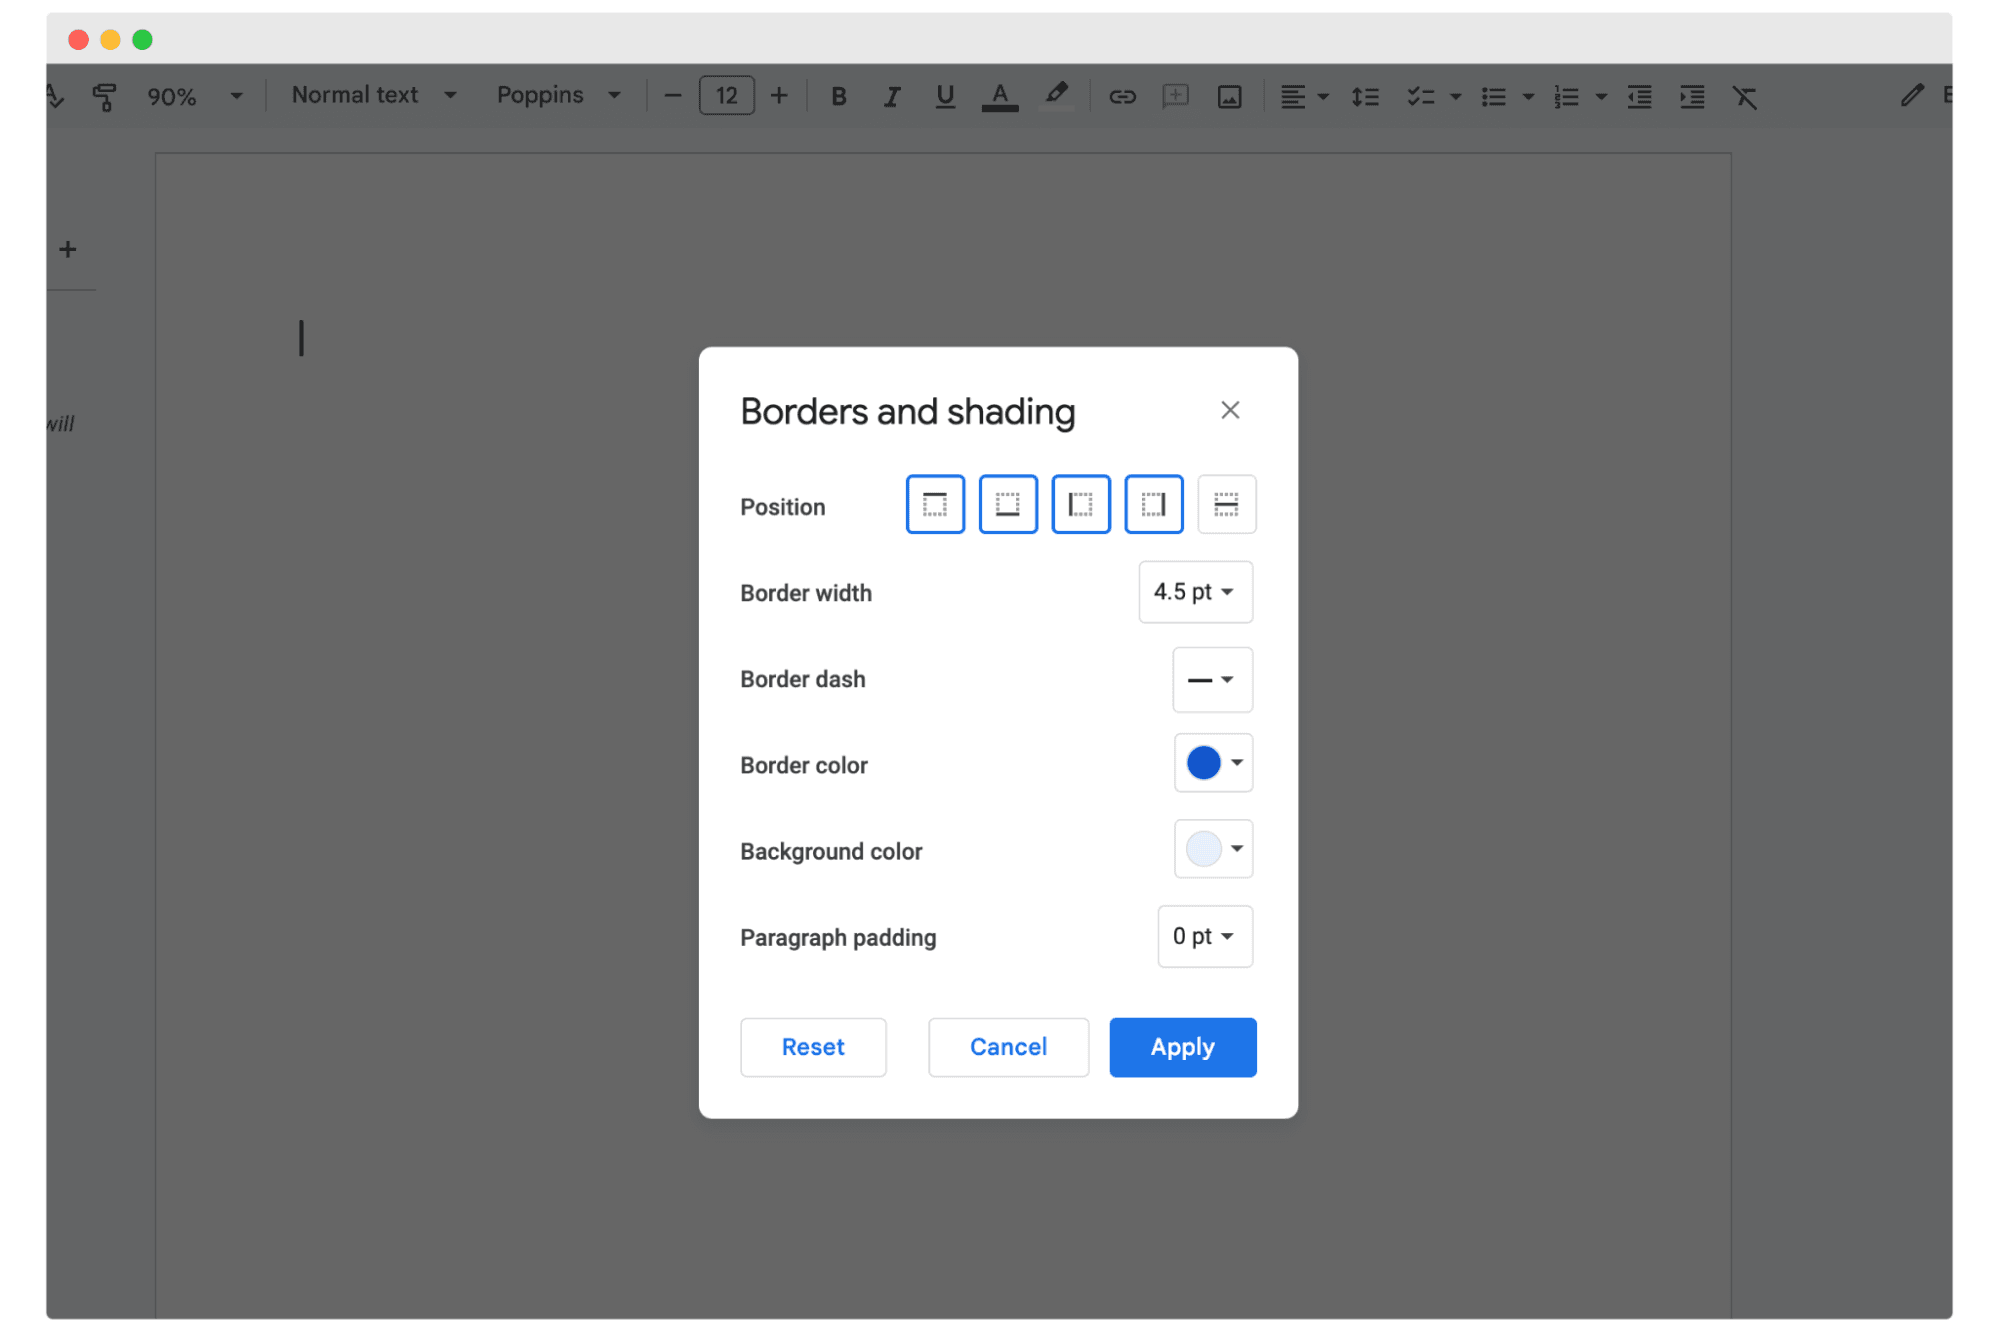
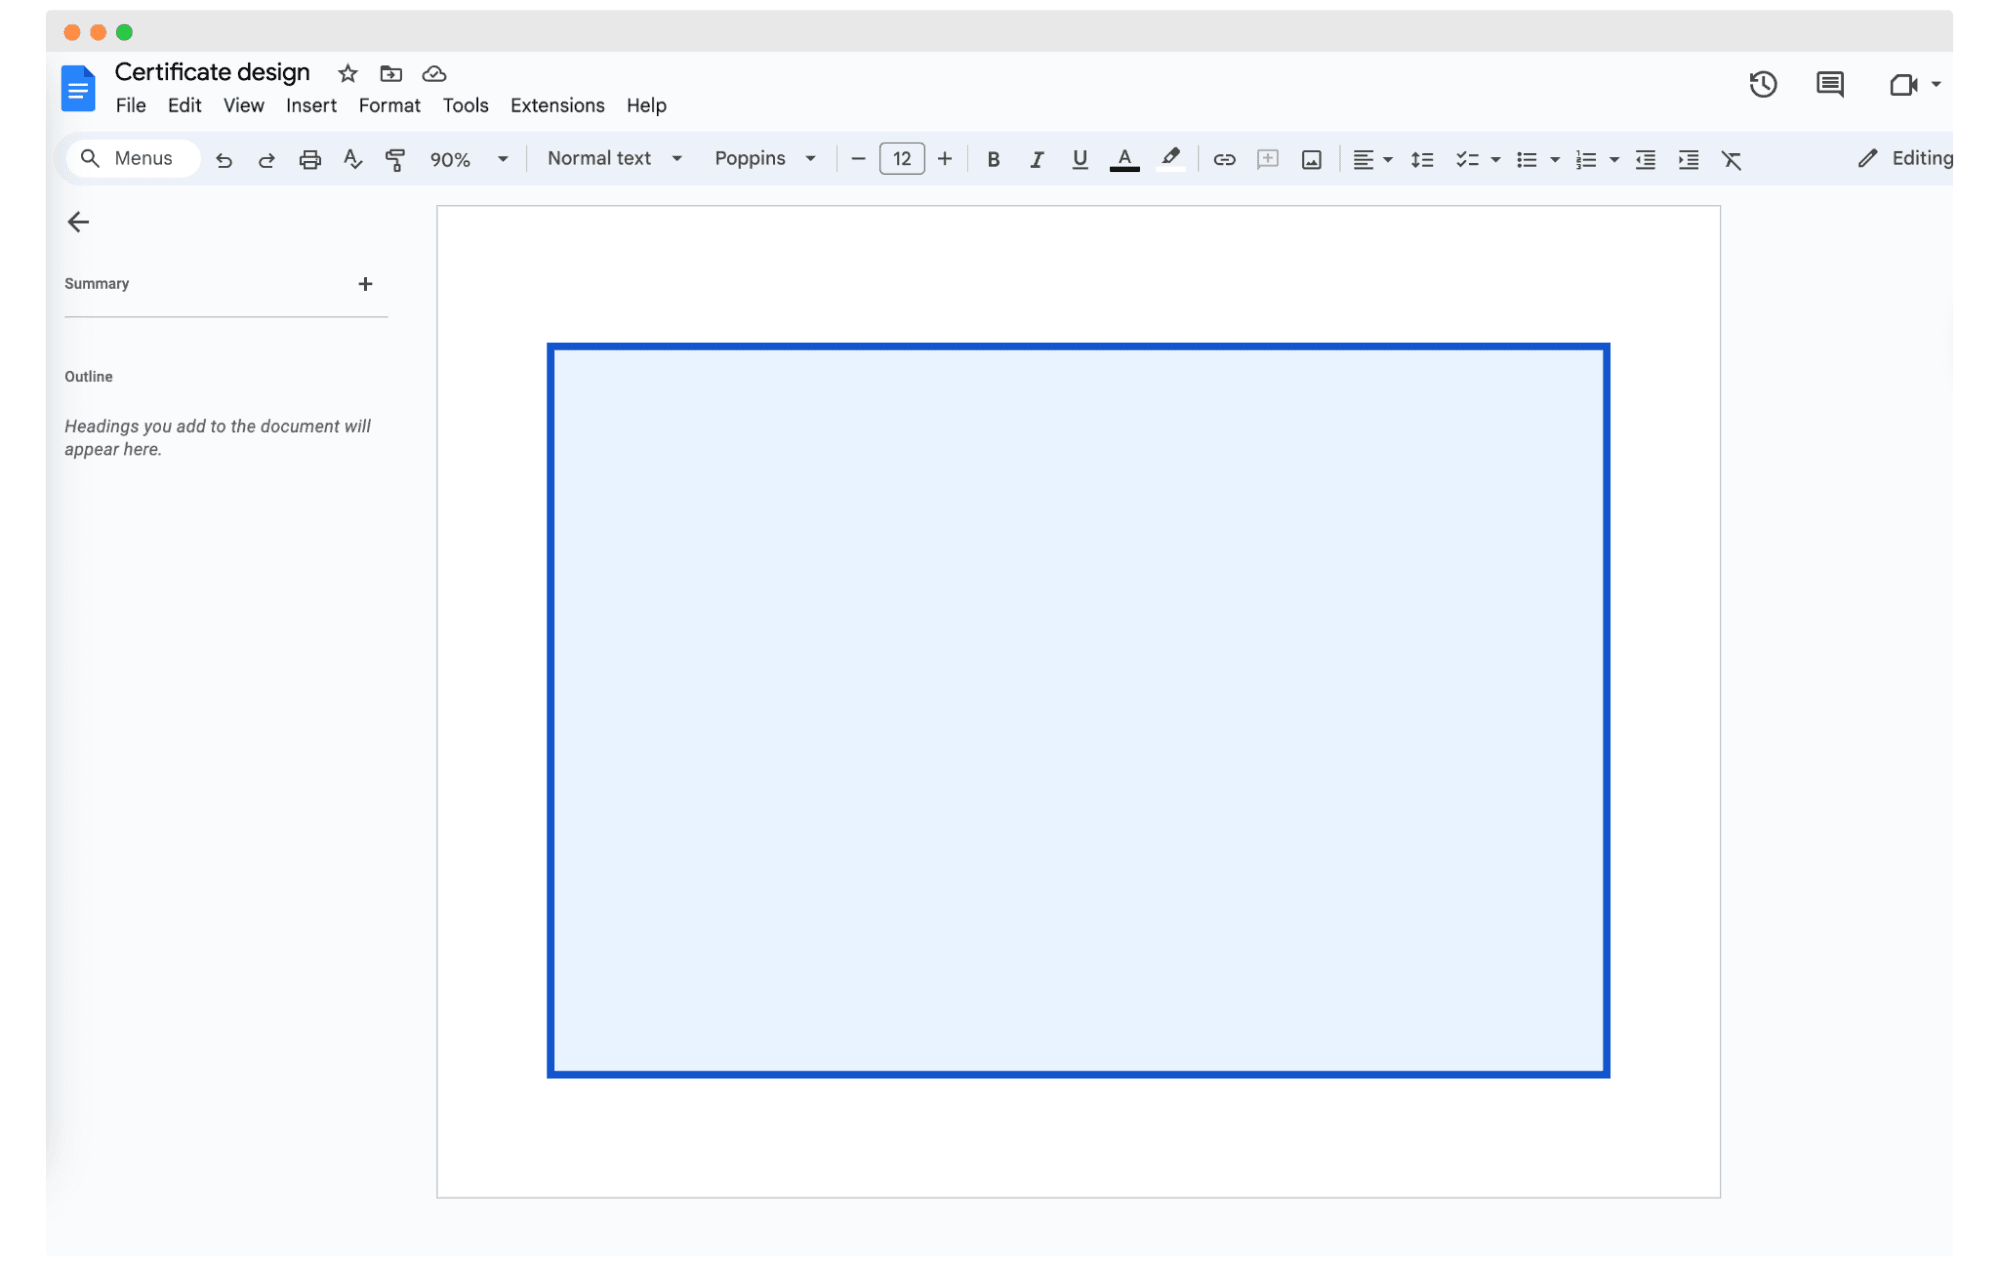
To expand the border across the entire page, click enter (same as the table border). It’s also time to adjust the margins if you want to, e.g., fill almost the entire page. Play around until you find an appearance of certificates you love.
What are the steps with image borders? If you want to use an image as a border in Google Docs, click Insert > Drawing > + New. Upload your chosen border. Resize and adjust the image to fit the page. Remember, consistency on all sides is key.
Step 3: Fill out the certificate with content
Your choice of words and their presentation can make or break your personalized certificate. Give your text some thought before you insert it.
What design elements should a certificate contain?
Title. Clearly state the purpose of the certificate (e.g., "Certificate of Achievement)
Recipient's name
Certificate description with a brief explanation of why the recipient deserves the award
The name of the institution, organization, or individual issuing the certificate and all relevant details
The date the certificate was issued
The signatures
Serial Number or Certificate ID
Adjust font sizes, colors, and styles. For the title, consider using a larger font. For the body, a readable, formal font works best. Contrast can be visually appealing. For example, a cursive font for the title and a sans-serif font for the body can look good together.
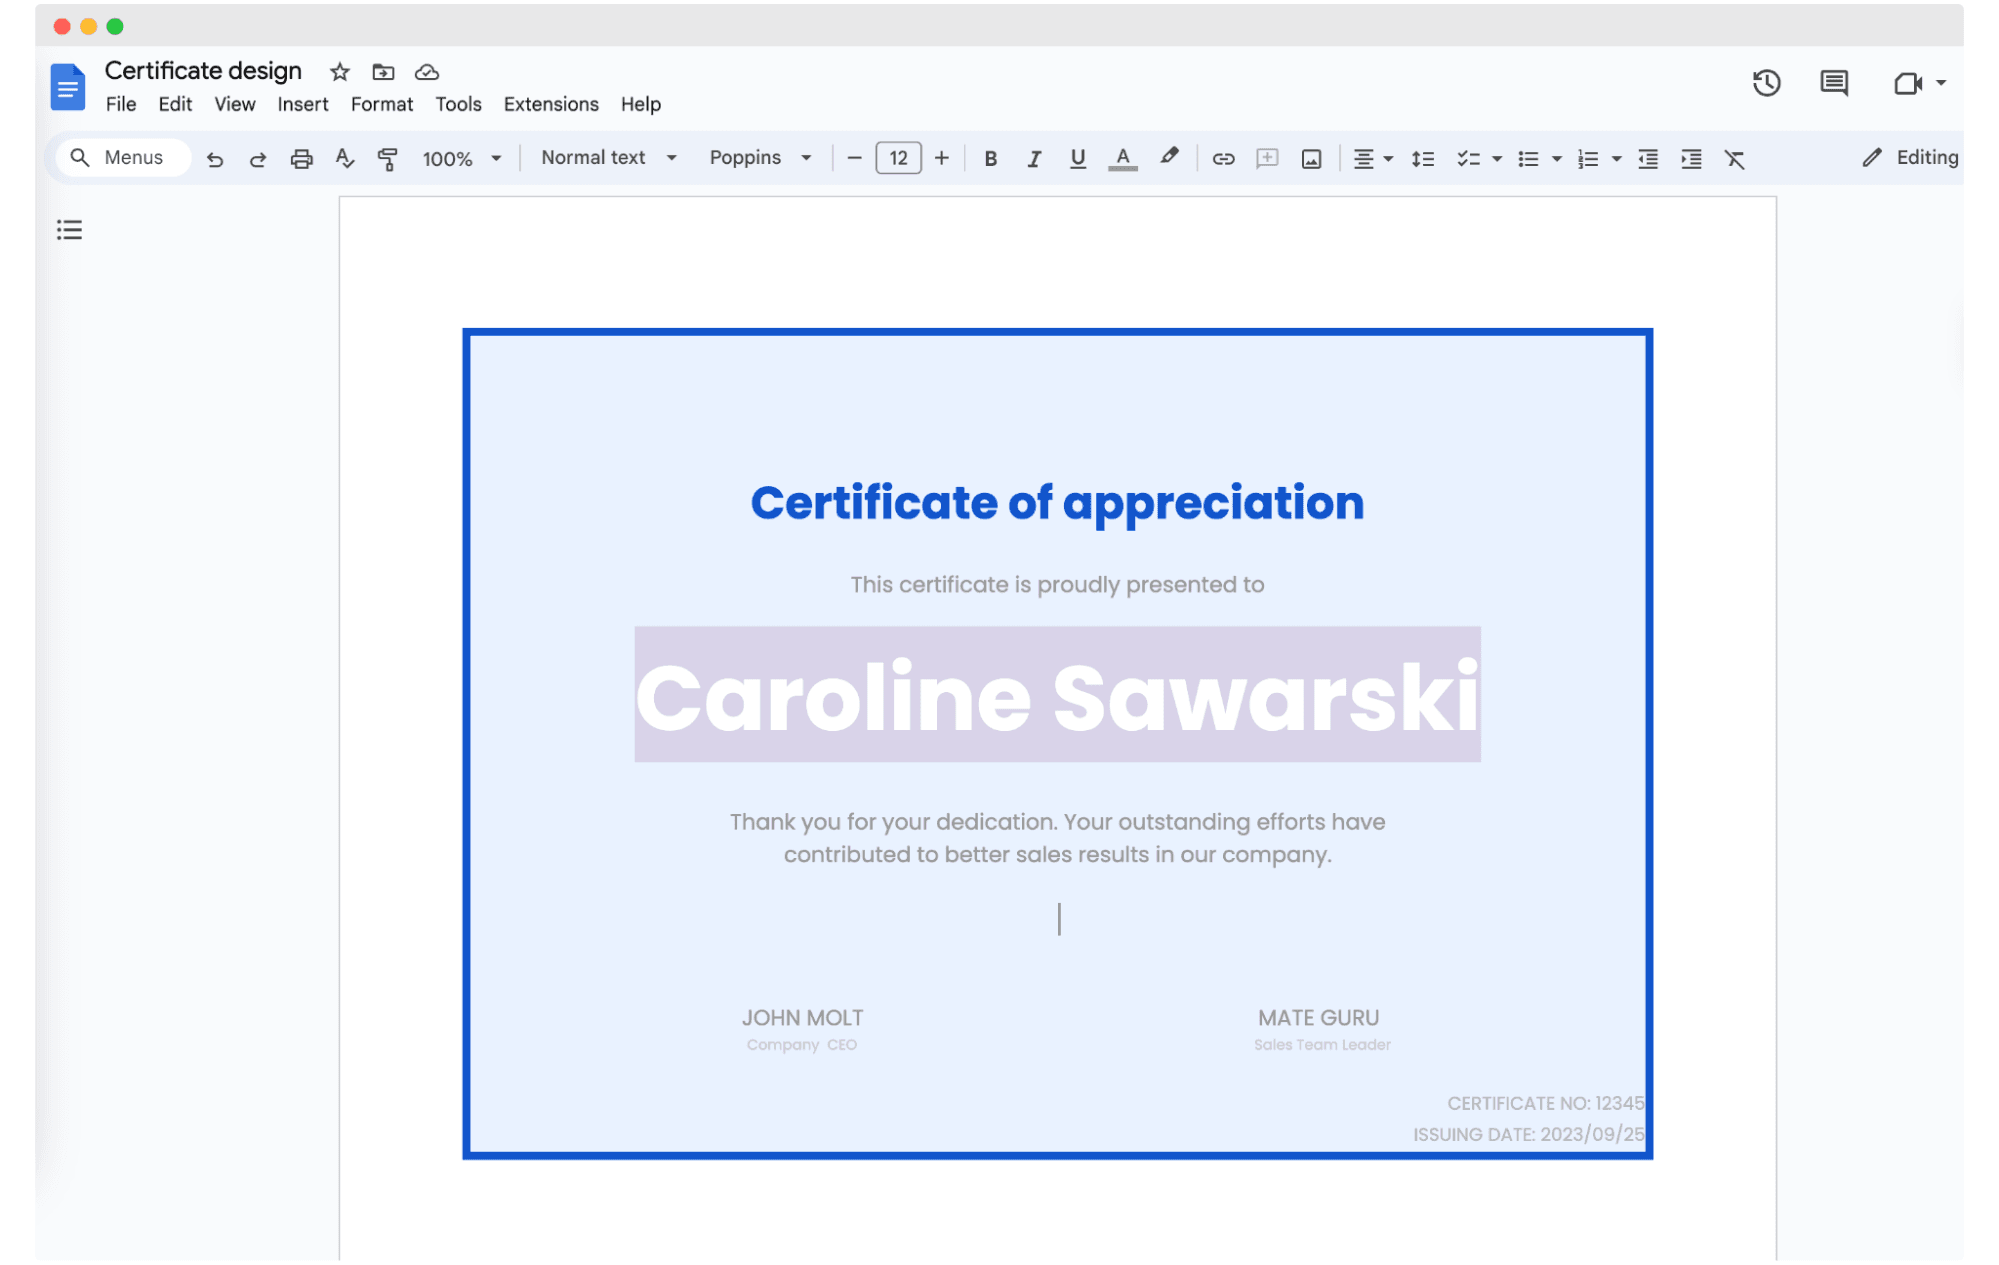
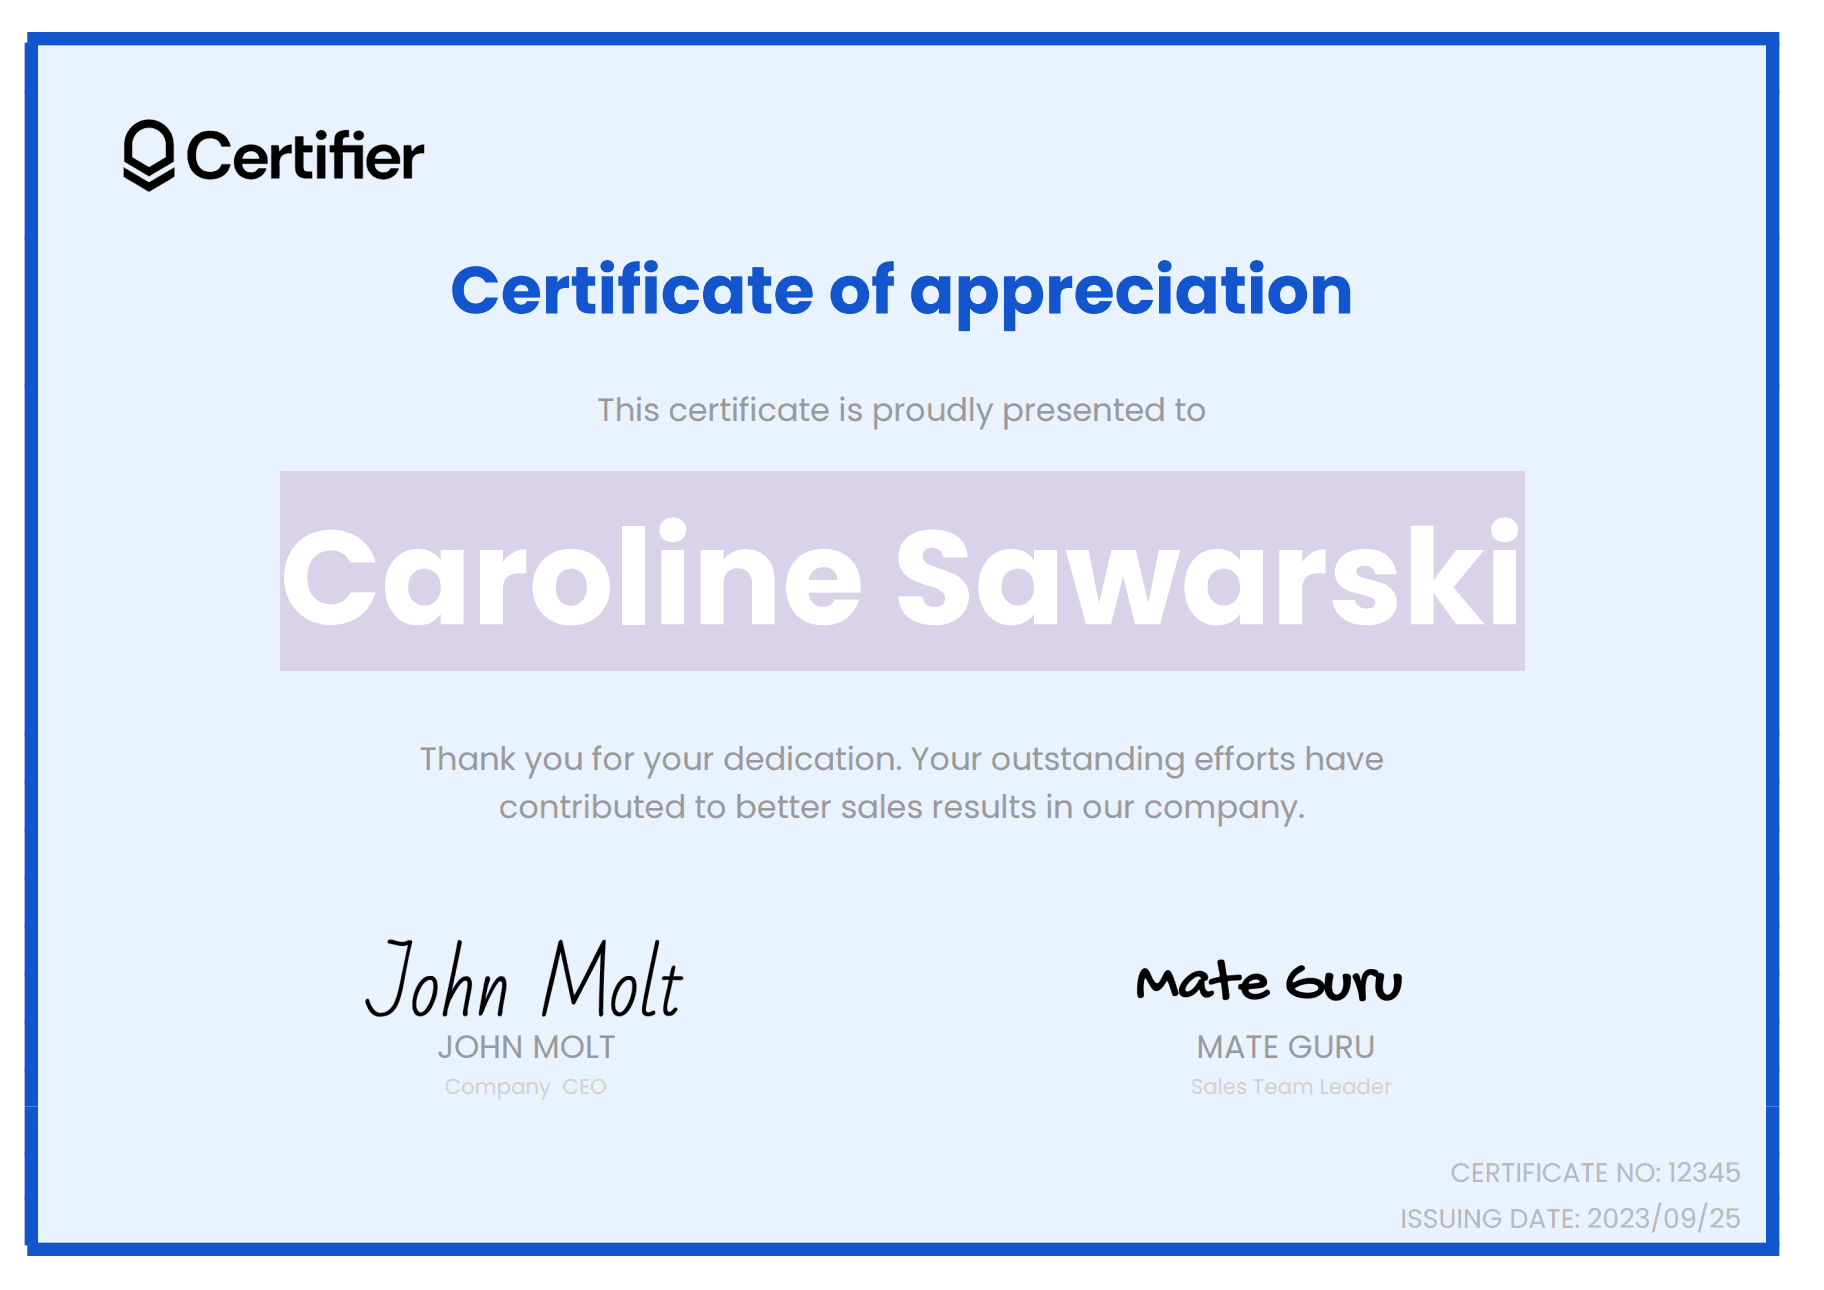
Our certificate
Title: Poppins Bold, size 25
Recipient’s name: Poppins Bold, size 50, Highlight color
Body and signatures: Poppins, size 12
Date, certificate no., surnames: Poppins, size 10
Tip: If you're tired of traditional fonts and want to use some crisp typography, you can download add-on fonts from the free Google Fonts library.
Vivid colors and playful elements can boost the visual appeal of certificates designed in Google Docs. Customize the font colors and styles, borders, and backgrounds using Google Docs' formatting options.
Step 4: Add signatures
A signature line lends credibility and authenticity to your certificate. It's not enough to type your signature and change the font to more hand-written. Include the digital version of your signature instead.
Select Insert > Image and then Upload from the computer.
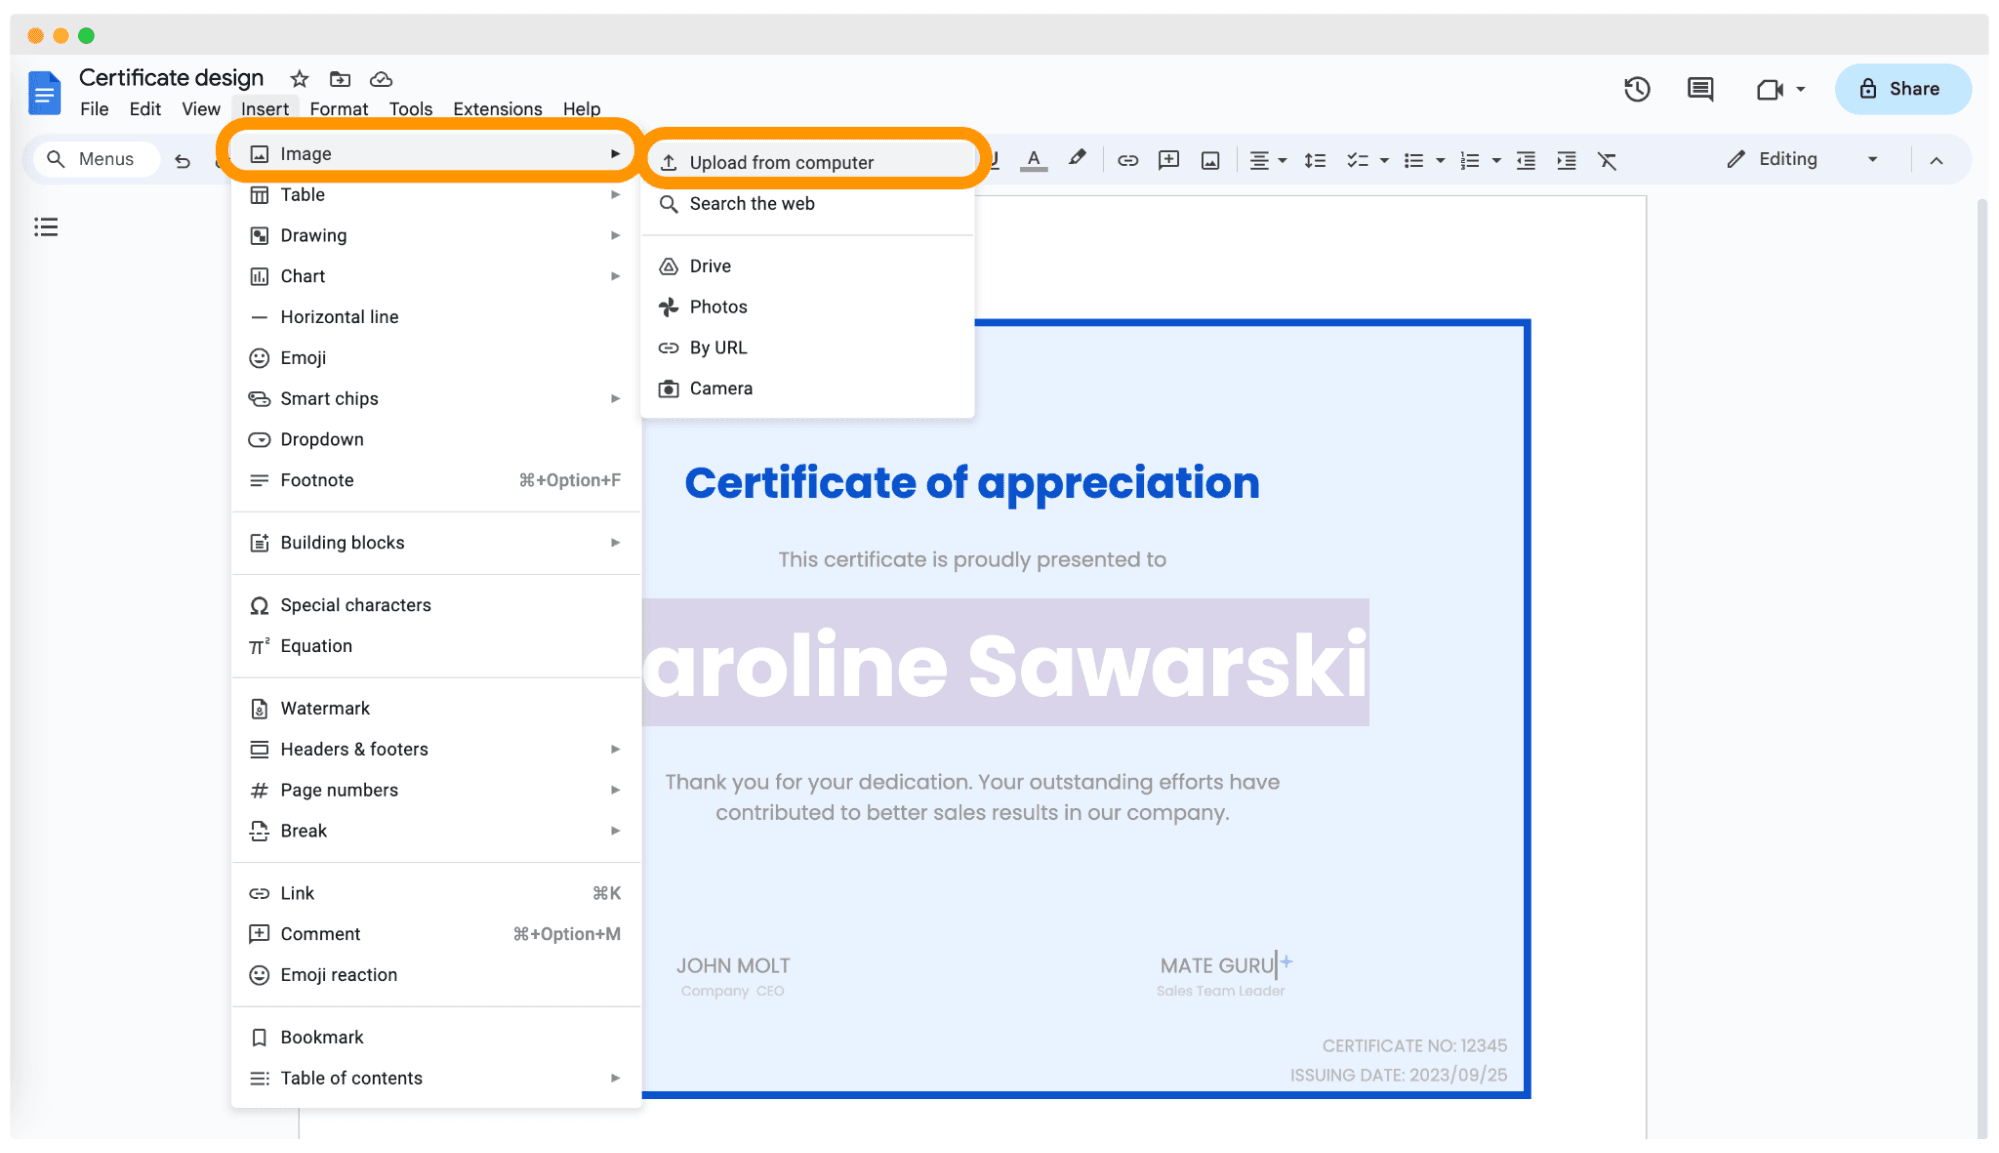
Choose the signatures you want to upload. If you need any help with it, Certifier provides a guide on how to include the digital signature into the certificate.
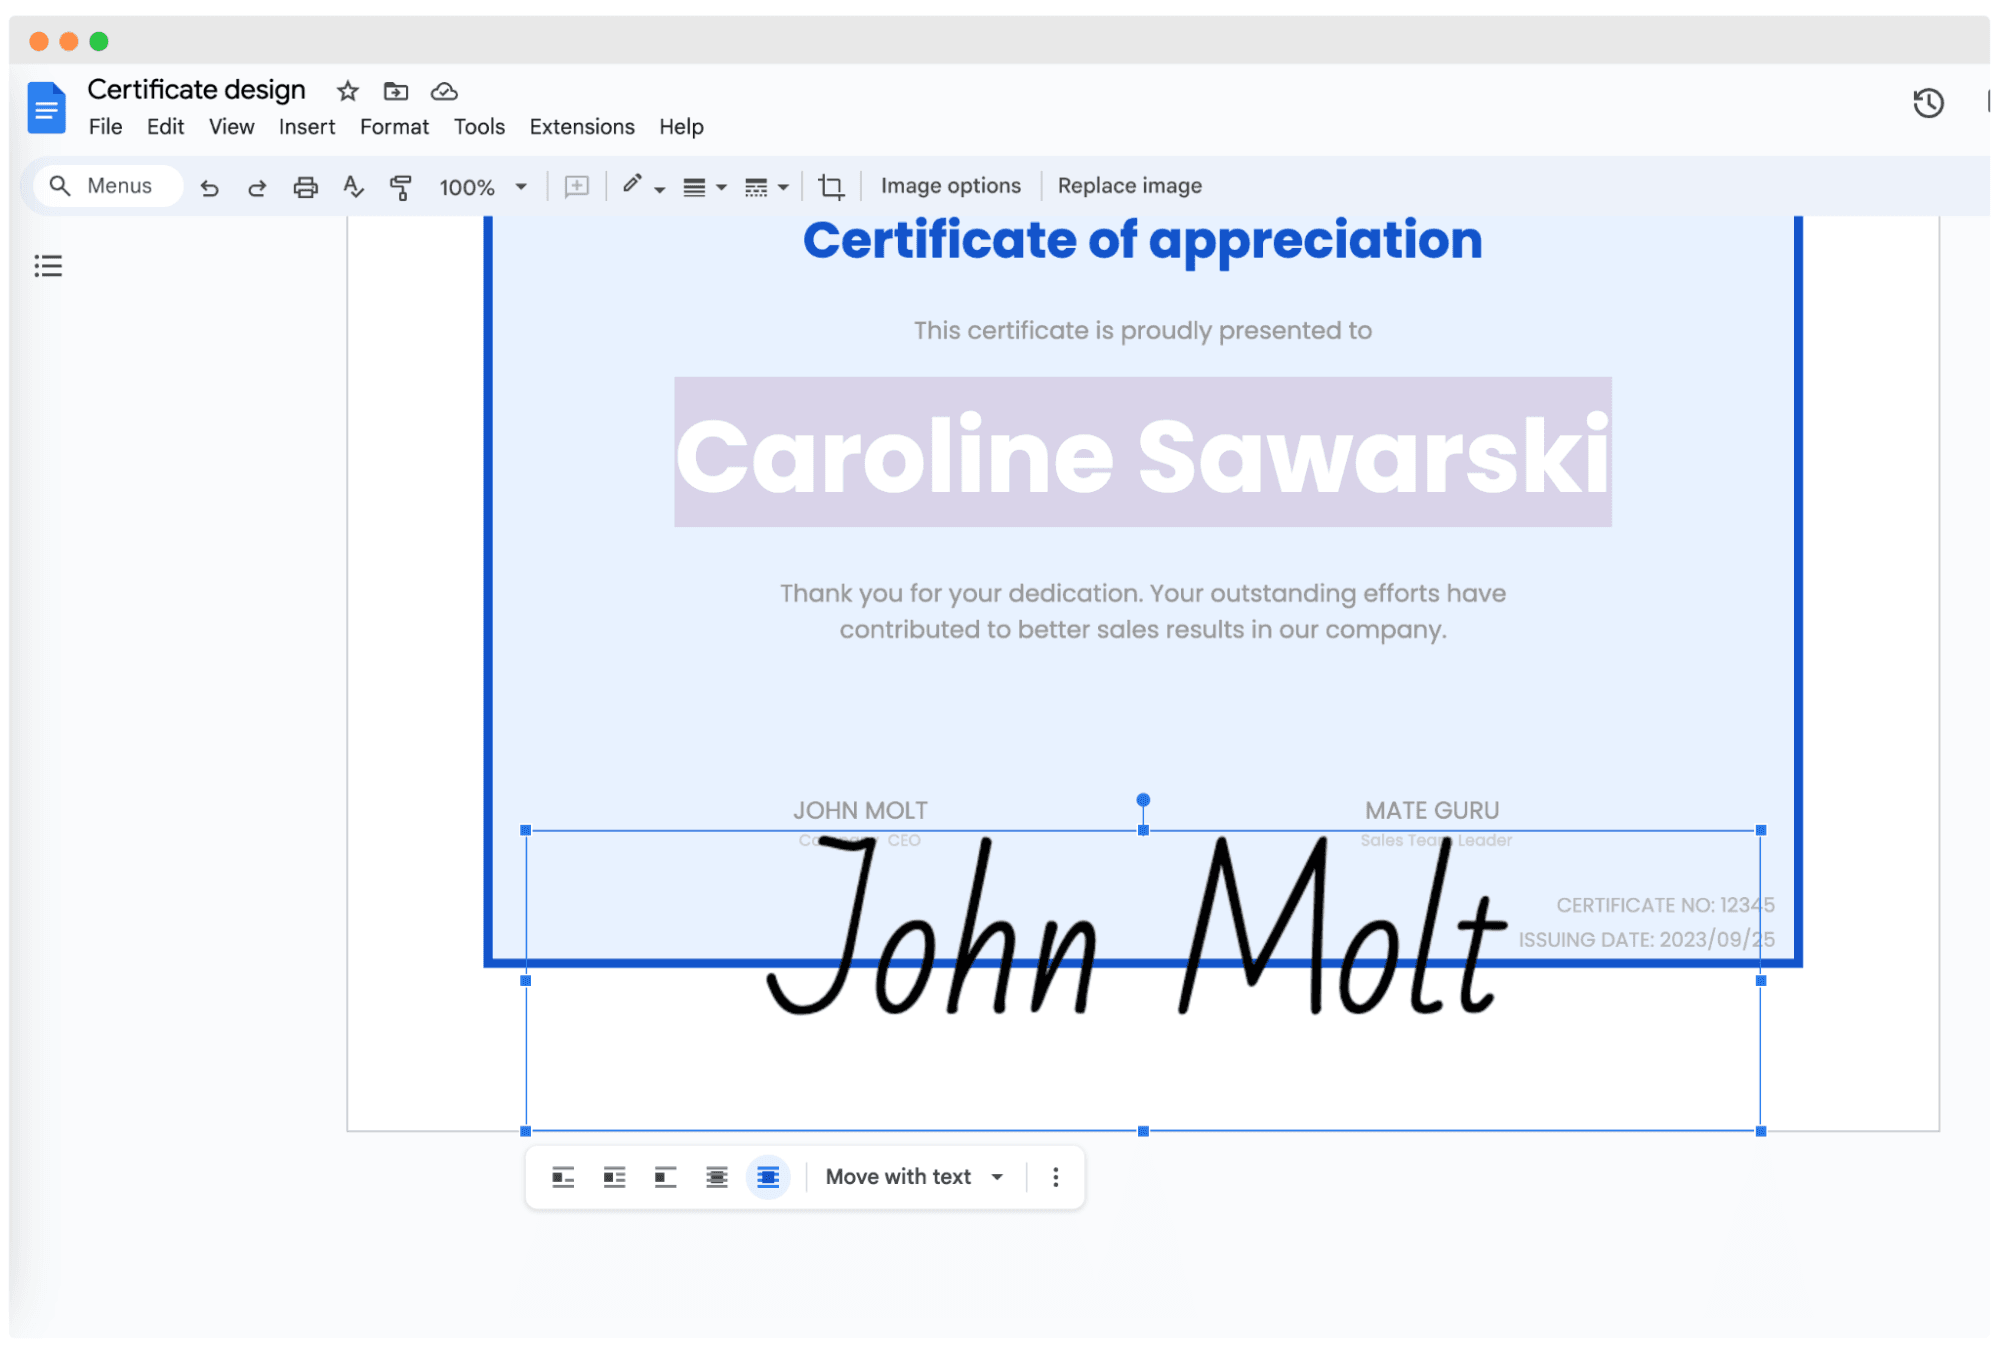
Choose “In front of text” to insert the signature without messing up the certificate layout.
Step 5: Finish with logo
Your certificate design wouldn’t be completed without branding and logo. Add logo the same way as signatures (see previous step).
Click Insert > Image. You can upload a pre-chosen logo or use one from your Google Drive. Resize and position the logo appropriately.
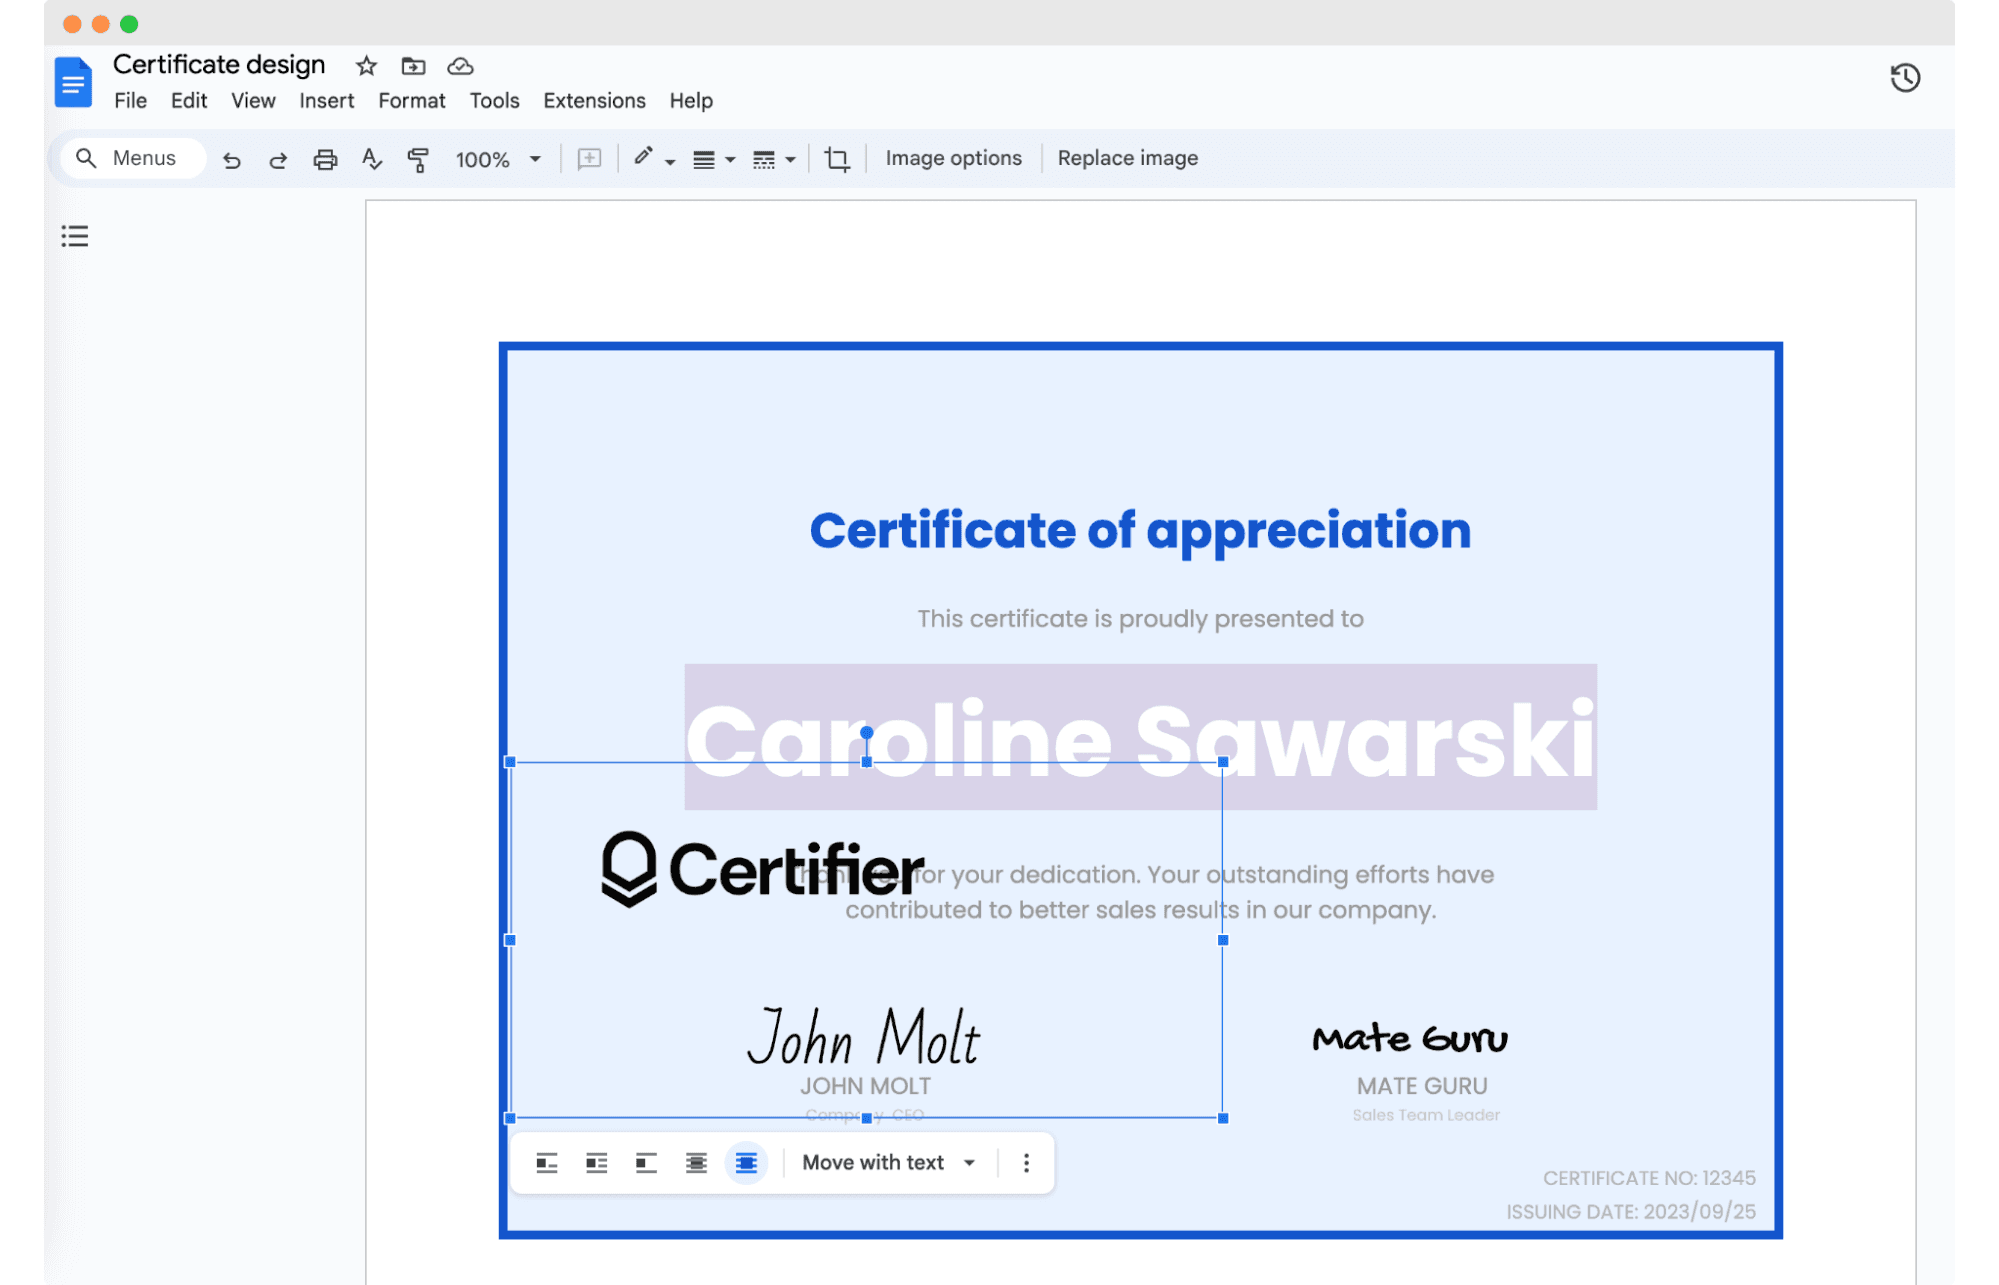
Here it is! Your certificate design is ready. Now you can download your credentials in any file format you want, send digital certificates via email, or print them.
Shortcut? Check out Certifier
Looking for a way to make certificates fast? Watch our video and see how you can make a certificate in Google Docs!
Or is something not going as you expected? It's no wonder. Google Docs is not suitable for creating custom certificates, and its editing tools in this area are very limited.
Certifier is a Google Docs alternative that provides all the features you need to create professional certificates. It has an intuitive interface (with a drag-and-drop option!), a wide range of fonts, color schemes, and shapes, and a variety of templates to choose from. Plus, it's free to use!
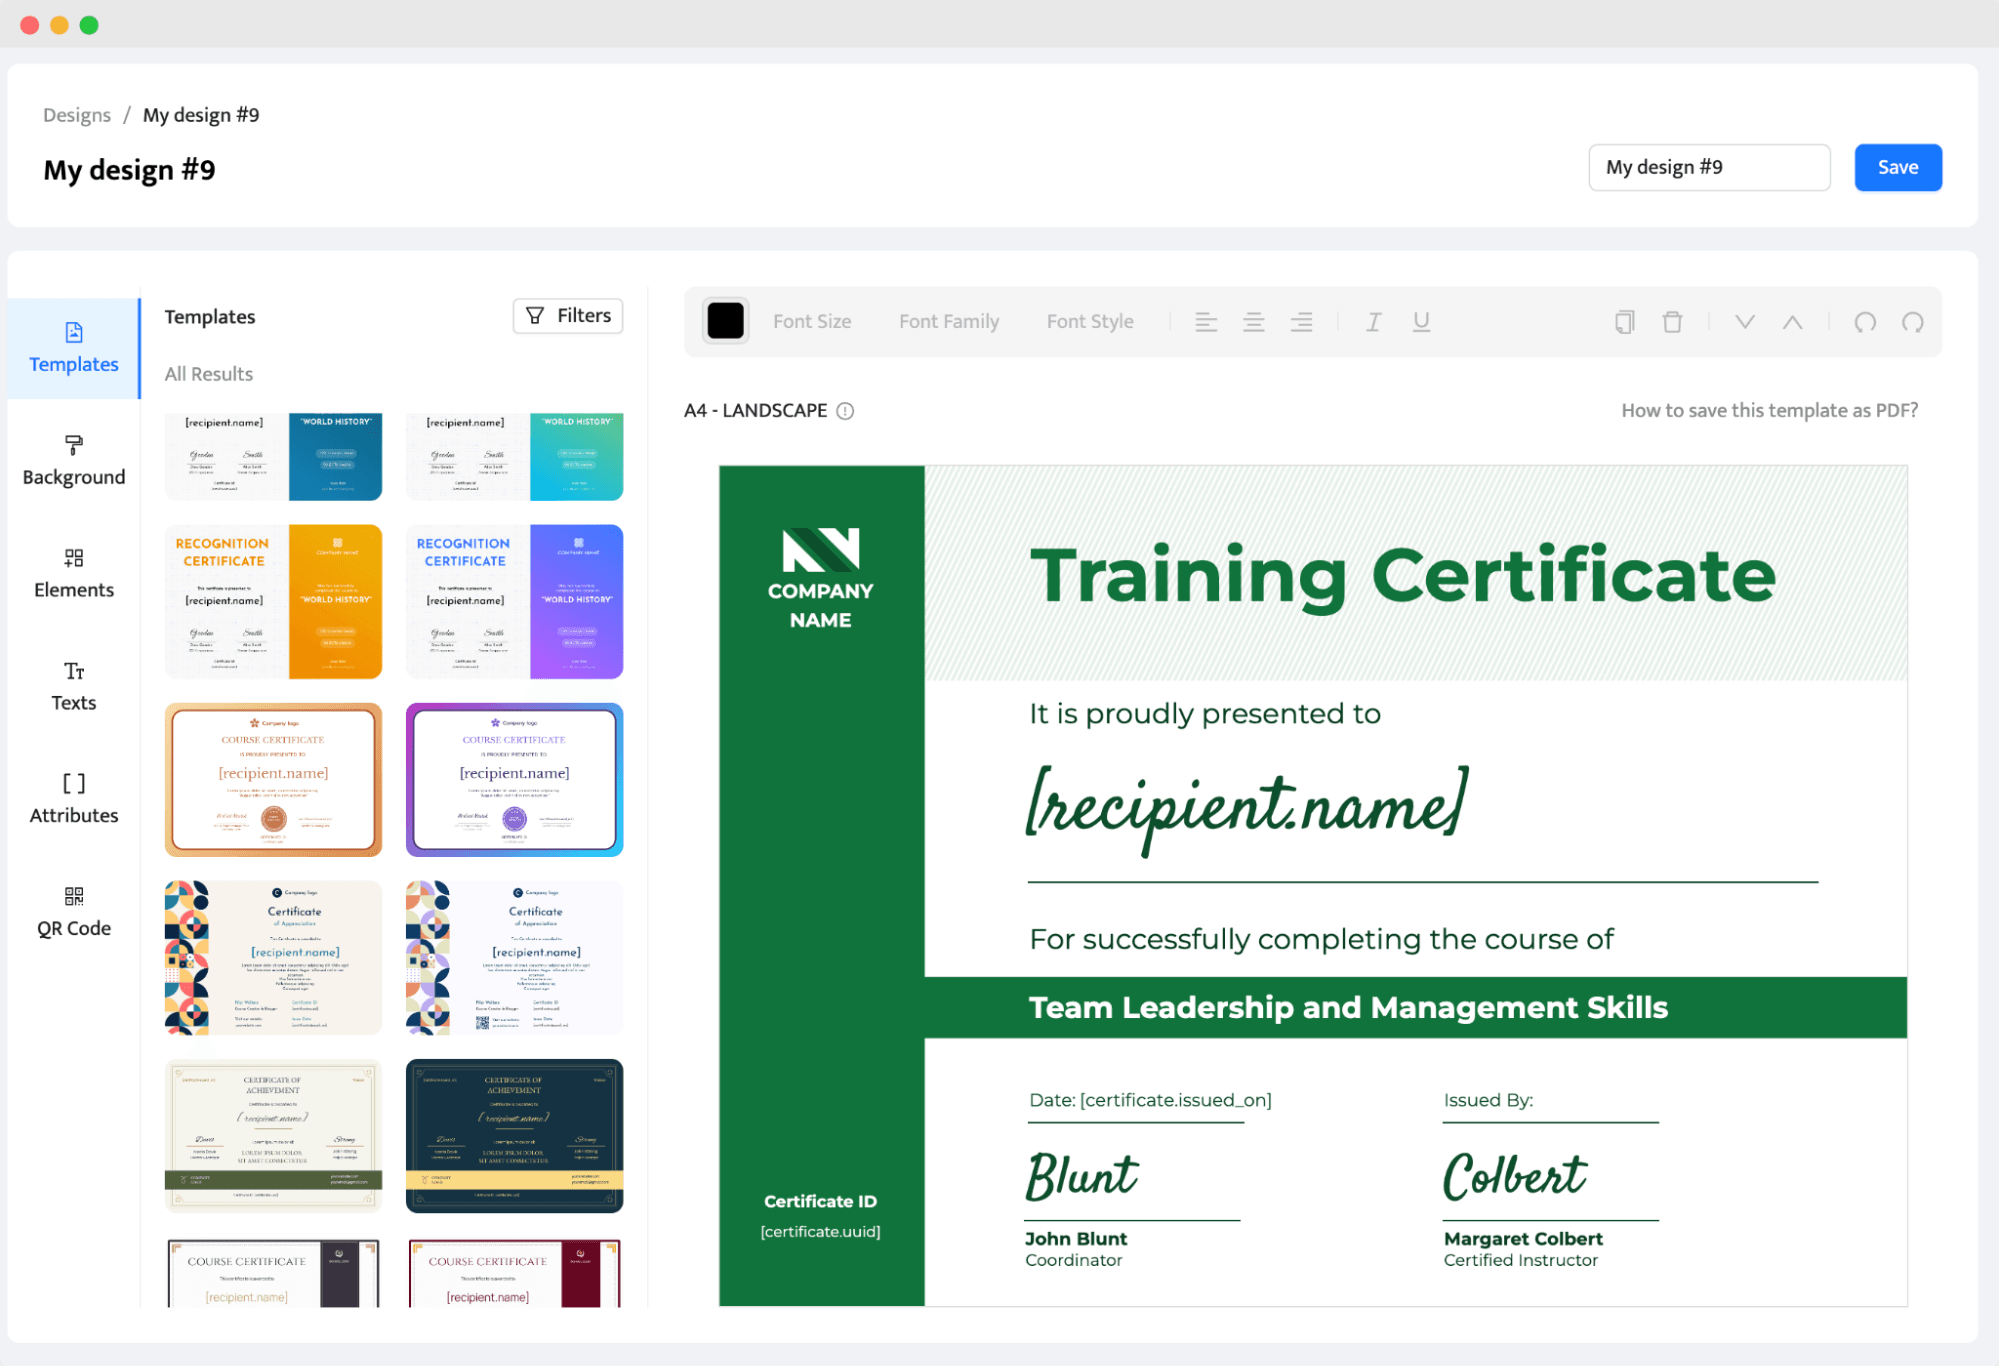
Create and send certificates effortlessly with just a few clicks. Join for free to give it a shot.
Wrap-up of certification in Google Docs
With a bit of creativity (and patience), Google Docs can be used to create professional-looking certificates.
Whether you stick with Google Docs or explore other dedicated tools like Certifier, make sure the end product fits the purpose. After all, it's all about creating a certificate that the recipient will cherish with pride.
FAQ: How to create certificates in Google Docs
Navigating through the process of creating certificates in Google Docs can bring up a few questions. We wanted to answer the most frequently asked questions on the topic.

