


Trusted by:
University of Southern California
Warner Bros.
Volvo
Amazon
Stanford University
Updated: July 10, 2026
17 min read
Running an event or wrapping one up soon? Our guide shows you how to send an Eventbrite certificate of attendance automatically using Certifier. Skip the manual edits and delays. Just upload your data—or connect via Zapier—to generate personalized certificates instantly.
Research with AI:
Let’s get straight to the point. Bad news first: you can’t generate an Eventbrite certificate of attendance in Eventbrite. You need another tool for this.
Good news: you can natively connect Eventbrite with Certifier, a certificate management platform, and issue hundreds or even thousands of Eventbrite certificate of attendance at once.
Today, we will show you how to do it, what Certifier offers and give you some useful tips on designing a certificate of attendance that everyone wants to share.
Eventbrite doesn’t support built-in certificate delivery. You’ll need a certificate management tool like Certifier to generate and send Eventbrite certificates of attendance.
Manual methods of certificate issuance are time-consuming and risky. Editing each certificate by hand often leads to delays, errors and missing certificates.
Certifier automates the entire process—it connects to Eventbrite via Zapier, so once you set it up, certificates are created and delivered automatically, no extra work required.
Eventbrite doesn’t come with a built-in tool to create or send certificates of attendance. So you can’t generate certificates directly in the Eventbrite platform.
You could export your attendance report, design certificates manually and send each one via email, but that takes hours.
But keep in mind that:
Certificates go out late—it takes time to write and send out a certificate and an email to every attendee. When credentials are delivered late, the excitement and social media share potential is already gone.
Mistakes happen—names misspelled, files misplaced, emails bounced. It also requires time to address those mistakes.
Follow-up emails pile up—attendees asking for access to their missing certificates.
No tracking—you don’t know who received it, opened it or shared it.
And let’s not forget the lost opportunity: no Eventbrite certificate sharing = no social proof, sponsor visibility or buzz around your event.
When you manage multiple events and hundreds of participants, each expecting a polished, personalized Eventbrite certificate of attendance, the cracks show fast.
You need a better system.
A system that lets you issue branded certificates right after the event date, using accurate attendance data from Eventbrite. One that tracks delivery, opens and gives you an Eventbrite certificate verification log for trust.
The solution here is Certifier. Take a look at a quick overview of what you can expect from connecting Certifier to Eventbrite versus not:

Issuing Eventbrite certificates of attendance doesn’t have to involve manual copy-pasting. Certifier lets you automate the entire process.
Now, you can connect Certifier and Eventbrite without any middleware —set up the workflow once and issue and send Eventbrite certificates of attendance at the moment when an attendee checks in at your event.
Key benefits of using Certifier
Eventbrite certificate automation
Eliminate manual work and reduce errors. Let your certificates run on autopilot—while you focus on planning the next event, Certifier helps you automate the process of generating and delivering personalized Eventbrite certificates.
Branding elements of your Eventbrite certificate of attendance
Fully customizable, professional certificates. Your event isn't generic, so why should your certificates be? Certifier lets you mirror your brand voice, colors and logo across every credential you send.
Credential tracking
Monitor certificate delivery, opens and resends. Know exactly who got their certificate, who opened it and who’s shared on social media.
Effortless Eventbrite certificate verification
You can include an ID number and a QR code with a verification link on every Eventbrite certificate automatically. With these, you prevent fake credentials.
Zapier is a connector tool that will send a trigger to Certifier. Then, Certifier generates and sends a personalized Eventbrite certificate of attendance to an attendee. To make it happen, you must take two steps: adjust an Eventbrite certificate template in Certifier and integrate the certificate tool with Eventbrite using Zapier.
Feel free to use other connector tools like Pipedream, Make or others.
Step 1: Create accounts
Make sure you have active accounts on both Eventbrite and Certifier
Create and Send Digital CredentialsStart issuing certificates and badges in minutes.
Step 2: Adjust an Eventbrite certificate template in Certifier
Log in to Certifier and design your event certificate:
Choose a ready-made certificate of attendance template—no matter what design you choose, all the templates are easily editable in Certifier visual builder. Just click the blue button under an editable design to be directed to the template editor.
Change the certificate wording. There are two kinds of text fields you will be working with: the text that stays the same for all your certificates and the text that changes depending on the event attendee, like recipient's name, issue date, event name and more.
To enable using the second text type, add dynamic attributes for your certificates—they allow for credential personalization without manual edits. The attributes work like smart tags that automatically fill in each attendee’s name, email, event date, or other details on the certificate, so you don’t have to type them manually one by one.
You will find them in the Dynamic Attributes section. How does it work? When connected via Zapier, Certifier pulls that info from Eventbrite and autofills the Eventbrite certificate of attendance with personalized info.
In the Text tab, change fonts (you can also upload a custom font), colors and size. Head to the Elements tab to upload a digital signature, logos or graphic elements as an image to match your event branding.
Tip: Certifier lets you add a certificate ID and a certificate QR code that links to a live verification page. This protects against fake credentials and builds trust with sponsors, partners or employers. Simply drag and drop the QR code or add [certificate.id] as a dynamic attribute.

Do you want to appreciate the event attendees who have been active during panels? Check out our certificate of participation templates.
Step 3: Log in to Zapier and create a Zap
Go to Zapier and click Create and then select Zaps

Step 4: Set Eventbrite as the trigger app
App: Eventbrite

Trigger Event: Choose either New Attendee Registered or New Attendee Check-In (depending on your preference)

Step 5: Set Certifier as the action app
App: Certifier
Action Event: Select Issue Credential
Click Continue

Step 6: Map the fields
Match attendee data from Eventbrite (e.g., First Name, Email, Ticket Type) to the matching fields in your Certifier’s Eventbrite certificate template

Step 7: Test and activate the Zap
Run a test to confirm everything works
Enable your Zap—certificates will now be automatically generated and emailed as attendees register or check in

Here’s a video tutorial if you prefer to watch the instructions rather than read them.
Manual CSV upload works well if you’re issuing Eventbrite certificates of attendance for a single event or a small group of attendees. But if you run multiple events or need certificates to go out automatically as people register or check in, use Zapier. It keeps everything hands-free and on time.
If you don’t want to connect via Zapier, you can upload attendee data manually and still issue hundreds of certificates at once.
You can also use other connector tools like Make or Pipedream.
Step 1: Export the Eventbrite attendance report
Go to your Manage my events

Click Events and scroll down to find your event
Select CVS Export

Step 2: Prepare your Eventbrite certificate template in Certifier
Log in to Certifier or sign up if you haven’t created an account yet—it’s super quick
Issue first certificate in 10 minTry our digital credentials platform to generate your first batch of certificates.
Either choose a pre-built certificate of attendance template or create a certificate from scratch
Psst! We recommend using an Eventbrite certificate template. You can adapt any template for your event and you don’t have to start from scratch. See the certificate examples for inspo.
Scroll up to see Step 2: Adjust an Eventbrite certificate template in Certifier where we discussed the template editing in detail.
Don’t forget to include dynamic attributes like [recipient.name], [issue.date], [certificate.id] and more

Step 3: Upload the CSV to Certifier
Create a credential template in the Credential Templates tab
A credential template works like a folder containing all the attendance certificates for a specific event. In Certifier, credential templates help you stay organized and make automation possible. Each Template is linked to one event, like the UX Pioneer Conference 2025, and controls how and when certificates are issued. Once it’s set up, Certifier knows which attendees to issue certificates to and which design and email template to use.
Fill in all necessary info about the credential template and select the design you have just created
Upload your Eventbrite CSV file
Map CSV columns to certificate placeholders (Name → [Name], Email → [Email], etc.)
Step 4: Review and send
Preview to check if your Eventbrite certificate of attendance is correct
Click + Issue Credential and Certifier will instantly issue certificates to every attendee
Feel like you need more guidance? Here’s a simple tutorial on how to automate certificate creation for your event.
Email delivery is optional, but highly recommended. Event attendees get a personalized message with a link to a certificate digital wallet. It’s a cloud-based, secure place where Eventbrite certificates of attendance are stored.

From there, they can share their certificate of attendance on their social media, for example on LinkedIn. So, with every share, your event gets promoted organically. Use the power of Eventbrite certificate sharing that Certifier gives—don’t miss this opportunity.
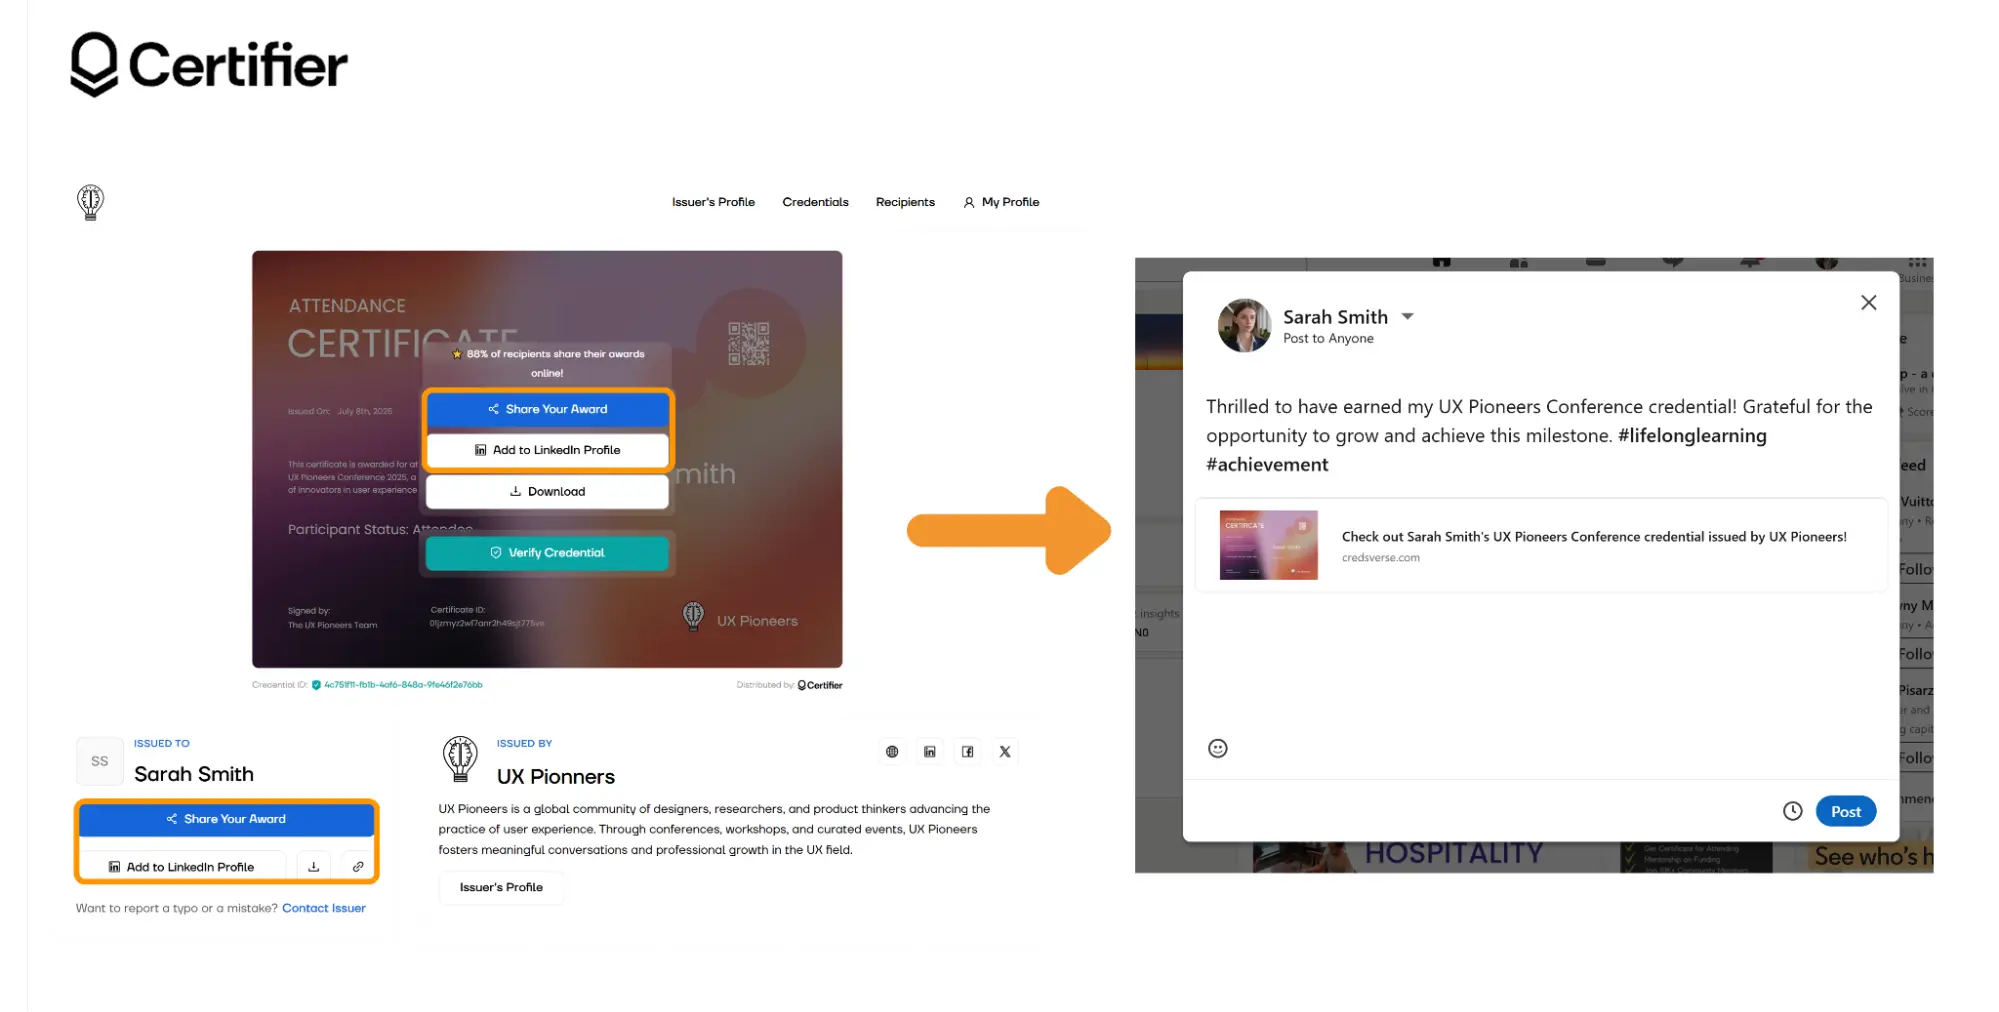 Just two clicks and a certificate of attendance Eventbrite is seen by the whole network. You can enable or disable social sharing in Certifier’s settings depending on your goals.
Eventbrite makes event management simple. Certifier makes certificate delivery just as easy.
When you connect the two via Zapier, you create a reliable system that takes care of certificate generation automatically.
Certifier reads your event attendance data and turns it into professional, personalized certificates of attendance that reflect your brand. Everything gets delivered at the right time, to the right people, with tracking and Eventbrite certificate verification built in.
If you prefer to upload your attendance file manually, Certifier still gives you a fast, flexible way to issue certificates in bulk. You stay in control and your attendees receive a professional Eventbrite certificate of attendance they can share.
Ready to make Eventbrite certificate automation part of your process? Sign up for Certifier and start issuing certificates the easy way.
Curious about how Eventbrite certificate automation works? We’ve answered the most common questions just for you.

- SaaS Growth
- Digital Credentials
- APIs
- Product Marketing
- Company Operations
CEO and Co-Founder
Sergey is CEO and Co-Founder of Certifier, a Forbes 30 Under 30 honoree building digital credential infrastructure for 2,000+ organizations worldwide and shaping the future of credentialing.