

Trusted by:
University of Southern California
Warner Bros.
Volvo
Amazon
Stanford University
Updated: October 16, 2026
14 min read
The best way to generate certificates from Excel depends on your volume, design requirements, and workflow. You can upload your sheet to a dedicated credential management platform like Certifier or use Word Mail Merge for a simple print job. For ongoing automated programs, you can connect Excel to Certifier natively or through a Zapier or Make.
Research with AI:
You can generate certificates from Excel by using your workbook as the recipient data source. The simplest scalable workflow is to prepare an XLSX or CSV file with one row per recipient, upload or connect it to a certificate generator, map columns such as name, email, course, date, or grade to certificate fields, preview the output, and send or download certificates in bulk.
You can also use Word mail merge with Excel if you only need printable certificates or simple PDF batches. That route works well for a class roster, workshop list, or internal training batch, but it is more manual. It doesn’t include hosted verification pages, credential analytics, built-in reissue workflows, or recipient self-service access unless you add another tool.
The right method depends on how your Excel file is used and on whether you need to do this on a continuing basis. A finished cohort list can usually be uploaded as XLSX or CSV, while a recurring training program needs a repeatable workflow.
A print-only process may be fine with Word mail merge or one-time upload, whereas recurring issuance would be best handled through Certifier's native integration with Microsoft Excel. A Microsoft 365 or LMS workflow may be best handled through Zapier, Make, or a developer-owned integration.
Best recurring workflow
connect an Excel workbook to Certifier and issue certificates from new approved rows.
Best one-off workflow
upload an XLSX or CSV file to a certificate generator and map Excel columns to certificate fields.
Best print-only workflow
use Word mail merge with Excel as the data source.
Best multi-app workflow
use Zapier, Make or Power Automate when the certificate trigger starts in Microsoft 365, an LMS, CRM, form tool, or event platform.
Minimum required Excel setup
one row per recipient, clear headers, recipient name, valid email address if sending digitally, stable date formats, and one internal test row.

Use this table to choose the workflow before you start. The best method depends on whether your Excel file is a final list, a live Microsoft 365 workbook, a print source, or one step in a larger automation. The methods below are arranged in order of difficulty, from easiest to implement
Method | Best For | Output | Automation Level | Main Limitation |
|---|---|---|---|---|
Connect Excel to Certifier | Recurring programs using Excel Online, OneDrive, SharePoint, or Microsoft 365 workflows | Digital certificates, hosted verification, email delivery, PDFs, analytics | High | Requires a connected workbook and stable columns. |
Upload XLSX or CSV to Certifier | One-off webinars, completed cohorts, and manual review batches | Digital certificates, PDFs, email delivery, verification | Medium | Requires a fresh upload when the spreadsheet changes. |
Word mail merge from Excel | Printable certificates and simple PDF batches | Word, PDF, or print | Low to medium | Manual delivery and no built-in credential verification or analytics. |
Power Automate, Zapier, or Make | Multi-app workflows with approvals, LMS or CRM triggers, or routing | Depends on workflow | High | More moving parts, connector limits, and monitoring work. |
Automating certificates from spreadsheet rows is useful when you manage learner records in a central table and want to trigger issuing automatically. This setup is common for webinar platforms, learning management systems, and event registration forms.
Using a spreadsheet database saves hours of manual entry. Rather than copying names one by one into graphic design software, you can let an automation engine map the spreadsheet rows to your template placeholders.
So, if you run a professional training seminar, a continuing education program, issue employee certifications, or operate as an academic registrar, this will be highly effective for you.
Working with Google Sheets? If your recipient data is stored in Google Workspace rather than Microsoft Office, follow our sister guide on how to generate certificates from Google Sheets.
Most certificate generation problems start in the spreadsheet. Before uploading, connecting, or merging your Excel data, clean the workbook as if each row could be issued immediately. To get a head start, you can download our sample spreadsheet as an xlsx file.
Use one row per recipient. Don’t place multiple names, email addresses, courses, or completion records inside one cell. Each certificate should come from one clean row.
Use clear headers in the first row of the recipient table. Common headers include Name, Email, Date, and CourseName. Depending on your use case, you might also need ExpirationDate, Grade, Cohort, Hours, and CredentialID.
Keep all fields needed for the certificate in one clean table or worksheet. If your workbook has several tabs, formulas, pivot tables, or internal notes, create a separate issuing tab that contains only the final recipient data.
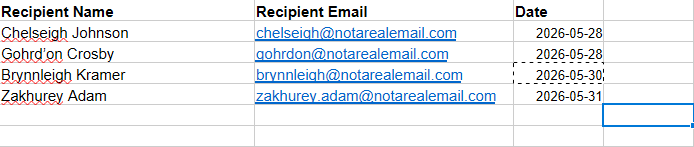
Check these items before generating certificates:

Confirm that every digital certificate recipient has a valid email address.
Choose the right format for the file, save it as an .xlsx or .csv
Avoid merged cells in the recipient table.
Remove blank rows inside the list.
Clear active filters before exporting or uploading.
Check hidden rows and hidden columns.
Convert formulas to final values if the receiving tool may not calculate them reliably.
Standardize dates before generating certificates.
Use one internal test row before issuing the full batch.
Keep column names stable after mapping fields in an automation.
If your source file has separate first and last name columns, create a FullName column before upload or mail merge. This reduces mapping mistakes and keeps names consistent on certificates. Certifier has a separate guide on how to combine first and last name in Excel if you need a simple formula-based setup.
For Excel Online and Power Automate workflows, store the workbook in a supported Microsoft cloud location such as OneDrive for Business or SharePoint, and use a structured table when the connector or workflow requires it.
Microsoft has a few limits regarding file size, locked files, concurrent edits, hidden columns, throttling, and complex formulas, so keep the issuing workbook simple.
Set up Certifier's native Microsoft Excel integration in less than 5 minutes. This is the recommended workflow when you issue certificates repeatedly from an Excel-based process. It works well for training programs, recurring webinars, Microsoft 365 teams, HR completion lists, compliance records, and event operations where new recipients are added over time.
Excel stays the recipient data source. Certifier handles the certificate design, dynamic field mapping, email delivery, PDF access, hosted verification, and tracking. That makes the workflow more suitable for managing digital credentials than a manual mail merge.
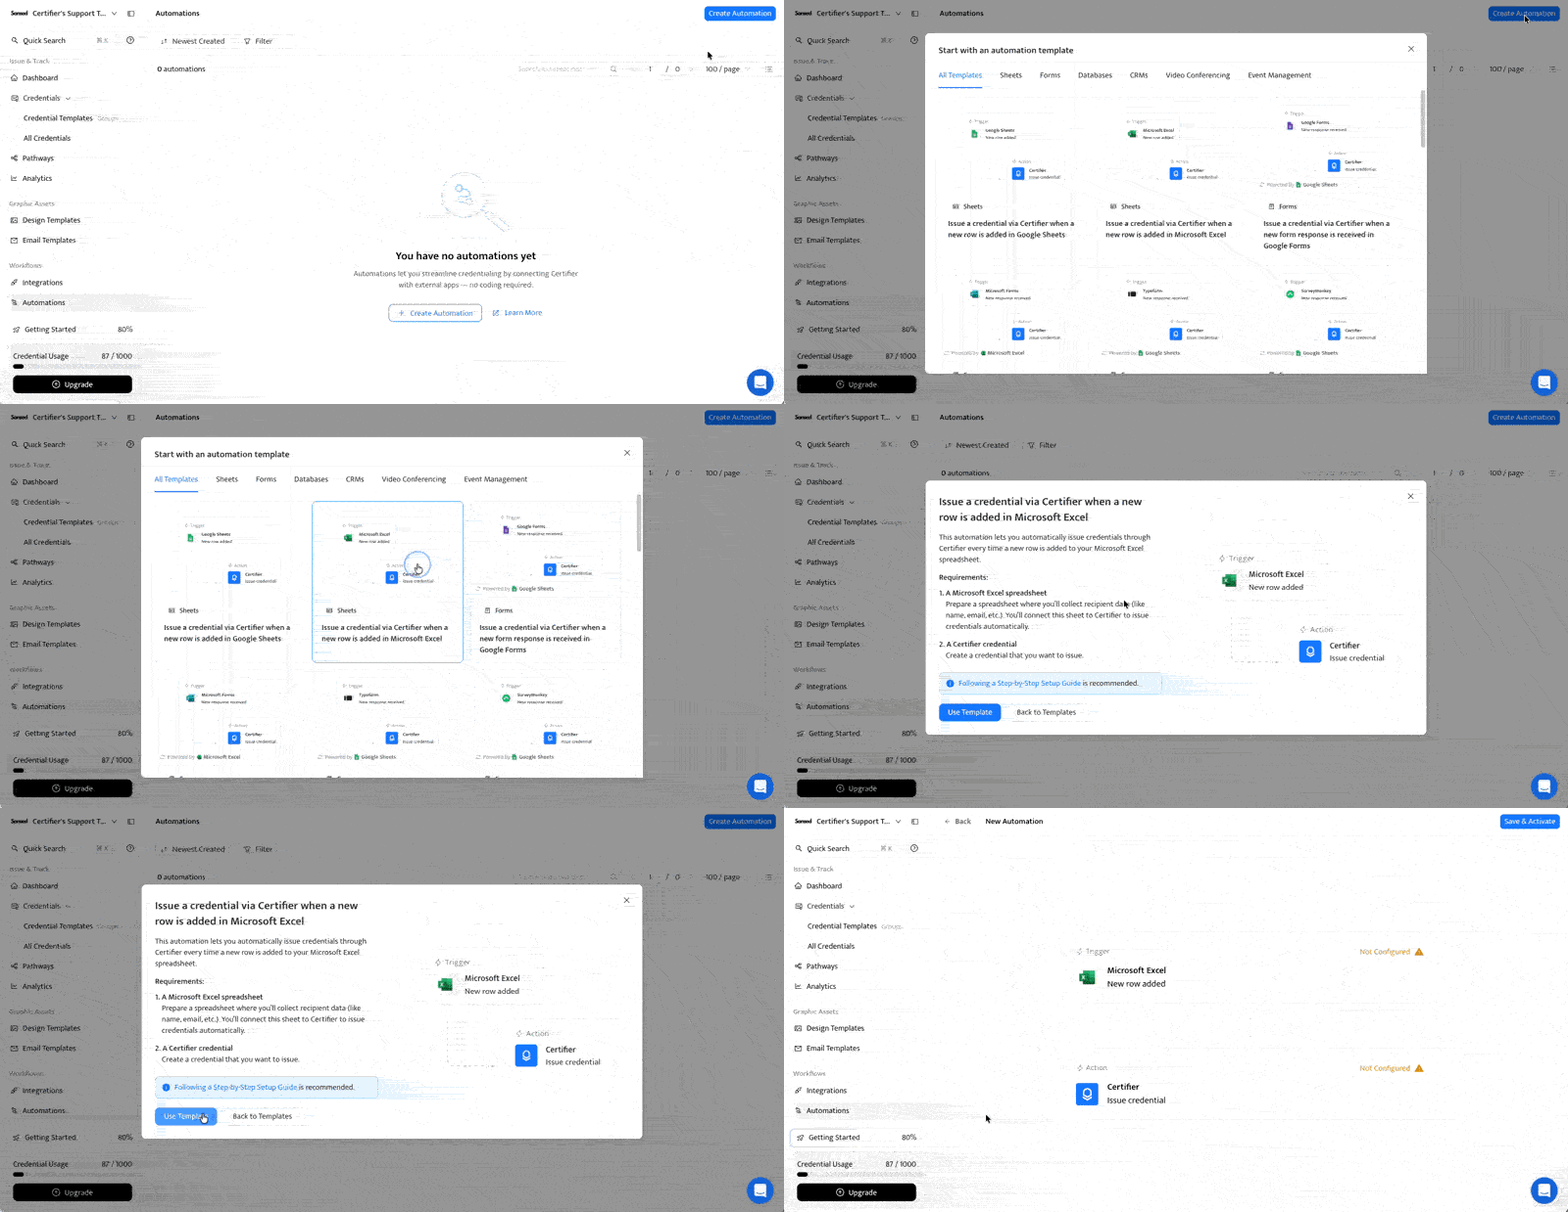
Here is the basic workflow:
01Create or choose the certificate template in Certifier.
02Prepare the Excel workbook with a clean recipient table.
03Create an automation in Certifier.
04Connect the Microsoft Excel account through the secure authorization flow.
05Select the workbook and the worksheet or table Certifier should monitor.
06Map Excel columns to recipient fields and custom certificate attributes.
07Choose the issuing behavior available in your setup, such as draft review or automatic issuing.
08Test with one internal row.
01Activate the workflow and monitor the first real batch.
For safer operations, keep an Input Sheet and a Live Sheet. Use the Input Sheet to draft, clean, and approve rows. Move only finished rows into the Live Sheet when they are ready to issue. Certifier's Microsoft Excel automation guidance notes that Excel sheets are checked on a timed interval, so an incomplete row can cause skipped or erroneous entries if it reaches the monitored sheet too early.
Keep the column headers stable after activation. If you rename Name to Recipient Name, add new custom fields, or change the table shape, the automation may need to be rebuilt or remapped depending on the product flow.
Use Certifier as your certificate generator from Excel when your team needs repeatable issuing rather than a one-time document merge.
Spreadsheet upload is best when the recipient list is final. Use this route for a completed webinar, a finished course cohort, a quarterly internal training batch, or any situation where you want to review the file before issuing certificates.
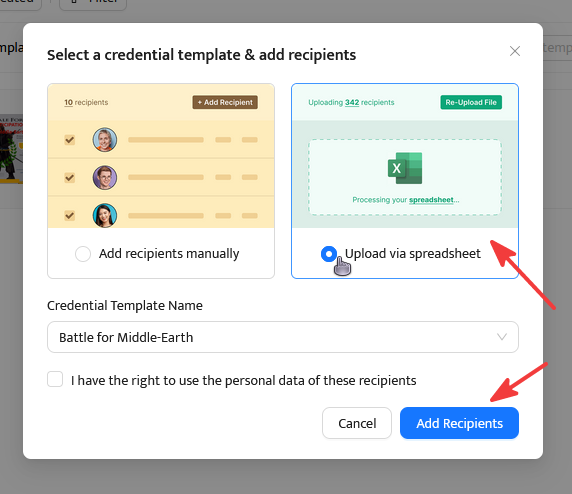
The process is simple:
01Make a clean copy of the final Excel file.
02Remove unused columns, blank rows, filters, comments, and internal notes.
03Save the file as .xlsx or .csv , depending on the upload workflow.
04Upload the spreadsheet to Certifier by going to your Dashboard, selecting Credential Templates > and then Issue Credentials option on the template you want to use.
05Map columns to certificate fields such as recipient name, email, course, date, and grade.
06Review invalid rows and fix email, name, or date issues.
07Generate drafts first if the batch is high-stakes.
08Publish, email, or download certificates.
This method gives you a manual checkpoint before anything is sent. It is also easier to troubleshoot than a live automation because the file is a fixed snapshot.
For the safest upload path, use XLSX or CSV. Certifier's spreadsheet upload troubleshooting documentation highlights CSV and XLSX as accepted formats and lists common upload blockers such as wrong file format, missing records, invalid emails, and columns without headers. If you have an older .xls workbook, convert it to XLSX or CSV before upload unless your current product flow confirms .xls support.
Word mail merge is the native Microsoft Office route. It is useful when you want printable certificates or a simple PDF batch and don’t need hosted verification, credential analytics, automated reissues, or recipient engagement tracking.
Microsoft's mail merge guidance recommends preparing the Excel spreadsheet before connecting it to Word. Column names should match the fields you want to insert, data should be in the first sheet, values such as dates or other formatted fields should be formatted correctly, and edits should be completed before connecting the workbook to the Word document.
To create certificates in Word from an Excel list:
01Prepare the Excel spreadsheet with one row per recipient.
02Use column headers that match the certificate fields, such as Name, Email, Date, and CourseName.
03Create or open the certificate template in Word.
04In Word, start a mail merge and connect the document to the Excel spreadsheet.
05Insert merge fields where personalized data should appear.
06Preview records to confirm each certificate fills correctly.
07Finish and merge to print, PDF, or email if that fits your process.
Mail merge is a good manual option, but it shifts the operational burden to your team. Delivery, corrections, reissues, recipient lookup, verification, expiration reminders, and analytics remain manual unless another tool is added.
It can also break when Excel values are inconsistent. Dates may appear in the wrong format, blank cells can create incomplete certificates, and mismatched field names can leave merge fields empty. Preview several records before printing or exporting the full batch.
Use an automation platform when the certificate workflow starts outside the Excel file or needs routing before issuing. This is common when an LMS, CRM, HR system, event platform, form tool, approval workflow, or Microsoft 365 process updates the spreadsheet before certificates are generated.
Use Power Automate when the workflow is Microsoft 365-native. For example, generating certificates from a Microsoft Form response, SharePoint list update, Teams approval, or Excel Online row can move through a Microsoft-controlled flow before reaching the certificate workflow.
Use Zapier or Make when the trigger starts in a cross-app workflow. For example, a course completion in an LMS, a paid order, a webinar attendance update, or a CRM stage change can create or update an Excel row, then pass eligible recipients to the certificate workflow.
Fortunately, Certifier offers a native Zapier integration you can use to trigger various actions when a certificate is issued.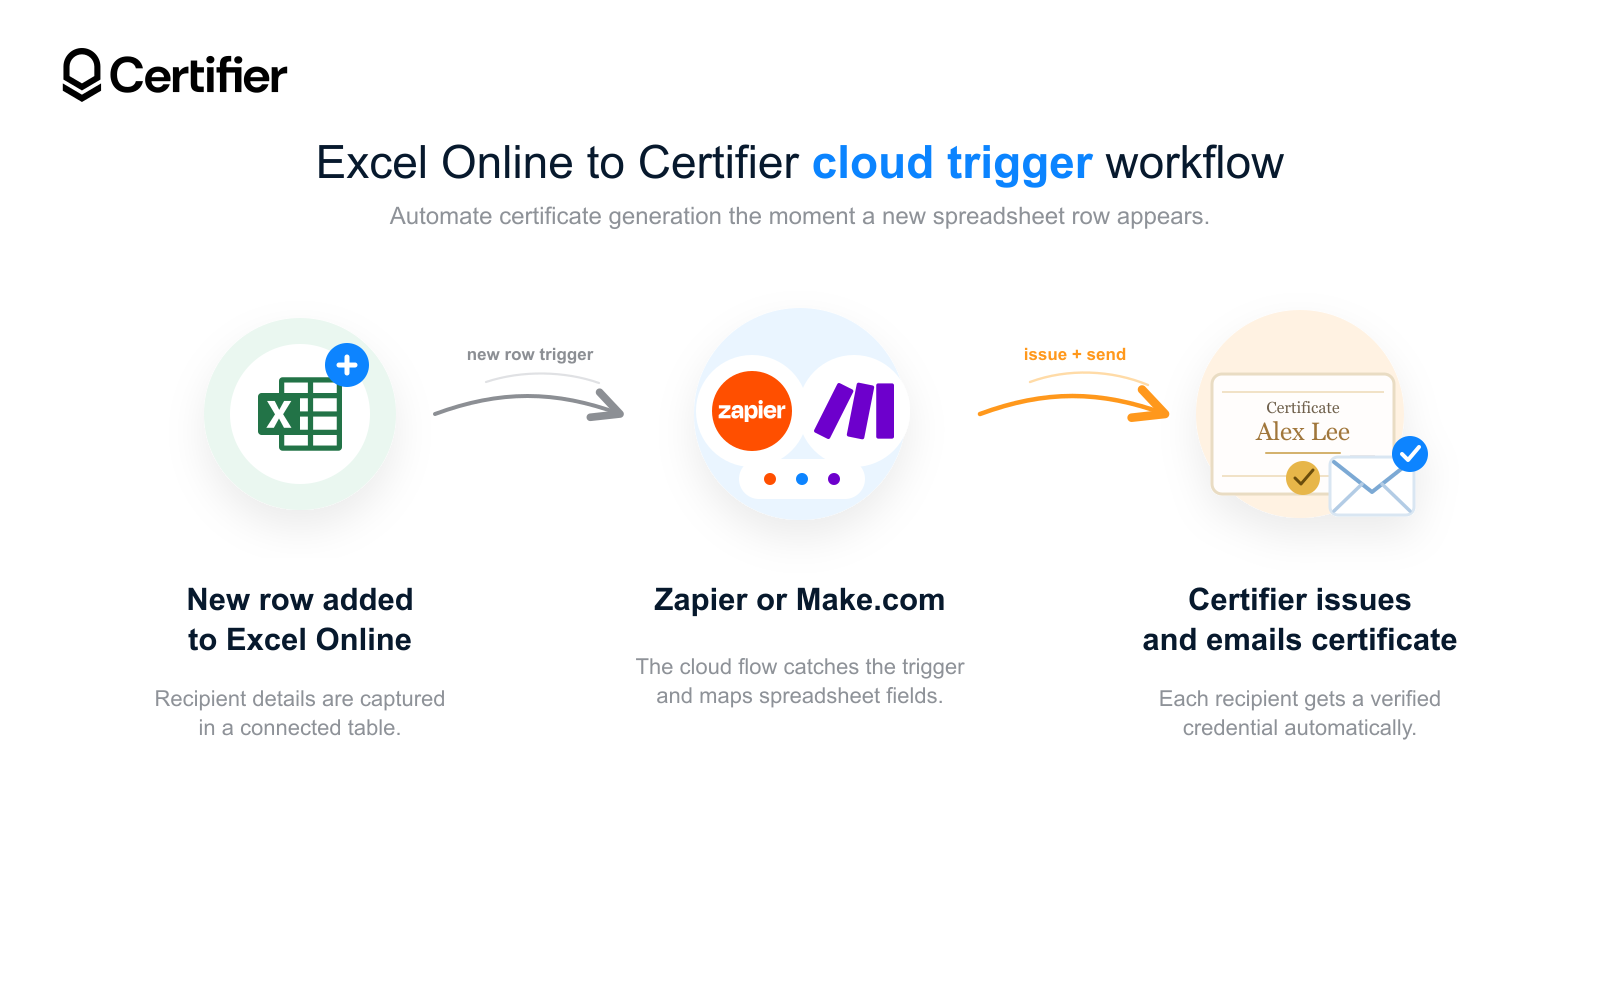 Here’s how you do it:

Choose the source trigger, such as course completion, form submission, paid order, or new Excel row.
Add filters so only eligible recipients continue.
Send the cleaned data to Excel, Certifier, or the next issuing step.
Map fields such as name, email, course, issue date, and custom attributes.
Test with one internal recipient.
Monitor failed tasks, duplicate sends, locked files, connector delays, and plan limits.
The main risk is operational overhead. Microsoft documents limitations for the Excel Online connector, including file-size limits, locked files after connector use, unsupported simultaneous edits, throttling, hidden-column constraints for some operations, and issues caused by complex formulas or many rows.
That doesn’t make automation a bad choice. It means the workbook should be clean, cloud-hosted, structured, and owned by someone who can monitor failures.
Read our guide to Microsoft Dynamics and Certifier connectors for a deeper comparison of popular automation options.
Use the developer route when certificates should be issued from a product database, LMS backend, CRM backend, customer portal, or internal operations system. In that case, Excel may still be useful for exports and audits, but it shouldn’t be the primary automation layer.
The Certifier API documentation includes endpoints for credential workflows such as listing, creating, issuing, sending, searching, updating, and deleting credentials, along with credential template and design template operations. Webhooks can notify your system when credential events happen, including credential creation, update, deletion, or issuance.
Certifier also documents a remote MCP server at https://api.certifier.io/v1/mcp for MCP-compatible AI clients. This is useful for AI-assisted internal operations, such as searching credentials, issuing a one-off credential, inspecting design templates, or correcting and resending a credential from a chat interface.
Treat Certifier's MCP as an internal tooling layer, not a replacement for a governed product integration.
This method is optional for most Excel users. Use it when a technical team wants controlled, native credential operations rather than spreadsheet-based processes.
Use this table when certificates don’t generate correctly from your Excel file.
Problem | Likely Cause | Fix |
|---|---|---|
Only some certificates generate | Blank rows, invalid emails, hidden filters, unsupported file format, or unmapped required fields | Clean the file, validate emails, remove filters, and test a small batch. |
Names appear wrong | First and last names are split, headers were mapped incorrectly, or formulas didn’t resolve | Create a Full Name column and remap fields. Use the first and last name Excel guide if needed. |
Dates appear in the wrong format | Mixed date formats or date values stored as text | Standardize dates before upload or merge. Preview several certificates before issuing. |
Excel columns don’t match merge fields, the wrong sheet was selected, or edits were made after connecting | Match field names, reconnect the data source, and preview records. | |
Duplicate certificates are created | Test rows were reused, records were uploaded twice, or automation retried after edits | Use a test file, draft mode, status columns, and deduplication checks. |
Excel automation does not trigger | File is local or read-only, not in supported cloud storage, not in a structured table, locked, or columns changed | Store the file in a supported cloud location, use a clean table, and avoid changing headers after mapping. |
Upload fails | Wrong file format, missing records, invalid emails, or a column without a header | Use XLSX or CSV, confirm each row has required data, validate emails, and make sure every column has a header. |
Excel is a strong place to organize recipient data, but it shouldn't become the entire certificate management system.
For a one-off batch, upload a clean XLSX or CSV file and map the column while paying attention to formatting.
For print-only certificates, Word mail merge is a workable native Microsoft Office route.
For repeatable digital certificates, use a platform that handles design, field mapping, email delivery, hosted verification, PDF access, and tracking, like Certifier.io.
There’s nothing saying you can’t keep Excel as the source of truth for recipient data, you just need the right issuing workflow to turn that data into accurate certificates without editing each certificate by hand.
If you need repeatable digital issuing from spreadsheet data, use Certifier's certificate generator from Excel to prepare, map, issue, and manage certificates in bulk with ease.
Prepare an Excel workbook with one row per recipient, you can use Certifier’s sample sheet, connect the workbook to a certificate workflow, map columns such as name, email, course, date, and grade to certificate fields, test one internal row, and activate the automation.
For recurring digital certificates, use a connected workflow such as Certifier's Microsoft Excel automation.
For Microsoft 365 routing, use Power Automate when the workflow needs approvals or additional steps.
You can generate certificates directly by uploading your Excel sheet (.xlsx or .csv) to a dedicated certificate generator like Certifier.
This bypasses Microsoft Word entirely. You can design your templates on a visual canvas, map your columns to recipient names, and email the PDFs automatically.
Use XLSX when you want to preserve workbook structure before upload. Use CSV when the receiving tool expects a simple plain-text table or when you want to avoid workbook-specific formatting issues. In both cases, check headers, blank rows, valid emails, and date formats before generating certificates.
Yes, but the method matters. Word mail merge can merge to email in some Microsoft Office workflows, but delivery management stays manual. A powerful and free certificate generator like Certifier lets you email digital certificates, provide PDF access, and keep issued credentials available for later edits, reissues, or tracking.
The best option depends on what you need. For a small print-only batch, Word mail merge may be enough.
For bulk digital certificates, Certifier has a bulk certificate generator that supports Excel or CSV upload, field mapping, email delivery, verification pages, PDF downloads, and reissue workflows.
If you choose a free tool, test one internal certificate first and confirm whether it supports the file format, branding, delivery, and verification you need.

- Content Strategy
- SEO & AEO/GEO strategy
- Conversion Rate Optimization
- Organic Growth
- Buyer Psychology
Head of Content
Vlad Melnic leads content at Certifier, bringing 10+ years of experience in SEO content marketing and conversion-focused content. His focus is turning complex product value into clear benefits.


