


Trusted by:
University of Southern California
Warner Bros.
Volvo
Amazon
Stanford University
Updated: June 10, 2026
15 min read
If you already work inside an AI assistant like Claude or ChatGPT, you don't need to switch tabs or set up complex integrations to issue digital credentials. Connect to Certifier's MCP and draft, verify, or issue certificates and badges directly from your chat window using simple conversational prompts.
Research with AI:
Issuing 250 certificates used to mean designing one in Canva or PowerPoint, exporting it as a PDF, and updating each recipient's name and email by hand.
Teams that needed more throughput moved to Zapier or Make to automate certificate generation: form responses to a spreadsheet, spreadsheet rows to a templating tool, templates to an email send. Faster, but still something that takes setup and breaks quietly.
Credentialing platforms folded that workflow into one place where design, dynamic recipient fields, bulk issuance, verifiable links, and recipient analytics live in one dashboard. Most training providers, schools, and event organizers use them today.
If you've been issuing certificates in bulk from Certifier, you already know how this speeds up the entire process.
The Model Context Protocol (MCP) is the next layer on top. It lets you do the same job from an AI assistant, with the credentialing platform sitting behind the chat as the system of record. This guide walks through how to set that up and issue your first batch.
Five Issuance Paths: Dashboard bulk upload for one-off batches, Certifier MCP for AI-assisted work from Claude or ChatGPT, Certifier native integrations with the most popular tools, Zapier or Make for trigger-based automation, and the Certifier API for developer-built integrations.
AI-Assisted Operations: Certifier MCP is a remote MCP server that lets Claude, ChatGPT, Codex, and other compatible AI assistants issue digital certificates and badges, find, fix, and manage credentials directly from a chat.
One-Minute Setup: Paste the MCP URL (https://api.certifier.io/v1/mcp) into your assistant's connector settings and approve OAuth once.
Safety Confirmation: Every issuance requires explicit confirmation. The assistant returns a plan (recipient count, template, sample rows) before anything reaches inboxes.
Full-Scope Support: The MCP handles bulk sends, single sends, fixes, updates, audits, drafts, and credential template creation from existing designs.
Free Tier Access: MCP access is included in Certifier's free plan, which covers 250 credentials per year.
The MCP is one of four ways to issue certificates from Certifier. Each fits a different kind of job. See the table below to find the best fit for yours.
Workflow | Best For | Use When |
|---|---|---|
One-off batches with a finalized list | Your recipient list is ready and you want to review the upload visually before sending. Closest to the "open the app and send it" mental model. | |
AI-assisted issuance, batch and single-recipient work | You want to issue certificates with AI, e.g., issue, update, find, or resend credentials from Claude or ChatGPT directly, or automate certificate issuance from your existing chat workflow. Best for teams that already work inside an AI assistant. | |
Recurring automation with the most-used apps | Your trigger lives in Google Sheets, Excel, HubSpot, Zoom, Salesforce, ActiveCampaign, or another app Certifier connects to directly. Quick to set up and no third-party integration app required. | |
Trigger-based, multi-app automation | Your trigger lives in an app Certifier doesn't connect to directly. Zapier, Make, and Pipedream cover 4,000+ apps and fire a credential automatically when something happens: a form submission, a course completion, a paid order. Setup is more involved than a native integration, but the workflow runs unattended once configured. | |
Developer-owned integrations | You're embedding credential issuance into a product, LMS, or backend system. Requires coding and gives you the most control. |
This guide walks through the MCP path.
Before you can issue certificates from a chat, you need four things in place: a Certifier account, an AI assistant that supports MCP, a credential template, and a recipient list. None of these takes long.
Certifier is the credentialing platform behind the chat. It holds designs for your certificates and badges, populates recipient details, sends delivery emails, and hosts the verification pages.
💡 These are the credentials issued after course completions, training programs, webinars, and events. The kind recipients add to LinkedIn or download as a PDF, not the kind used for IT infrastructure, such as passwords or SSH keys.
If you don't have an account yet, create a free Certifier account. Signing up creates your Certifier workspace, where all your templates, credentials, and recipient records live. The free plan includes 250 credentials annually and MCP access.
Certifier MCP works with any AI assistant that supports the Model Context Protocol, an open standard that lets AI assistants take actions in other tools. This guide uses Claude, but the same setup also works in ChatGPT, Codex, Antigravity, and other MCP-compatible clients.
To connect, you’ll only need to paste the remote MCP server URL into your assistant's connector settings. The same URL works for every assistant:
https://api.certifier.io/v1/mcp
A credential template is the certificate or badge you'll issue. Each template has a name, a design (the visual layout), and any additional details, such as event type, price, format, and a description, to give anyone viewing the credential more context about it.
If you don't have a template yet, the walkthrough below covers setting one up. The MCP issues from templates that already exist in your Certifier workspace. It can't design a new visual layout from a chat prompt yet, so you need to build the template in the dashboard first.
Recipient data lives in a CSV or Excel file. Two columns are required; the rest are optional.
Field | Required | What Its For |
|---|---|---|
Recipient name | Yes | Appears on the certificate and the delivery email |
Recipient email | Yes | Where the assistant sends the certificate |
Custom Attributes | Optional | Any other personalized fields your template uses: grade, date, speaker name. One design + these attributes = one personalized certificate per recipient. |
A few things to check before you attach the file:
Duplicate emails or names. Two rows for the same recipient = two credentials, unless you want that.
Blank recipient names. The name is required, so the assistant pauses to ask whether to skip those rows or use the email address as a fallback.
Blank or invalid email addresses. Required when sending by email. Invalid addresses cause delivery failures.
Dates in mixed formats. Pick one format and use it across the file.
Unused columns. Columns that don't map to any template attribute can confuse the column mapping in Step 4.
Sensitive data. Strip anything that doesn't belong on a public credential.
Start to finish, the walkthrough takes about 7-10 minutes the first time. Most of that is the credential template setup in step 1. After that, future batches run in a couple of minutes: open the chat, attach the list, send the prompt, confirm.
In Certifier, go to Credential templates and create a new one (or jump straight to Step 2 if you already have one). The template is where the name, the design, and any additional details (event type, price, format, description) live.
Fastest path: generate with AI. Pick a type and write a short description of what the certificate is for, anything from an event to a training completion. Certifier's AI recommends a matching design and pre-fills the template data (name, description, format). Use the design as-is, or customize it to match your brand: adjust colors and text, add a logo, drop in a QR code linking to the verification page. Review the pre-filled details, tweak anything that isn't right, and create the template.
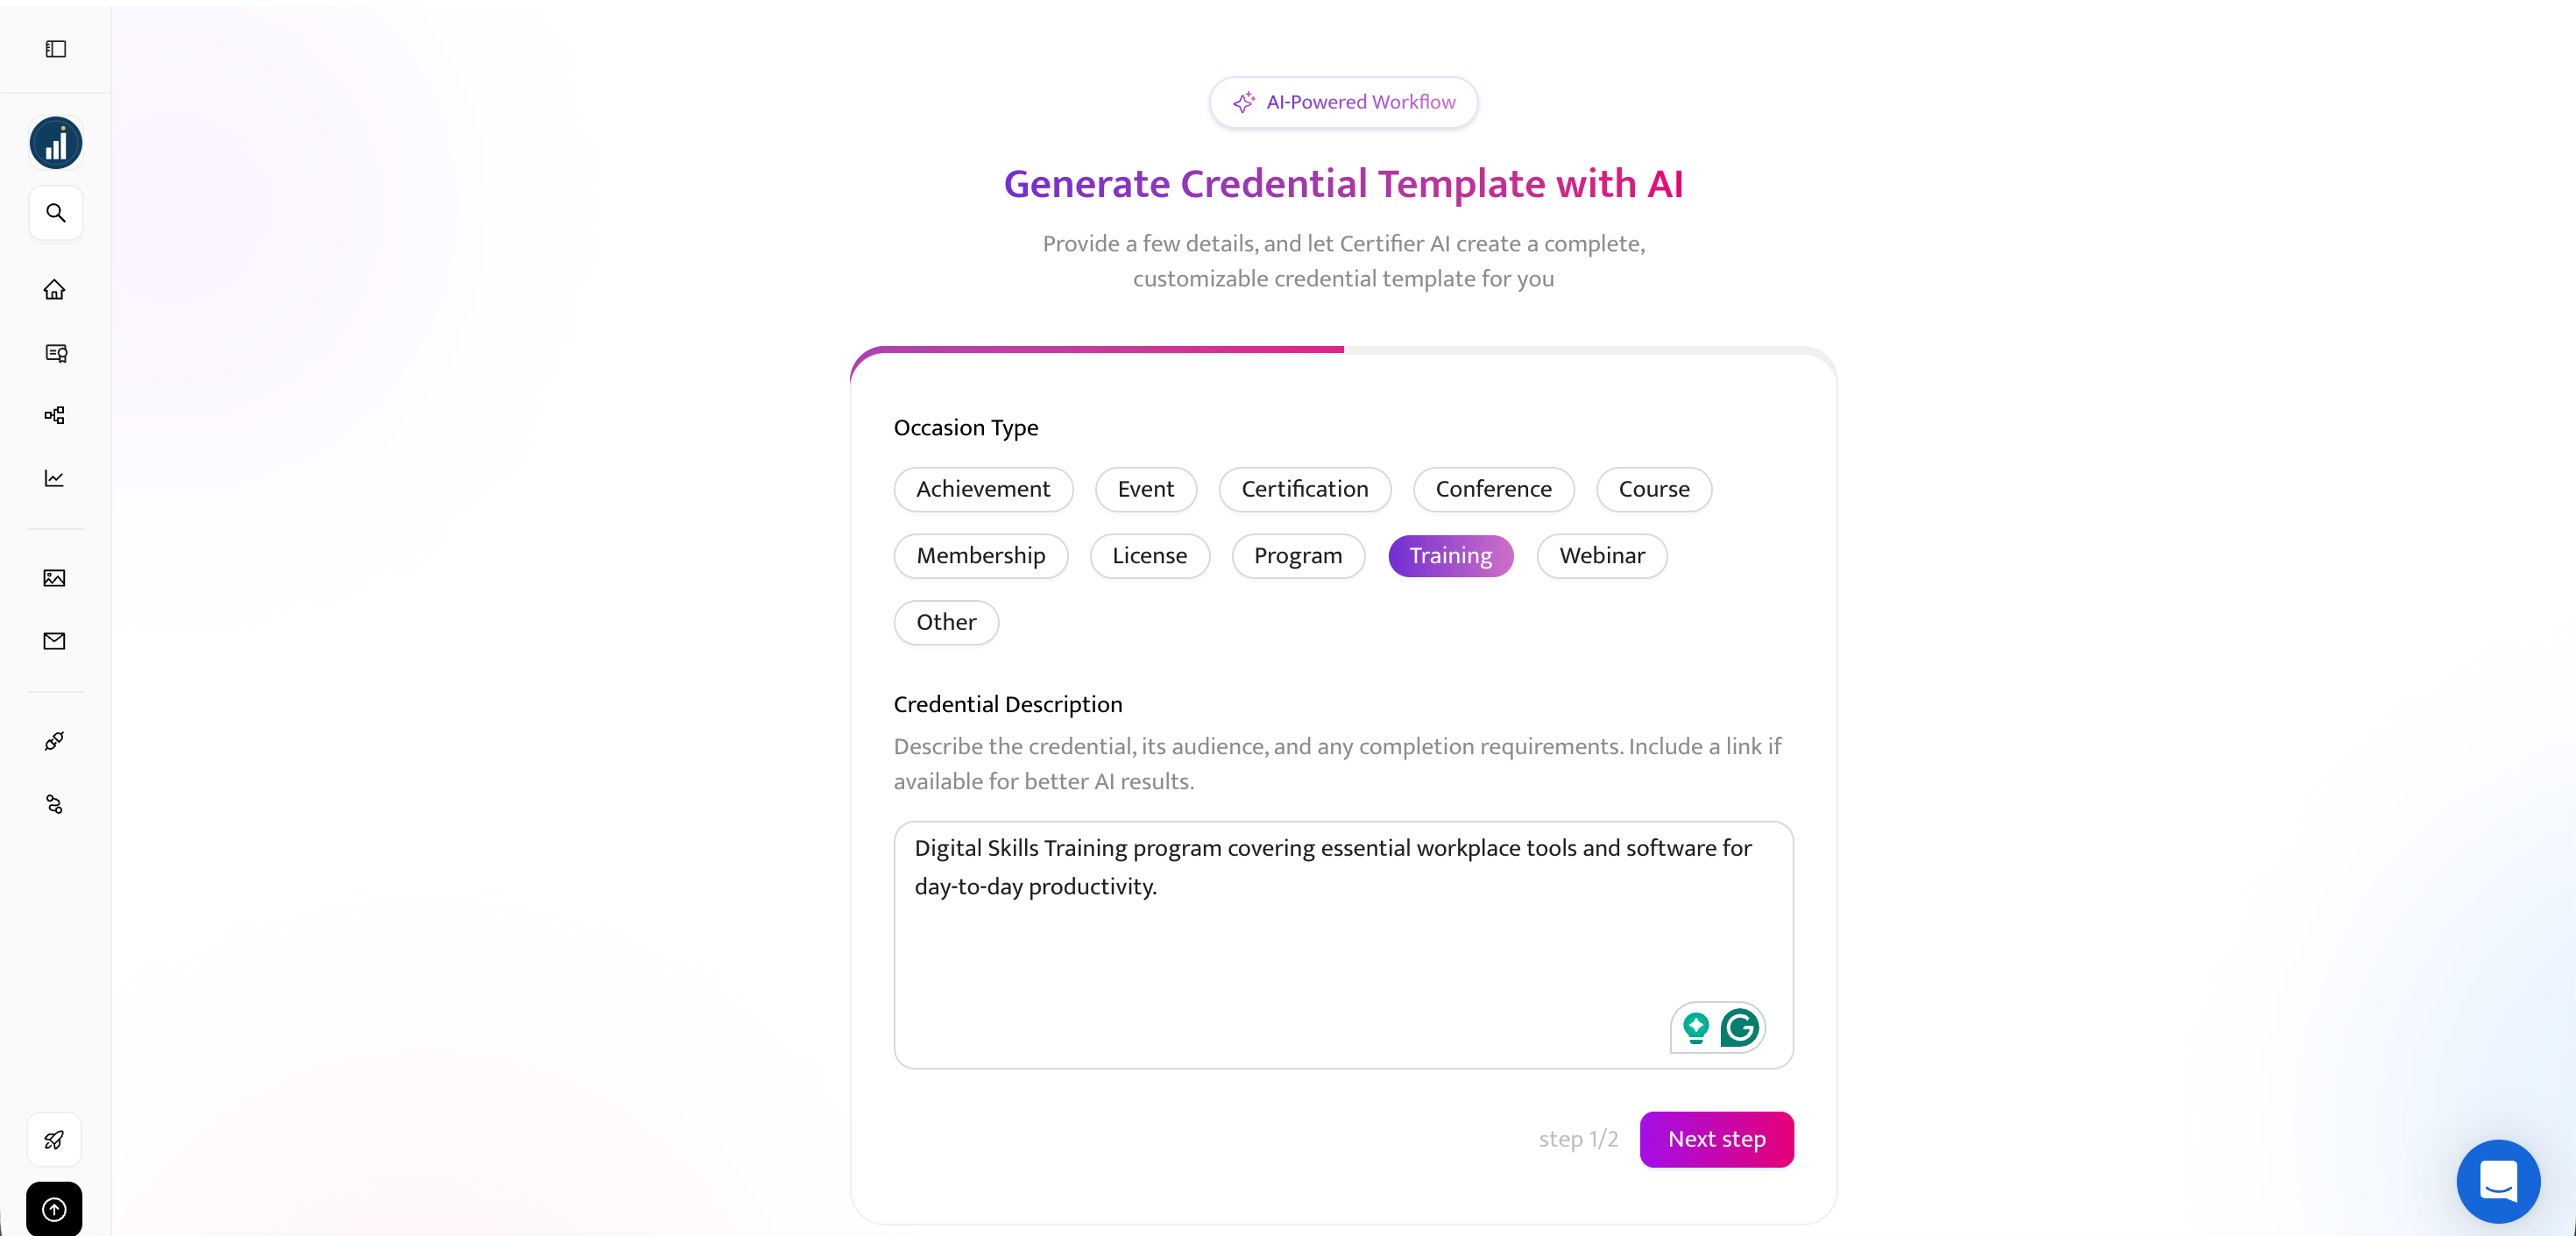
Alternative: pick from the template library. Certifier has hundreds of pre-built designs for both certificates and badges. Browse, pick one close to what you need, and customize it the same way. Then fill in the template details (name, description, event type, format), and save.
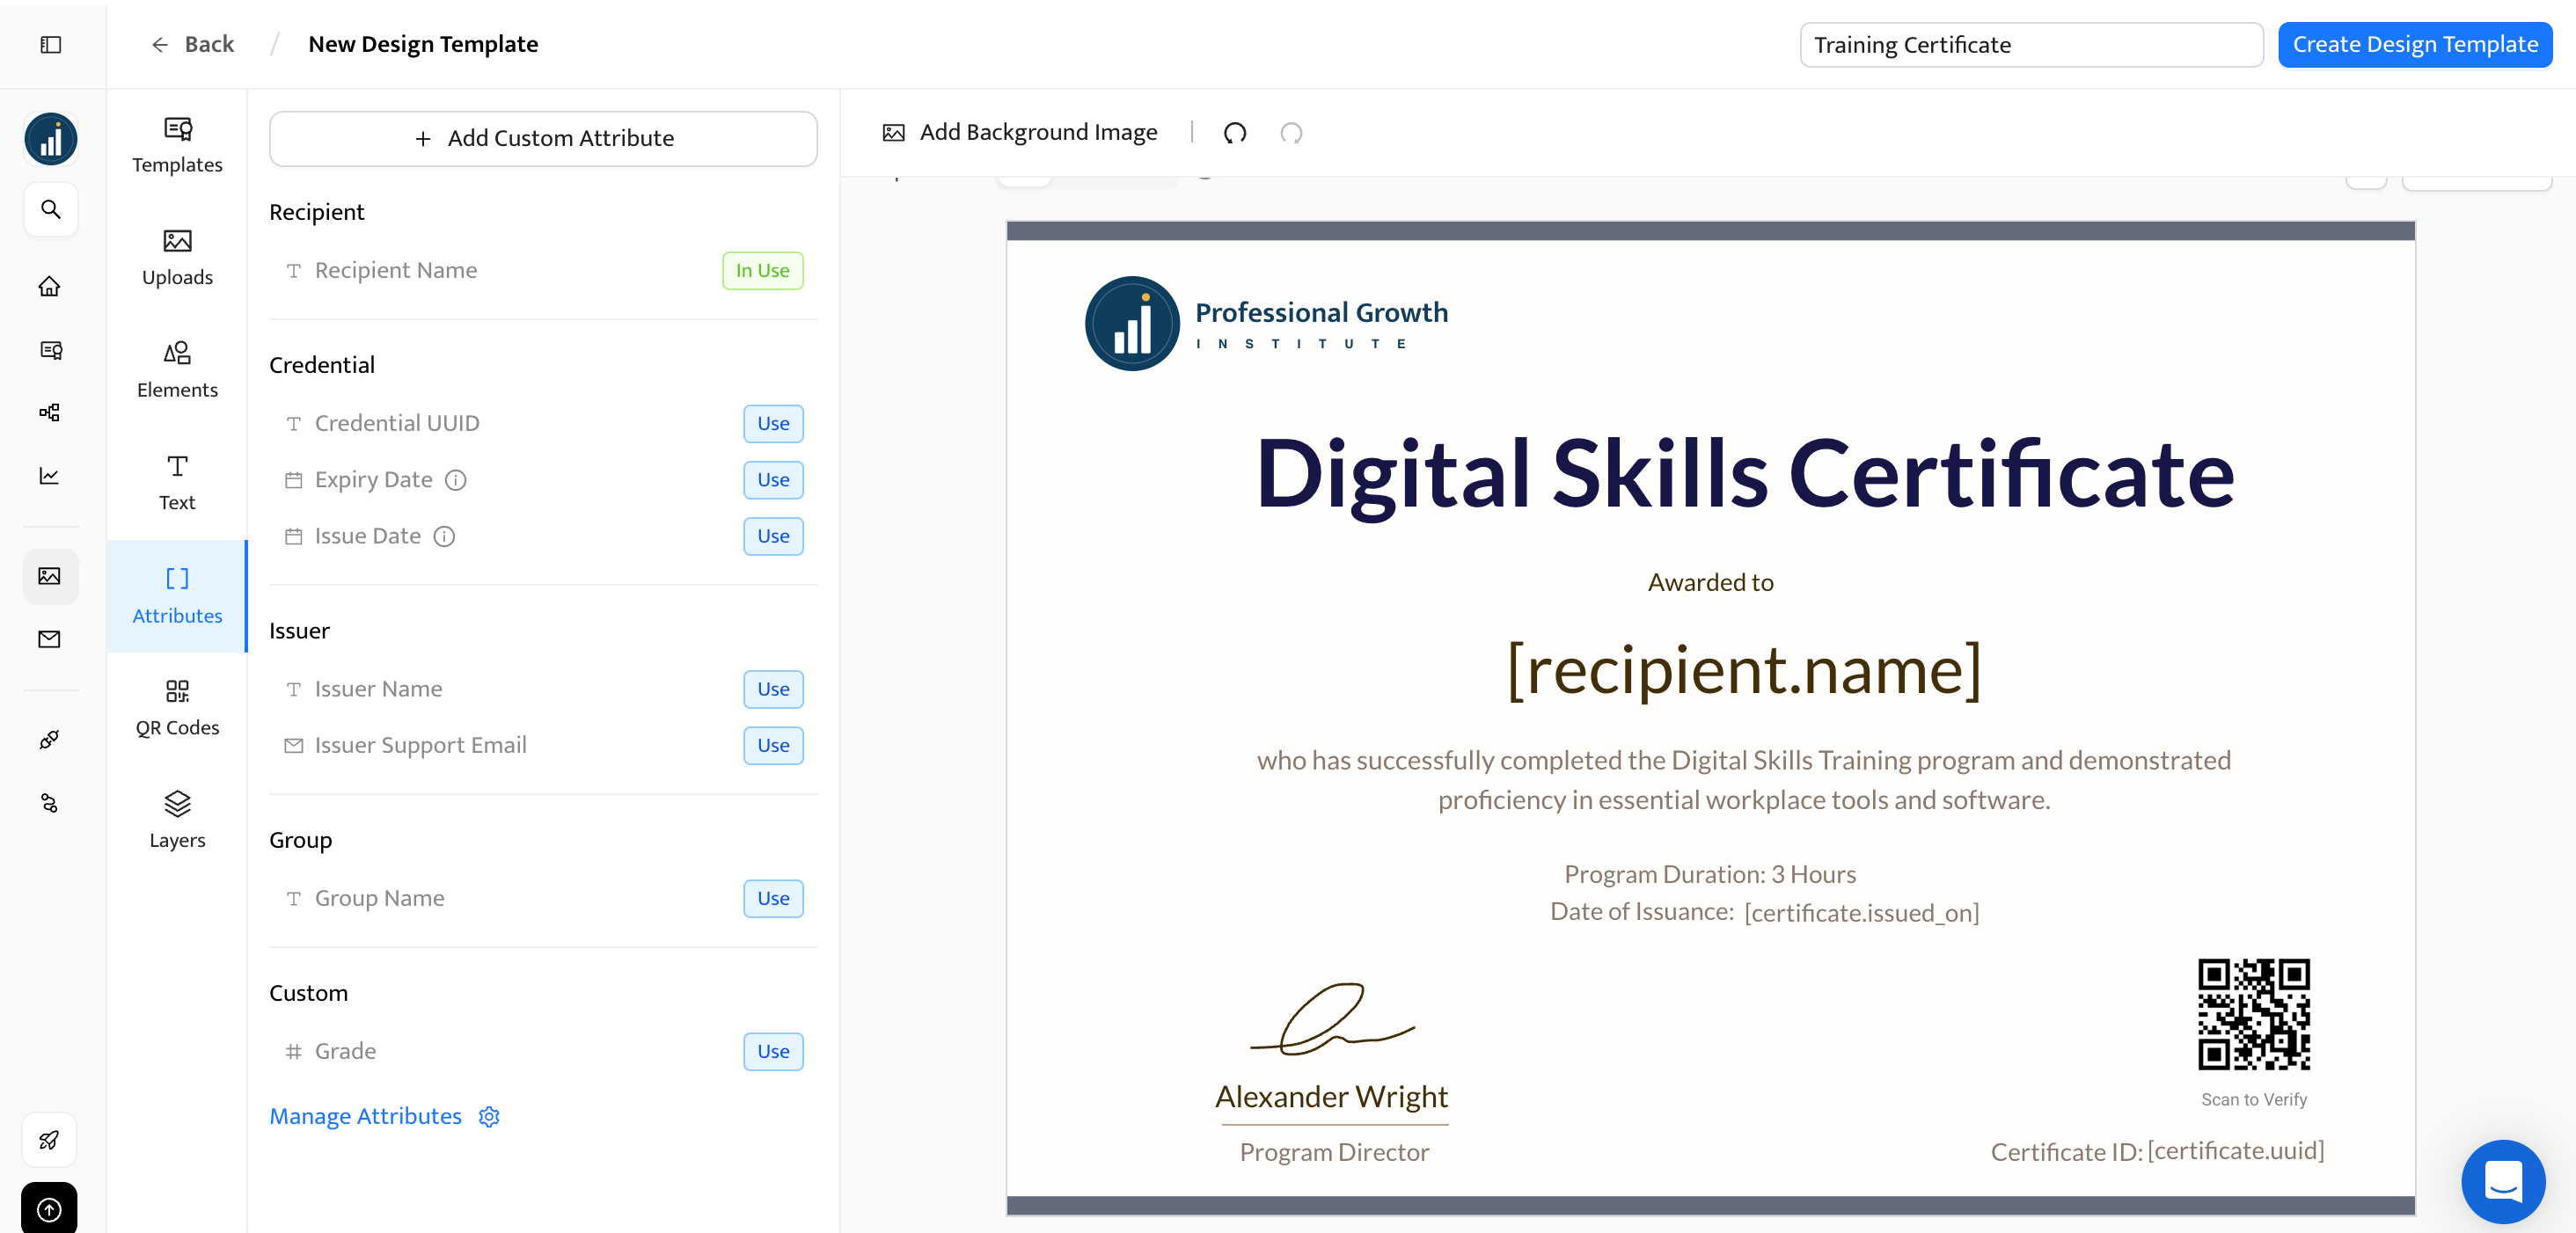
Either way, check the dynamic attributes. Anything wrapped in brackets (like [recipient.name]) is an attribute. Each one is later replaced with the actual recipient's data when you issue the certificate. In most cases, you'll need recipient name, issue date, and unique ID attributes for each certificate. You can add more for grades, completion hours, instructor name, or anything else your certificate displays.
The connection path depends on the assistant.
In ChatGPT. Install Certifier directly from the ChatGPT app marketplace, or open Apps from the sidebar and search for Certifier. Approve OAuth when prompted, and you're connected.
In Claude. Add Certifier as a custom connector. Open Settings → Connectors → Add custom connector, paste the Certifier MCP server URL, and approve OAuth.
In Codex, Antigravity, or another MCP-compatible client. Use the same custom-connector path as Claude. Paste the MCP server URL into the assistant's connector settings and approve OAuth.
The Certifier MCP server URL is the same for everyone:
https://api.certifier.io/v1/mcp
Our step-by-step setup guide follows the process in more detail if you need it.
To confirm the connection worked, ask the assistant to list your credential templates:
List my Certifier credential templates. Show the template name, template ID if available, and whether each template has certificate or badge designs attached.
The assistant returns the template you created in Step 1.
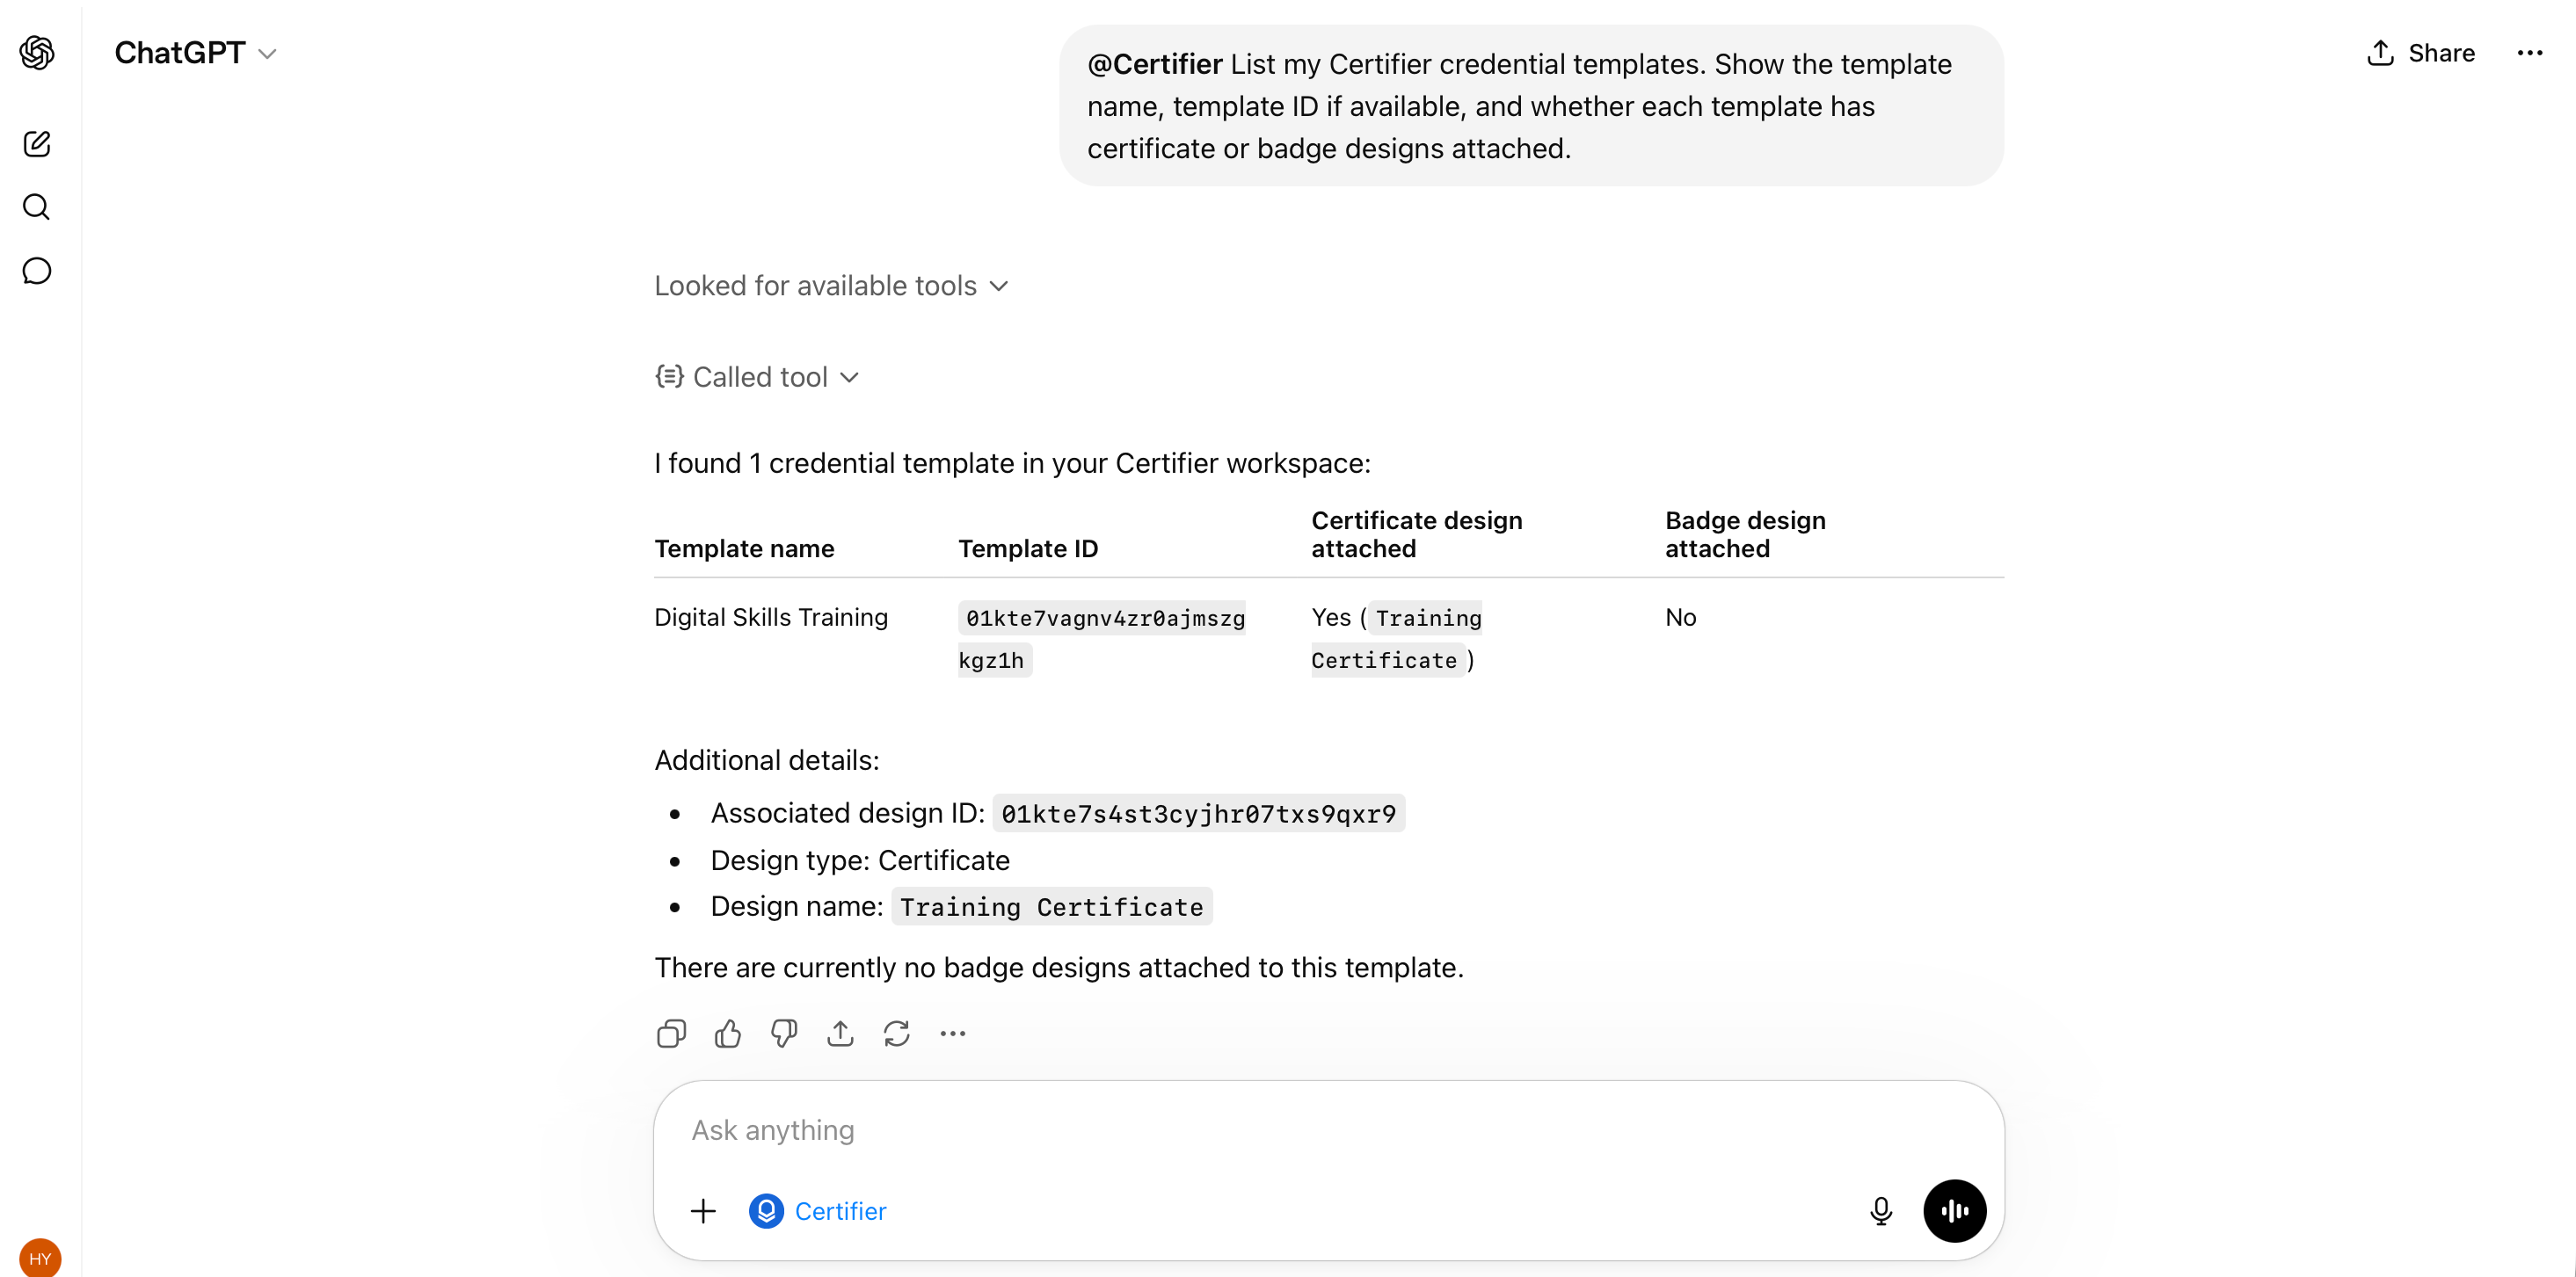
If it doesn't see it, the connection didn't go through. Recheck the URL and autorization or try removing the connector and setting it up again.
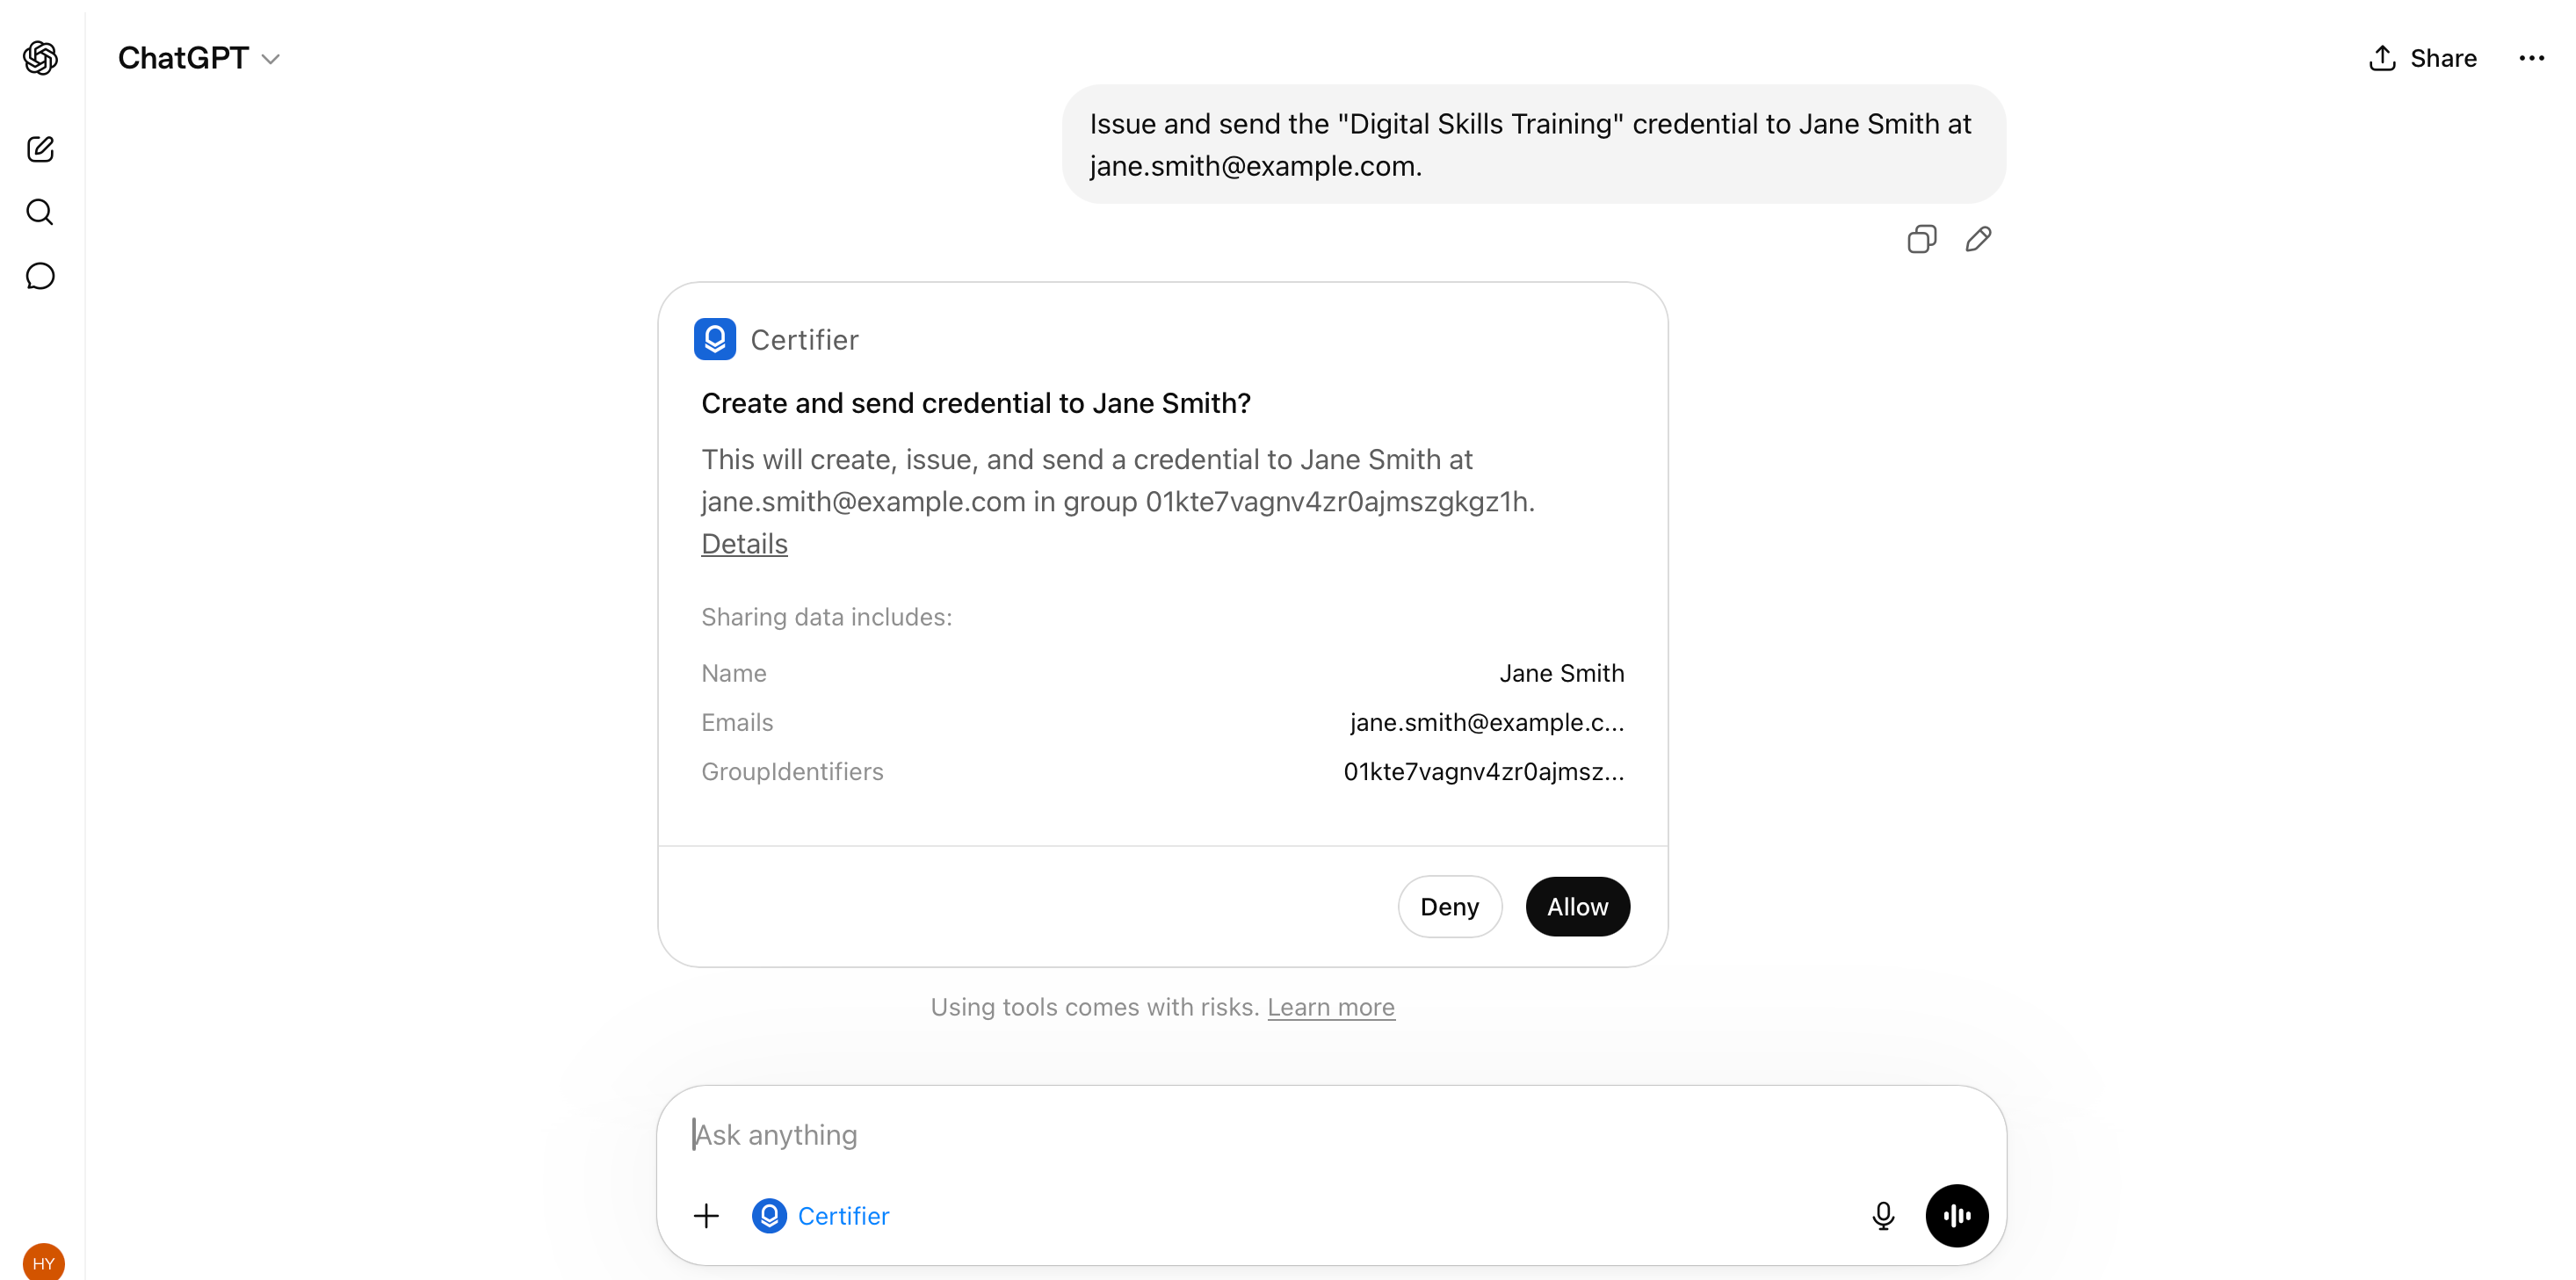
Before issuing to the full list, run a one-recipient test using your own name and email. This catches design errors, missing attributes, or anything else that wouldn't be obvious until certificates land in inboxes.
Copy this prompt and replace the values in curly braces:
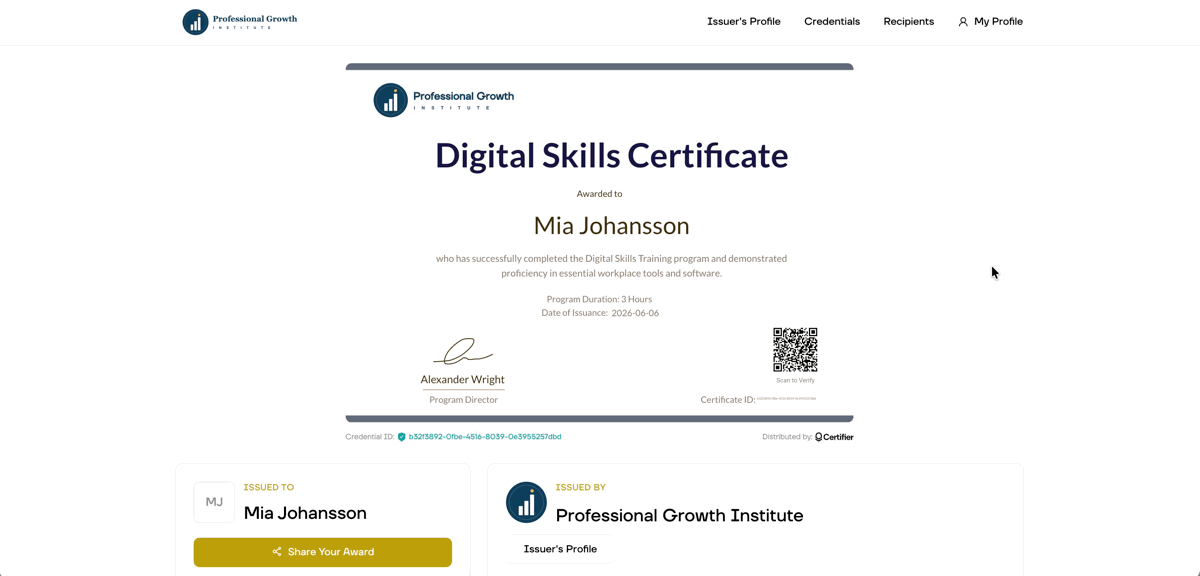
Issue and send the "{Digital Skills Training}" credential to {Your Name} at {your.email@example.com}.
The assistant responds with a plan: a short summary of what it's about to do, the template name, and the recipient details. Confirm, and the credential is issued and sent within seconds. The confirmation step here ensures that nothing is issued or sent until you confirm, so you can stay certain that Certifier only performs actions with your explicit sign-off.
Check your inbox. The delivery email contains a link to the credential page where you'll see the name, design, dynamic attributes, and verify button as the recipient will see them. If anything's off (typo in the template, attribute missing, design issue), fix it in Certifier and re-test before moving to the full batch.
Want more control? For high-stakes credentials, complex templates, or workspaces with similarly-named templates, write a structured prompt that requests the plan up front:
Prepare a one-recipient test for the "{Digital Skills Training}" credential.
Recipient:
Name: {Your Name}
Email: {your.email@example.com}
Course date: {Month DD, YYYY}
Instructor: {Instructor Name}
Return the issuing plan first, including the exact template, recipient email, mapped fields, and whether the credential will be sent by email. Do not issue or send anything until I confirm.
Same end state, more explicit control over what the plan contains.
With the test confirmed, you're ready for the real batch.
Attach your recipient list. Drag the CSV or Excel file into the conversation, or use your assistant's file upload button. Clean column headers and one row per recipient with no merged cells will save back-and-forth with the assistant.
Write the prompt. Point at the file and tell the assistant which columns map to which fields:
Issue and send the "{Digital Skills Training}" credential to everyone in the attached file. The recipient's name is in column A, email in column B.
If your file isn't picked up correctly when attached to the chat, you can paste the rows directly into the conversation in comma-separated format:
Jane Doe, jane@example.com
John Smith, john@example.com
If you pasted rows directly into the chat instead of attaching a file, use "everyone on this list" instead of "everyone in the attached file."
If your file has more attributes (grades, course date, instructor name, completion hours), name each one and which column it lives in:
Issue and send the "{Digital Skills Training}" credential to everyone in the attached file. Recipient name is in column A, email in column B, score in column C, course date in column D, and instructor name in column E.
For high-stakes batches (large cohorts, compliance programs, multi-stakeholder approvals), request a strict plan up front:
Prepare a batch issuing plan for the "{Digital Skills Training}" credential from the attached file.
Mapping:
Recipient name: column A
Email: column B
Score: column C
Course date: column D
Instructor: column E
Return the plan first, including: total recipient count, template name, delivery mode, any rows with blank required fields, and three sample rows with their mapped attributes. Do not issue or send anything until I confirm.
This forces an explicit plan-first response and locks down exactly what shows up in the plan.
Review the plan, then confirm. Before any certificate is sent, the assistant returns a plan. Nothing reaches inboxes until you confirm. Verify:
Recipient count. Should match your file.
Template name. Should be the right one, especially if your workspace has similarly named templates.
Delivery mode. The plan should show whether the assistant intends to send by email or save as drafts.
Required fields. Recipient name and email should have values for every row.
Attribute mapping. Custom attributes should map to the right columns (the grade column shouldn't be mapped to email).
While the batch sends, head to your Certifier dashboard to track delivery in real time.
Go to Credentials → All Credentials to see the full list. The most recent run will be at the top. Each row shows the recipient, the credential status, and a link to the recipient's credential page.
The dashboard displays delivery status metrics that the chat doesn’t yet surface: bounced emails, recipients who haven't opened the delivery message, or recipients who opened but didn't share the credential. This way, you can proactively reach out to these people directly or resend credentials.
A few seconds after you approve the batch, each recipient gets a delivery email with a link to their certificate page. The certificate itself isn't a PDF attachment: it's a hosted, verifiable credential they can share, download, and prove with one click.
Here's what shows up for them:
A personalized certificate page. A public URL with their name, the program details, the issue date, and any other attributes you set. They can open it directly in a browser, nothing to install.
One-click LinkedIn share. From the certificate page, a recipient can post the credential straight to their LinkedIn profile. Links for X, Facebook, and other networks sit on the same page.
PDF download. For recipients who want a portable copy (for their portfolio, their HR file, or a CV attachment), the certificate downloads as a high-resolution PDF.
A printed copy on demand. Recipients can order a printed and mailed version of their certificate directly from the credential page, which is handy for office displays, framing, or for anyone who prefers paper.
A verify button. Anyone with the link (an employer, a registrar, a certification board) can confirm the credential is real, issued by you, and unmodified. No login required.
This is the same delivery experience whether you've issued a certificate or a digital badge. Both are hosted, verifiable, and shareable from the same recipient page.
This is also why the one-recipient test matters. The recipient page is part of the product experience. Check it before you send the same experience to 250 people.
Beyond the initial batch, credentials need ongoing care: typos to fix, expirations to renew, records to audit, new templates to build. The MCP supports each of these from the chat.
Fix typos and resend
Caught a misspelled name, an outdated job title, or an expired date after the batch went out? Tell the assistant what to fix and which recipient it belongs to. It finds the credential, applies the correction, and resends.
Find the credential for {Alex Jonhson}, update the recipient's name to {Alex Johnson}, and resend.
Update certificate expiration dates
Annual recertifications and compliance renewals usually mean opening the app, filtering the relevant cohort, and updating expiration dates by hand. From the chat, push out an expiration update to a single recipient or a whole group in one prompt. Useful for CPD programs, ISO renewals, or any credential with a yearly cadence.
Find the credential for {Alex Johnson} and update the expiration date to {December 31, 2026}.
Audit and export issued certificates
When an auditor needs every credential issued in Q3, or your operations team wants the latest batch synced to a CRM or LMS, filter in the chat by date, recipient, course, or template. The assistant returns a clean CSV ready to drop into a spreadsheet, a workflow tool, or an external report.
Find {"Product Training 2026"} credentials issued in the last 30 days and export as CSV.
Draft and send drafted certificates
For programs that need internal sign-off before delivery (compliance, legal, multi-stakeholder approvals), draft credentials in the chat first. They sit in your workspace until you confirm. Once approved, ask the assistant to send a specific draft, or batch-send everything that's been cleared.
Draft the “{Product Training 2026}” credential for {Jane Doe} at {jane@example.com}.
Find the drafted credential for {Jane Doe} and send it.
Send all drafted credentials from the "{Product Training 2026}" template.
[attach file] Create credentials as drafts for the attached recipient file. Do not send emails. Return the draft count, sample rows, and any failed rows.
Create new templates without leaving the chat
As you launch new cohorts, programs, or events, ask the assistant to spin up new credential templates using designs you already have. Renaming, updating, and deleting templates work the same way. However, keep in mind that new visual designs still happen in Certifier's design editor.
Create a credential template called "{Leadership Academy Spring 2026}" based on the "{Leadership Certificate}" design. Return the template details before making changes.
For the full set of prompts and example flows, see the Certifier MCP capabilities and prompts guide.
MCP is powerful because it lets an AI assistant act in another system. That is also why the approval pattern matters.
Use these rules for production batches:
01Connect only to the official Certifier MCP server.
02Use OAuth rather than sharing API keys in a chat.
03Authorize the correct Certifier workspace.
04Use the fewest data fields needed to issue the credential.
05Require a plan before write actions.
06Review every approval screen before issuing or sending.
07Keep Certifier as the operational source of truth after the batch runs.
08Revoke MCP access if a client, user, or workspace should no longer have access.
If your organization has strict data or AI policies, review them before uploading recipient files to an assistant. MCP permissions and client-side approval behavior can vary by AI product, plan, and admin settings.
That's the full flow: one credential template, one MCP connection, one prompt. The first batch takes about 10 minutes to set up, and every batch after that runs in a couple of minutes.
If you'd like to send digital credentials with AI on your own list, Certifier's free plan covers 250 credentials and includes MCP access. That's enough for a full cohort or a quarterly event. Start for free and issue your next batch from a chat.

- Content Strategy
- SEO & AEO/GEO strategy
- Conversion Rate Optimization
- Organic Growth
- Buyer Psychology
Head of Content
Vlad Melnic leads content at Certifier, bringing 10+ years of experience in SEO content marketing and conversion-focused content. His focus is turning complex product value into clear benefits.