Trusted by:
Updated: December 05, 2025
9 min read
How to Make an Attendance Sheet in Google Sheets?
Ready to improve your attendance tracking? If you want to monitor classroom, event, or webinar attendance, Google Sheets offers a flexible platform to manage records effectively. Read on and follow simple steps on how to make an attendance sheet in Google Sheets that really works.
Google Sheets offers a free and accessible way to keep attendance records organized and up-to-date.
In this guide, we'll show you how to make an attendance sheet in Google Sheets from scratch. You'll learn how to set up your attendance sheet to add features that make tracking attendance faster.
Here's what you get:
How to create attendance sheet in Google Sheets
Actionable tips for effective attendance tracking (with formulas)
How to use Google for attendance?
Google offers simple yet powerful tools to help you manage attendance efficiently. Its exceptional power lies in the seamless integration of several tools helpful during events, meetings, or classes – Google Meet, Google Forms, and Google Sheets.
By using this Google tool hub, you can create a free attendance tracker that's accessible online, easy to update, and shareable with others.
Google Meets, for example, allows you to gather attendees' information via Google Forms. Data will be automatically imported into Google Sheets. That’s why you must prepare all the columns and rows first to use this data further, e.g., to automate the attendance certification with Certifier.
How to make a simple attendance sheet in Google Sheets?
An attendance tracker helps you manage a classroom, host a webinar, or conduct a workshop effectively. In this detailed guide, we'll show you step-by-step instructions on how to make attendance sheet in Google Sheets.
Step 01: Open a new Google Sheet
Step 02: Set up headers
Step 03: Combine first and last names
Step 04: Freeze the header row
Step 05: Format the date column
Step 06: Set up data validation for attendance status
Step 07: Secure and share online attendance sheet
Step 01: Open a new Google Sheet
Go to Google Sheets and sign in to your Google account. Once you’re in, click the Blank spreadsheet option to start a new document.
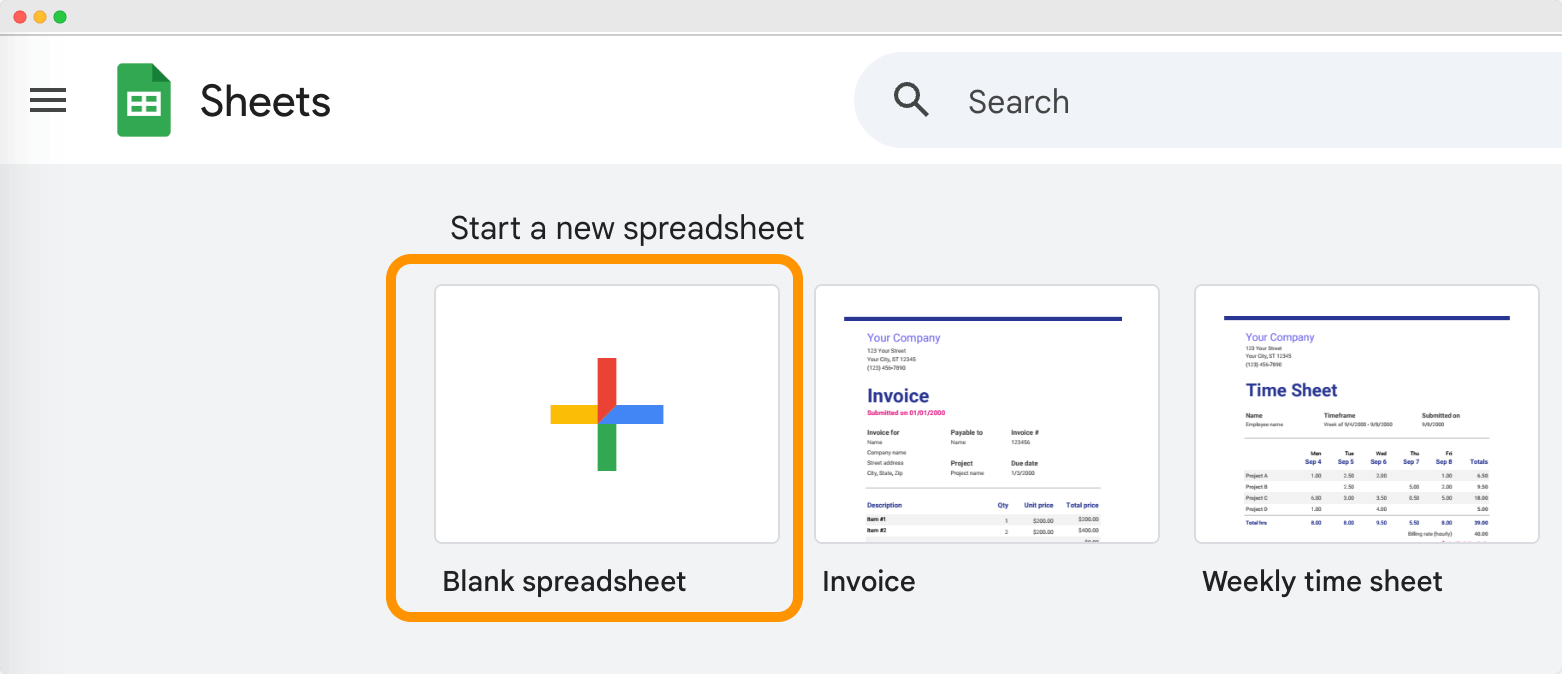
Click on the Untitled spreadsheet at the top left corner to name your file. Type in a name like "Attendance Sheet" so as not to lose your new attendance tracker among folders.
Step 02: Set up headers
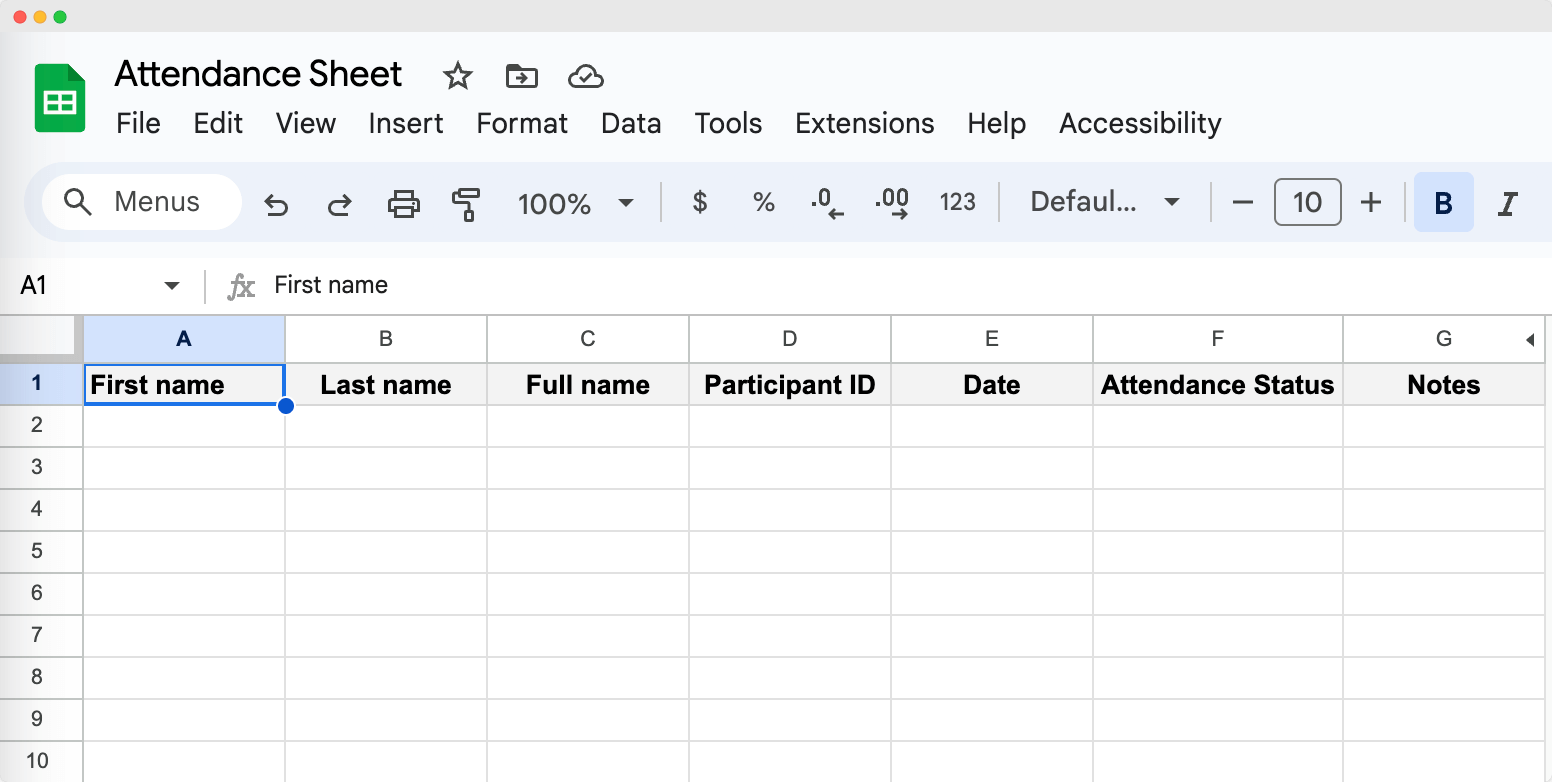
In the first row, enter the following headers:
First Name
Last Name
Full Name
Participant ID
Date
Attendance Status
👉🏼 Expert tip: Reserve a column for notes where you can add comments about attendance, such as reasons for absence or special circumstances.
This structure helps you collect all the essential information for your attendance sheet online.
Step 03: Combine first and last names
For later use, you’ll usually need the full name in one cell, instead of separate first and last name columns.
👋 If you’re here for the purpose of creating an attendance tracker that will generate certificates, then – it’s super important to merge the first and last names into a single Full Name column. Do you use Excel instead of Google Sheets? Get to know more tips on how to combine first and last name in Excel.
Click on cell C2 under Full Name. Enter the formula =A2 & " " & B2 and press Enter.
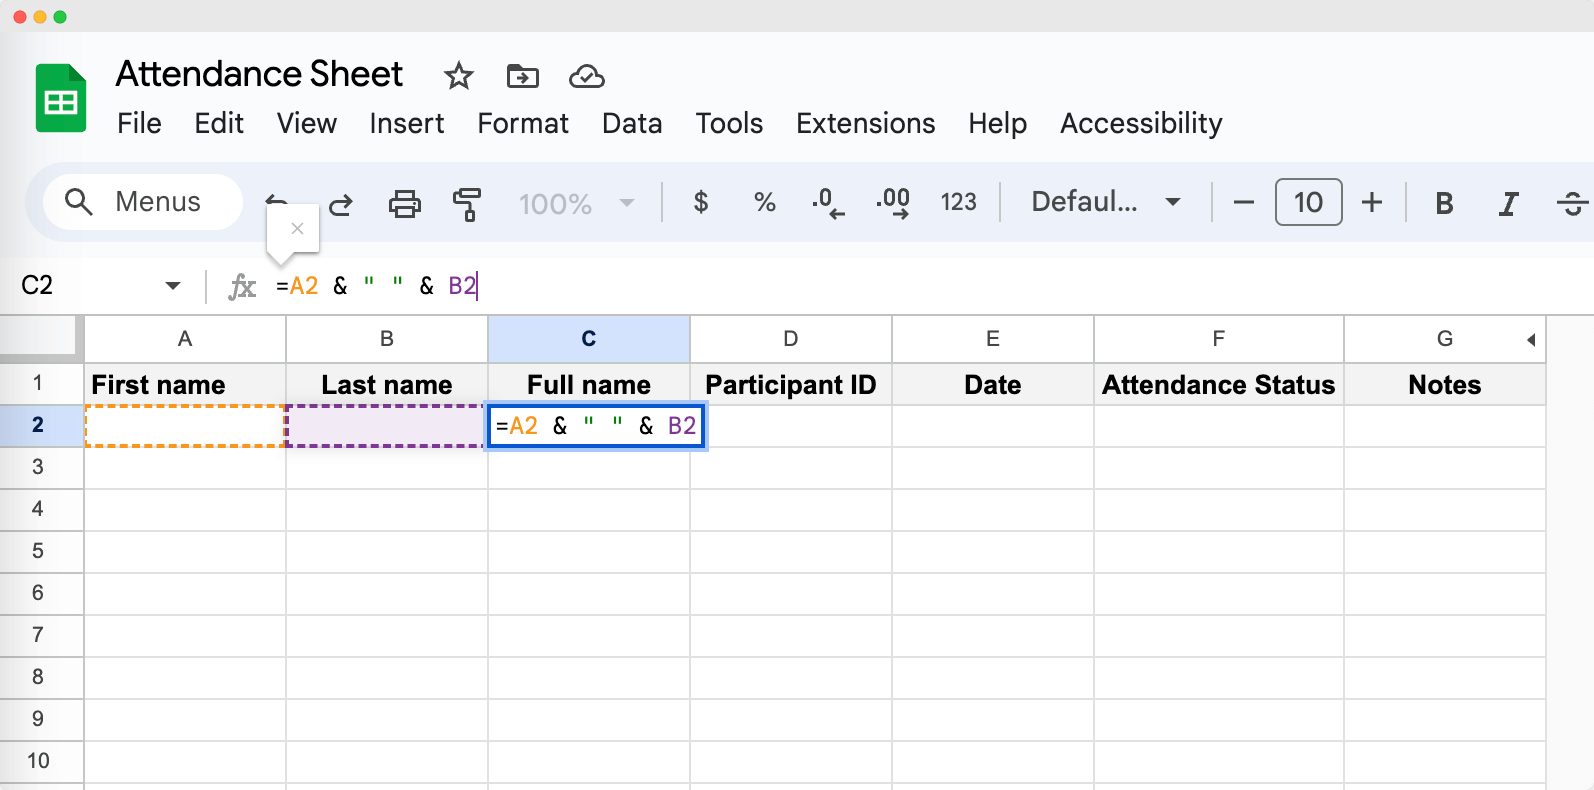
To apply the formula to all rows, click on the small blue square at the bottom-right corner of cell C2. Drag it down to apply the formula to all rows where you have data.
👉🏼 For more details on merging names in Google Sheets, check out our guide on how to merge first and last name in Google Sheets.
Step 04: Freeze the header row
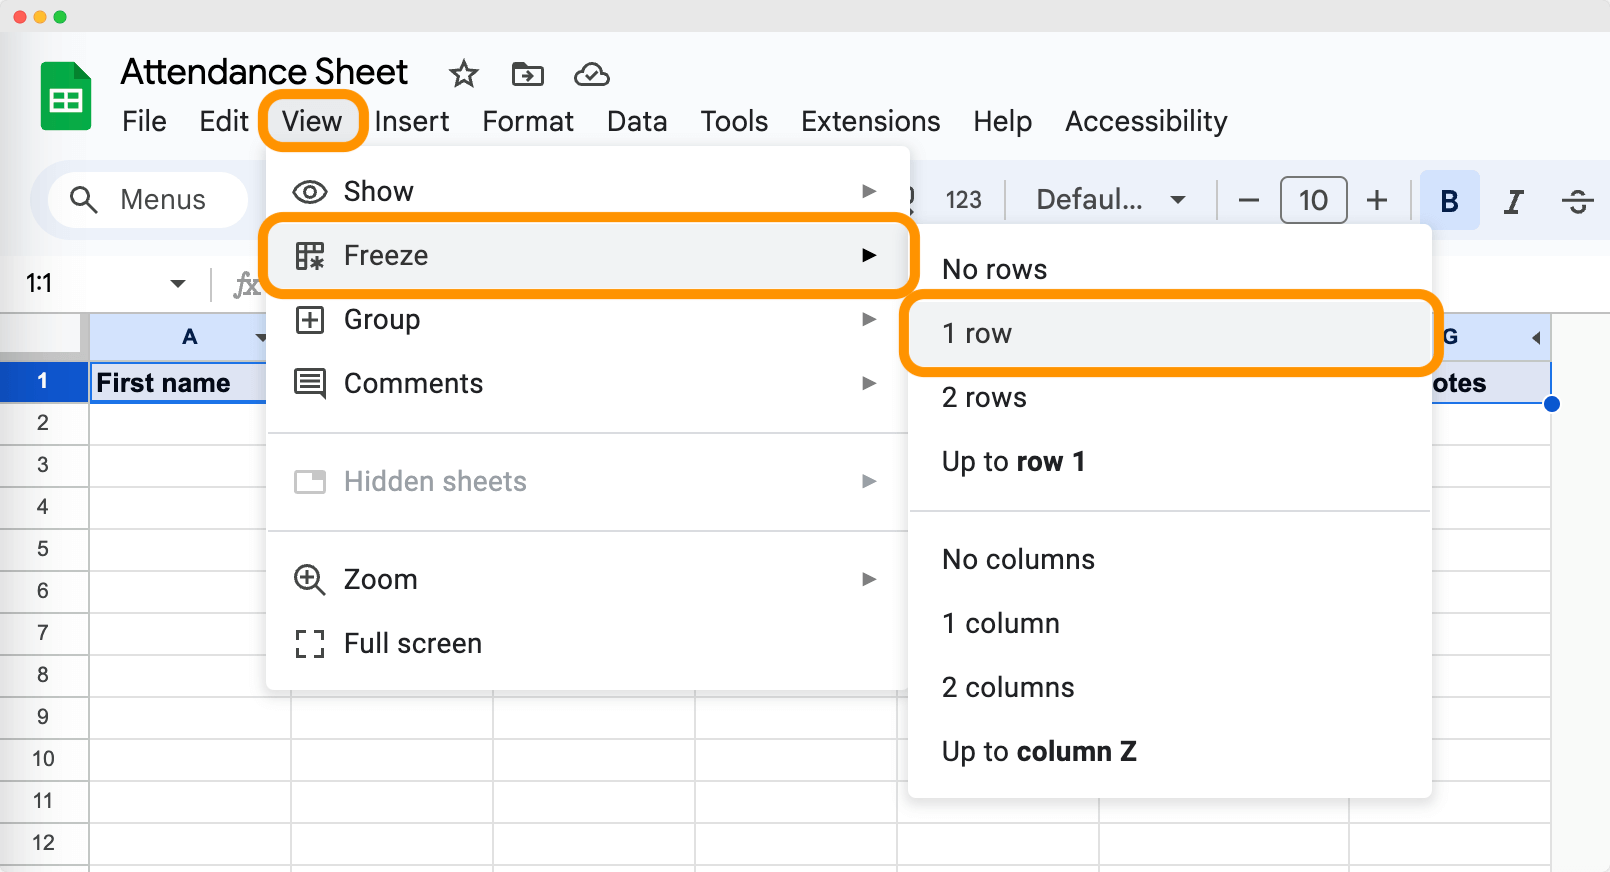
Freezing the top row remain the header visible as you scroll down the sheet. It may seem unnecessary now, but if you later have a lot of attendance records, it helps you work on the spreadsheet seamlessly.
Mark the row that you want to freeze. Click on View in the top menu. Hover over Freeze and select 1 row.
Step 05: Format the date column
The next step is all about making sure your date format is lined up nicely. Here's how you can tidy up date columns so that they have a consistent format across all rows.
Click on Column E (or wherever you keep your dates). Choose Format from the top menu and select Number > Date.
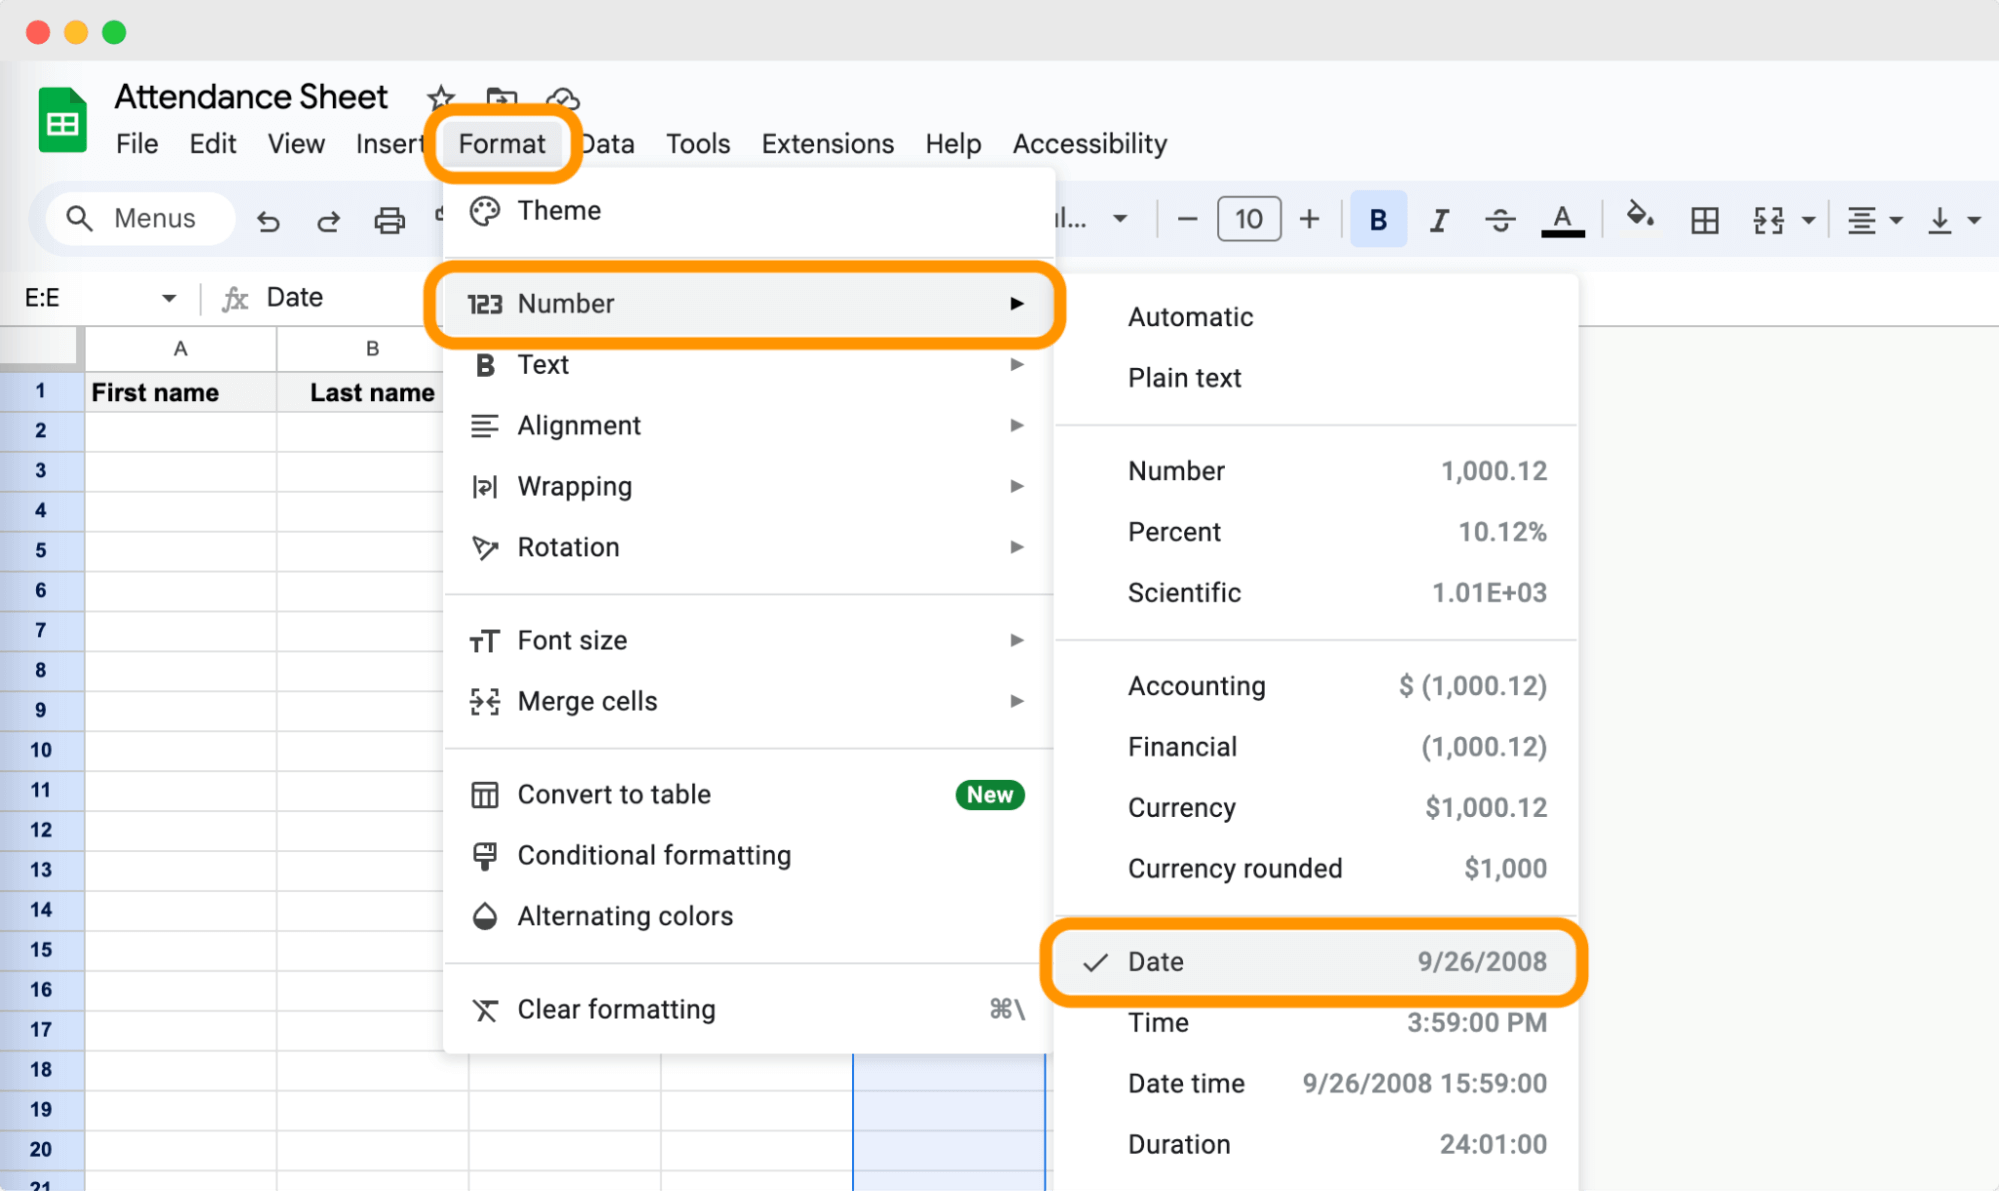
Thanks to that everyone reading the attendance sheet quickly see what’s going on without any date confusion.
Step 06: Set up data validation for attendance status
Maintaining a precise record of attendees is essential when, e.g., managing an event. That's why setting up a dropdown menu for the Attendance Status column in your Google Sheets attendance tracker can really streamline things.
Use data validation to create a dropdown menu for the Attendance Status column, restricting entries to "Present," "Absent," "Late," or "Excused". These options will now be the only ones available in the dropdown menu for each cell under Attendance Status. This helps maintain consistency and avoids any typos or unaccounted statuses.
Select the cells under Attendance Status (column F). Click on Data > Data validation. Choose + Add rule.
Choose the range In the Criteria section, select Dropdown. Change the range starting from F2. Enter the criteria, e.g., Present, Absent, Late, Excused. You can also select a particular color for each category. Click Done.
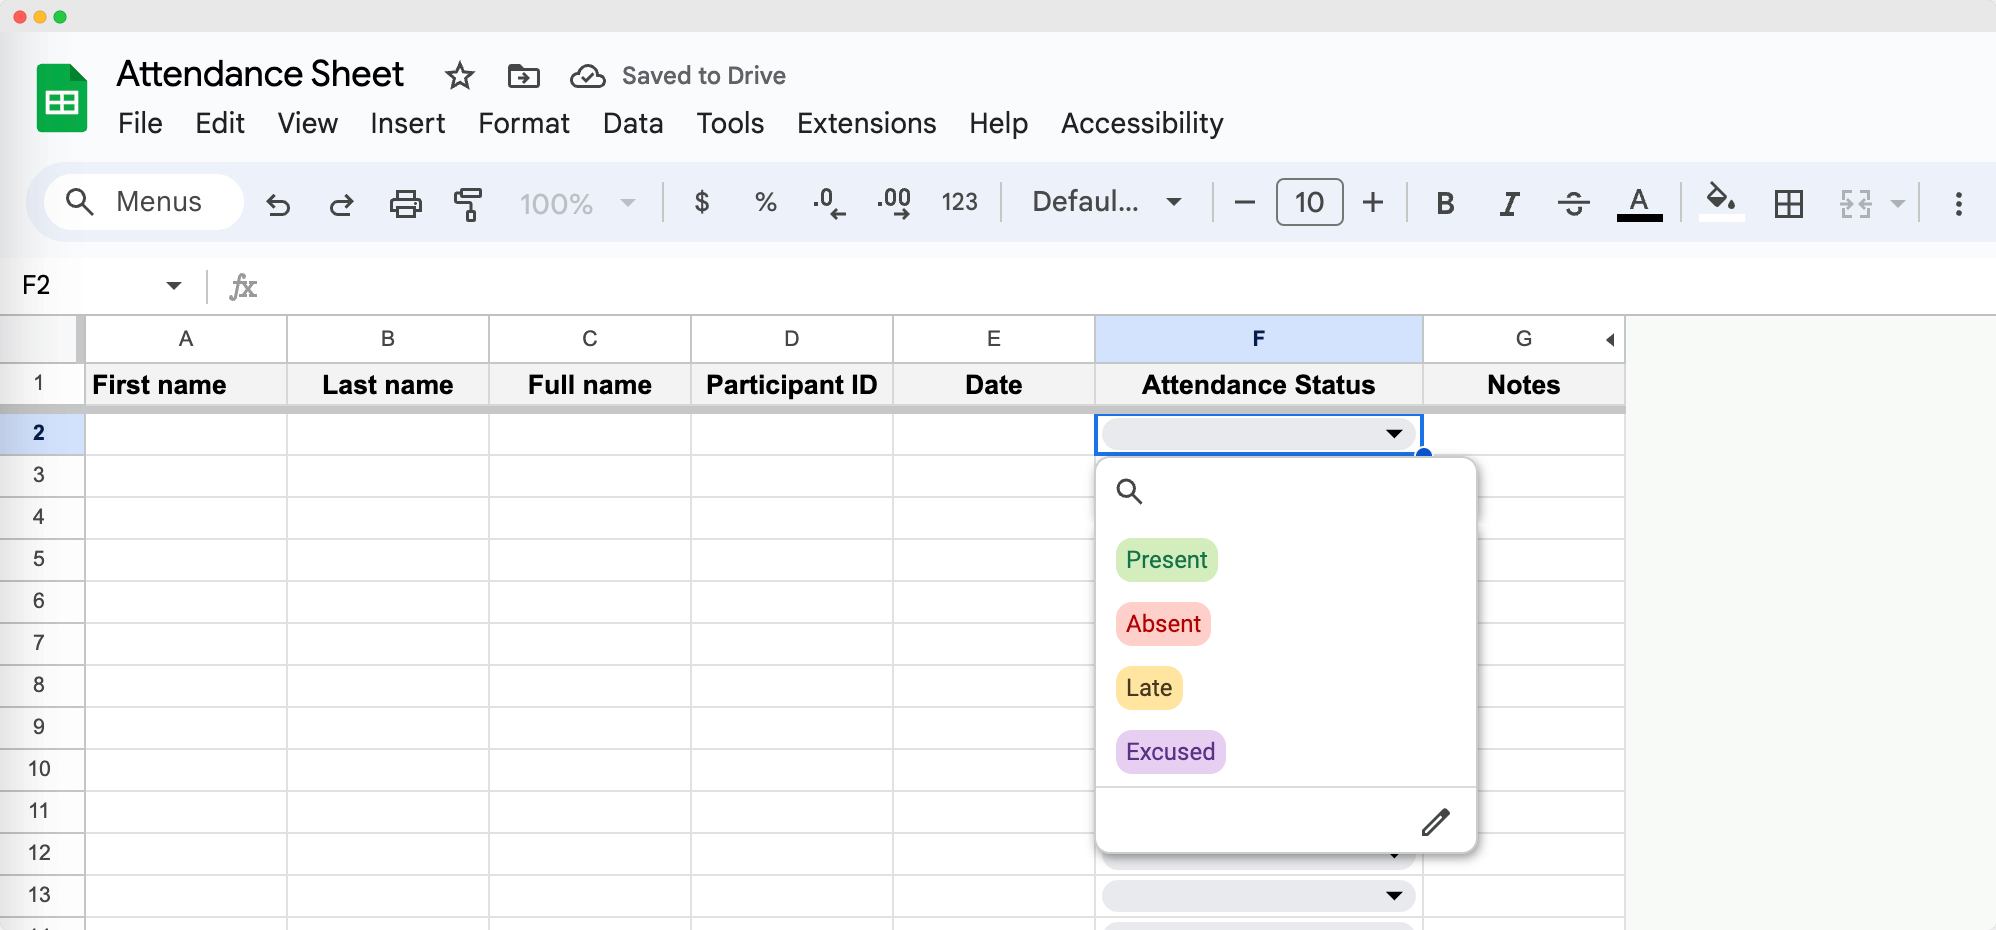
Now, each cell in the Attendance Status column will have a dropdown menu, making it easier to track attendance in Google Sheets.
Step 07: Secure and share online attendance sheet
Once you’ve got your attendance sheet all set up and ready to go.
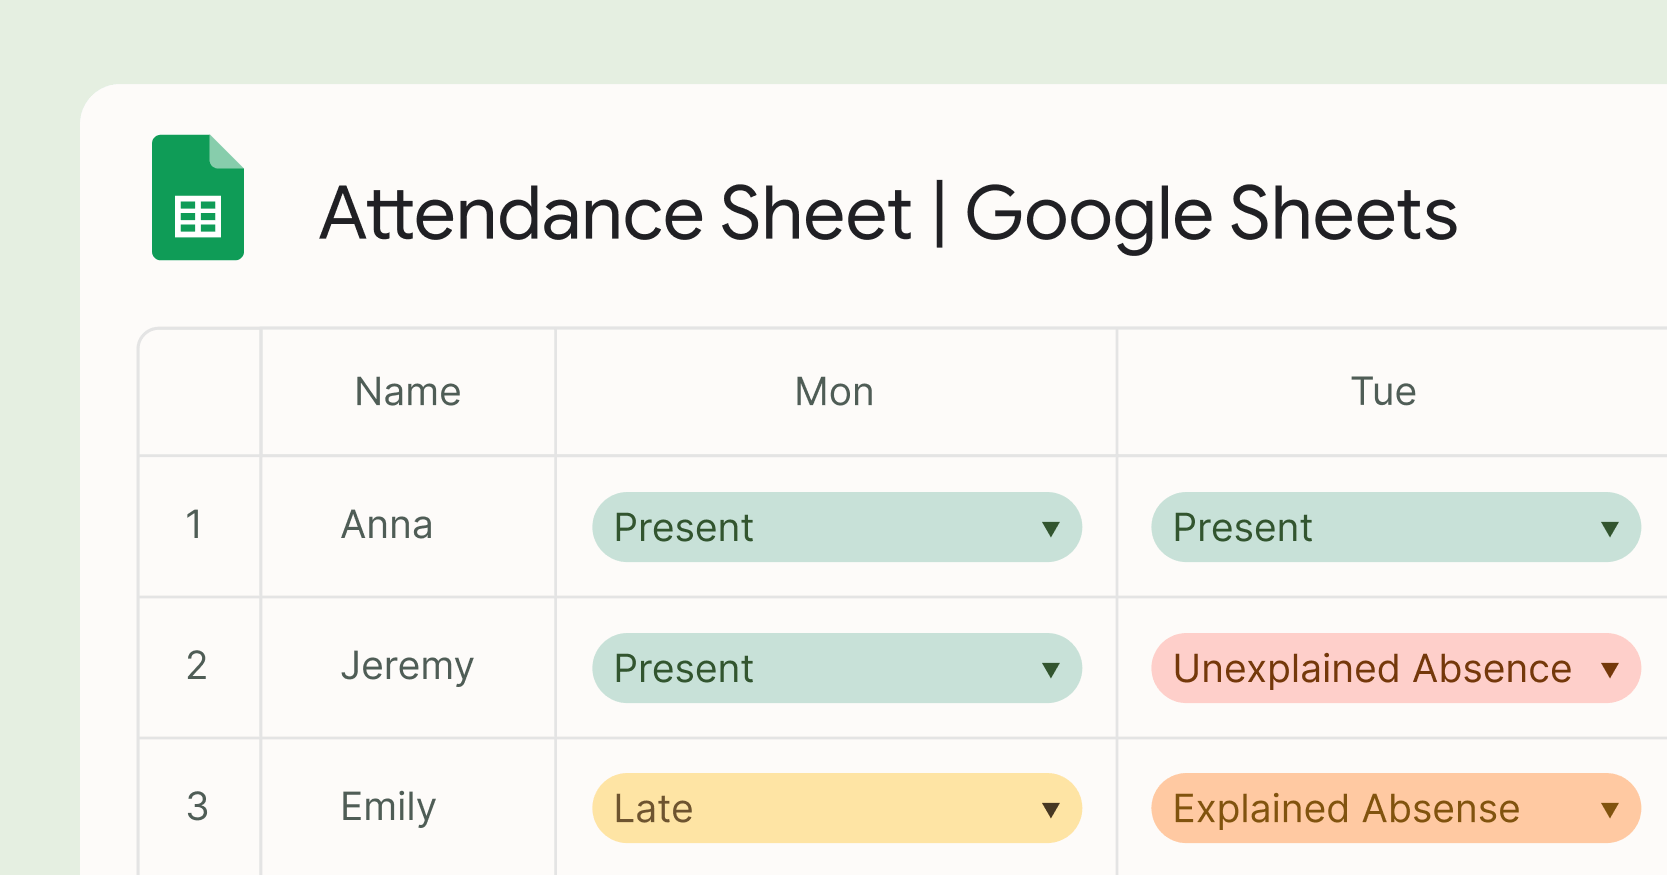
Here’s your ready Google Sheets attendance template:
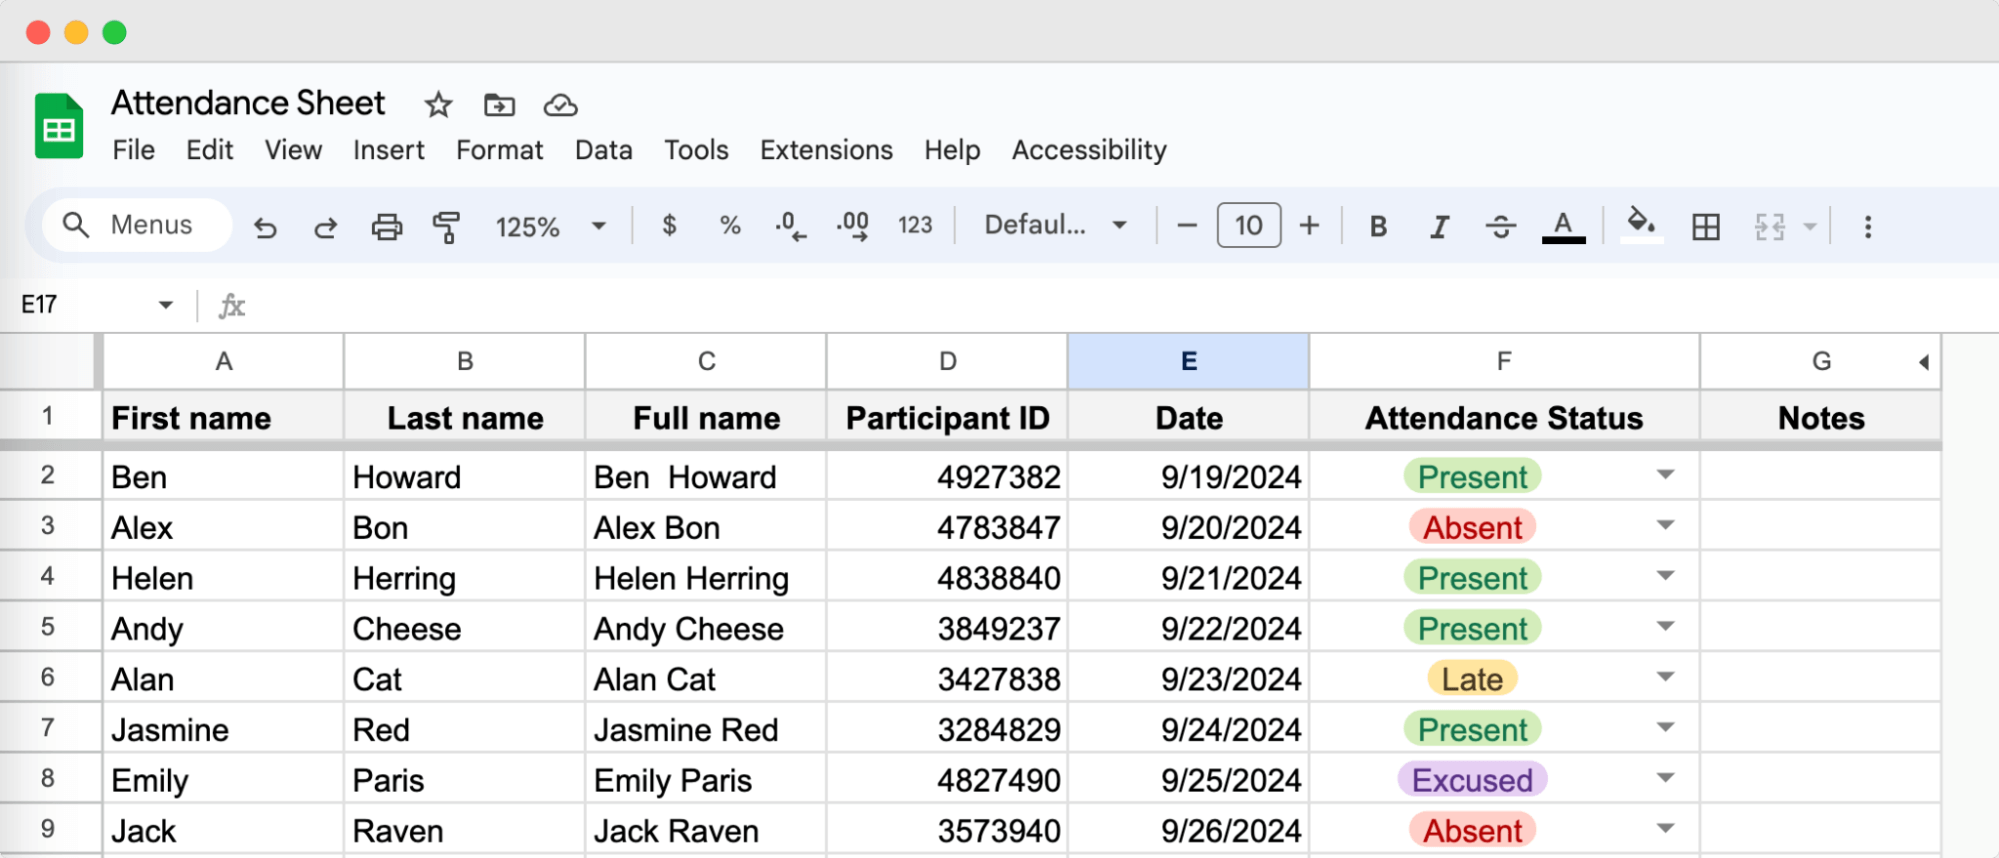
The next crucial step is to make sure the spreadsheet both secure and shareable. This is especially important if you’re coordinating with a team or need to keep your data confidential.
Click on Share in the top-right corner. This opens up your sharing options. Under General access, choose Restricted to limit access. Add specific people by entering their email addresses and setting their permission levels.
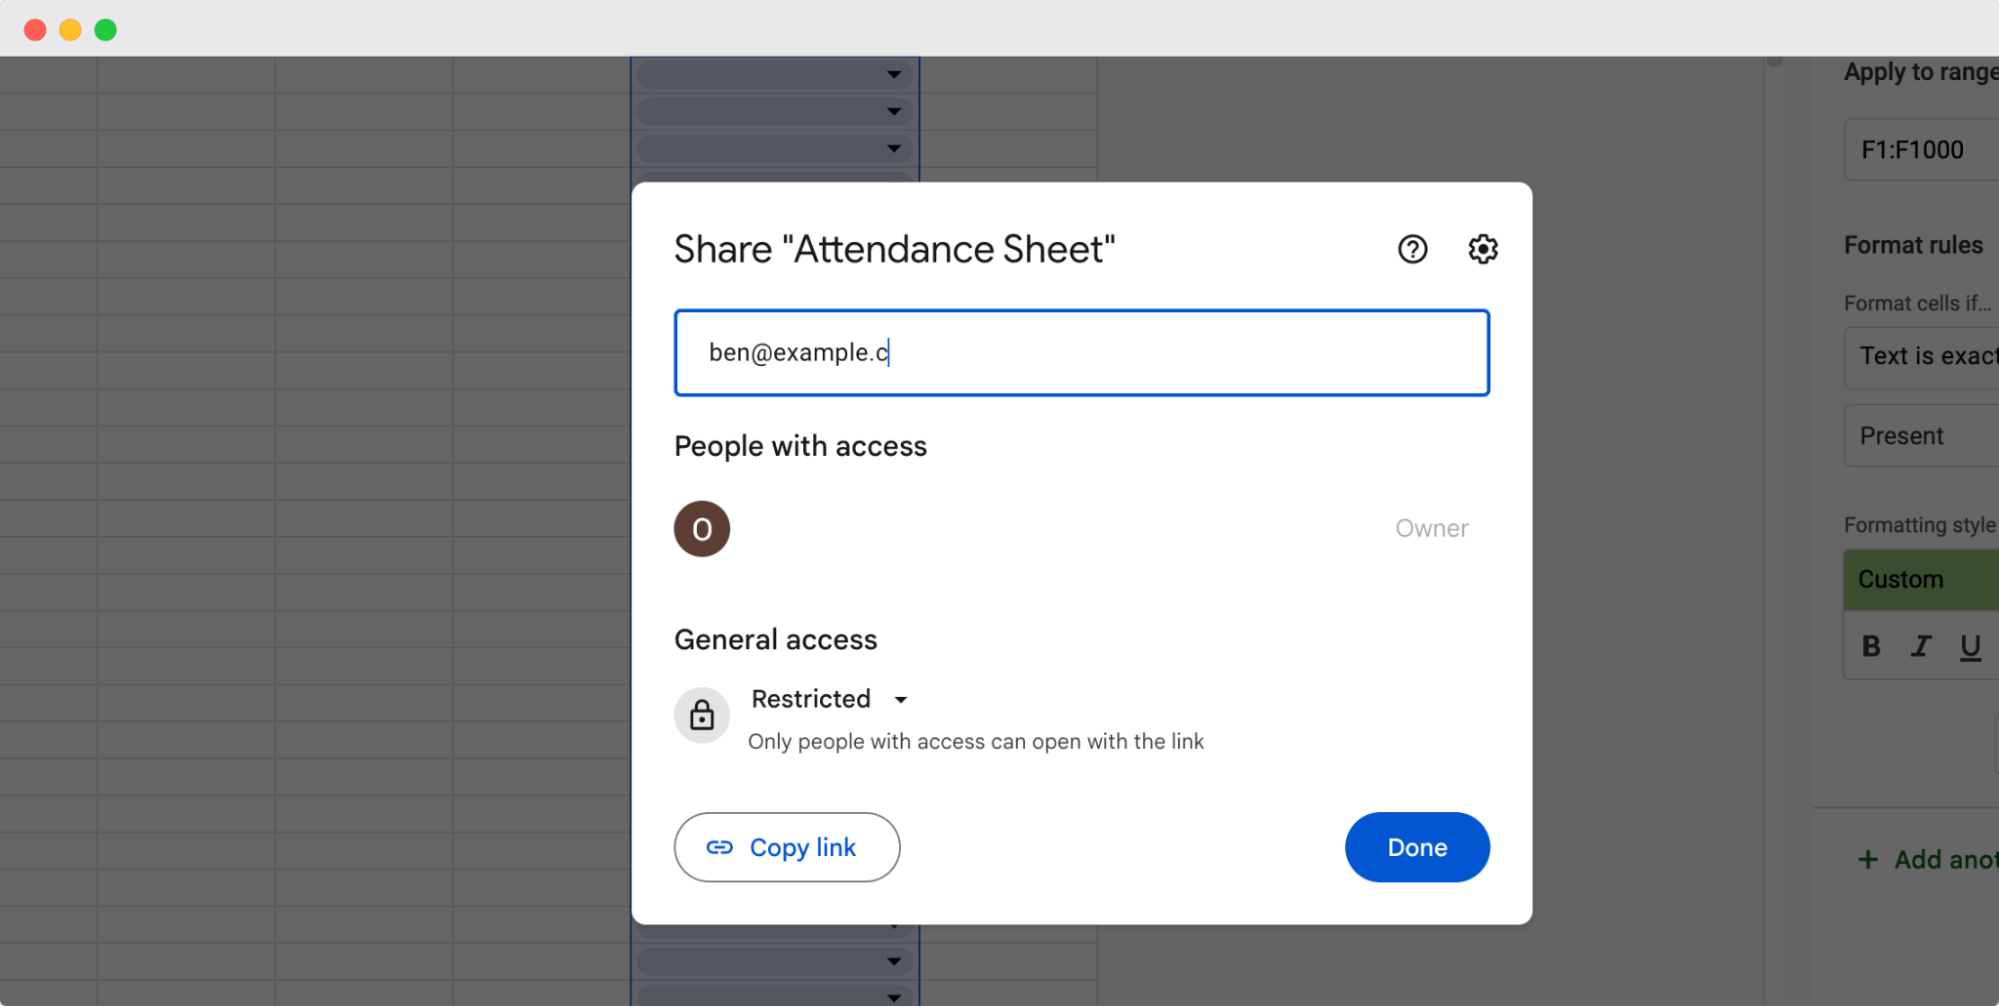
✍🏻 Keep a note: If you have co-organizers or assistants, grant them Editor access so they can help manage the attendance tracker Google Sheets.
How to make an attendance sheet in Google Sheets with QR code?
Making a QR code for your attendance form simplifies the check-in process and improves how you track attendance. Here’s what to do to generate QR code:
Open your Google Form and click the Send button in the top right.
Click the link icon (looks like a chain), select Shorten URL, and copy the link.
Go to a free QR code generator like QRCode Monkey or QR Stuff.
Paste your link into the URL field and create your QR code.
Download the QR code image to your device.
Share the QR Code with attendees.
For in-person events: Print the QR code or display it on a screen where attendees can scan it upon arrival.
For virtual events: Add the QR code to your presentation slides or share it on your screen during the event. Also, provide the form link in the chat as a backup option.
👋 Expert tip: If you’re a big fan of QR codes, you can automatically generate them in Certifier and add them to certificates as well. What's this all about? The certificate QR code can link to your website (boosting your traffic) or to a digital wallet where attendees can view, verify, or share their credential (maximizing your reach).
More tips on how to make attendance tracker
When you've mastered creating a basic tutorial on how to create an attendance sheet in Google Sheets, you might think you've covered all bases. However, the possibilities for optimizing your attendance tracker extend far beyond the initial setup. Here are some more tips to boost your digital attendance register even more.
Apply conditional formatting
Conditional formatting visually highlights different attendance statuses, and makes it easier to review your attendance tracker at a glance. You can use it in whichever column you want. Let’s assume that we want to add some background color to each of the status tag.
Select the Attendance Status column (column F). Click on Format > Conditional formatting.
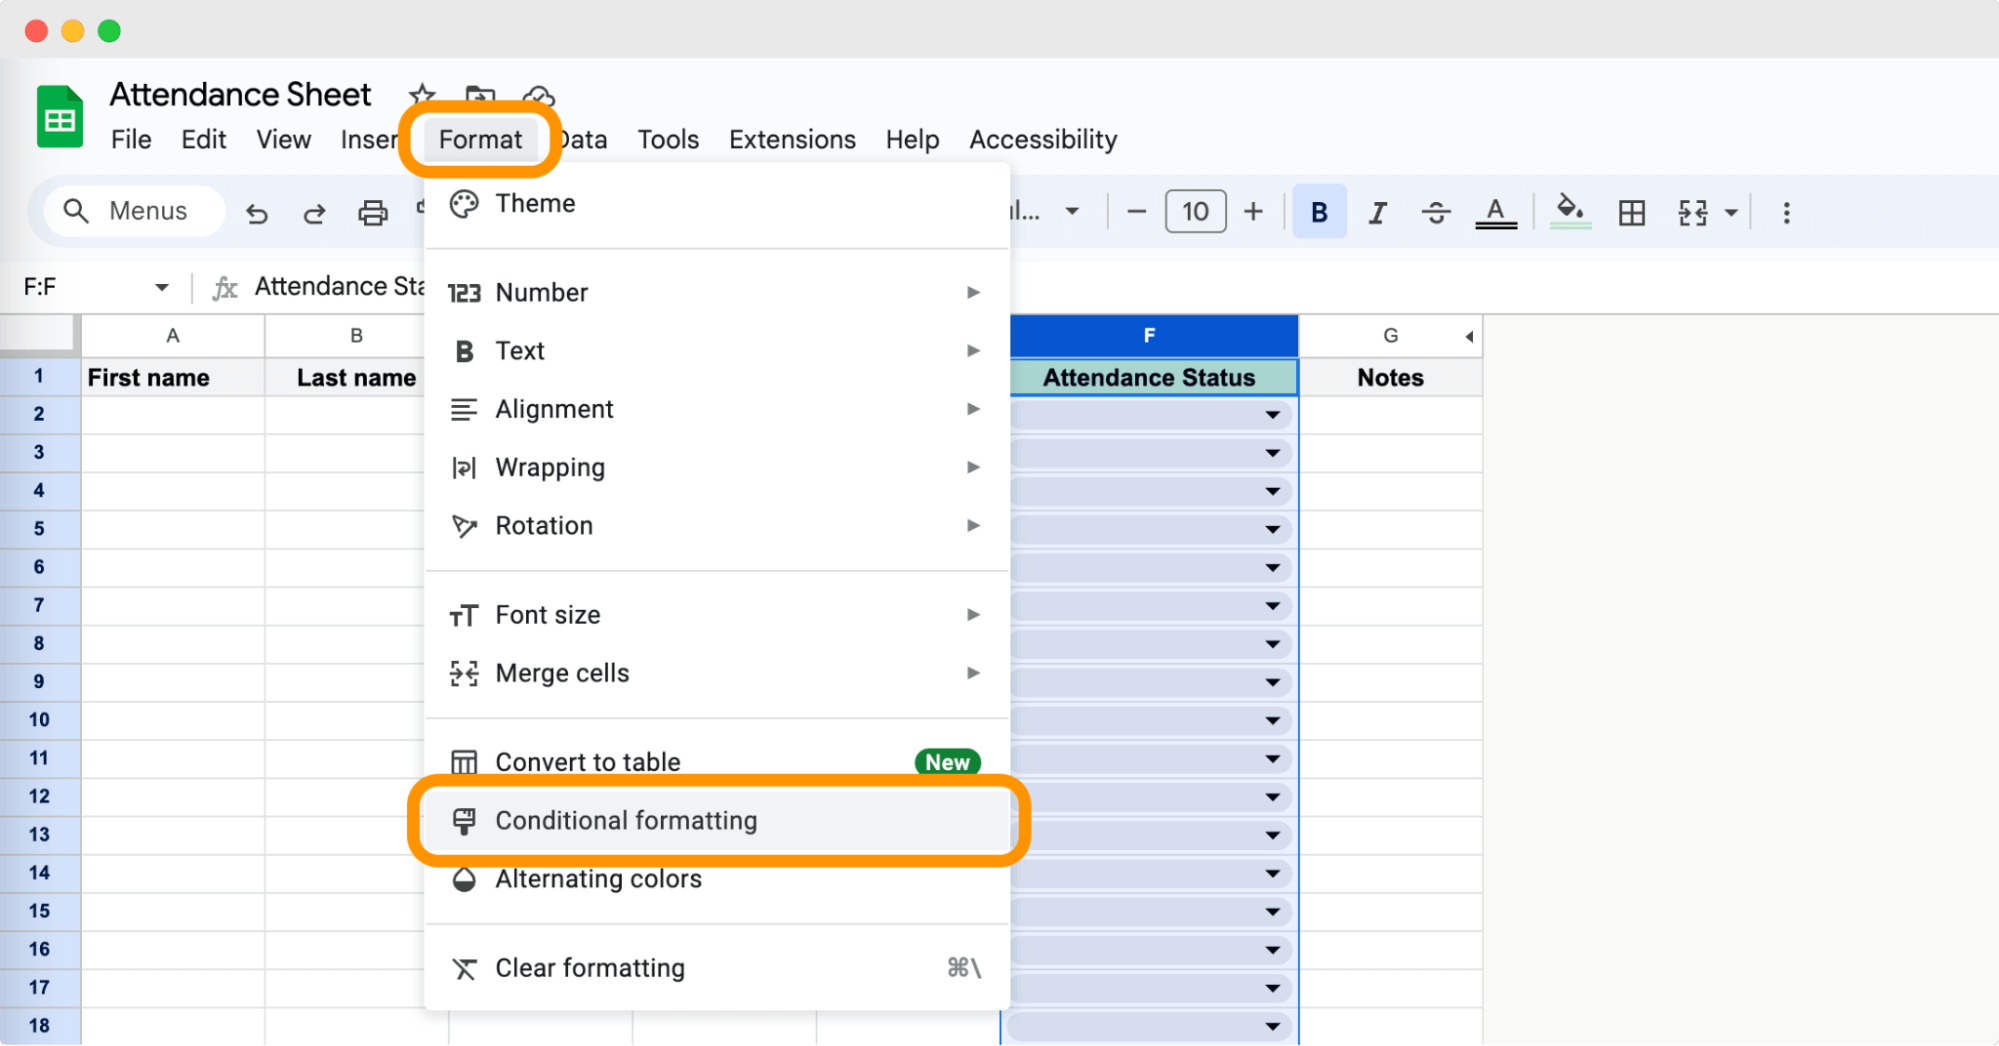
In the Conditional format rules panel, click Add another rule for each attendance status:
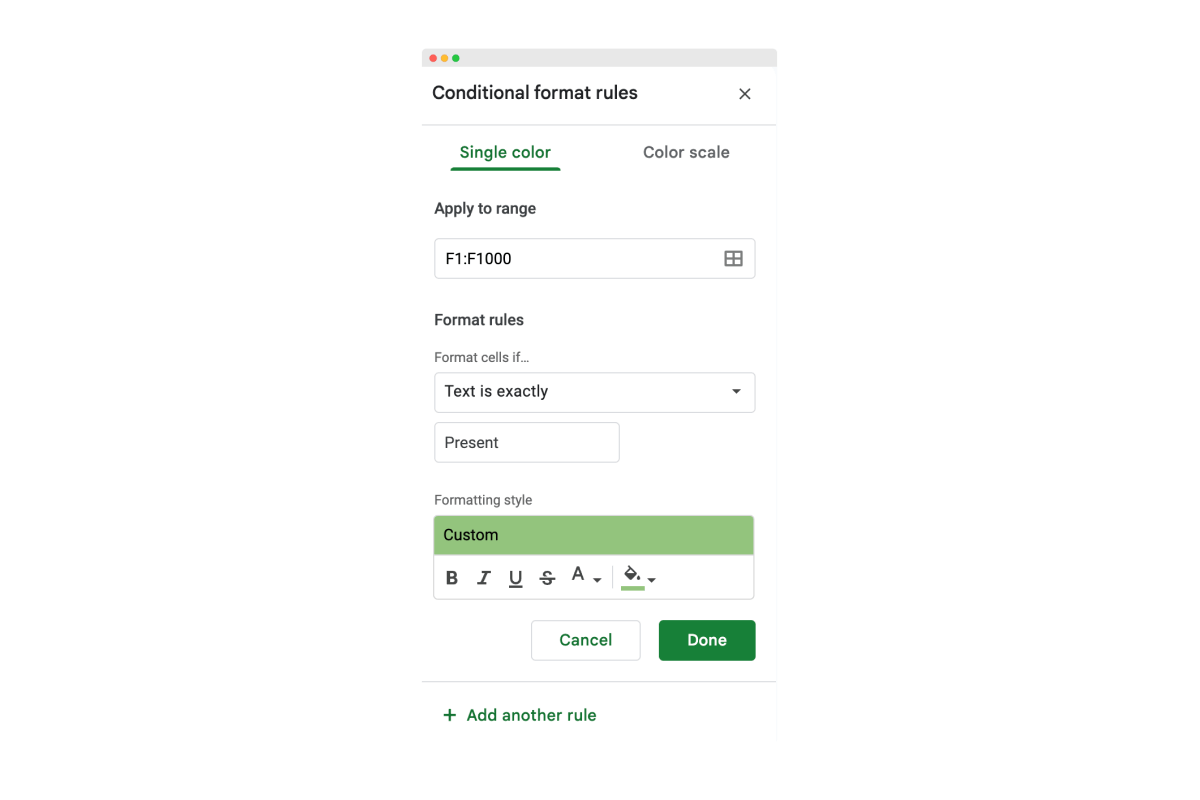
Present: Under Format cells if..., select Text is exactly. Enter Present. Choose a green fill color.
Absent: Select Text is exactly. Enter Absent. Choose a red fill color.
Late: Select Text is exactly. Enter Late. Choose an orange fill color.
Excused: Select Text is exactly. Enter Excused. Choose a blue fill color.
Click Done if you want to save the rules.
Automate attendance tracker with formulas
Introduce simple formulas for calculating totals, like =COUNTIF(range, "criteria"), to count how many attended.
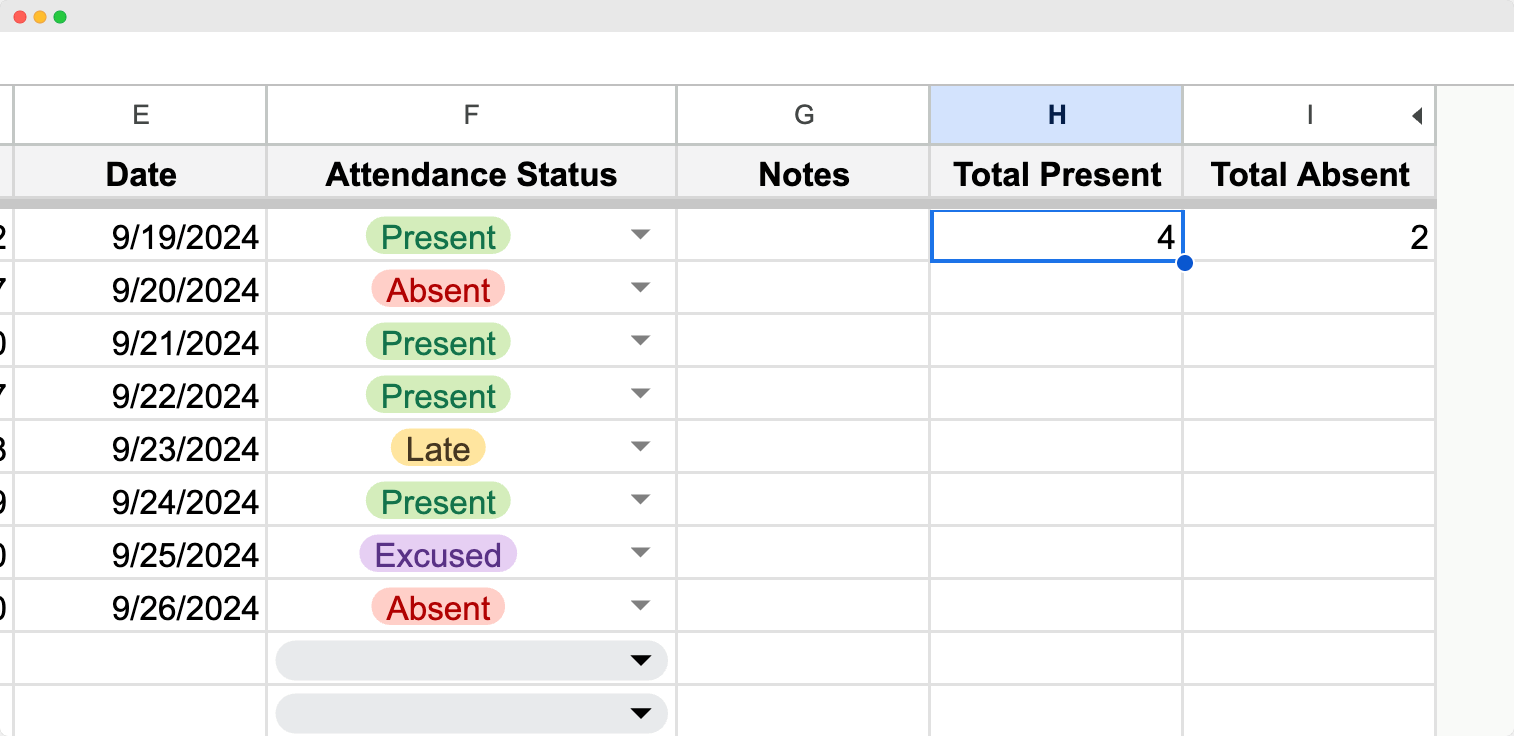
Calculate total present: In cell H1, type Total Present. In cell H2, enter the formula =COUNTIF(F2:F100, "Present").
Calculate total absent: In cell I1, type Total Absent. In cell I3, enter the formula =COUNTIF(F2:F100, "Absent").
You can adjust the range F2:F100 based on the number of participants in your attendance sheet template.
Use IF statements to automate status updates
The =IF function can automate certain status updates. For example, to flag participants who have been absent more than three times.
In cell J1, type Flag. In cell J2, enter the formula: =IF(COUNTIF(F2:F100, "Absent") > 3, "Review Attendance", "")
This formula checks if a participant has more than three absences and flags them for review.
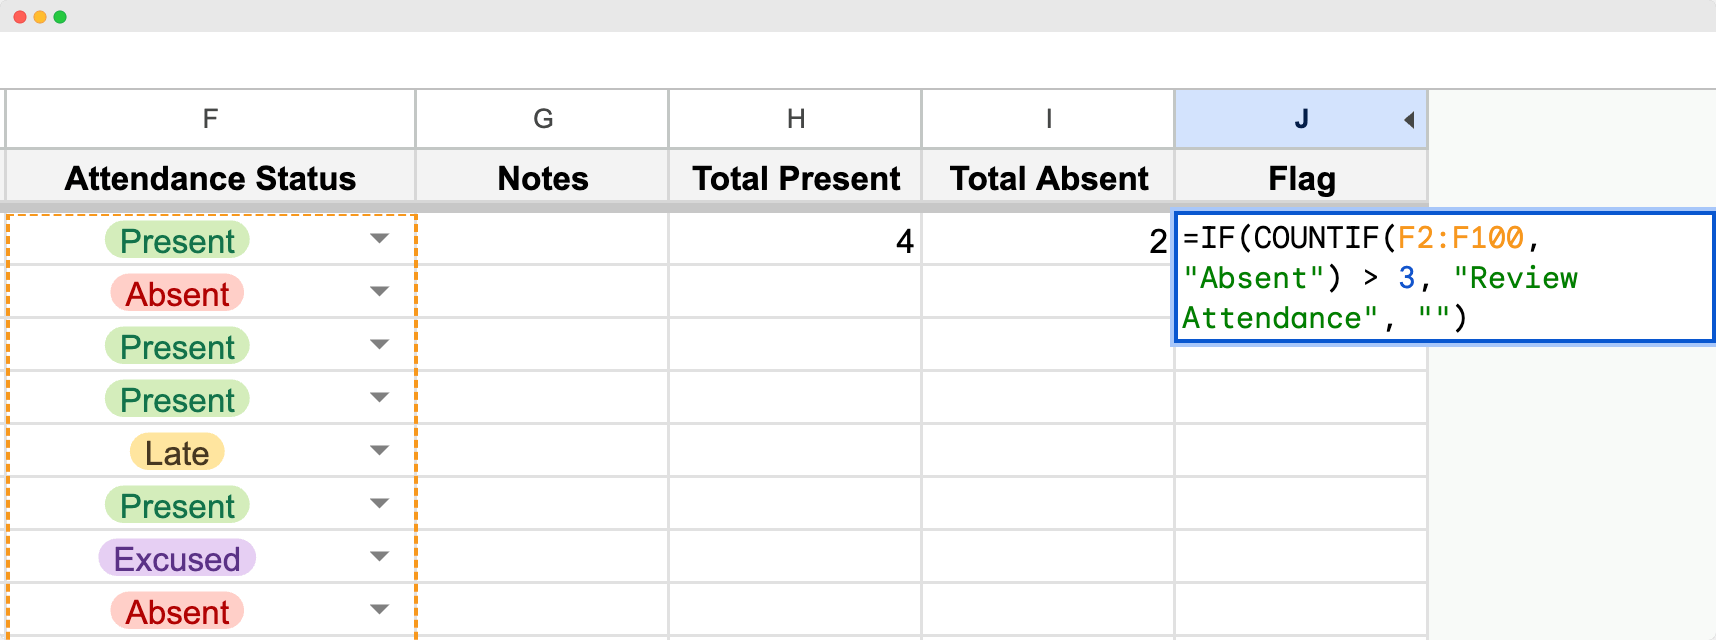
You can change criteria in the formula according to your specifications.
Set up notifications for updates
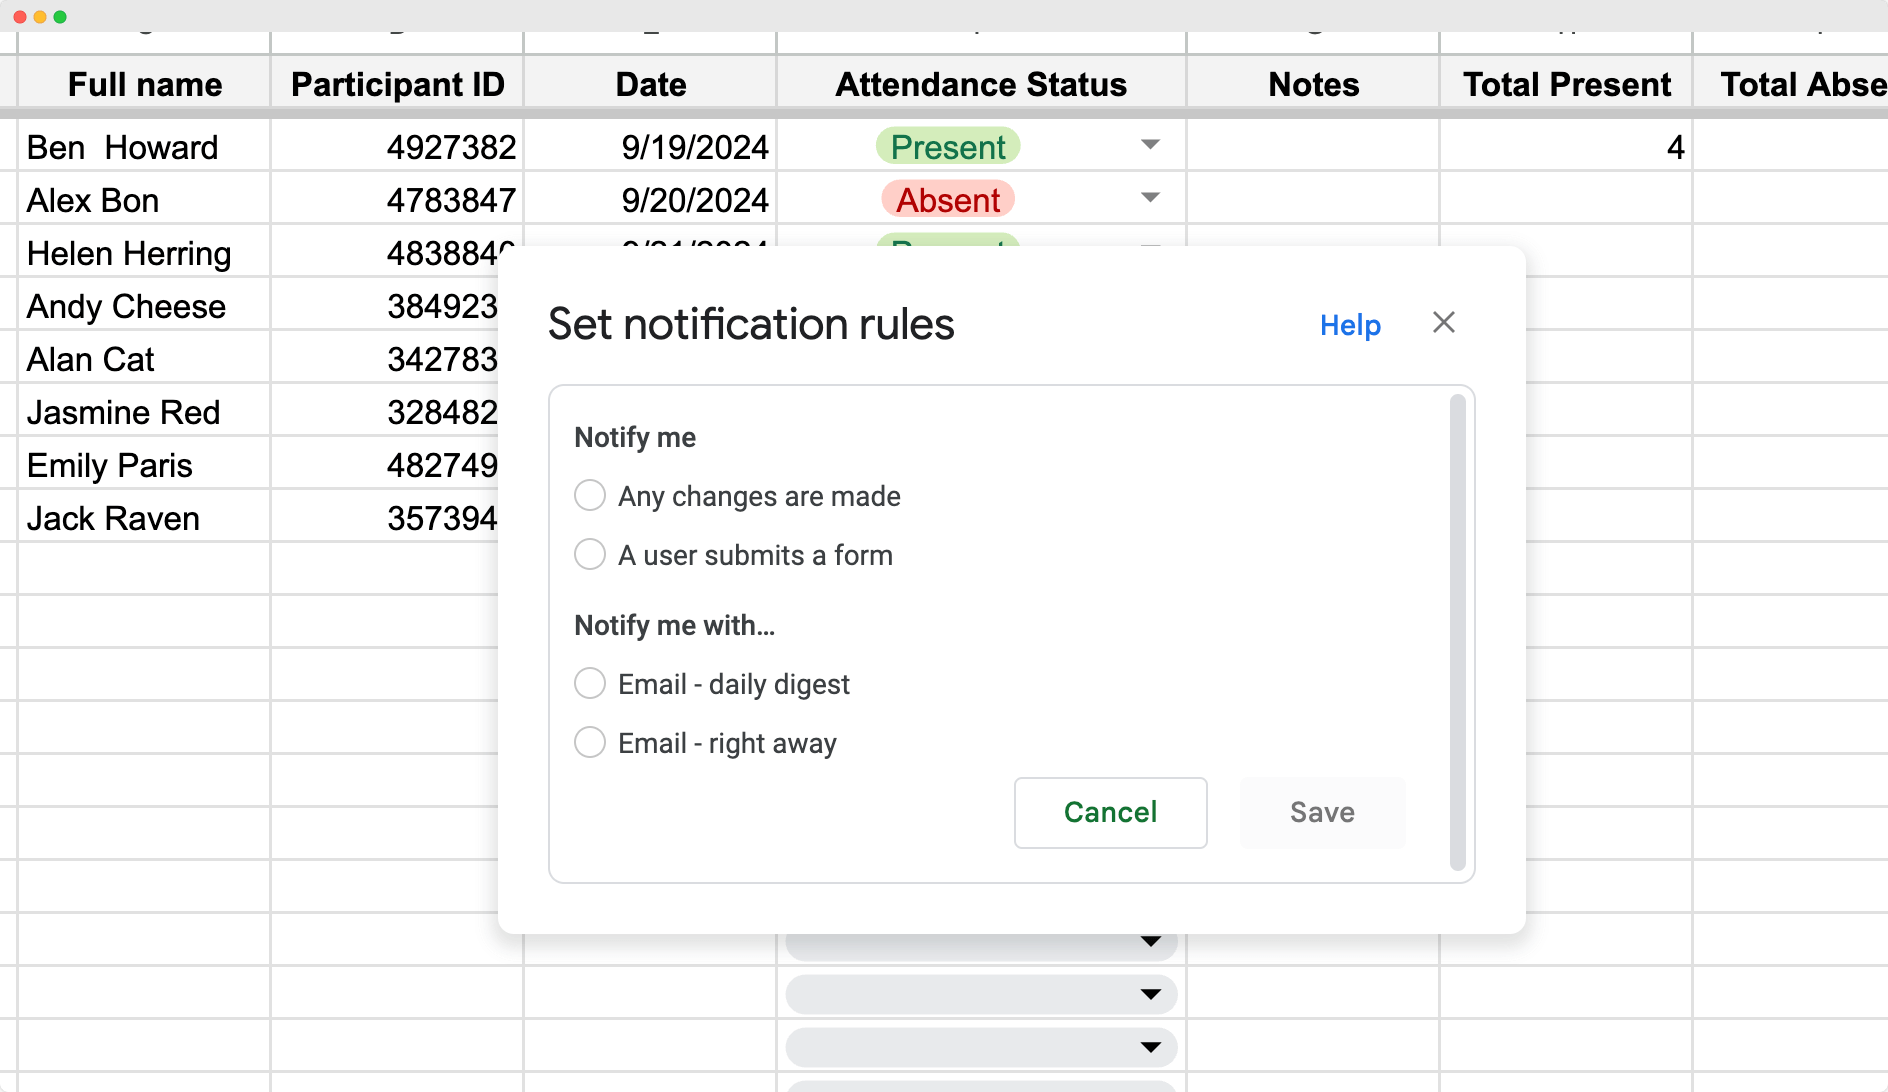
Wondering how to track attendance in Google Sheets? You can configure your attendance sheet template to send you email notifications whenever someone edits or adds to the sheet. This feature is particularly useful if you need to stay updated on real-time changes.
Click on Tools in the menu bar, and select Notification rules from the dropdown options. In the dialog box that appears, you can set up the type of notifications you want. You have the option to receive notifications when any changes are made or when a user submits a form. You can choose to be notified immediately by email or with a daily summary. Don’t forget to save the changes.
Integrate Google attendance sheet with Certifier for certificate generation { Google attendance sheet integration }
Taking your attendance tracker to its full potential involves not just tracking attendance but also acknowledging participation. You can automate sending out certificates to each participant right after they’ve met your attendance criteria.
Sign up to Certifier first. The Certifier integration with Zapier works even on the free plan.
Create and Send Digital Credentials
Use Zapier to connect your spreadsheets with Certifier. Zapier acts as a bridge, triggering actions in Certifier whenever updates are made in your Google Sheets. To start, create a new Zap and select Google Sheets as the trigger app. Choose a trigger event, such as "New or Updated Spreadsheet Row", which fits how you wish to capture attendance data for certificate issuance.

With the connection established, set Certifier as the action app in your Zap. Configure it to issue certificates whenever a participant meets your predefined attendance patterns.
You can design certificate of attendance templates in Certifier that automatically populate with participant data like names, dates, and other specifics pulled from your Google Sheets.
You can also explore alternative Certifier integration options — like the low-code Certifier integration with Pipedream for more control, or the Certifier integration with Make for visual workflow building.
Do you want to see how it works in action? Watch the tutorial on integrating Certifier with Make to build your custom workflows:
Make the most of Google Sheets attendance template
That’s a wrap on how to create an attendance sheet in Google Sheets. You're all set to organize your classes, workshops, or events attendance with ease. Check out Google Sheets and get started on your tracker. Remember, it’s designed to be user-friendly, so you can tweak things as needed.
Ready to automate attendance tracking? See how Certifier works. Generate certificates based on the attendance records and do more for less! Sign up for free.
FAQ on how to create an attendance sheet in Google Sheets
Navigating through Google Sheets to track attendance can be a breeze once you know your way around. Here's a straightforward FAQ to help educational institutions, event organizers, or anyone in need of a robust attendance system.


