Trusted by:
Updated: January 29, 2026
10 min read
How to Issue LearnDash Certificates After Course Completions?
Tune the certificates you issue while using your favorite course platform. LearnDash runs your course and Certifier takes care of certificate delivery. Connect them with Zapier to send personalized, branded LearnDash certificates automatically. Read the guide and start issuing.
LearnDash is a powerful LMS that turns your WordPress site into a full-featured online course platform. You can create lessons, track progress, quiz your students and yes—you can issue course completion certificates too. But here’s the catch: the native certificate system is lacking.
There are no templates. Branding options feel limited. Automation for delivery and verification isn’t built in. And if your LearnDash certificates are clunky, you risk losing course takers or hurting your revenue.
You can keep using LearnDash and fix these gaps by connecting it to Certifier via Zapier. You’ll get automated and personalized certificates—without changing your LMS.
In this guide, we’ll walk you through the entire setup step by step.
TL;DR
LearnDash offers certificates, but you have to build them from scratch. The process involves shortcodes, limited formatting options and there’s no way to send them in bulk.
You can connect LearnDash with Certifier using Zapier to automate certificate issuing after course completion.
Certifier is a full-featured certificate management tool with editable templates, dynamic attributes that pull user data automatically and bulk issuing capabilities—the two platforms work seamlessly together.
Can you issue a certificate in LearnDash?
Yes, you can—but it’s not as straightforward as you’d expect. And it’s not as impressive as you may think.
The certificate created in the LearnDash certificate builder looks like the one on the left—but with one simple step, it can look like the polished version on the right.
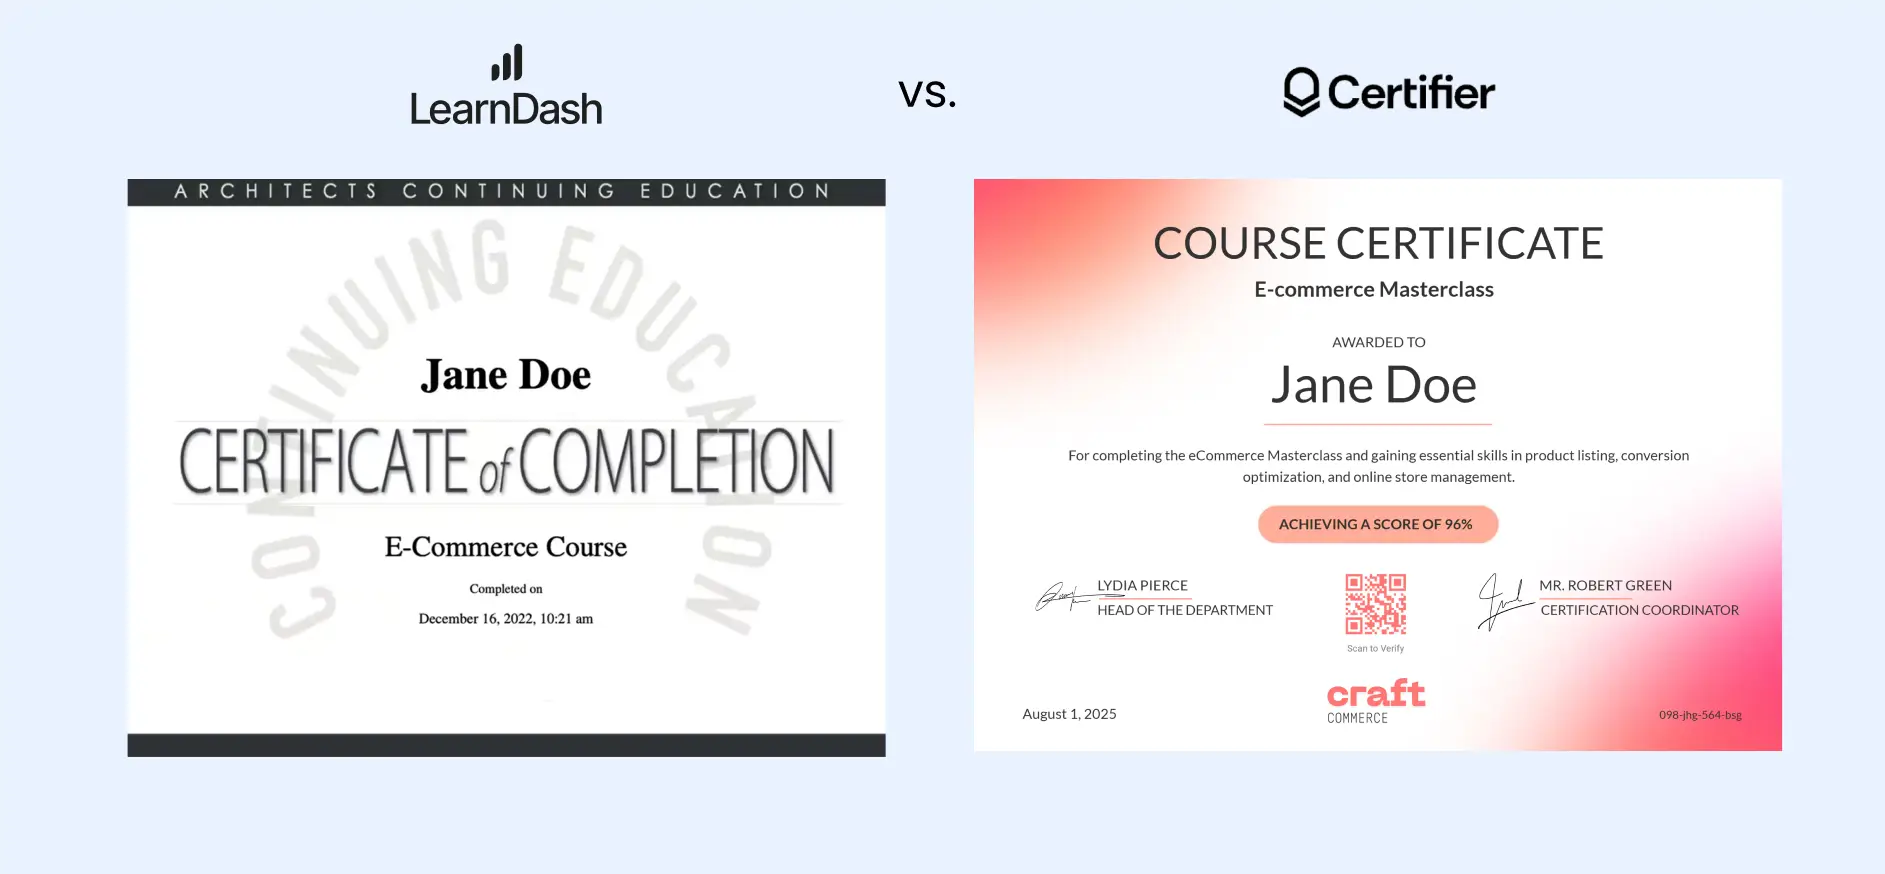
So, what’s this secret sauce? Connecting LearnDash with Certifier via Zapier.
LearnDash solo vs LearnDash with Certifier
Creating a LearnDash certificate is possible—but you may find it frustrating at some point. You’ll need shortcodes, external tools and trial-and-error just to get a basic PDF.
Certifier removes all of that friction and gives you automated, branded certificates that look good and work at scale.
Let’s compare what’s missing—and how Certifier supports LearnDash with its amazing certificate capabilities.
Certificate templates and design flexibility
LearnDash: No built-in certificate templates. You upload a background and start from scratch. Styling is rigid and misalignments are common.
Certifier: Access to thousands of ready-to-use LearnDash certificate templates, all fully customizable in a visual editor with real-time preview.
Personalization and shortcodes
LearnDash: You need to manually add shortcodes like [user_firstname] and they break if placed incorrectly or outside their intended scope.
Certifier: Smart dynamic attributes handle all personalization—name, course, date, ID—without LearnDash certificate shortcode hassle.
Certificate delivery and automation
LearnDash: No native email support. There’s no way to issue in bulk.
Certifier: Certificates are automatically emailed to learners the moment they complete a course.
Verification and shareability
LearnDash: Certificates are static PDFs. No LearnDash certificate verification, no QR codes, no way to share on LinkedIn without custom solutions.
Certifier: Each certificate comes with a unique ID, certificate QR code and verification page—plus a digital wallet and sharing options for LinkedIn.
Let us show you how to set up LearnDash + Certifier using Zapier—and start issuing branded, verifiable LearnDash course certificates automatically. Certifier’s native integration with Zapier makes it even easier to map course completions to certificate delivery, without coding or complex workflows.
How to issue LearnDash certificates with Certifier?
When using only the LearnDash certificate builder, you’re stuck with manual formatting, LearnDash certificate shortcodes, static PDFs and no verification features.
You’ll often run into problems like LearnDash certificate not showing or layout bugs. Also, shortcode mismatches might discourage not tech-savvy users.
Why issuing LearnDash certificates with Certifier works better than doing it natively? You skip all of the issues mentioned above. Instead, you get:
Automation
User-friendly, drag-and-drop visual certificate builder (not reliant on HTML or shortcode)
Built-in QR codes and LearnDash certificate verification
Bulk issuing
Email delivery from your domain
Shareable LearnDash certificates for LinkedIn, resumes and beyond
To achieve that, you need to log in to Certifier first. If you don’t have an account yet, create it—it takes just a minute.
Step 1: Set up a Zapier workflow between LearnDash and Certifier
To generate LearnDash course certificates automatically, you need to set up a Zap—an automated workflow between LearnDash and Certifier.
Go to Zapier and click Create Zap.
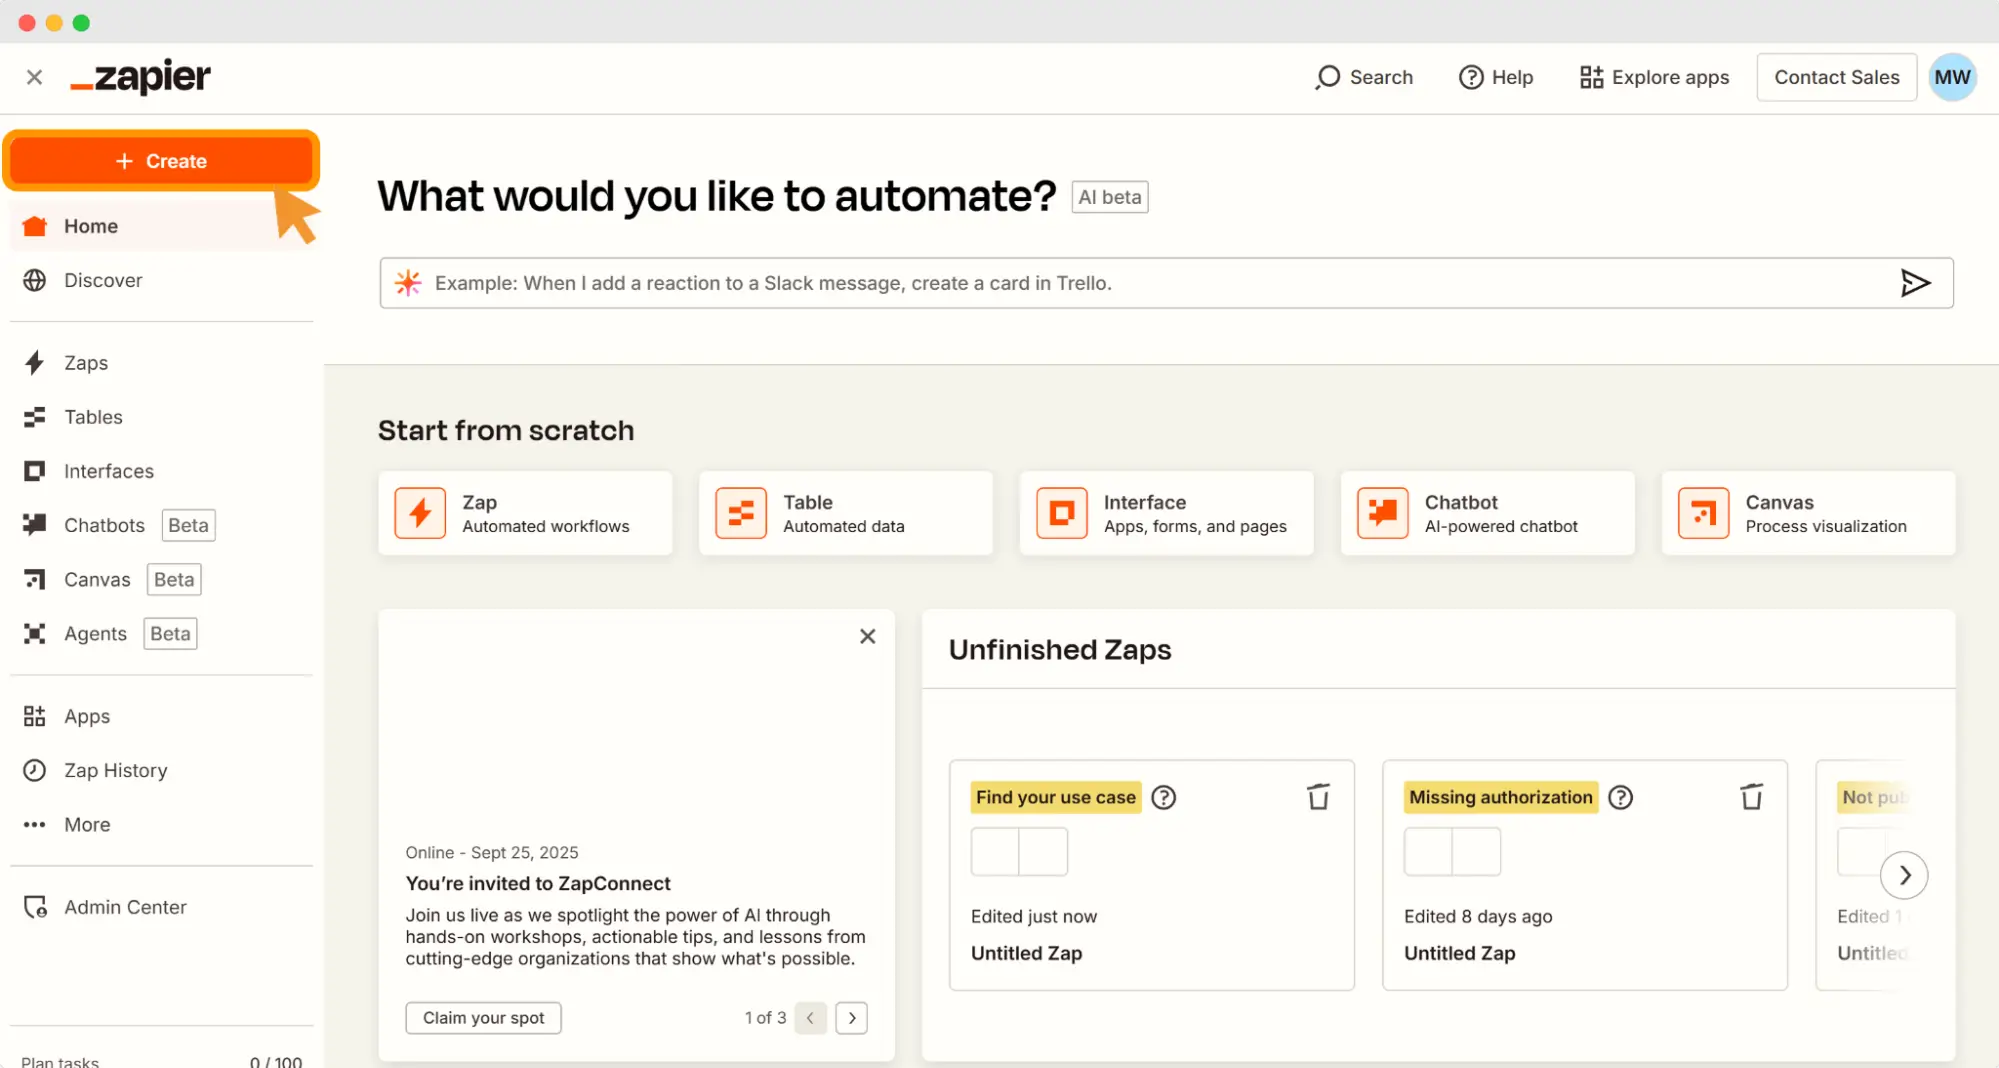
Set LearnDash as your trigger app. Trigger event: Course Completed. Connect your LearnDash account and choose the course that should trigger the certificate.
Set Certifier as your action app. Action: Issue Credential. Connect your Certifier account and select the group that matches your course.
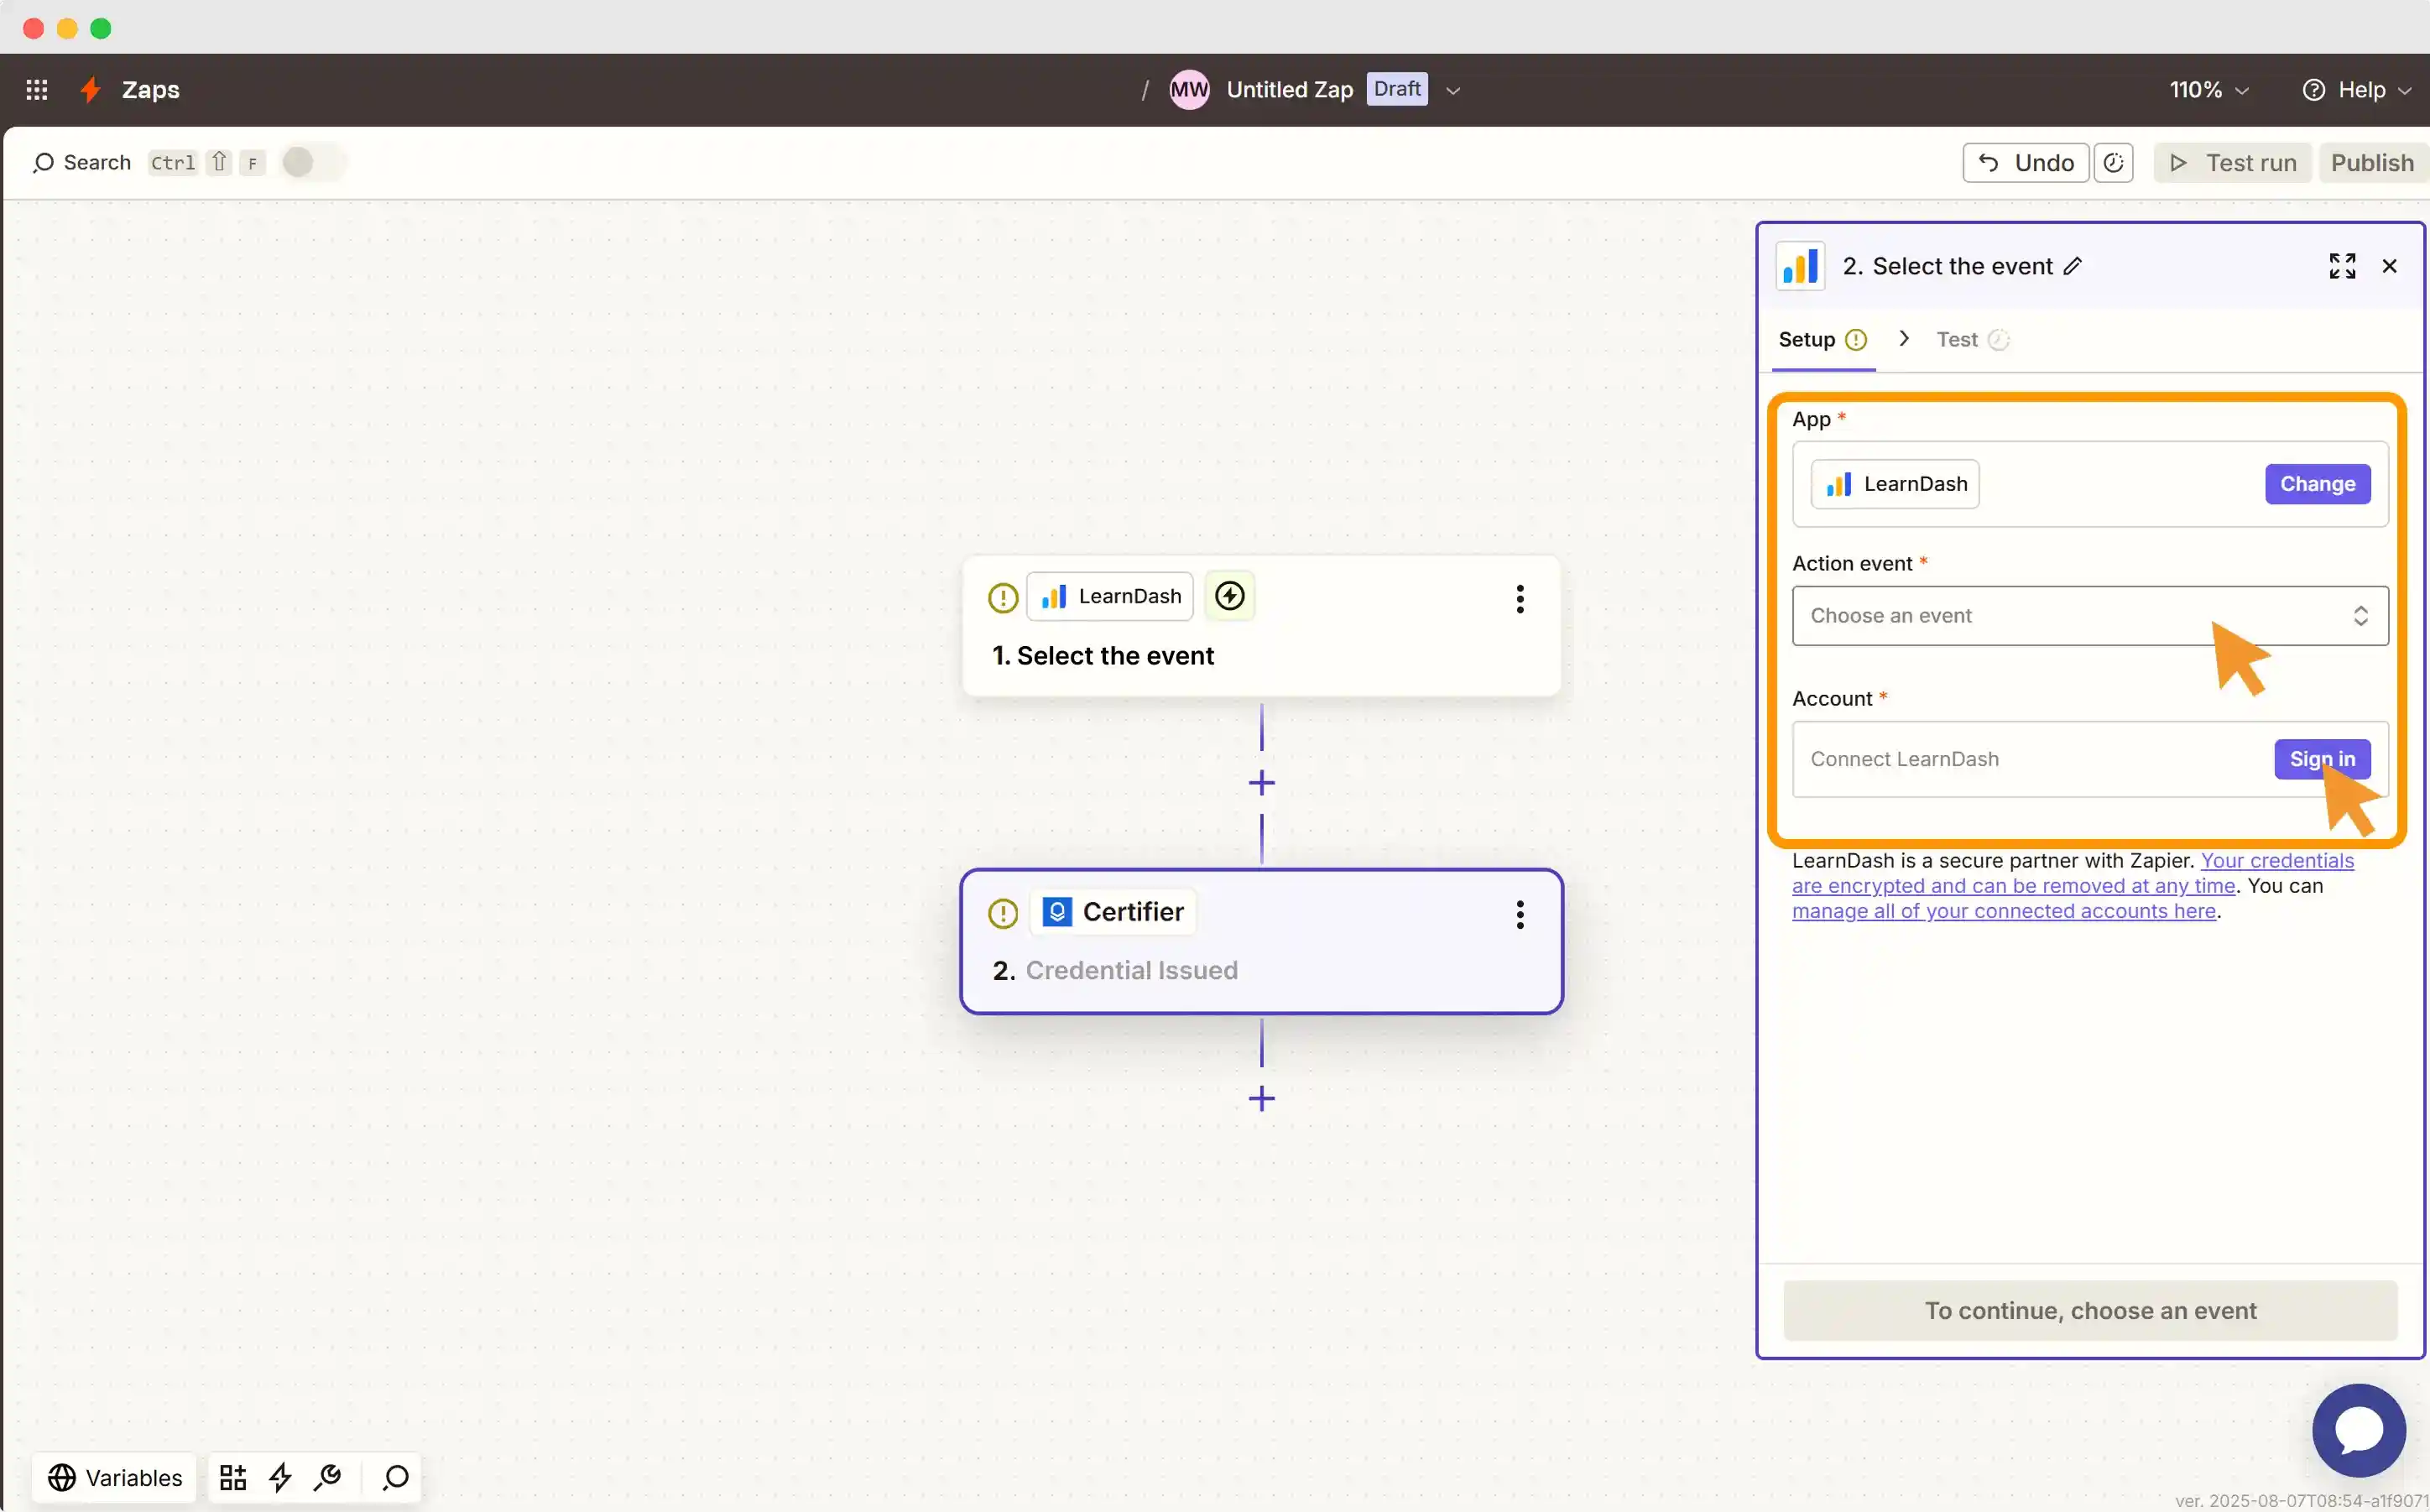
This step means that when a user completes a course in LearnDash, Certifier will automatically issue a course certificate on your behalf.
At the end, test your Zap to make sure everything works smoothly.
Check out the video tutorial on how to use Zapier to connect Certifier with other tools:
Step 2: Customize your LearnDash certificate template in Certifier
Now that automation is set up, it’s time to create the actual certificate.
Log in to Certifier and go to the Designs tab.
Browse the available course certificate templates. Filter by style or use keywords like "course" or "graduation".
Pick a template that fits your brand and customize it.
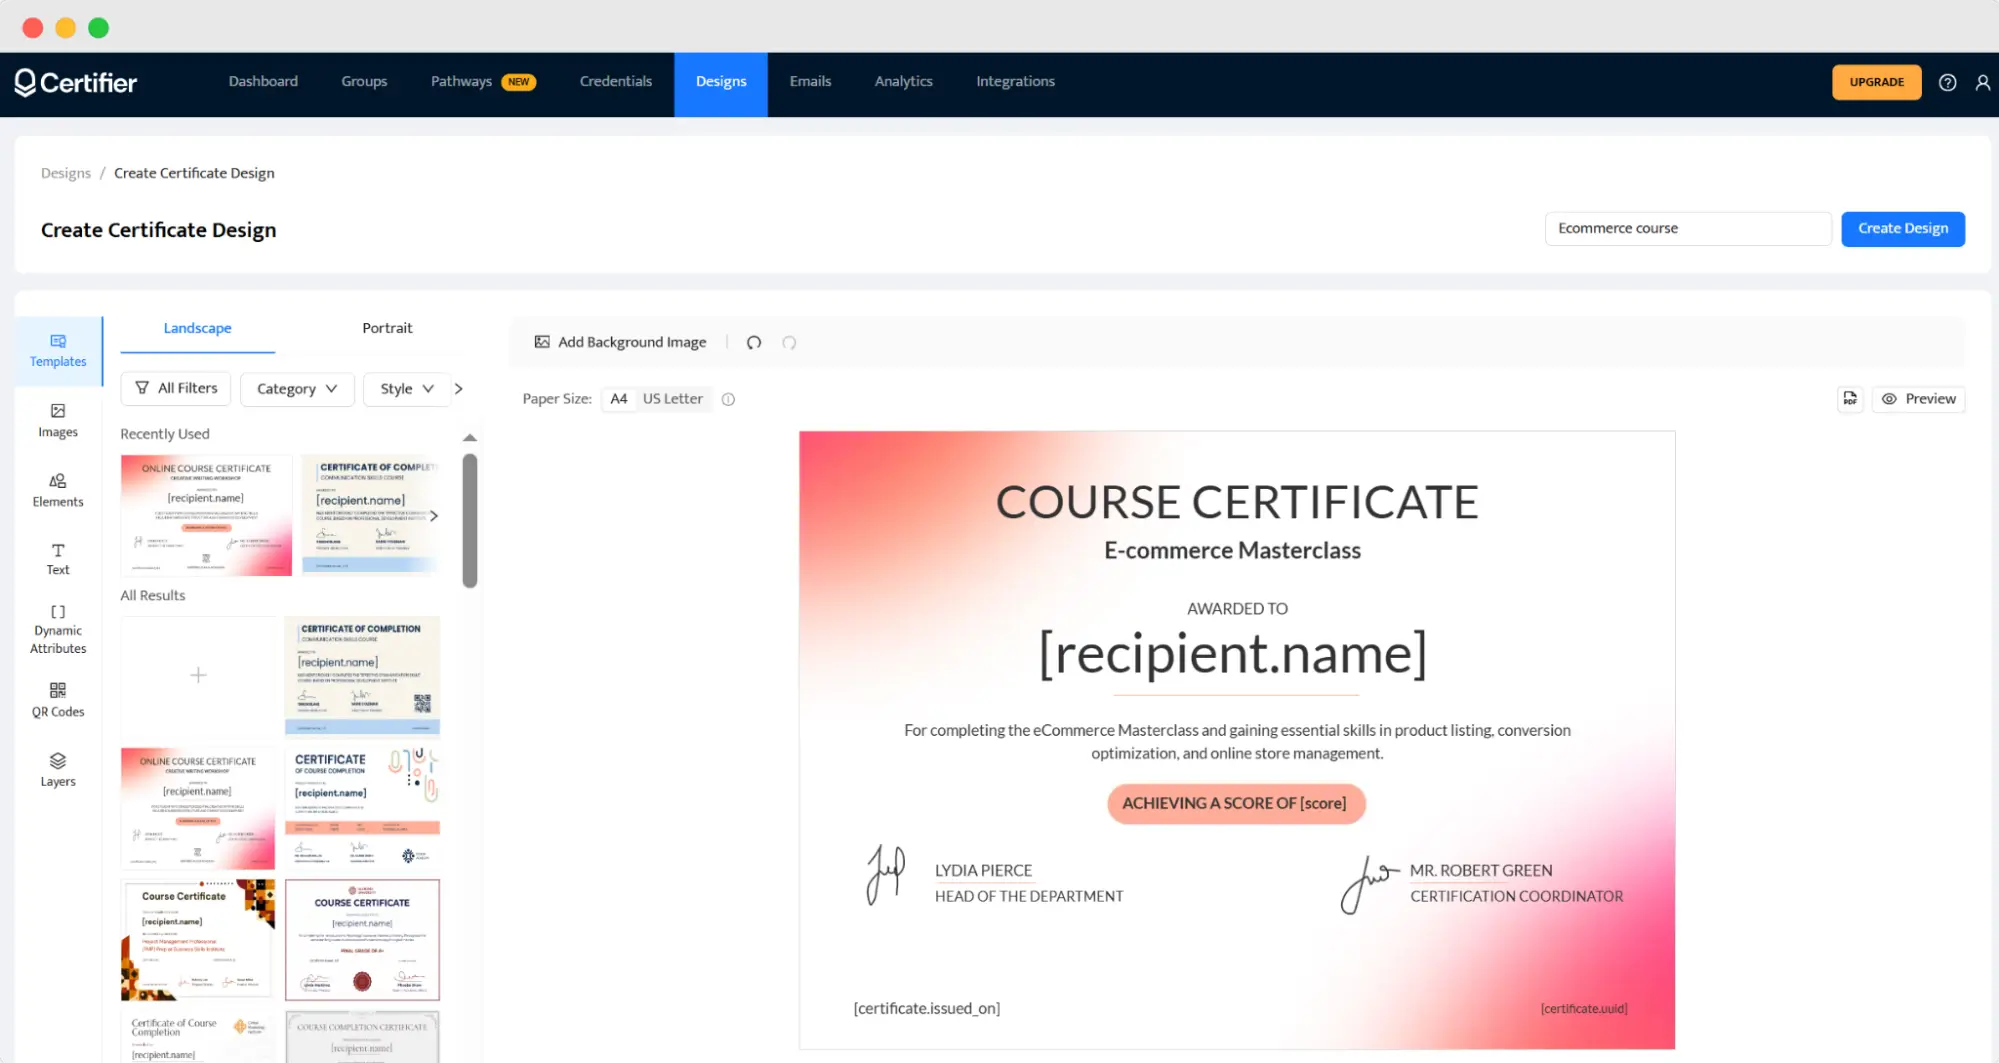
Use Certifier’s certificate builder (not to be confused with the native LearnDash certificate builder) to:
Upload your logo
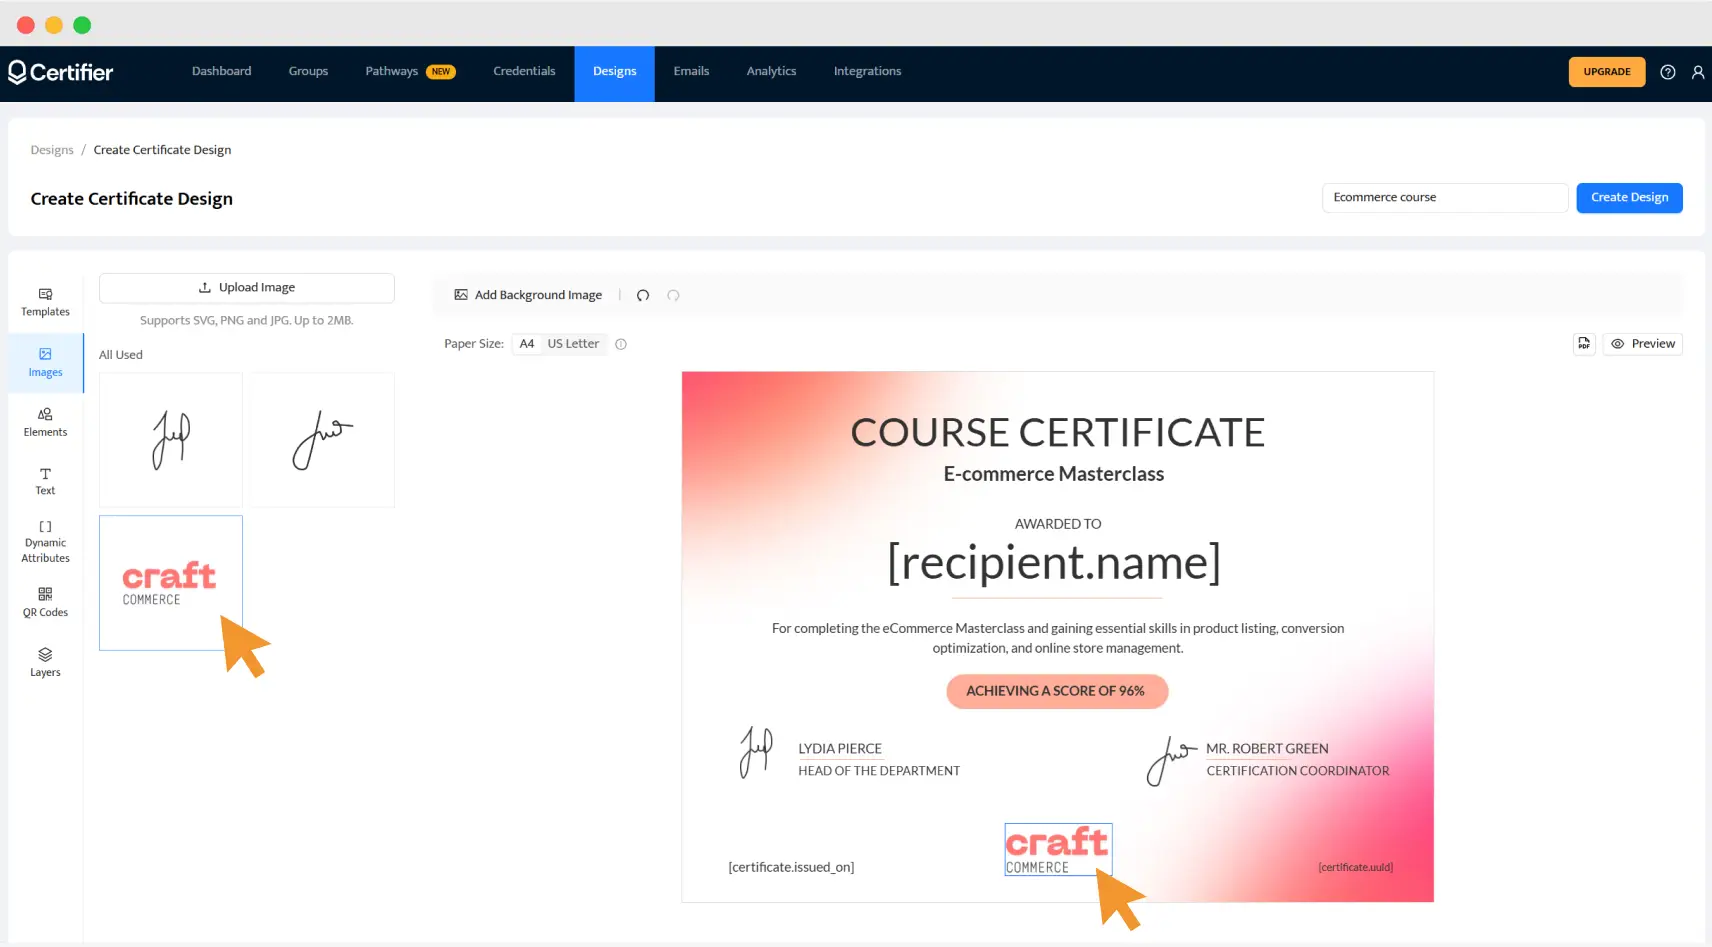
Set your brand fonts and colors.
Add static elements (e.g., issuer name, certificate title).
Insert dynamic attributes on your certificate: student name, course name, completion date, unique certificate ID.
What are dynamic attributes? Dynamic attributes are placeholders that automatically fill in personalized data—like the student’s name, course title, completion date, certificate ID or score—at the moment of issuing.
You don’t need to manually enter learner details or use LearnDash certificate shortcodes like [user_firstname]. Certifier pulls all the data directly from your Zapier integration and inserts it into each certificate.
For example:
[recipient.name] → becomes Jane Doe
[course.name] → becomes Ecommerce Masterclass
[certificate.issued_on] → becomes August 1, 2025
[certificate.uuid] → becomes LD‑2025‑49387
Need a unique ID on each LearnDash course certificate? Certifier generates it for you—no LearnDash certificate unique ID generator plugin required.
Want to add LearnDash certificate verification? Just drag in a QR code on a design. Students can scan or click to confirm authenticity and share or add their LearnDash certificate on LinkedIn in seconds.
Read our step-by-step instructions on how to create a course certificate. Actionable tips included.
Step 3: Issue, track and send your LearnDash course certificates
Once your design is ready:
Link it to a Group in Certifier.
Note: In Certifier, a Group is where you store and manage certificates for a specific course or event. It connects your certificate design with the list of recipients and automation rules. It’s a space that holds everything related to one certificate type—template, data, issuing status and tracking—so you can control and organize your LearnDash course certificates in one place.
Certifier handles issuing, storing and tracking.
Students receive a LearnDash email certificate automatically, with your branding and message.
You can monitor status, views, shares and more—all from your Certifier dashboard.
Students can access their certificate through a certificate digital wallet. No more support emails asking where to find it.
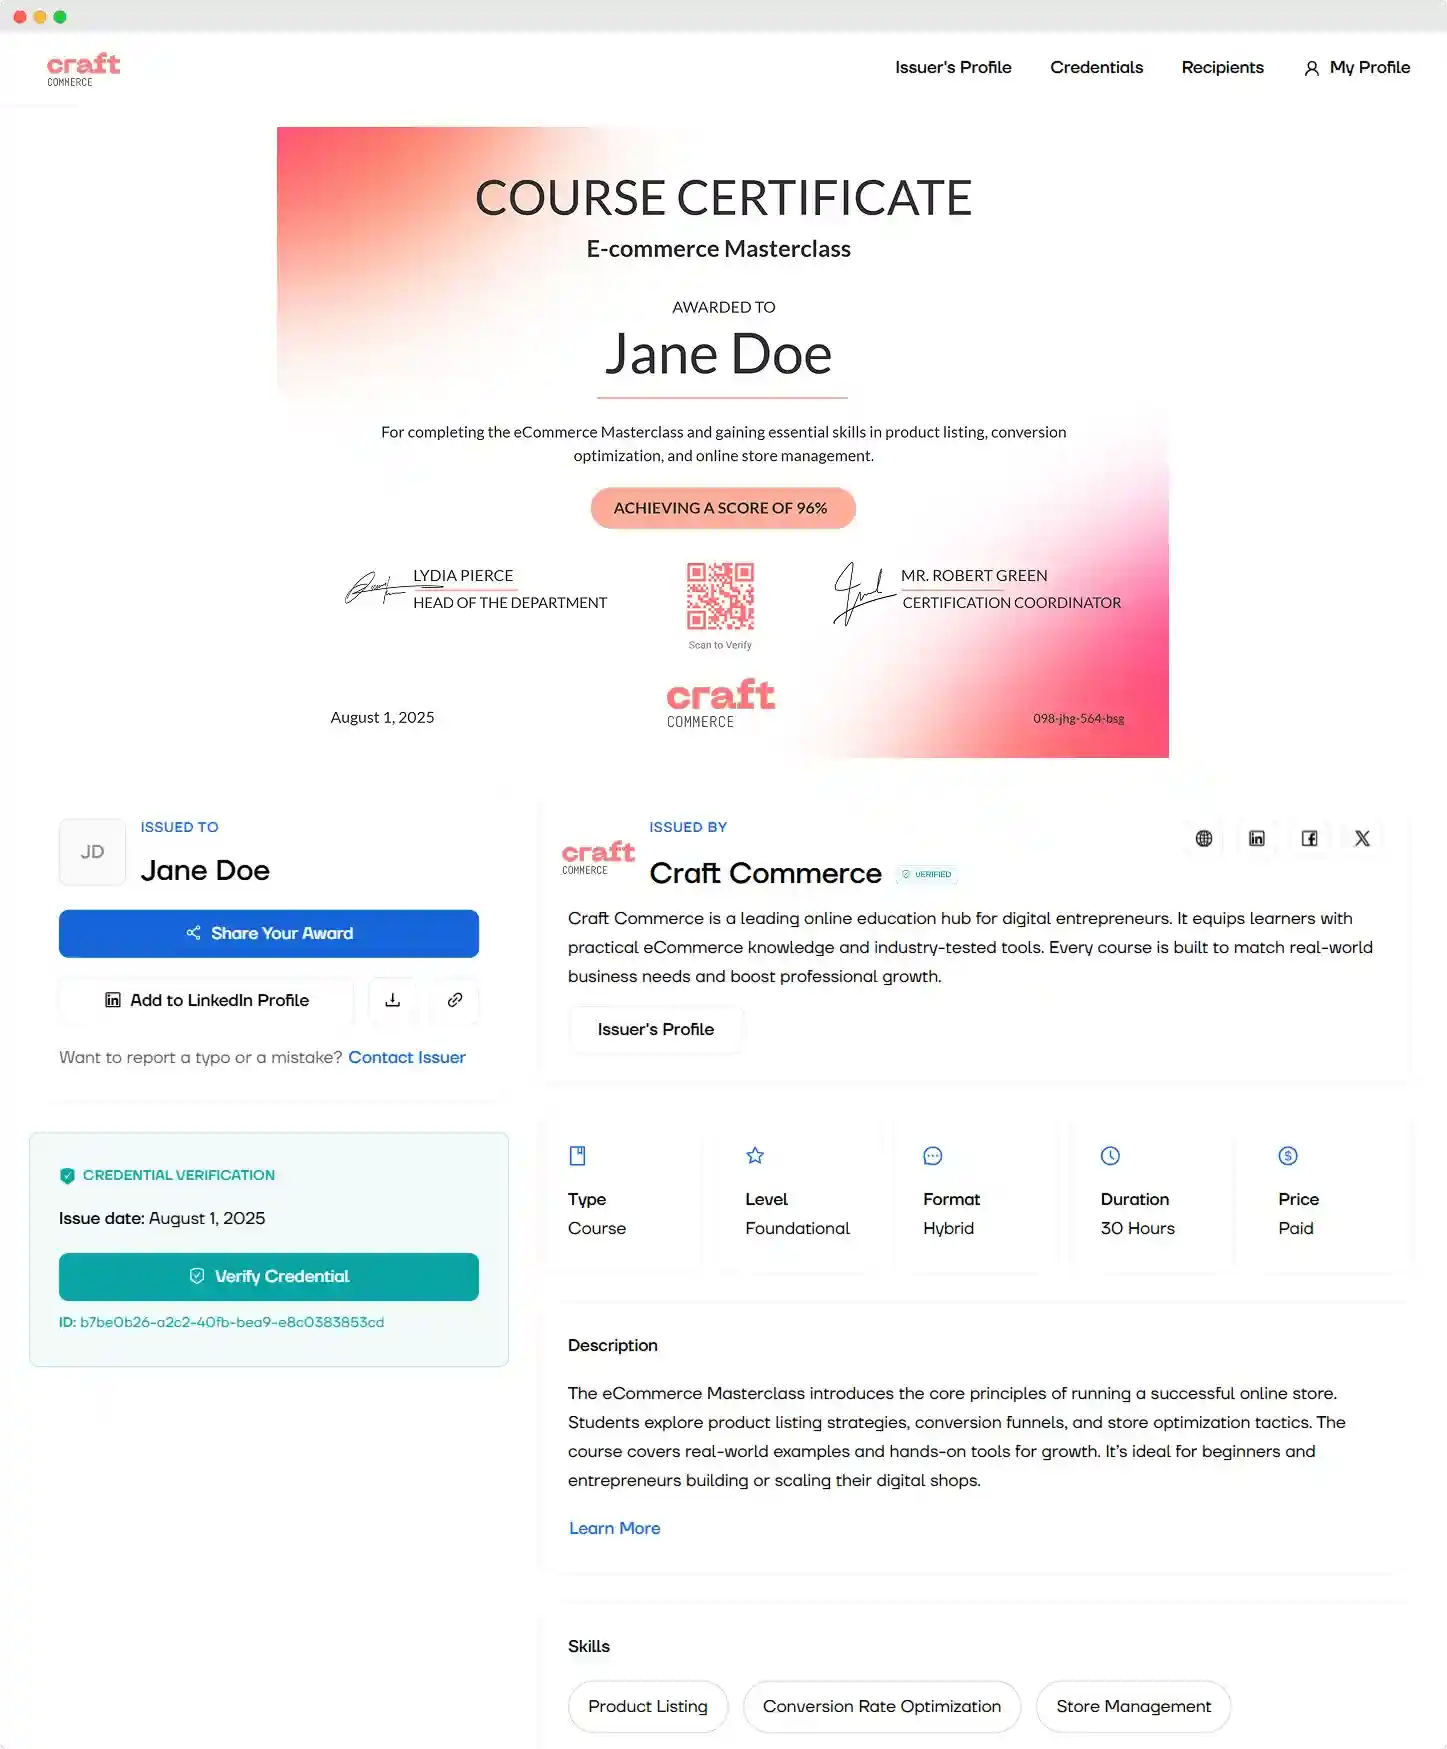
No matter what LMS platform you use, Certifier connects with dozens of tools. Check out Certifier integration list to find your favorite platforms.
How to create certificate in LearnDash?
LearnDash lets you create certificates either using the classic certificate LearnDash editor or the LearnDash certificate builder add-on. Both options work, but they come with limitations that quickly become apparent when trying to create professional, branded credentials at scale.
Mind that the tools doesn’t provide any LearnDash certificate templates.
Option 1: Classic certificate LearnDash editor
The default method (shown below) opens a blank WordPress editor where you need to manually insert LearnDash certificate shortcodes like [user_firstname], CSS and HTML.
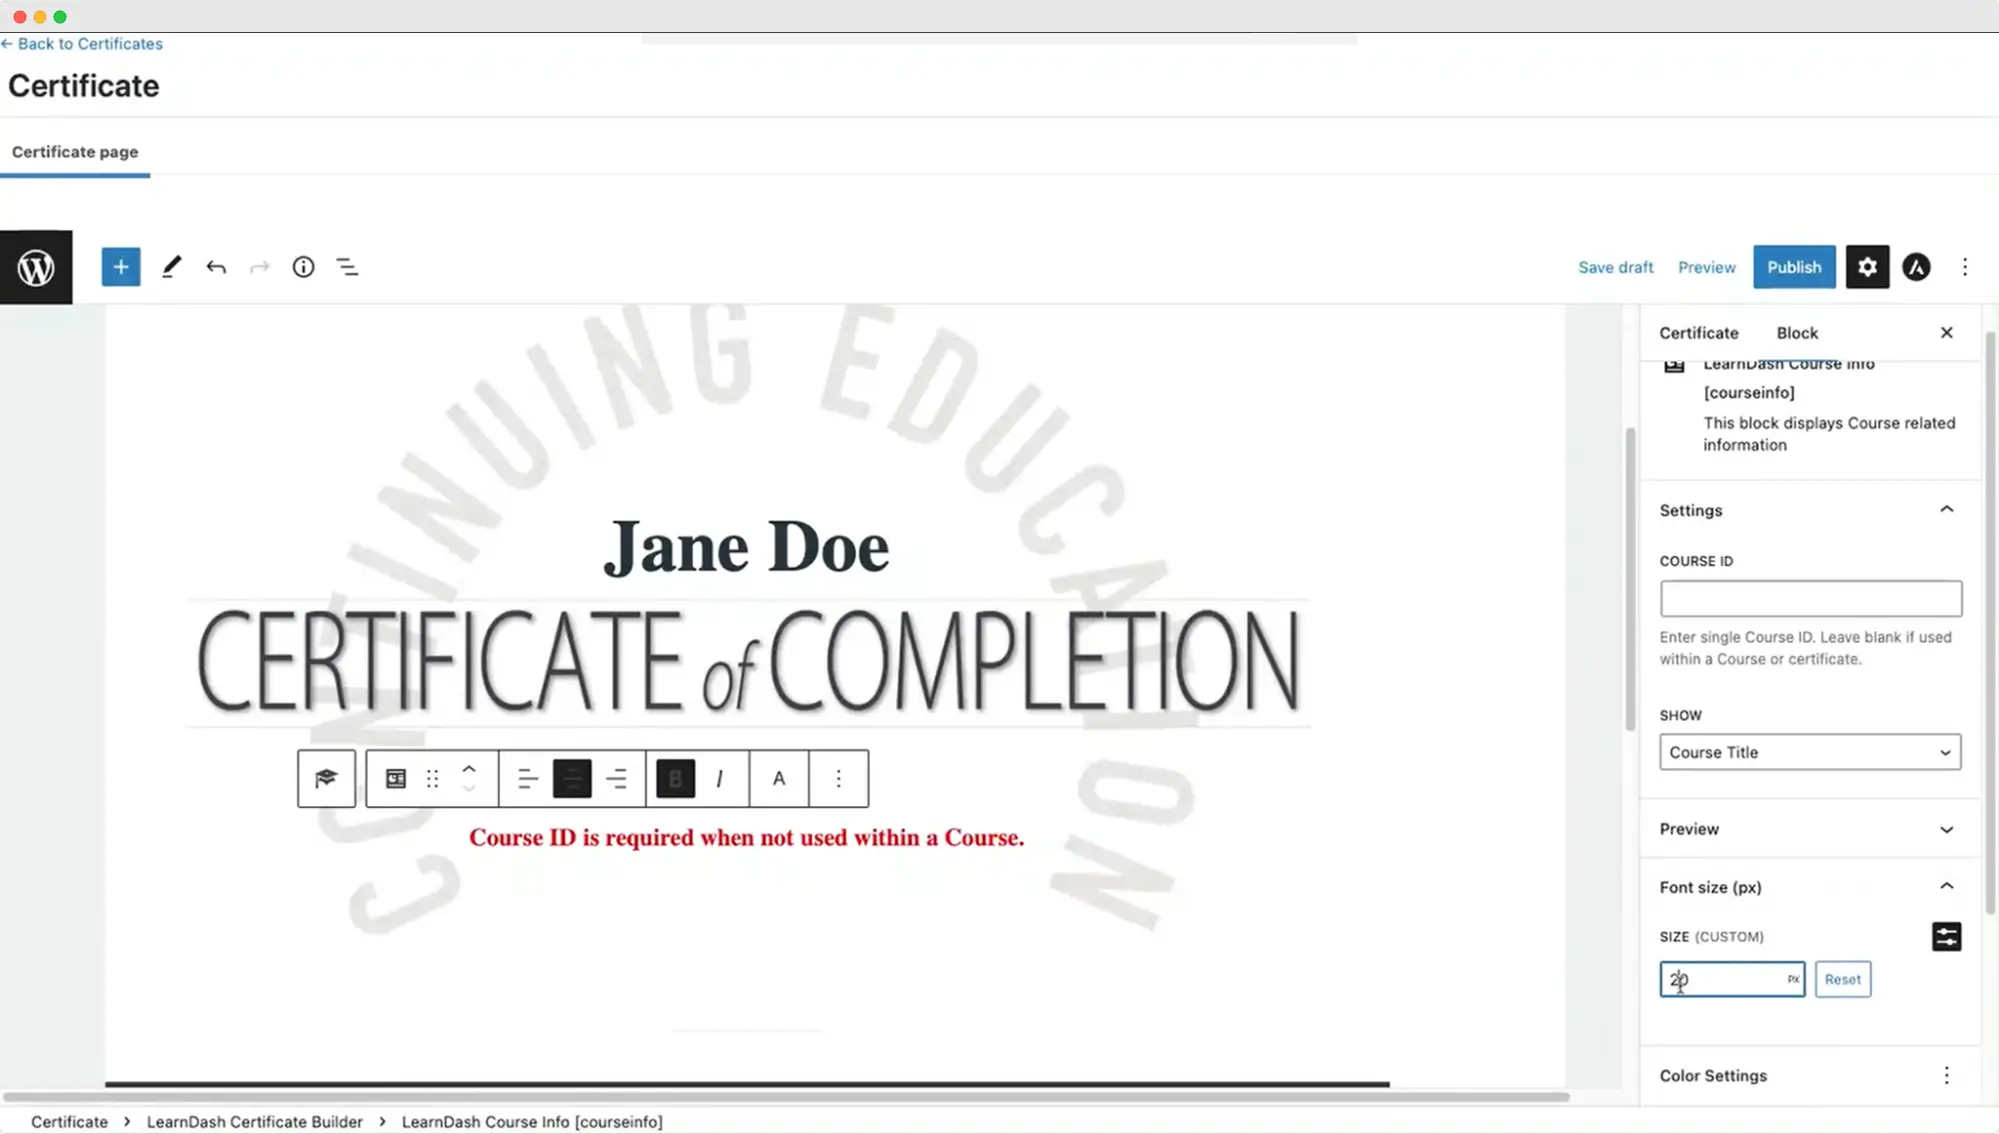
There's no LearnDash preview certificate option—your certificate has to be attached to a course or quiz before you can see how it renders for students.
The process includes:
Adding your background image manually
Typing or pasting in shortcodes for dynamic data
Relying on trial and error for LearnDash certificate fonts sizing and positioning
Publishing, assigning to a quiz or course and testing in a real user flow
Learn more about the ideal credential sizing to make your LearnDash certificate size on point. Psst! Certifier’s templates are in the best format by default.
Option 2: Certificate builder add-on
The newer certificate builder uses WordPress’s block editor (Gutenberg) and offers slightly more visual flexibility. You can insert LearnDash-specific blocks like:
User meta (e.g., student name)
Course info (course title, completion date)
Quiz info and Group info (only if those modules are attached)
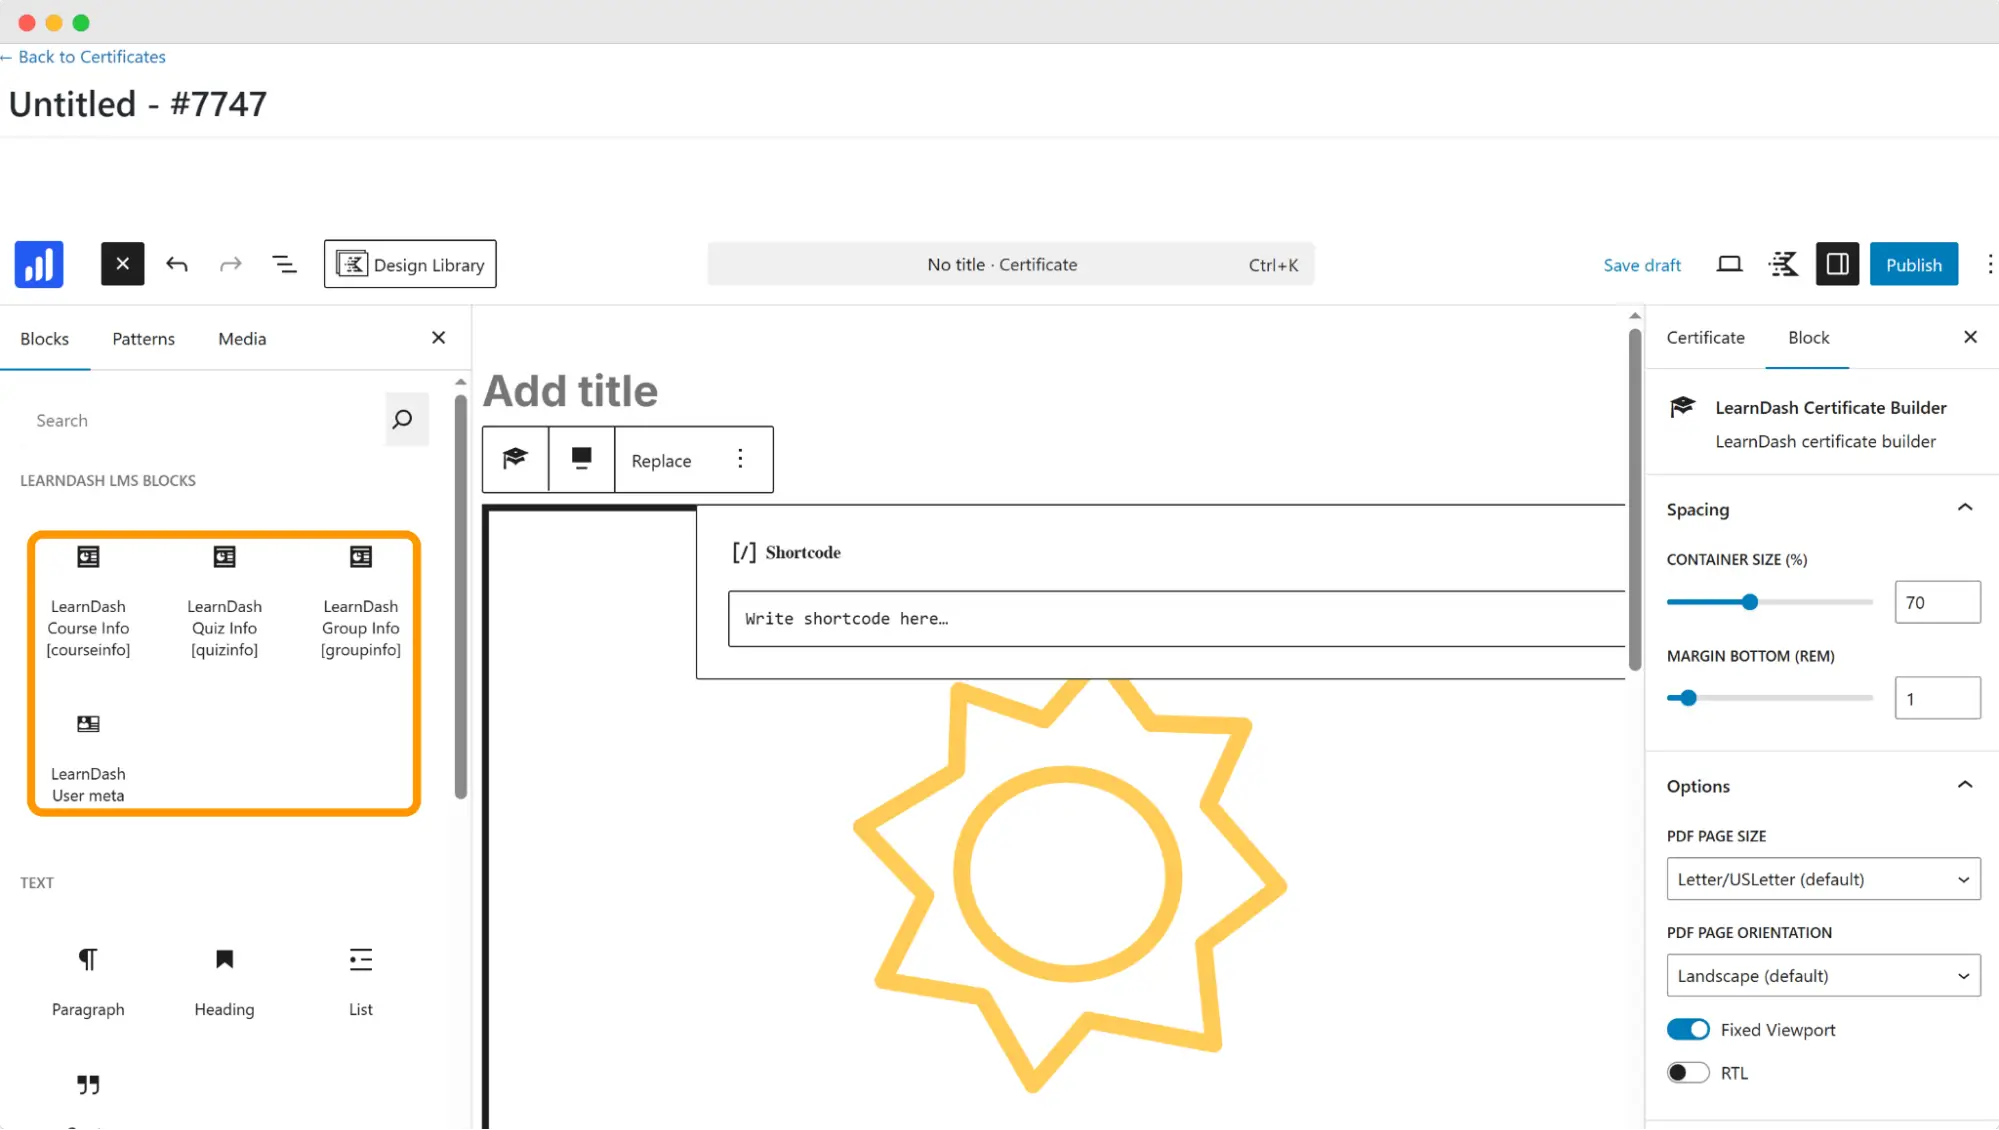
But even with this builder:
You still can’t rely on what you see—the preview doesn’t match the final PDF output.
Spacing and alignment require guessing and multiple iterations.
LearnDash certificate fonts and styling remain rigid and there's no support for live dynamic previewing.
You’ll also need to:
Manually enter course IDs if used in a quiz context.
Create a test user and a dummy course to preview the final result.
Go back and forth adjusting padding, font sizes and block placements.
Repeat this process for each course if certificates differ.
Bottom line? It works—but only if you have time and a tolerance for outdated design workflows.
Skip LearnDash certificate builder, automate issuing credentials with Certifier
LearnDash is a solid LMS—but its built-in certificate system isn’t built for scale. Certifier complements LearnDash and fills the gaps in certificate creation and delivery. Together, they make your LearnDash certificate process faster and more rewarding for students.
And you don’t need to code anything. You just connect LearnDash and Certifier using Zapier and let the automation do the work.
Sign up for Certifier for free.
FAQ on LearnDash certificates
Learn more about issuing LearnDash certificates. Go through the answers to the most frequently asked questions.

- Product Management
- Customer Research
- Digital Credentials
- Product Strategy
- Design Systems
Product Manager
Uliana leads product management at Certifier, using her UI/UX background to explain platform features and help organizations maximize their credentialing capabilities.

