

Trusted by:
University of Southern California
Warner Bros.
Volvo
Amazon
Stanford University
Updated: October 16, 2026
16 min read
You can generate certificates from Google Sheets without copying names into a template one by one. The cleanest and fastest workflow is to keep your recipient data in Sheets, connect it to a certificate generator, map each column to the right certificate field, and issue the certificates in bulk.
Research with AI:
For most schools, course creators, webinar teams, and training coordinators, Google Sheets works best as the recipient database. It’s where names, emails, course titles, scores, dates, and completion status already live.
The certificate design, delivery emails, PDF downloads, verification pages, and tracking should happen in a tool built for digital credentialing that allows you to run the setup once with minimal maintenance.
This guide covers four practical ways to generate certificates Sheets: a direct Google Sheets Certifier integration for recurring programs, a CSV upload for one-off batches, a Google Apps Script plus Google Slides route, a multi-app connection via Zapier or Make for custom logic and multi-app routing, as well as a bonus option for developers and agentic workflows.
Direct connection Use Certifier’s native Google Sheets connection when new recipients are added over time and you want certificates issued automatically with no admin work.
CSV upload for when the list is final, you want to review the batch before sending, and you don’t have to do it more than once.
Google Apps Script & Slides for native Workspace setups, but only if your team is comfortable maintaining code and checking Gmail or Apps Script quota limits.
Zapier or Make best for multi-app logic, such as triggering credentials based on LMS, CRM, or form entries
Preparation keep one recipient per row, place headers in row 1, avoid merged cells, make sure email addresses are valid, and, optionally, use a test row.

Use this table to choose the workflow before you start. The right method depends on whether your certificate list is a one-time batch or a live sheet that keeps receiving new rows.
Method | Best For | Main Advantage | Main Limitation |
|---|---|---|---|
Connect Google Sheets to Certifier | Recurring courses, live events, Google Forms responses, and ongoing training programs | No-code automation with field mapping, email delivery, hosted credential pages, and analytics | Best suited to teams issuing certificates in batches or recurring programs, less practical for issuing a single, one-off certificate |
Export Google Sheets to CSV and upload | Finished lists, one-time webinars, completed cohorts, and manual review workflows | Simple, predictable, and easy to control before publishing | Requires a fresh export every time the sheet changes |
Use Google Apps Script and Google Slides | Technical teams that want a native Google Workspace setup | Can merge Sheets rows into Slides templates and send PDF attachments through Gmail | Requires code maintenance, authorization, quota checks, and custom error handling |
Use Zapier or Make as an add-on | Multi-app workflows where data starts in a CRM, LMS, payment tool, or form builder | Adds conditional logic and app-to-app routing | Creates another automation layer to maintain and troubleshoot |
When Is Google Sheets Certificate Automation the Right Fit?
Automating certificates from spreadsheet rows is useful when you manage learner records in a central table and want to trigger issuing automatically. This setup is common for webinar platforms and learning management systems.
You can also use Google Sheets as a middleware bridge for compatible platforms. For example, you can connect SurveySparrow to Certifier through Sheets to automate certificates for new survey takers. Teams can also connect Zoho to Certifier via sheets for credential workflows based on form submissions.
For webinars, you can issue participation credentials to hundreds of webinar attendees automatically after the event, thereby fully automating attendance exports.
In educational contexts, it saves a lot of time to automate certificate delivery the moment students pass a course and their name is added to a sheet. The same goes for continuing education, where you can track professional development hours and generate digital credentials with specific credits.
Event organizers can print or email badges and certificates of attendance directly from registration data.
Working with Microsoft Excel spreadsheets? If your recipient data is stored in Microsoft Office, follow our sister guide on how to generate certificates from Excel spreadsheets.
Clean spreadsheet data prevents most certificate generation errors. Before connecting Google Sheets to any certificate workflow, review the sheet as if every row could be emailed immediately.

Use row 1 for clear column headers such as Full Name, Email, Course Name, Issue Date, Expiration Date, Instructor, Grade, or Hours.
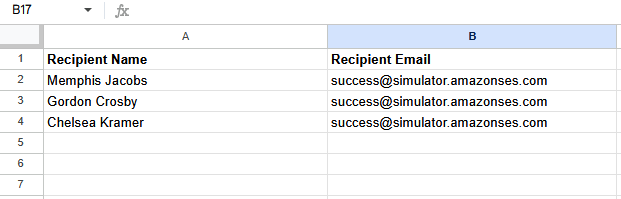
Keep one recipient per row.
Don’t place multiple names, emails, or course completions inside one cell.
Validate email addresses before sending.
Remove spaces, missing domains, duplicate recipients, and personal test addresses that should not receive final credentials. If you use the Certifier method our platform will tell you if the email sending failed for some reason.
Use consistent date formatting, preferably YYYY-MM-DD, when dates need to appear on the certificate.
Convert formulas to final values before exporting CSV files, especially if columns combine first name and last name or calculate completion dates.
Keep only the fields needed for certificate generation. Extra CRM, LMS, or event metadata makes mapping slower and raises the chance of choosing the wrong field.
Add one internal test row before the live batch so you can confirm the certificate design, email content, and mapped attributes.
A pro tip for working with database Sheets is to avoid merged cells as much as possible. These, alongside hidden header rows, blank rows in the middle of the list, and notes above the table can really mess things up.
Keep the Input Sheet separate from the Live Sheet. Use the Input Sheet to collect, clean, and review recipient data. Copy only complete rows into the Live Sheet when they are ready to issue. This simple split reduces accidental duplicate sends and keeps partially edited rows away from your automation.
If your data comes from Google Forms, treat the form response tab as the Input Sheet. Review required fields, clean incomplete submissions, and move only approved rows into the Live Sheet or connected issuing workflow. This should keep half-finished form responses from becoming live certificates.
This is the recommended workflow when you issue certificates after every cohort, webinar, class, workshop, or recurring training session. Google Sheets remains the source of recipient data, while Certifier handles certificate design, dynamic field mapping, email delivery, hosted verification, PDF downloads, and analytics.

Step 1: Create or clean your Google Sheet.
Start with the data-prep checklist above and keep the Live Sheet for rows that are ready to issue. Jumpstart this process by using our sample sheet.
Step 2: Choose or design the certificate template in Certifier.
Add dynamic attributes for fields you want to personalize, such as recipient name, course name, issue date, score, or instructor.
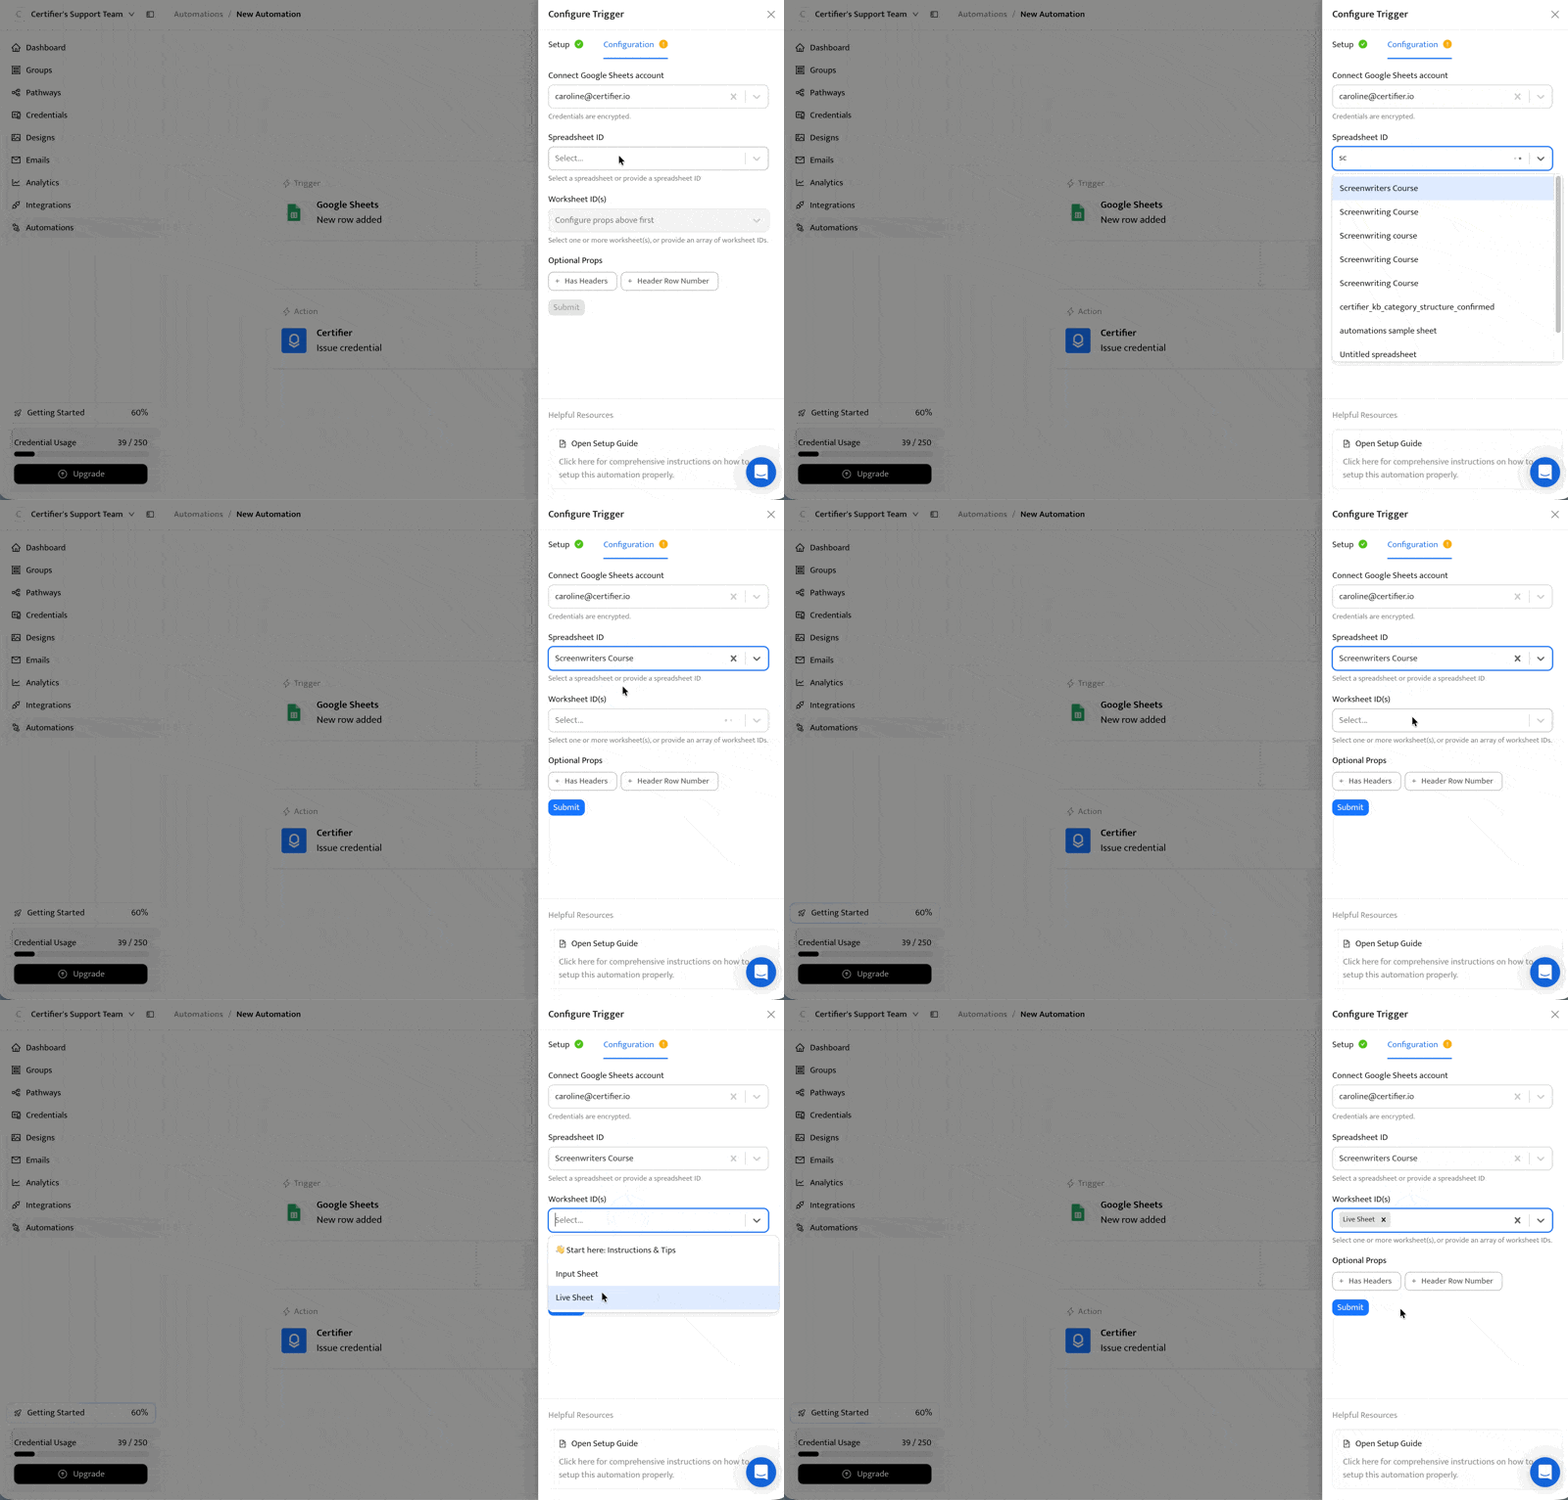
Step 3: Create a Google Sheets automation in Certifier.
Connect your Google account through the authorization flow, select the spreadsheet, and choose the Live Sheet tab.
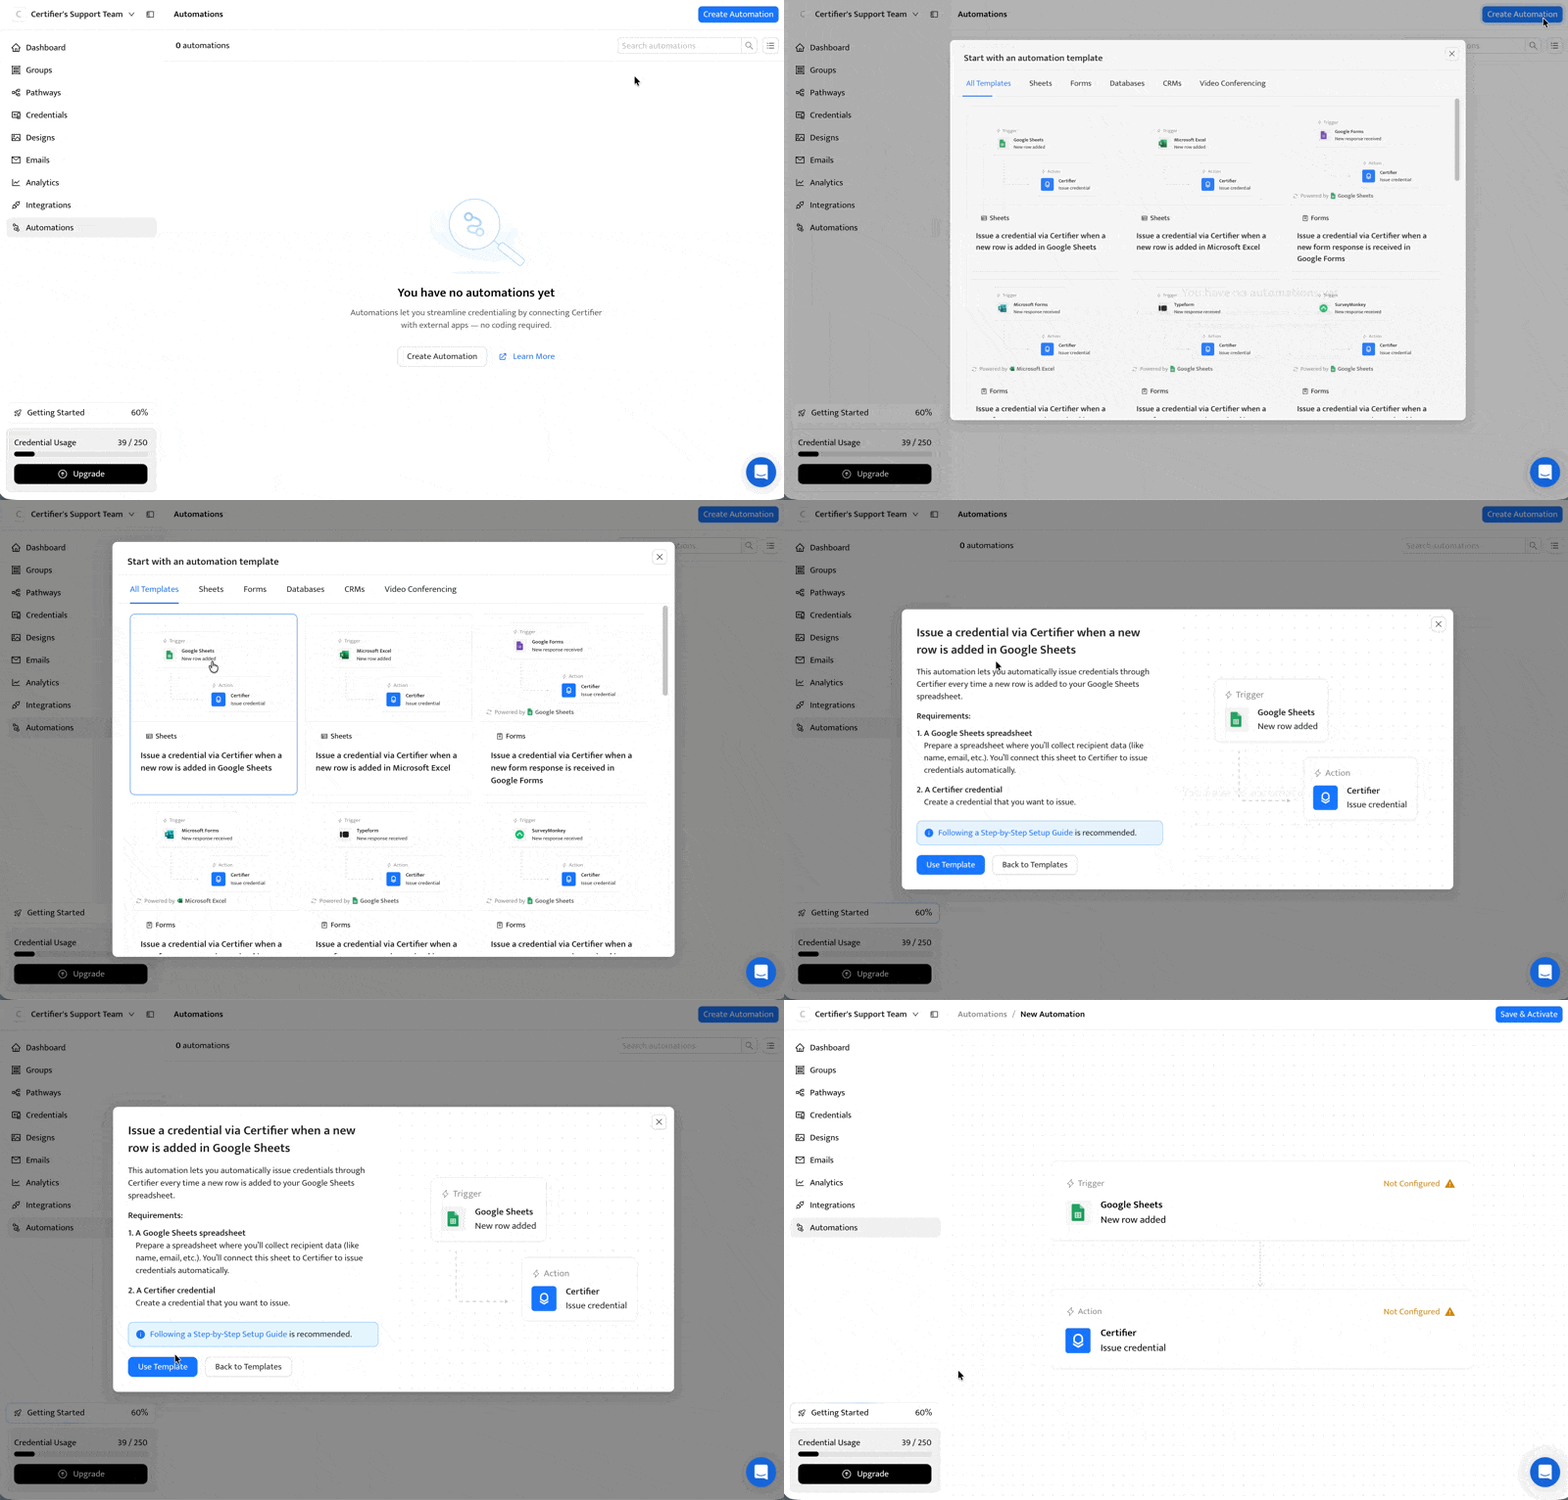
And don't forget to configure trigger, which will prompt you to connect your Google account via OAuth.
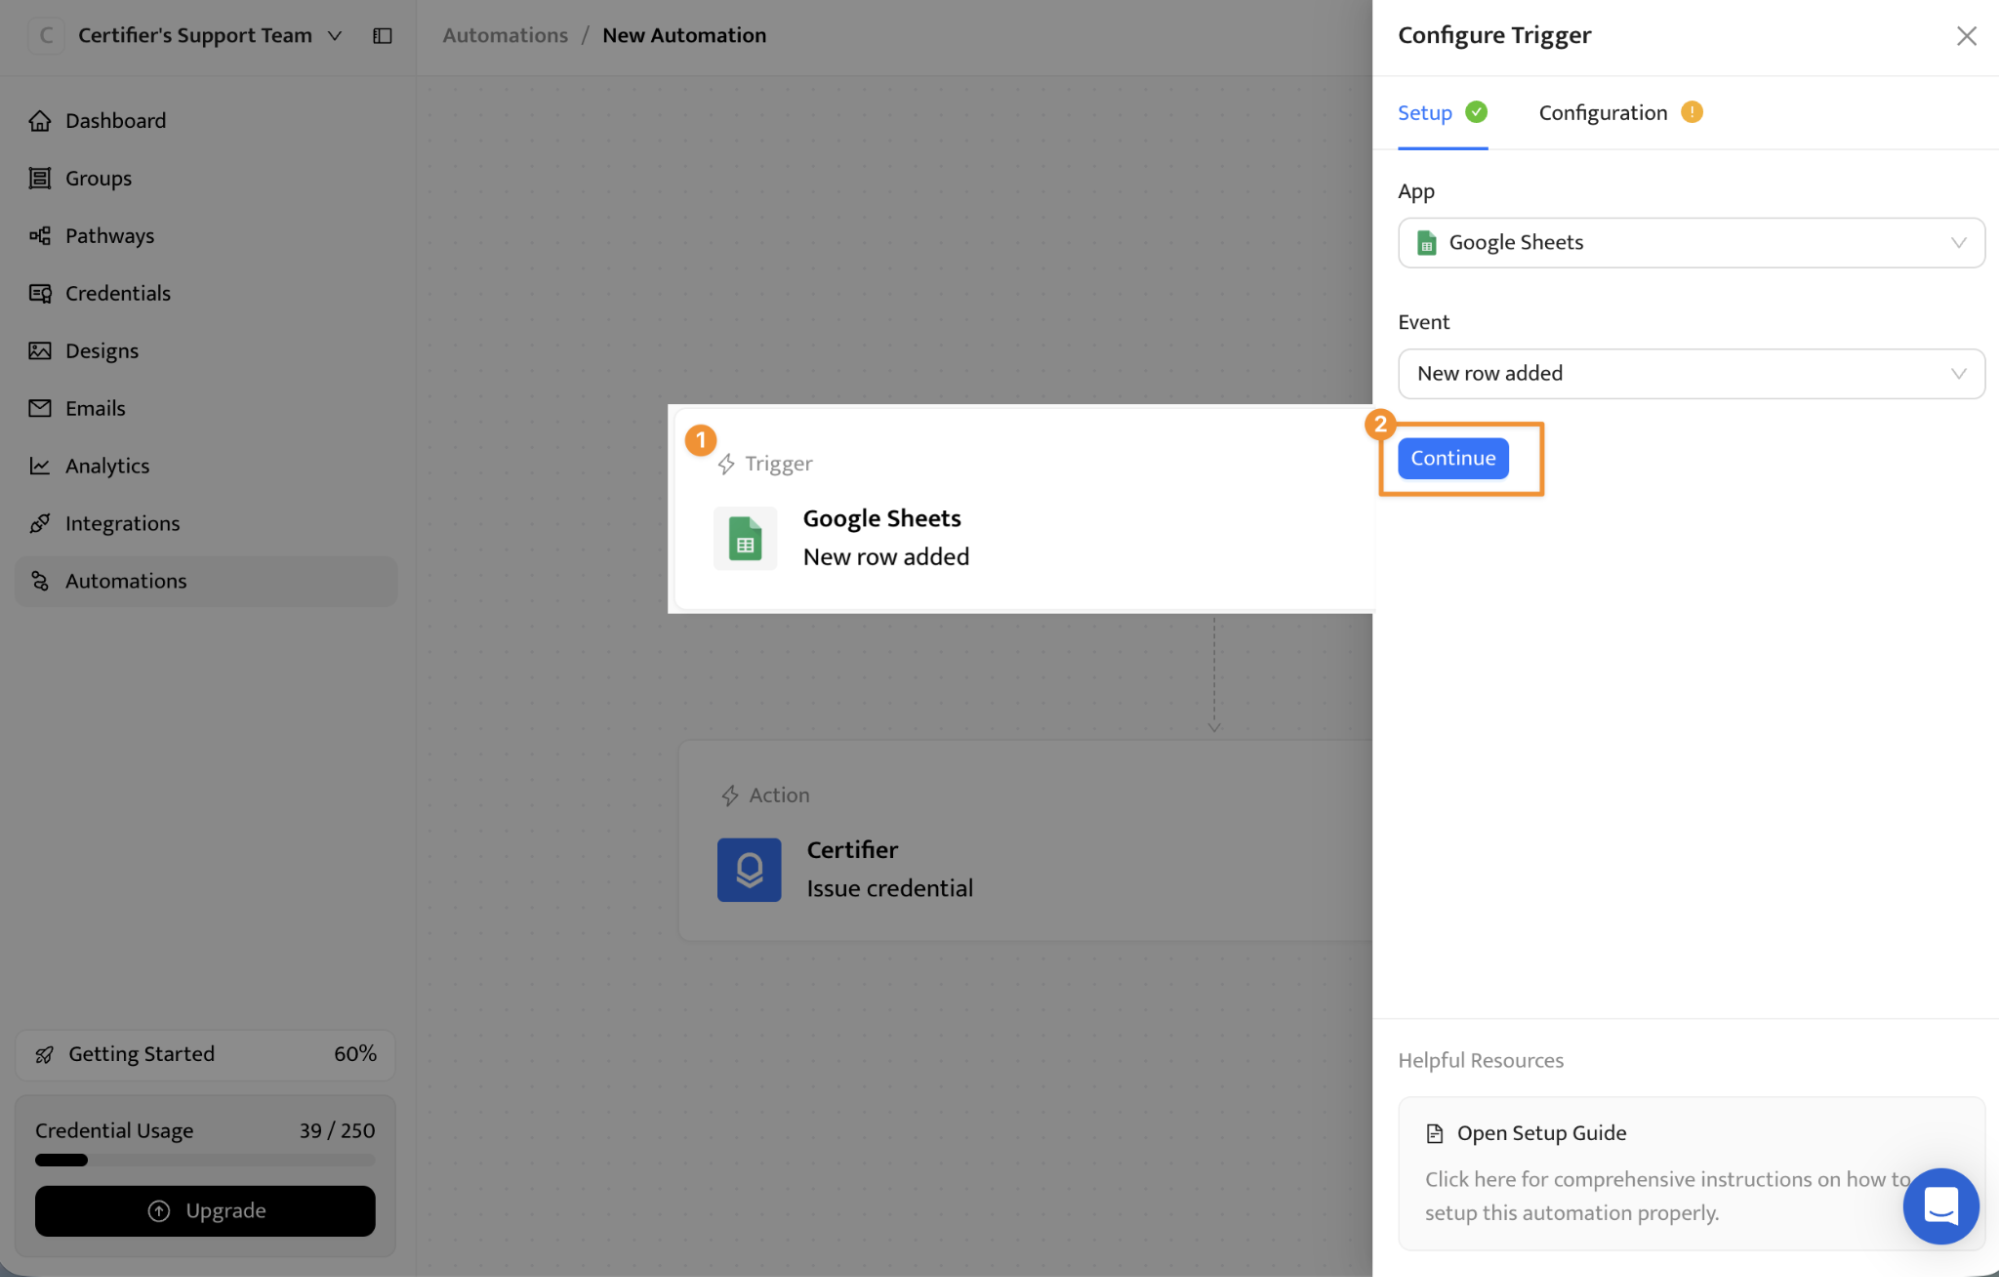
Step 4: Map each spreadsheet column to the right credential field.
At minimum, map recipient name and recipient email. Then map any custom fields that should appear on the certificate or in the email.
Step 5: Run a test with one internal recipient.
Save the first credential as a draft if you want to confirm layout, spelling, email copy, and verification links before sending.
Step 6: Activate the workflow.
Click Save & Activate and confirm. From here, your manual flowFrom this point, adding complete rows to the Live Sheet can trigger certificate creation and delivery without manual copy-paste if you set Send Credential to True.
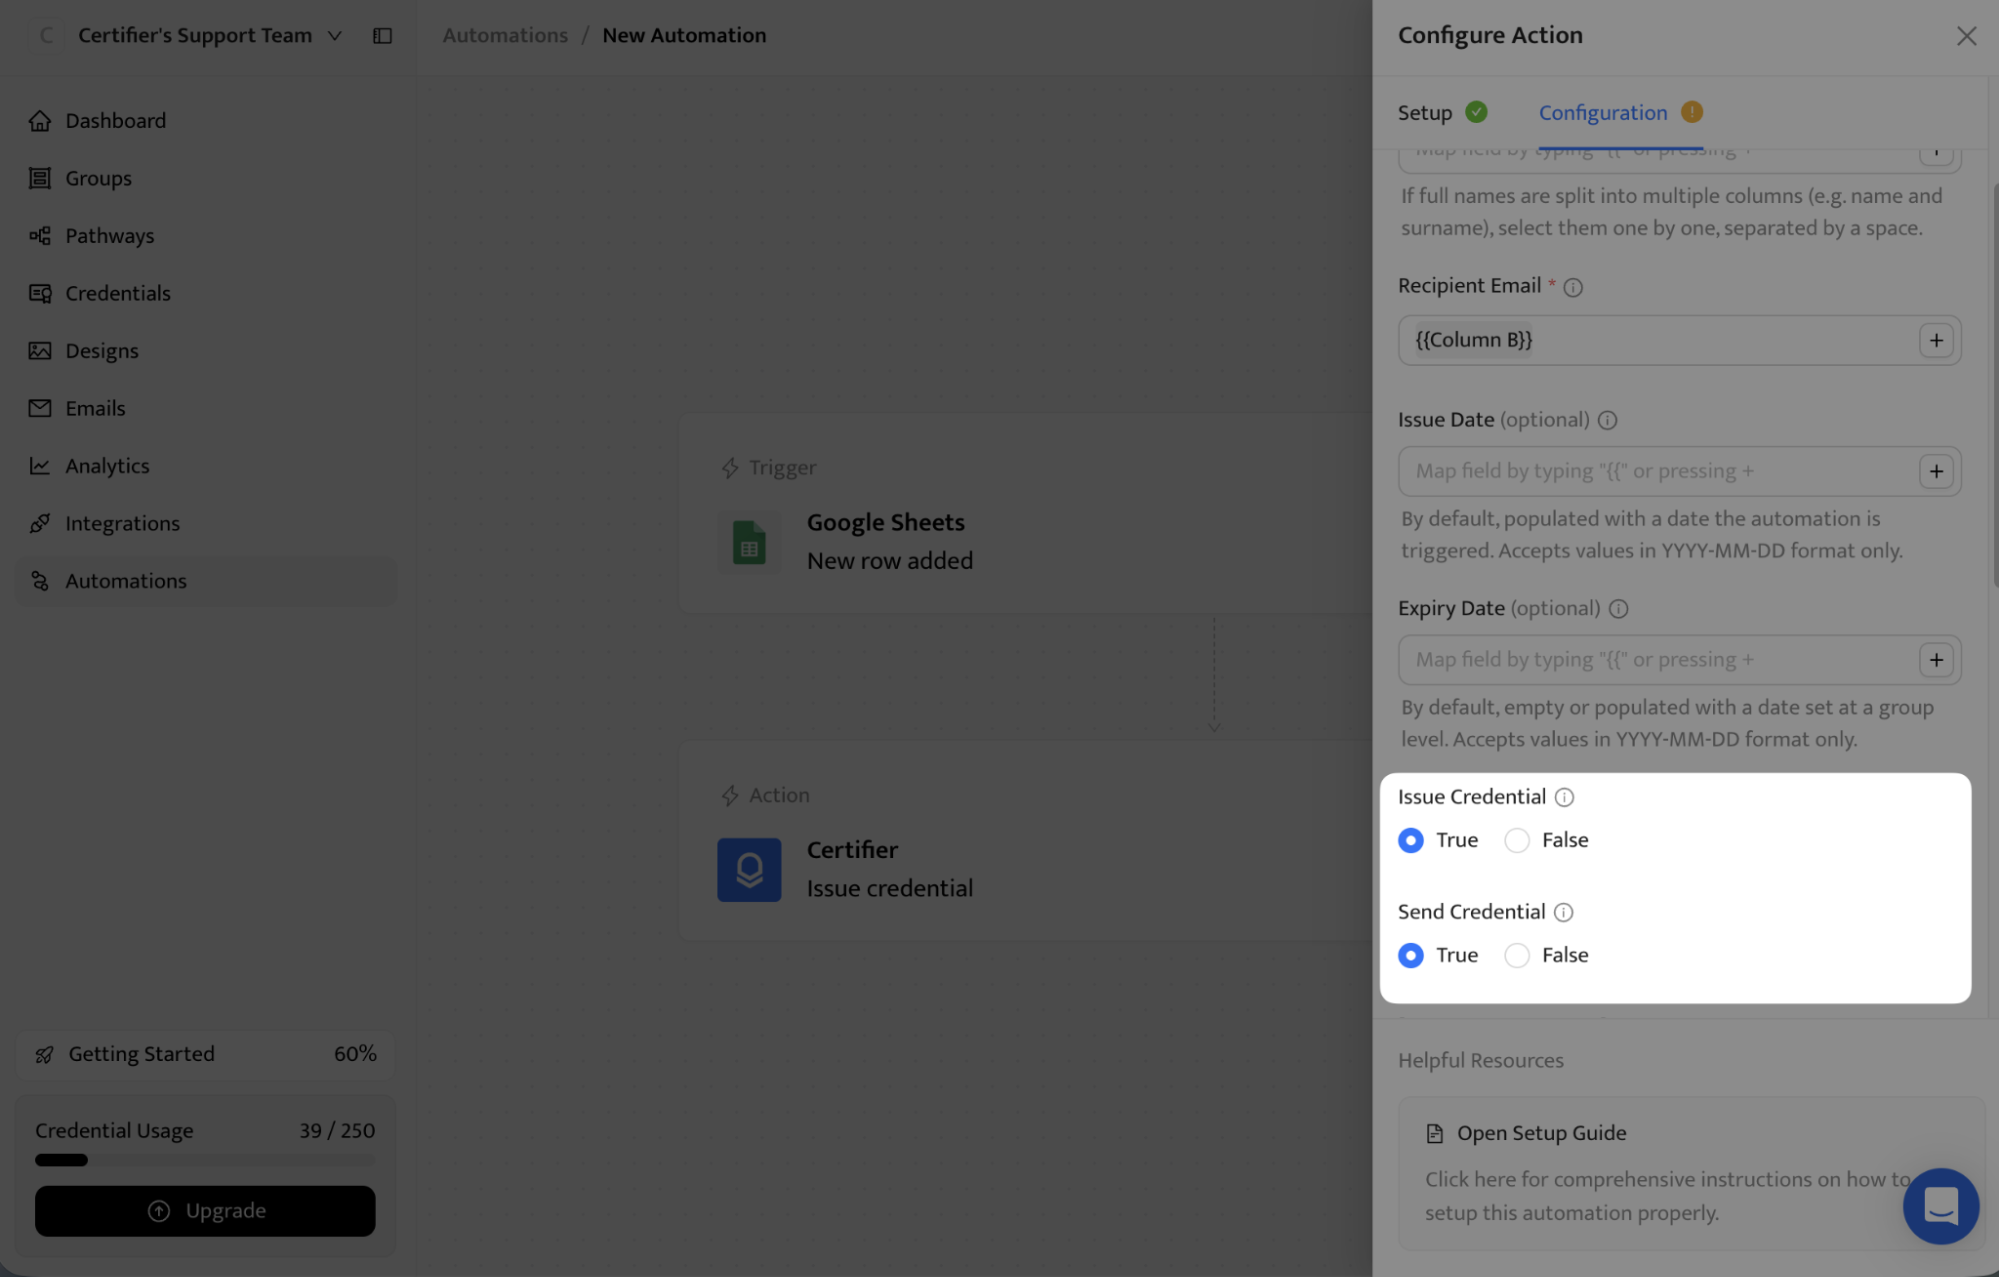
The practical advantage is control. You can keep unfinished rows in the Input Sheet, move only approved rows into the Live Sheet, and use drafts while testing. Once the setup is stable, you can switch to automatic sending for routine cohorts.
Ready to automate recurring certificate batches? Generate certificates from Google Sheets with Certifier
Note: The same row-based automation also works with other structured data tools. For example, you can also connect Smartsheet to Certifier natively and issue credentials when a new row is added.
CSV upload is best when the recipient list is final and you don’t need live automation. It’s a good fit for one-off webinars, completed course cohorts, quarterly internal training, and any batch you want to review before publishing.
Step 1: Make a copy of the final Google Sheet tab so you have a stable version of the batch.
Step 2: Remove unused columns, blank rows, notes, filters, and formulas that are not needed for certificate generation.
Step 3: In Google Sheets, choose File > Download > Comma Separated Values (.csv) for the active sheet.
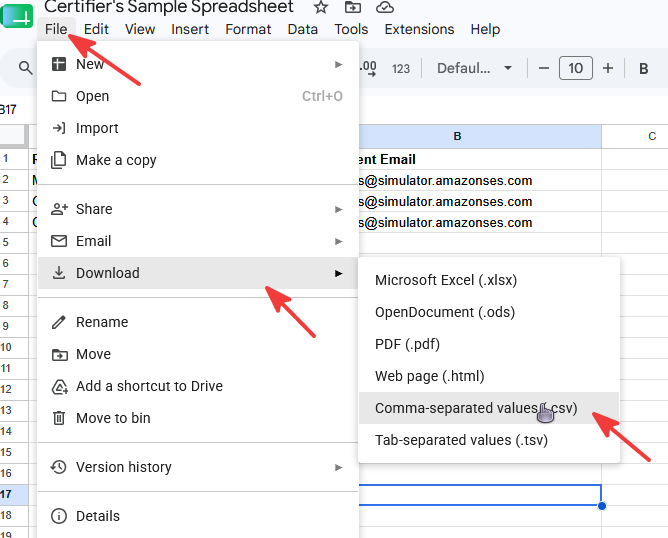
Step 4: Upload the CSV file to Certifier as the recipient list for your credential template.
Step 5: Map CSV columns to recipient name, recipient email, and any custom attributes.
Step 6: Review validation warnings, save the credentials as drafts if needed, then publish and email the certificates.
This method gives you a manual checkpoint before anything is sent. The tradeoff is that CSV files are snapshots. If someone edits the Google Sheet later, you need to export and upload a new file.
Need a certificate design before importing recipients? Explore Certifier's certificate templates.
Google Apps Script can generate certificates from Google Sheets if you want a native Google Workspace setup and you are comfortable editing code.
The typical workflow uses a Google Slides certificate template, a Google Sheet with recipient rows, and a script that copies the template, replaces placeholders, exports PDFs, and sends emails through Gmail.
Google provides an official Apps Script sample that customizes Google Slides certificates with employee data from Google Sheets and sends them as Gmail PDF attachments. The sample uses Drive, Spreadsheet, Slides, and Gmail services, so it is a useful starting point for technical teams.
Step 1: Create a Google Slides certificate template with placeholders for fields such as recipient name, date, course name, or instructor.
Step 2: Create a Google Sheet with one row per recipient and headers that match the fields the script will read.
Step 3: Open Extensions > Apps Script and adapt the certificate script for your presentation ID, destination folder ID, placeholder names, and email copy.
Google has a helpful Apps Script certificate automation sample you can use as reference.
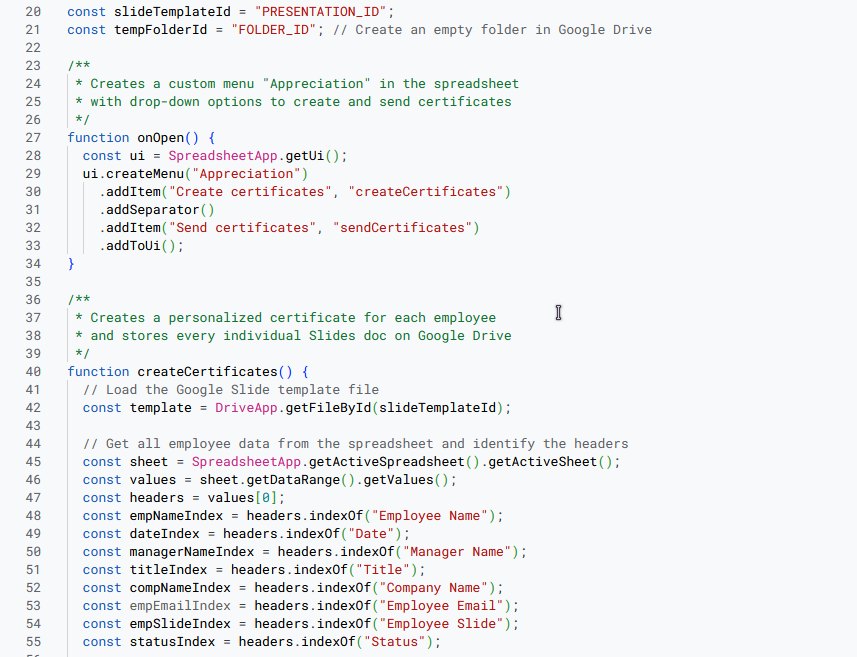
Step 4: Run the script first on one internal row, authorize the required Google services, and check the generated PDF.
Step 5: Add status columns such as Created and Sent so you can avoid sending the same certificate twice.
Step 6: Before sending a large batch, check current Gmail and Apps Script quotas for your account type.
The native route is viable, but it has hidden operating costs. You need to maintain the script when headers change, handle errors when rows are incomplete, check Google sending limits, and give recipients a way to retrieve or verify certificates later.
It also doesn’t provide a dedicated credential page, analytics, branded delivery workflow, or self-service PDF access unless you build those pieces yourself.
Google notes that sending limits can change without notice and are applied over a rolling 24-hour period. Treat quota checks as part of the workflow, especially for large cohorts or external recipient lists.
Zapier or Make is useful when Google Sheets is only one step in a larger workflow. For example, a learner might finish a course in an LMS, pay for a workshop through a checkout tool, register for an event, or submit a form. The automation platform can capture that event, clean or route the data, and send the approved recipient details into Google Sheets or a certificate issuing workflow.
Use this route when the workflow starts outside Google Sheets or needs conditional logic that the direct integration does not cover.
Step 1: Choose the source app and trigger, such as a completed course, paid order, form submission, event attendance update, or new spreadsheet row.
Step 2: Add filters so only eligible recipients continue through the workflow. Common checks include completion status, payment status, required fields, and duplicate records.
Step 3: Send the cleaned data to Google Sheets, Certifier, or another issuing step depending on your setup.
Step 4: Map recipient fields such as name, email, course, issue date, and custom attributes.
Step 5: Test the workflow with one internal recipient before turning it on for a cohort.
Step 6: Monitor automation history, failed tasks, duplicate sends, and plan limits after launch.
The advantage is flexibility. Zapier and Make can connect tools that do not share a native integration.
The tradeoff is operational overhead: another platform can fail, retry, change pricing, or need owner knowledge when a field name changes.
For product-native or developer-owned workflows, use Certifier's developer platform instead of forcing every issuing process through a spreadsheet. The Certifier API can create credentials, issue drafts, send credentials, search existing credentials, manage credential templates, and work with design templates.
This is the better route when certificates need to be issued from your own LMS, product database, customer portal, CRM backend, or internal operations system.
Certifier also documents webhooks for event-driven automation. Webhooks can notify your system when credential events happen, such as a credential being created, updated, deleted, or issued. That helps engineering teams keep external records synchronized, trigger follow-up workflows, and build audit or support tools around credential status.
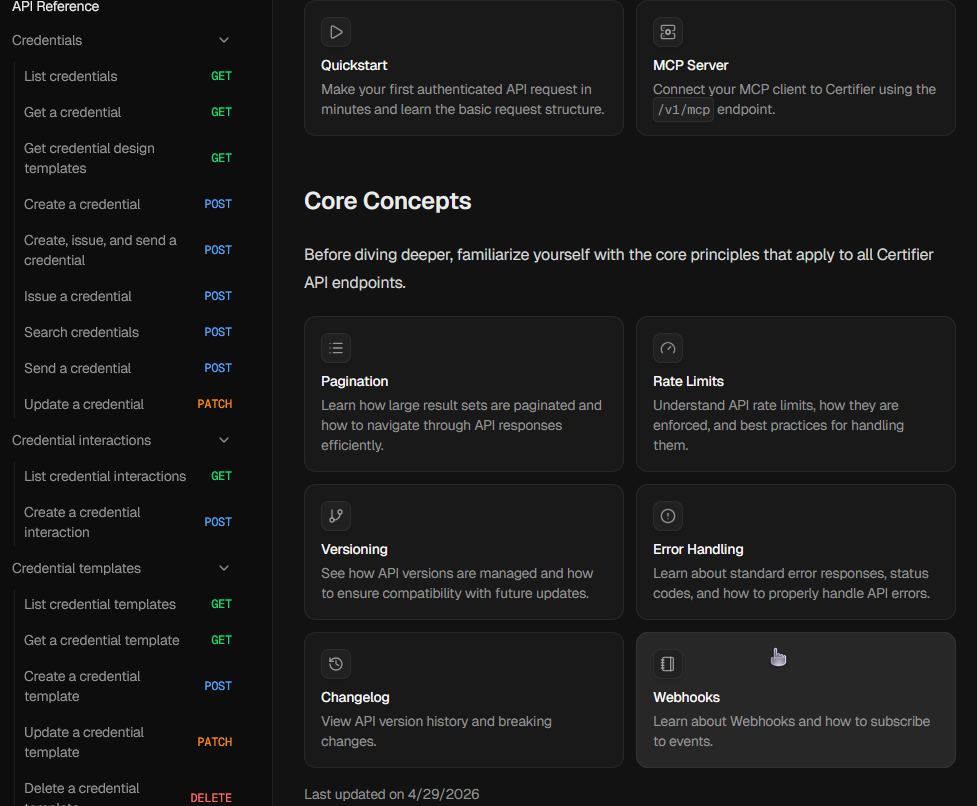
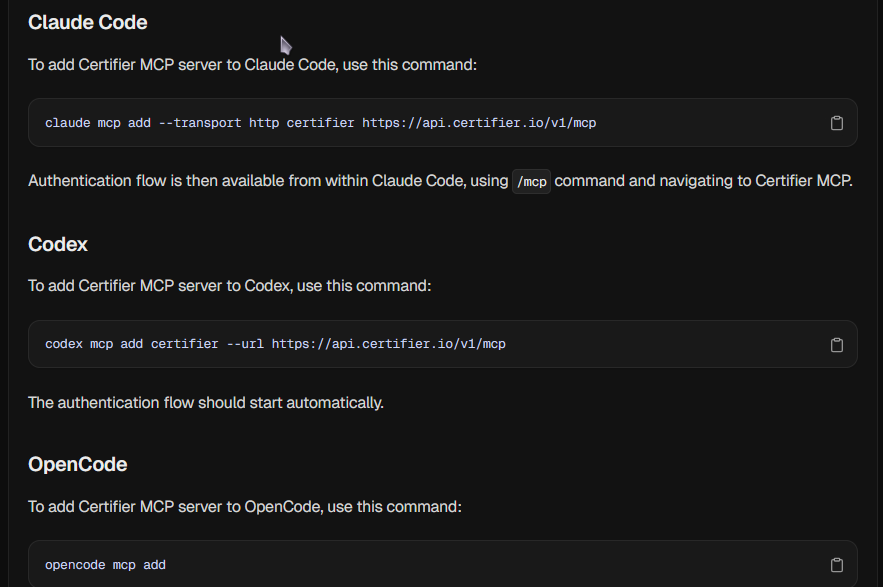
Certifier's MCP server is a newer option for MCP-compatible AI clients, and the server runs at https://api.certifier.io/v1/mcp
It uses OAuth, and lets authorized clients search, list, inspect, create, issue, send, and update credentials from a chat interface with minimal effort.Treat MCP as useful for AI-assisted operations and internal tooling, not as a replacement for a stable REST API integration inside your product.
A practical rule: use Google Sheets or CSV when operators own the process, Zapier or Make when several no-code tools need routing, and the Certifier API, webhooks, or MCP when a technical team wants native, governed, or AI-assisted credential workflows.
Most certificate generation issues come from spreadsheet structure, field mapping, or send-state mistakes. Start with the sheet before rebuilding the whole workflow.
Problem | Likely Cause | Fix |
|---|---|---|
Certificates are not generated | The automation is watching the wrong tab, the row is incomplete, or the trigger has not processed yet. | Confirm the selected Live Sheet, complete required fields, and allow processing time before adding duplicate rows. |
Names or course fields are blank | Column headers changed after mapping or the wrong column was selected. | Restore the original header name or remap the field in the certificate workflow. |
Emails fail validation | Email cells include spaces, missing domains, duplicate values, or non-email text. | Use a cleanup column, trim spaces, and test a small batch before sending. |
Dates appear in the wrong format | The sheet mixes date formats or stores dates as text. | Standardize dates as YYYY-MM-DD and preview the certificate before publishing. |
Recipients get duplicate certificates | Rows were copied into the Live Sheet more than once or no status column is being used. | Use the Input to Live routine and add a status column for issued rows. |
CSV upload misses custom fields | The field exists in the sheet but was not mapped as a custom attribute. | Map every certificate field during upload, including optional fields such as score or instructor. |
If you need the fastest way to generate certificates from Google Sheets, connect Sheets to Certifier and let each approved row become a personalized credential.
Rely on the CSV upload when you want a controlled one-time batch or use Apps Script when your team is prepared to maintain the code, monitor quotas, and build its own delivery and verification process.
Zapier or Make are good methods when the certificate trigger starts in another app, but Certifier's API, webhooks, and MCP are superior alternatives if you have a technical team and you’re looking for native automation of credential issuance or an AI-assisted credential operation.
The key is not to make Google Sheets behave like a certificate designer. Let Sheets organize the data, then use the right issuing workflow to create, send, and verify certificates without manual copy-paste.
For recurring cohorts, events, and training programs, use Certifier to generate certificates from Google Sheets.
Create a clean Google Sheet with recipient names and emails, connect the sheet to Certifier, map each column to the certificate fields, test one row, and activate the workflow. For a native Google-only route, use Google Apps Script with a Slides template.
Google Sheets can store the recipient data, but it does not design, send, track, or verify certificates by itself. You need a connected certificate generator, a CSV upload workflow, or a Google Apps Script setup with Google Slides.
No. CSV upload is for one-off batches. If your Google Sheets integration is connected and active, the live sheet can send approved rows into the certificate workflow directly.
At minimum, include recipient name and recipient email. Add course name, issue date, expiration date, grade, hours, instructor, or any other fields you want to display on the certificate or email.
Yes. If Google Forms writes responses into a Sheet, you can review or clean those rows before moving them into the Live Sheet. For fully automatic programs, make sure each submitted row contains the required fields before issuing and you can use a connector like Zapier to fully automate certificate generation from Google Forms.
You can build a Google Workspace script without buying a certificate platform, but the workflow still depends on your account permissions, authorization, Gmail or Apps Script quotas, and your ability to maintain the script.
Keep draft data in an Input Sheet, move only ready rows into the Live Sheet, and maintain a status column for issued certificates. Test with an internal recipient before activating automatic sends.

- SaaS Growth
- Digital Credentials
- APIs
- Product Marketing
- Company Operations
CEO and Co-Founder
Sergey is CEO and Co-Founder of Certifier, a Forbes 30 Under 30 honoree building digital credential infrastructure for 2,000+ organizations worldwide and shaping the future of credentialing.


