Trusted by:
Updated: July 30, 2025
11 min read
How to Automatically Generate Teachable Certificates?
Teachable and Certifier work better together. Teachable runs your course and Certifier makes the certification process automated and smooth. Connect the two and close the gaps—what Teachable doesn’t cover, Certifier does. Read the guide on how to generate Teachable certificates in a snap.
Teachable is a great platform for running online courses. It gives you everything you need to build, sell and manage learning experiences, but it’s missing one surprisingly important piece: a solid built-in certificate tool that will make your Teachable certificates fully-branded and professional.
Teachable lets you add your logo, colors and issue certificates, but every course creator using the native tool ends up with the same three templates and the same rigid layout. That means your certificate looks just like thousands of others. There’s no design freedom, no verification and no way to scale.
It becomes more than a limitation, it’s a lost opportunity to deliver high-quality branded certificates that set your course apart from the rest.
When connecting Teachable with Certifier, a certificate management platform, you don’t have to choose between a powerful course platform and professional certificate automation. You can have both.
In this guide, we’ll show you how to create Teachable certificates using Certifier, so you can decide which approach fits your course and your goals best.
TL;DR
You can generate Teachable certificates, but the built-in credential tool is limited in certificate customization, management and verification.
You can easily integrate Teachable with Certifier, a certificate management platform, via Zapier, Make or Pipedream.
Certifier allows you to:
create branded, professional-looking certificates, issue personalized certificates automatically as soon as students complete their course, analyze the ROI.
Can you create a certificate in Teachable?
Technically, yes. Teachable lets you generate certificates of completion using one of three built-in templates.
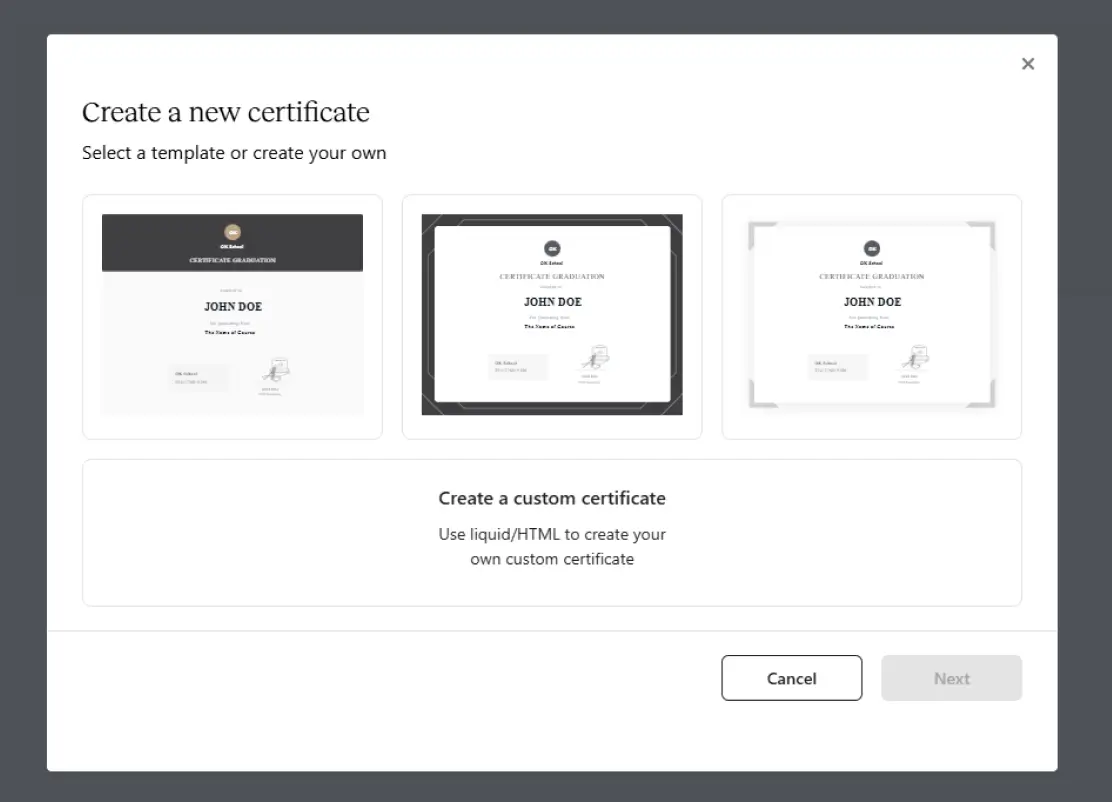
You can access them under your course settings—add a logo, change the text and send automatically once the course is finished.
But here’s the catch: every Teachable course creator is using the same layouts, and there’s no way to redesign them beyond surface-level tweaks.
Even when you upload your logo or change colors, the certificate still looks like every other Teachable certificate template out there.
Want to use custom fonts? You’ll need to know Liquid or HTML. Want to update certificates in bulk, add verification or automate the process for hundreds of students? That’s simply not possible inside Teachable.
The result? Generic, static PDFs that fail to convey your course quality or your brand.
Teachable without Certifier vs Teachable with Certifier
Before opting to create a custom certificate of completion in Teachable, please go through these limitations you may face.
Here’s a brief table for a quick comparison.
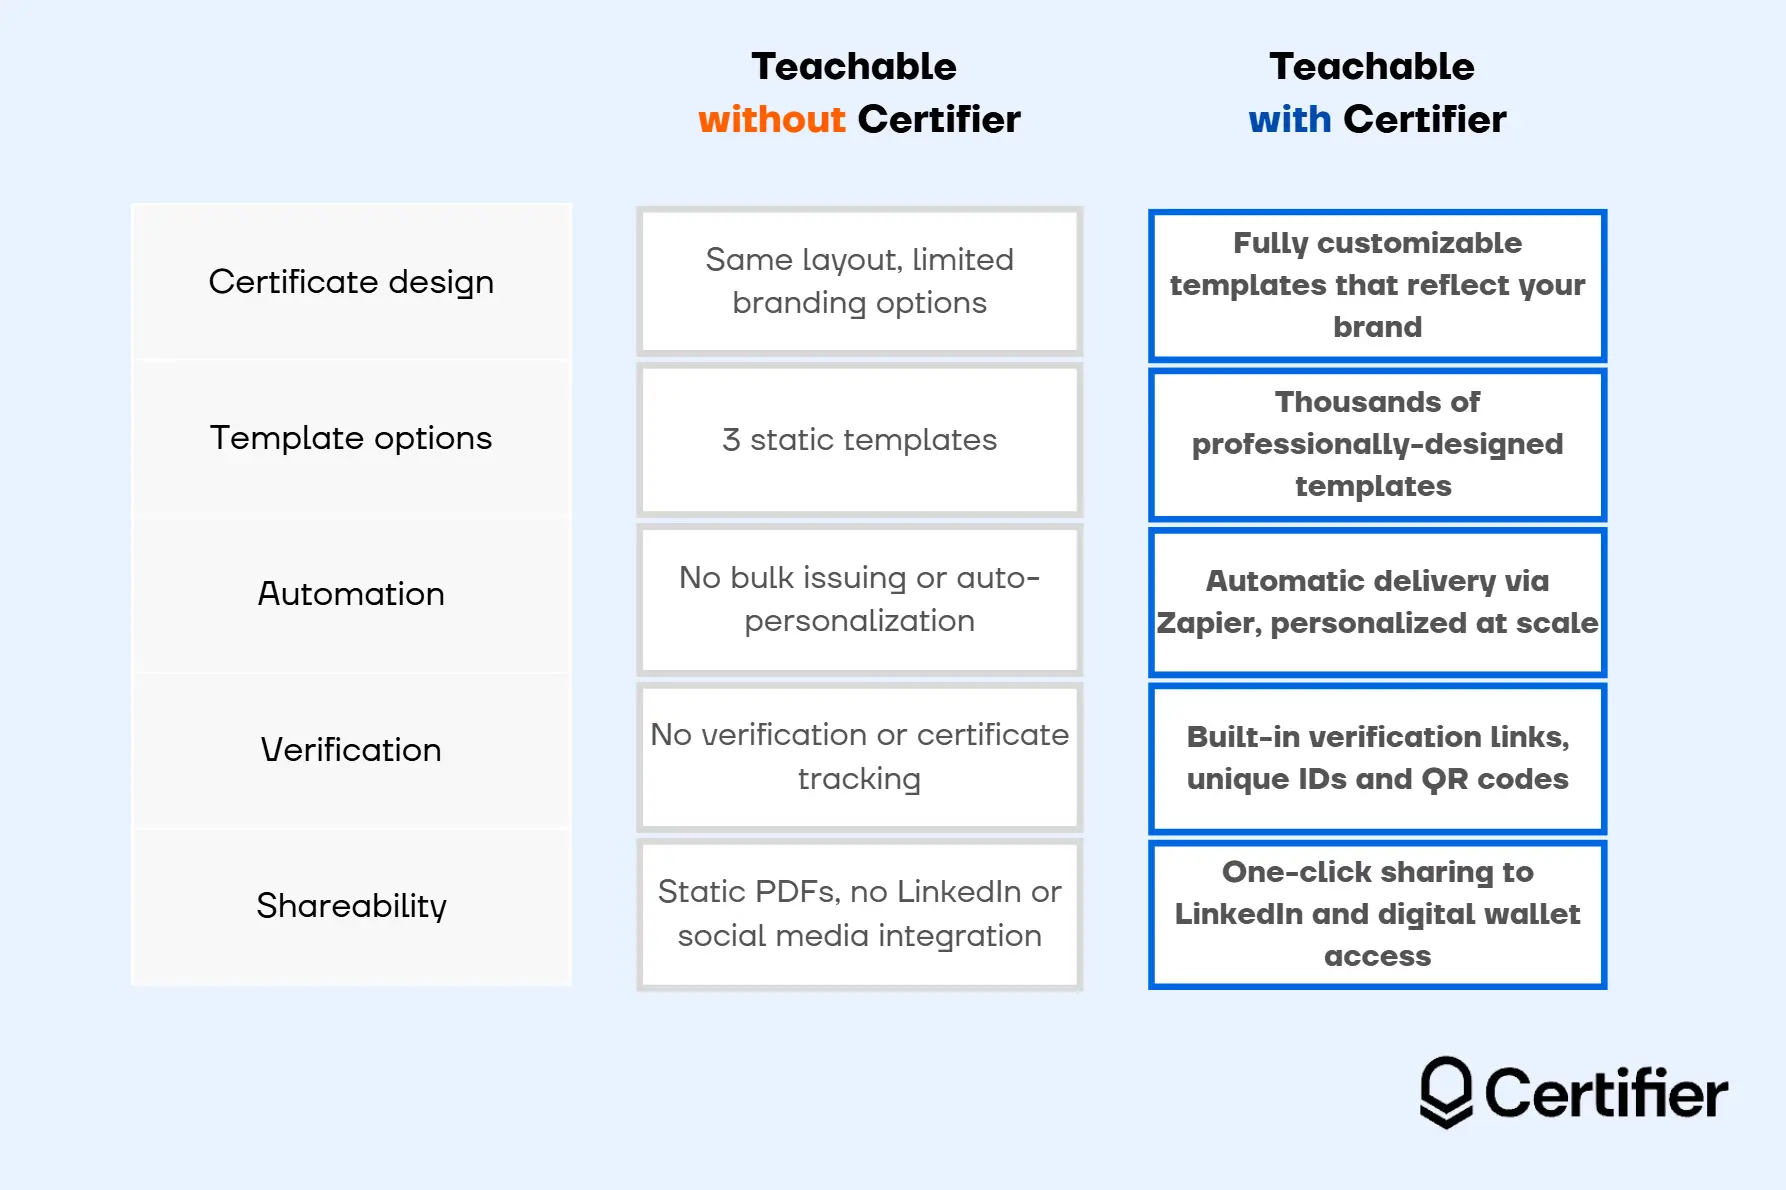
Below are the Teachable gaps that Certifier can bridge:
Only three editable certificate templates → Hundreds of professionally-designed, customizable templates
Rigid layouts and limited branding options → Full creative control over fonts, colors, logos, layout and certificate elements
No verification or QR codes → Certificate ID, verification URL and scannable QR code
No automation or bulk issuing → Seamless automation via Zapier—set it up once and branded, personalized Teachable certificates will be sent on auto-pilot
No personalization at scale → Dynamic attributes automatically personalize each Teachable certificate PDF with learner data
No dashboard to manage credentials → Certificate dashboard with filters, stats and engagement tracking
Teachable certificate PDFs that students forget about → Digital credentials learners actually share on LinkedIn or other social media
No storage or access after download → Certificates are saved to a secure digital wallet students can access anytime
In short, your students receive a professional-looking credential they can actually use—instantly accessible from their email or digital wallet and ready to share on LinkedIn.
Want to see the difference for yourself?
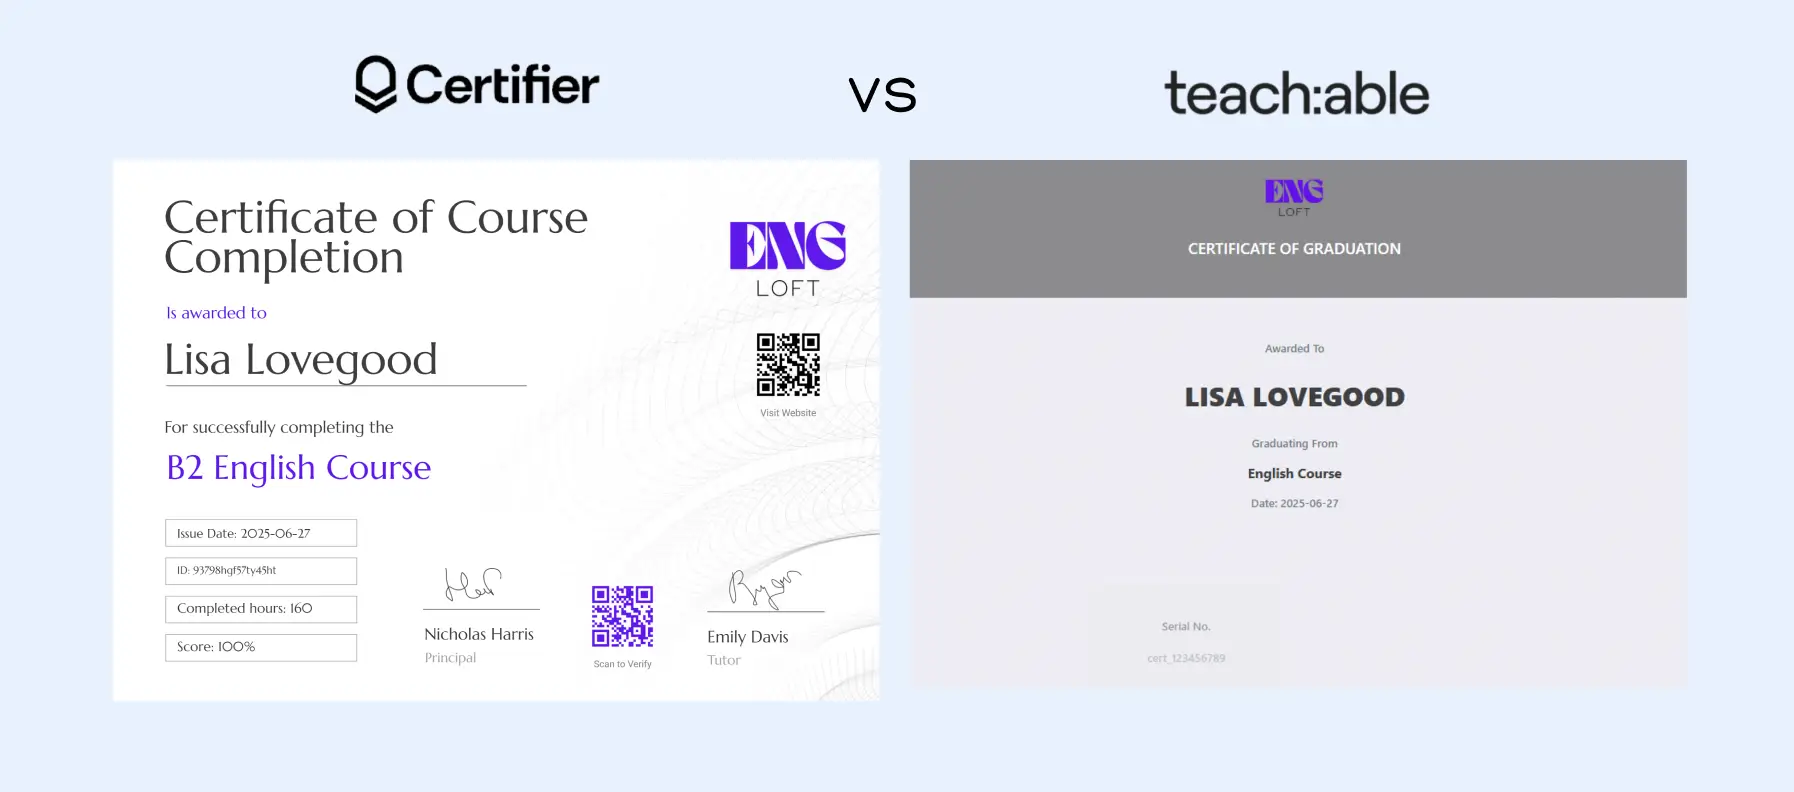
At first glance, both are certificates. But only the Certifier one:
Is truly branded and tailored—the logo is big, the colors are branded and there are course-specific, personalized details
Includes verification option
Looks polished enough for LinkedIn, resumes or sharing online
Reflects the actual quality and professionalism of your course
Do you want to provide certificates like the one on the left? It’s super easy. You can still take advantage of Teachable and deliver an amazing Teachable certificate free! Read the step-by-step tutorial.
Create and Send Digital Credentials
Issue branded Teachable certificates automatically with Certifier
Issuing certificates manually or relying on Teachable’s native tool slows you down and takes the chance away from you to provide a fully branded certificate for Teachable.
This is how you can issue Teachable certificates of completion—Using Zapier, you connect Teachable with Certifier.
You need to adjust the template, set up automation once and, as soon as a student completes a course, Certifier generates and sends branded, personalized certificate automatically. Everything happens behind the scenes.
Step 1: Connect Teachable with Certifier via Zapier
Certifier supports Teachable certificate automation no matter the scale. You stay focused on teaching—Certifier takes care of the logistics. How to achieve that? Connect those two tools with Zapier.
This is a two-step process: firstly, you’ve got to connect Certifier with Teachable using Zapier to create a workflow. The second part includes designing a Teachable template that will be used in the workflow.
We will walk you through these steps from start to finish.
Let’s start with the first step.
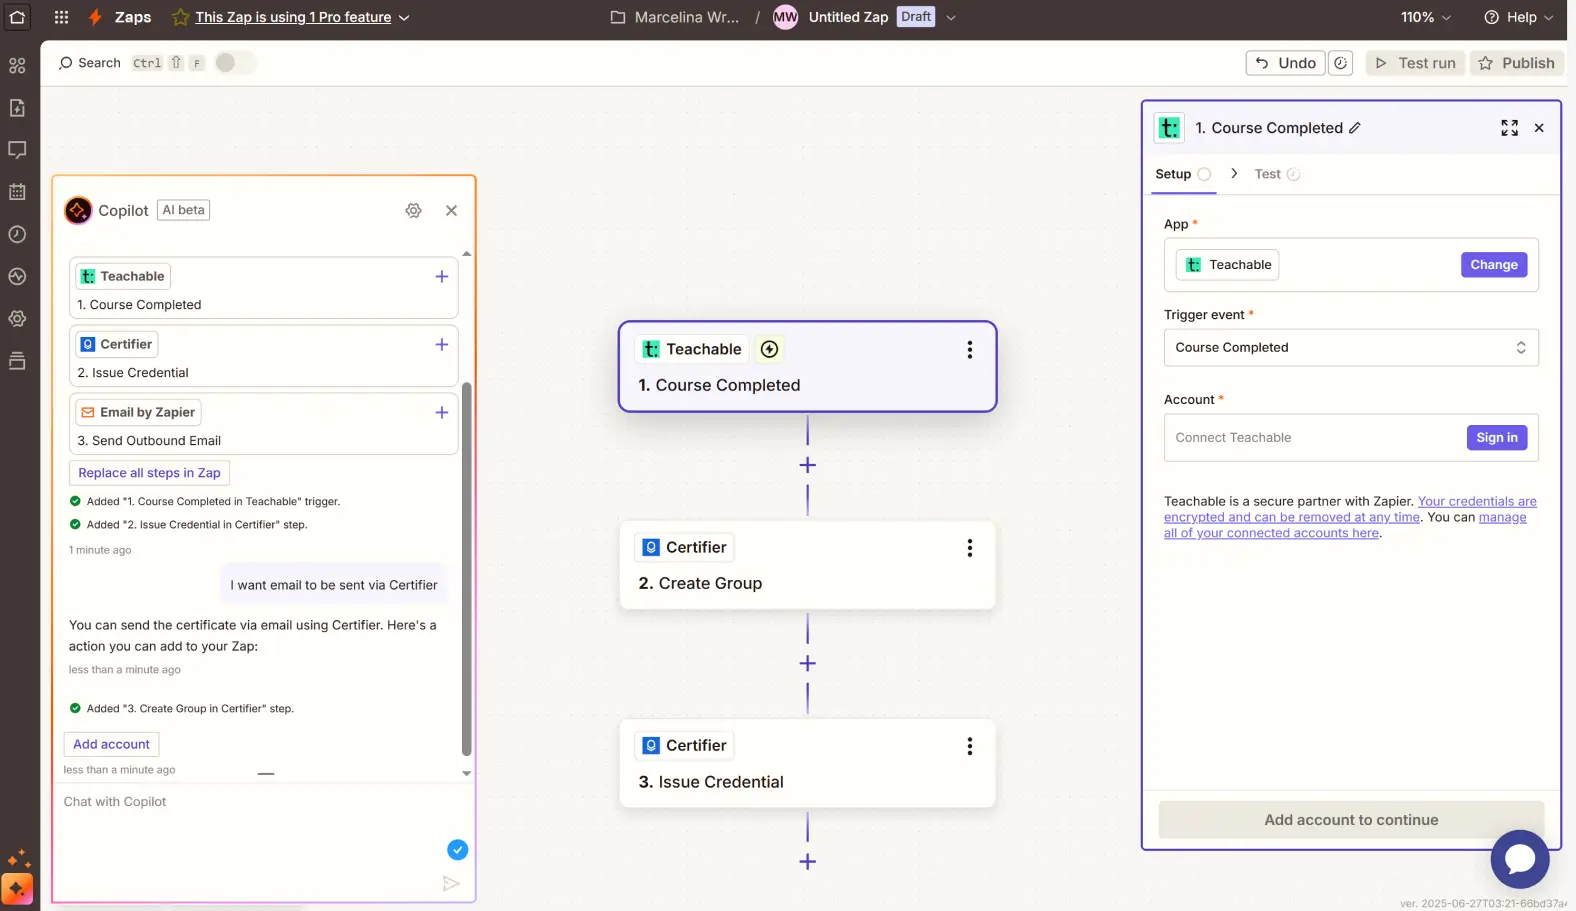
1. Create a new Zap in Zapier
Head to Zapier and click Create Zap. Use the AI Copilot to describe your goal—e.g., “Send Certifier certificates after Teachable course completion.”
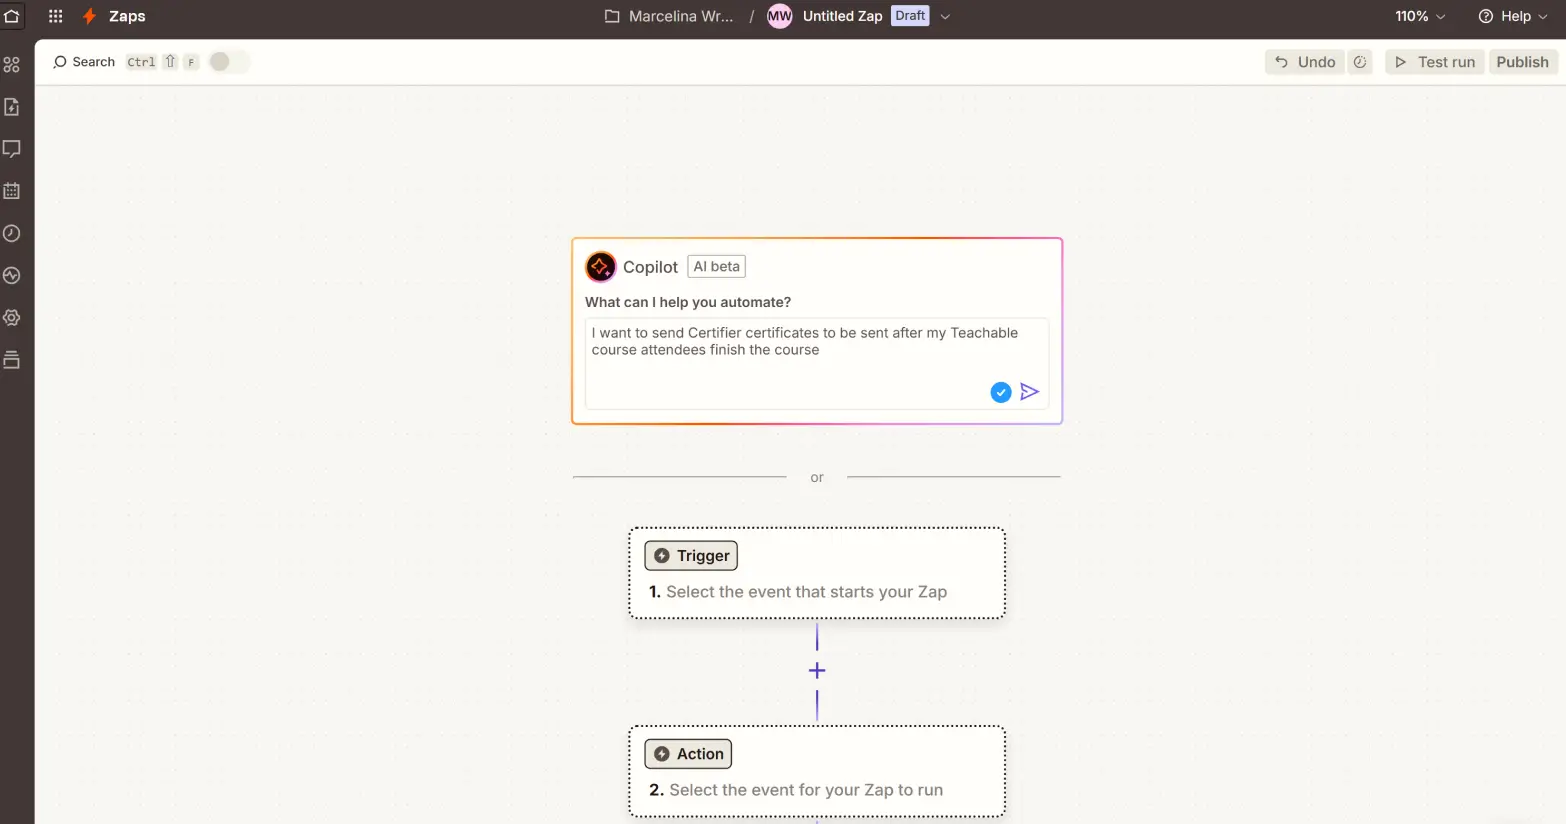
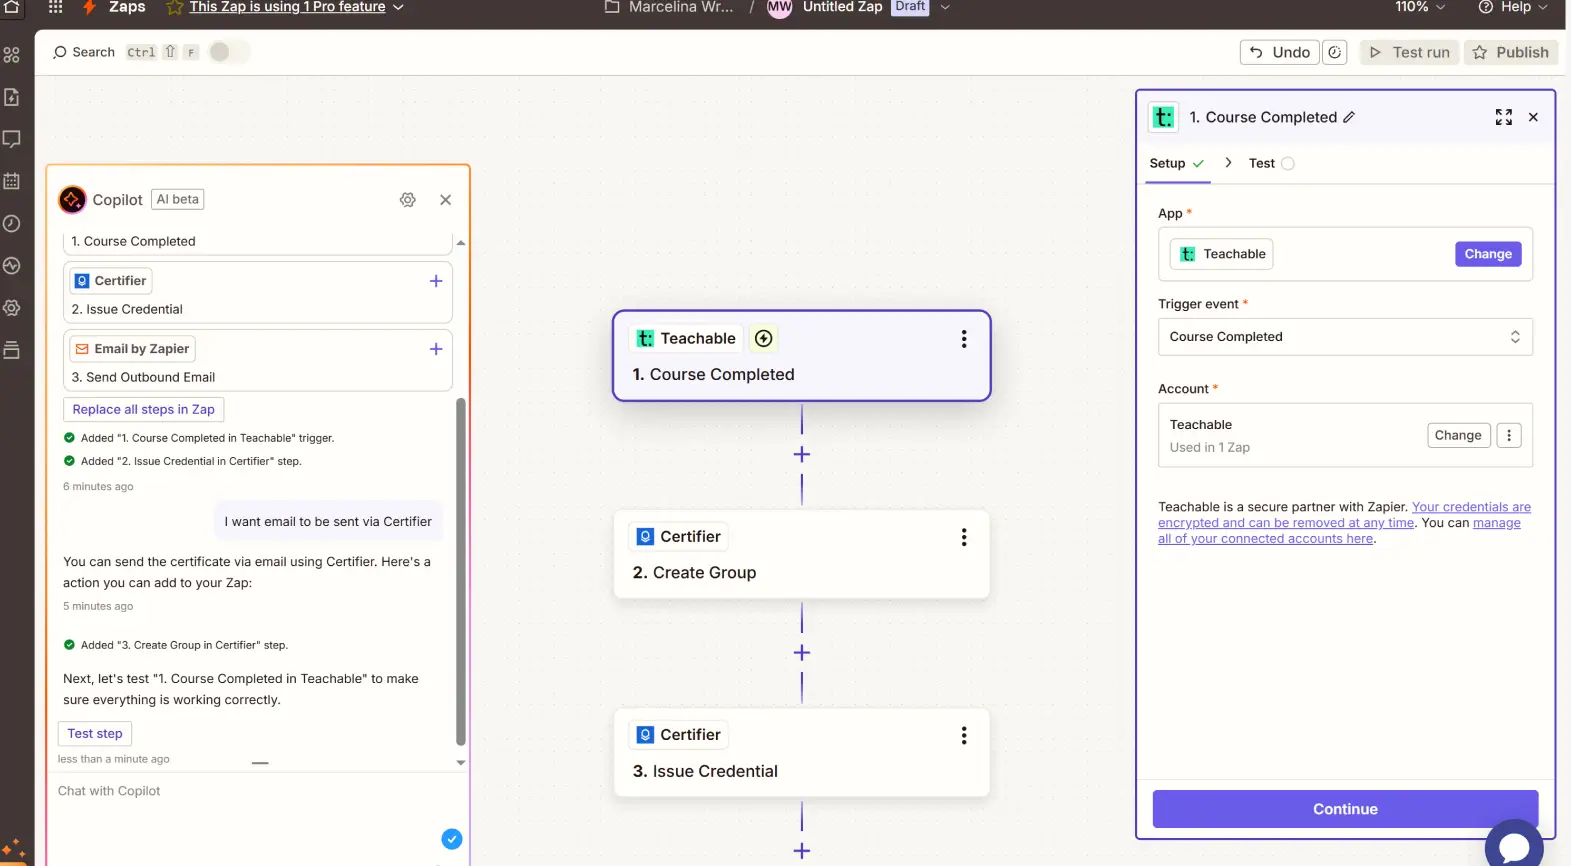
2. Choose Teachable as the trigger app
Set the trigger event to Course Completed and connect your Teachable account.
3. Set Certifier as the action
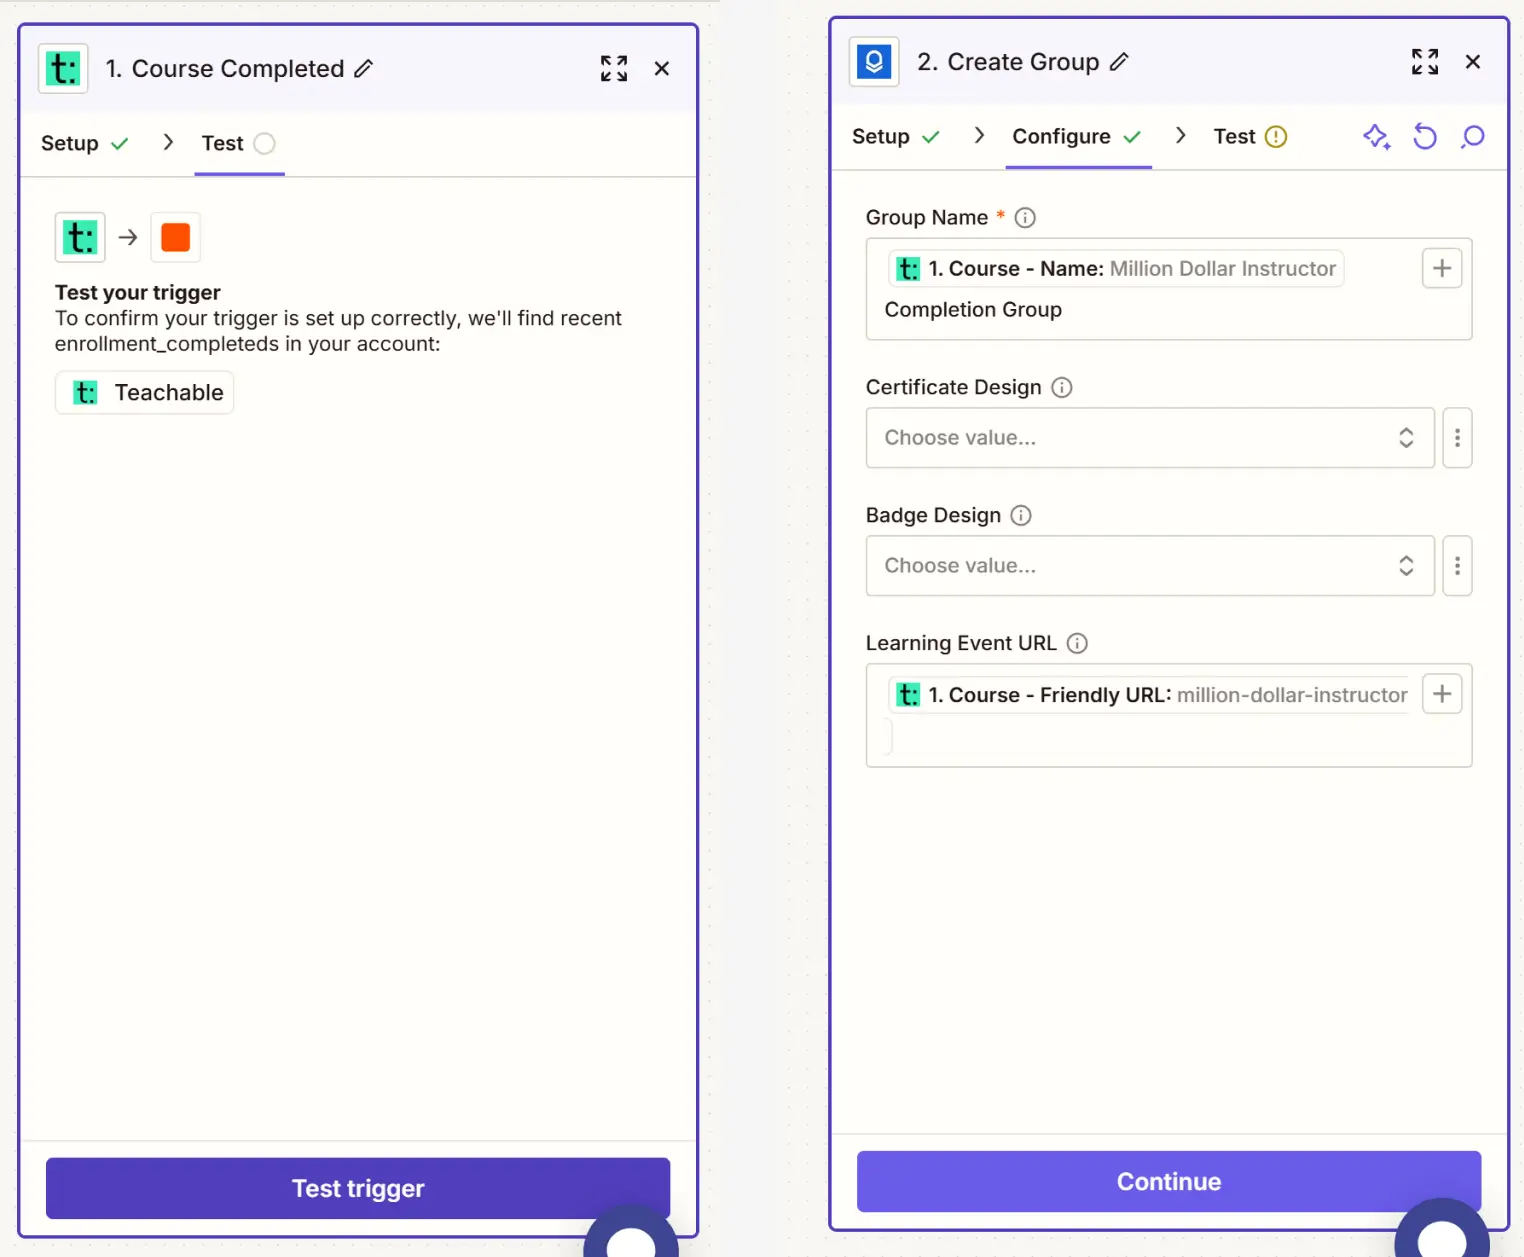
Search for Certifier and choose the Create Group and Issue Credential actions. You’ll be able to assign a certificate template and add a unique Learning Event URL.
4. Customize your certificate settings
In the Certifier setup, choose:
Group Name (linked to the course name)
Certificate Design (pick from your Certifier library)
Learning Event URL (auto-filled from Teachable course info)
5. Test and publish your Zap
Zapier will walk you through a test. Once everything’s working, click Publish and you’re done.
Want to explore other integrations? Certifier also connects with Google Forms, Typeform, Kajabi and webinar tools like Zoom and GoToWebinar. See the complete integration list here. If you can’t see the tool you use, you can always connect through Zapier, just like you did with Teachable.
If you need a visual walk-through on how to use Zapier, watch our video tutorial.
And this is the whole setup you need to go through. However, there’s one more thing to do—design your custom certificate of completion.
Step 2: Design a branded Teachable certificate using Certifier templates
Certifier is a complete certificate management platform that lets you create, customize, and automatically issue branded certificates at any scale.
Unlike Teachable’s built-in tool, which limits your layout and branding options, Certifier gives you complete creative freedom and automation in one place. You’re not stuck with fixed templates or static PDFs.
You get editable designs that match your course branding and a backend system that handles issuing and tracking for you.
Let’s get to the second step, which is setting up your certificate of completion template.
Here’s what you can do to create custom certificates:
Log in to Certifier
Log in to Certifier or sign up if you don't have an account yet.
Choose a template
Go to the Designs tab and use the filter feature to see the course certificate templates. You can also narrow the choice by selecting a specific style or color.
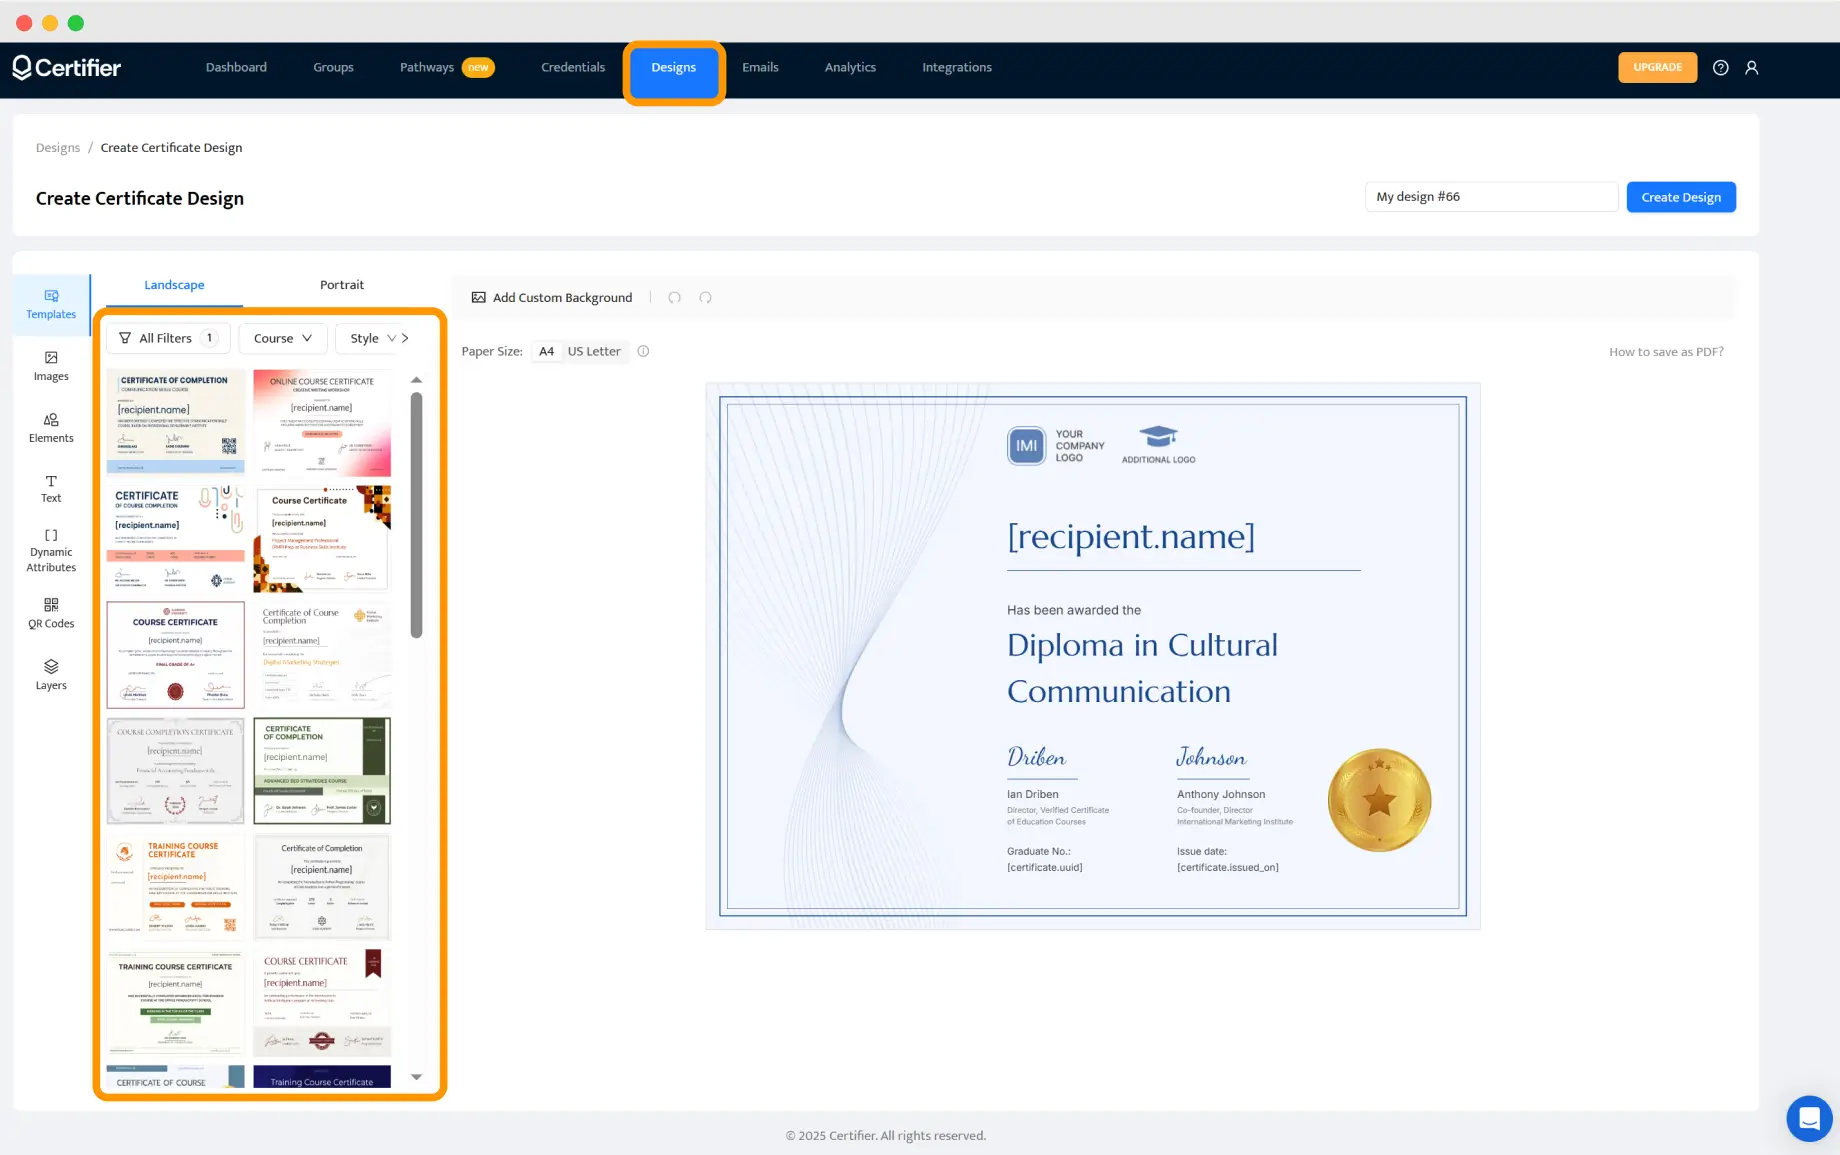
Moreover, you can browse the templates in the Certifier certificate templates gallery. It’s filled with editable designs suitable for any event and style.
All are free to use and fully customizable. You’ll find options tailored for coaches, educators and course creators of all kinds.
Customize the design
Use Certifier’s drag-and-drop certificate design editor to match the credential to your brand. With our flexible layout, you can adjust the Teachable template whatever you want it to be.
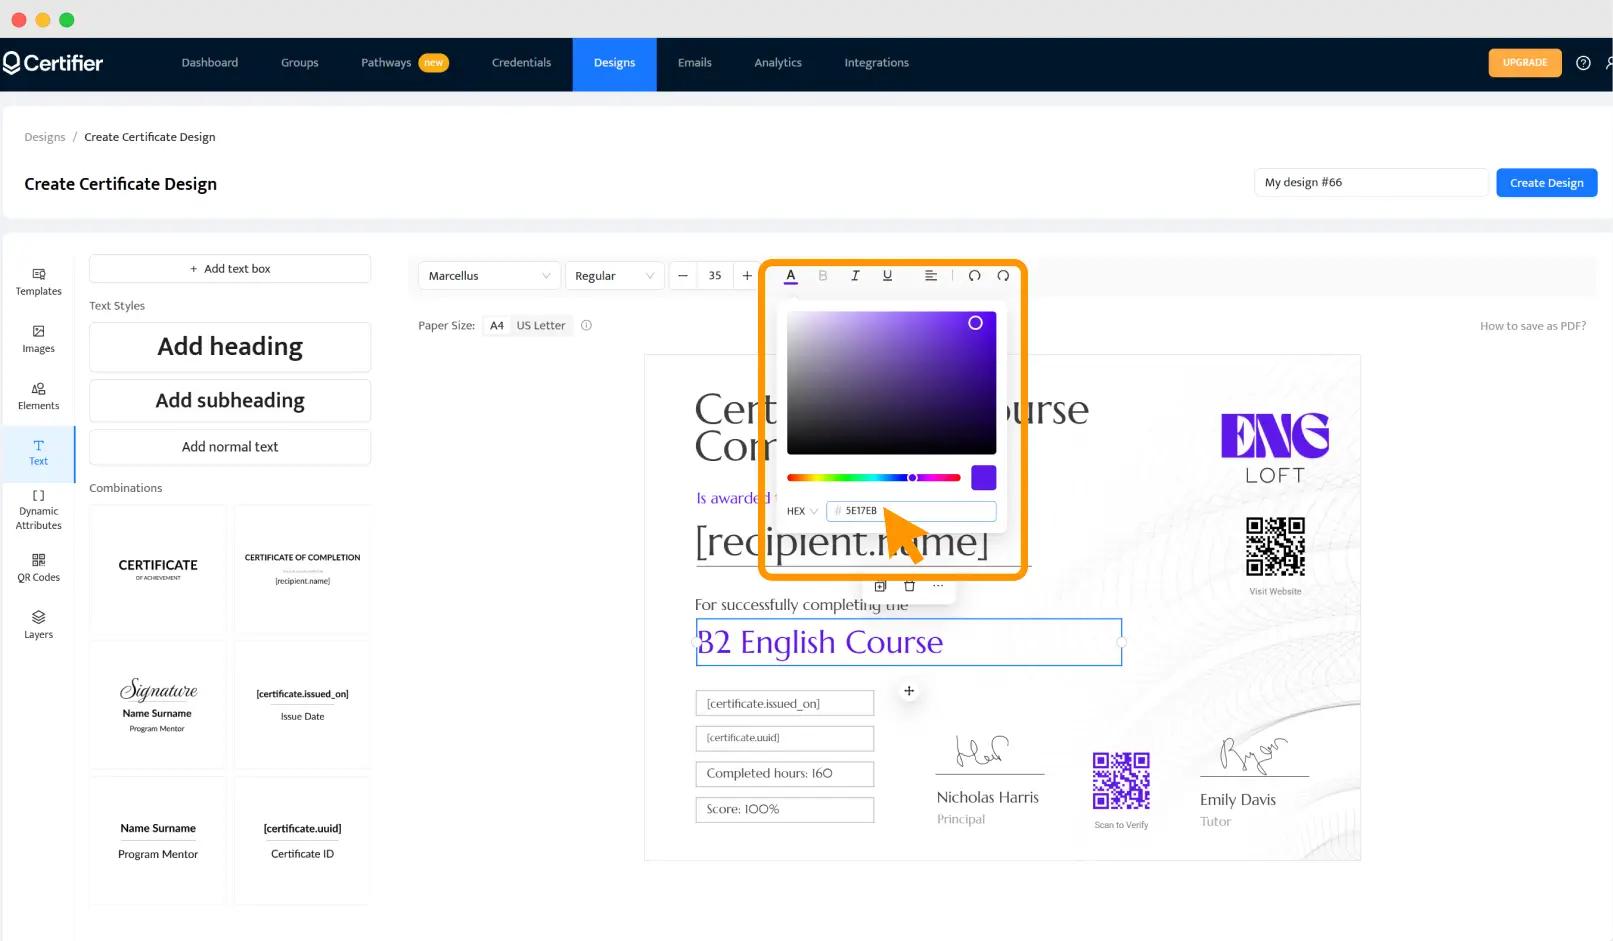
Add any image as you want. Upload logo, choose a font or upload a custom one and apply your brand colors. Include the static elements that you want to have on each of your Teachable certificates. Meaning, all the parts that will remind unchanged from one certificate to another (congratulation note, issuer’s info, etc.).
Include the fields with personalized data, like student name, score details, certificate ID, using certificate dynamic attributes. They work as placeholders that will be automatically filled in with unique details. You add the attribute to the template and Certifier pulls the data from a CSV sheet with the recipient's info. You don’t have to add any personalized info manually for each Teachable certificate, the platform does it for you.
Add verification elements such as certificate QR code linking to the verification page and Teachable certificate ID. Both of them are generated in Certifier automatically and you don’t have to use third-party tools to have a QR code or unique certificate ID. For the ID number add the dynamic attribute and for QR code just drag and drop it on the Teachable certificate design.
With such customization, you will definitely stand out from competition.
Design tip: Use your brand’s HEX code to quickly match the color of your course completed certificate to your visual identity.
Save & issue
Now, create a group in the Groups tab. A group is as a folder that holds all the certificates for a specific course or program. In Certifier, Groups help you stay organized. Each Group is connected to one course (like a B2 English Course) and it’s what allows certificates to be sent automatically to a certain course group when they finish a Teachable course.
Preview the final design before issuing. If everything looks good, click Save. Now your Teachable certificate is ready to be used in the Zapier Teachable automation. Course certificates will be sent to students as soon as they complete your Teachable course. You don’t have to send them on your own.
Did you know that? You can also duplicate a group if your learners are progressing through levels, for example, moving from B2 to C1. You don’t have to re-enter course info or design settings. Just reuse what you’ve already set up and adjust only what’s needed.
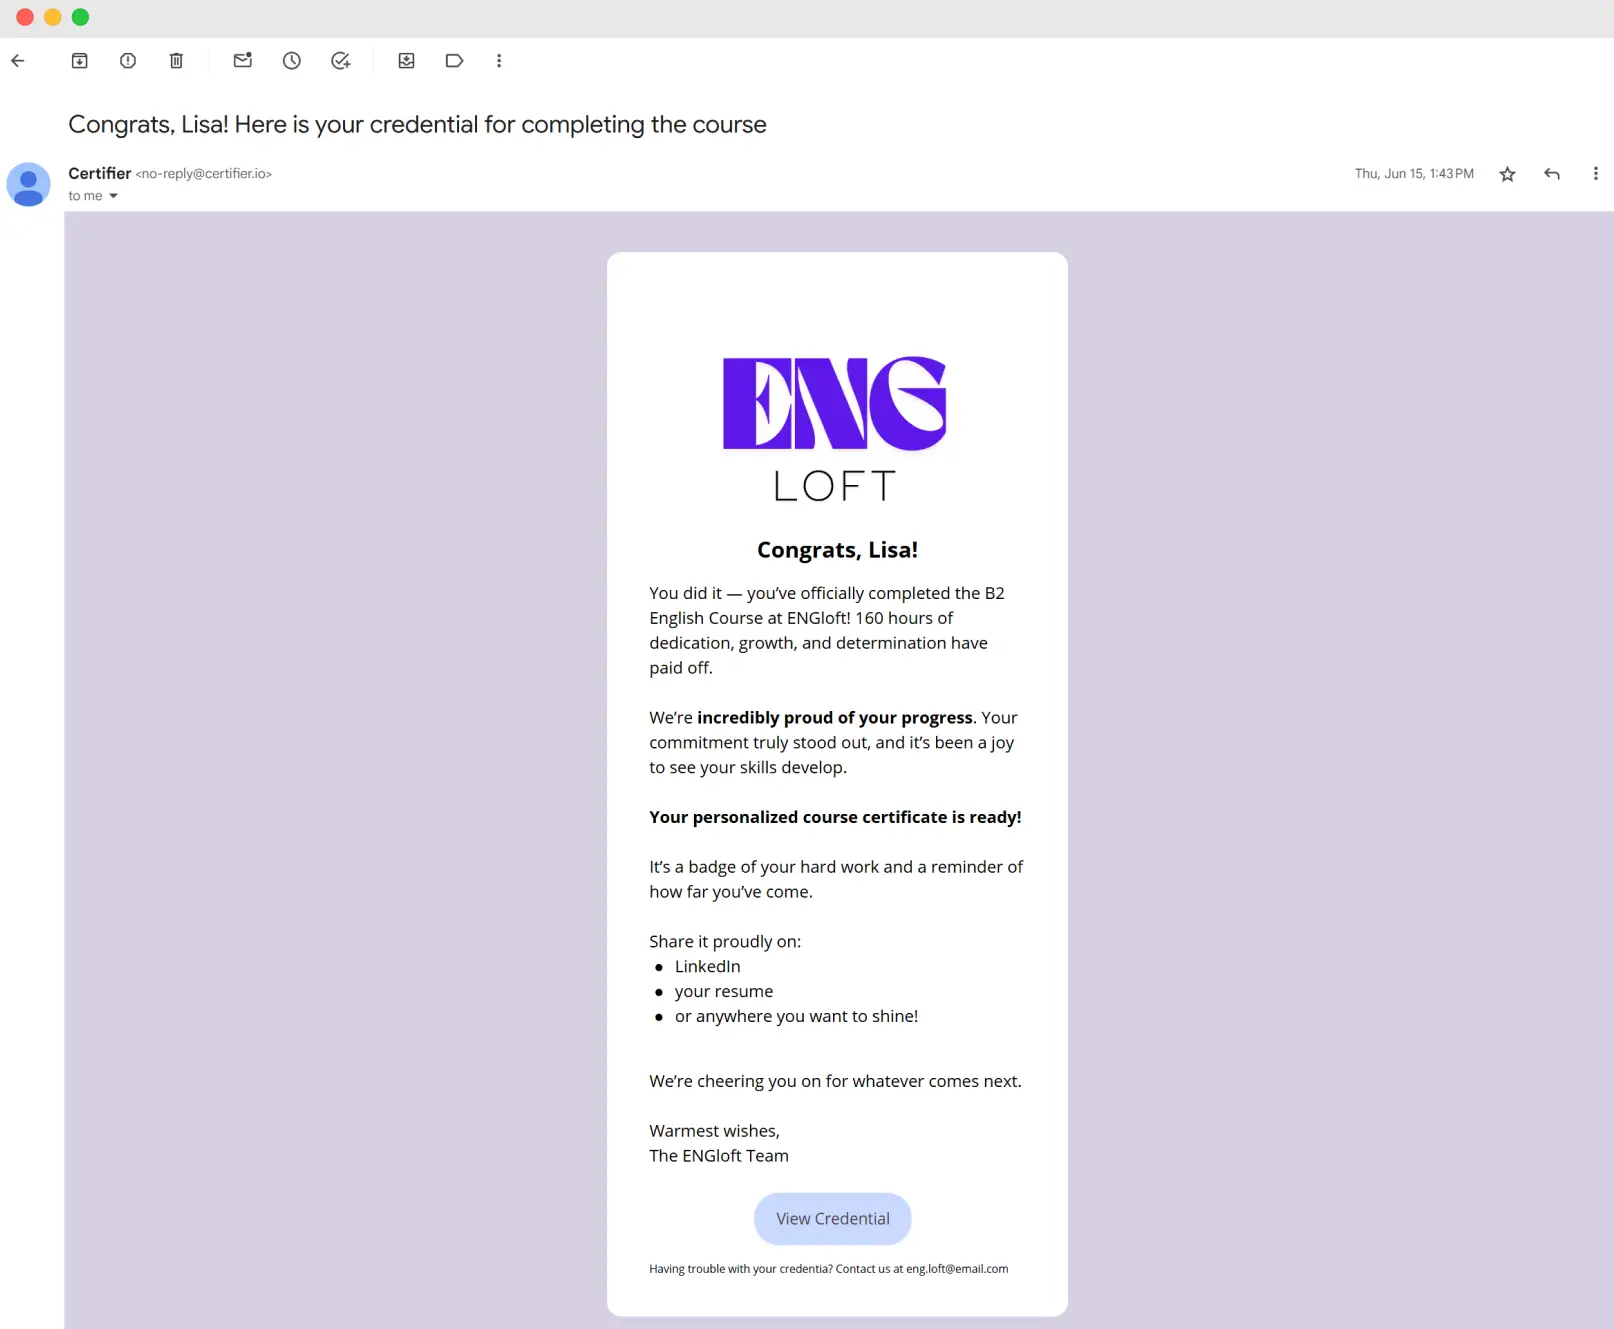
Teachable certificates are delivered via email. It’s an optional step, but super convenient. Pity not to take advantage of such an opportunity.
And it’s not just any email. It comes from your domain, with your branding, logo and colors, and you can customize the message, using the dynamic attribute—the placeholders that autopopulate with recipients’ personalized data.
So instead of a generic notification, learners receive a professional, fully-branded certificate email. It’s a huge value to your course that will help you stand out from the competition.
Moreover, learners can access the Teachable certificate online, via the certificate digital wallet. It’s a cloud-based, secure place where credentials are stored.
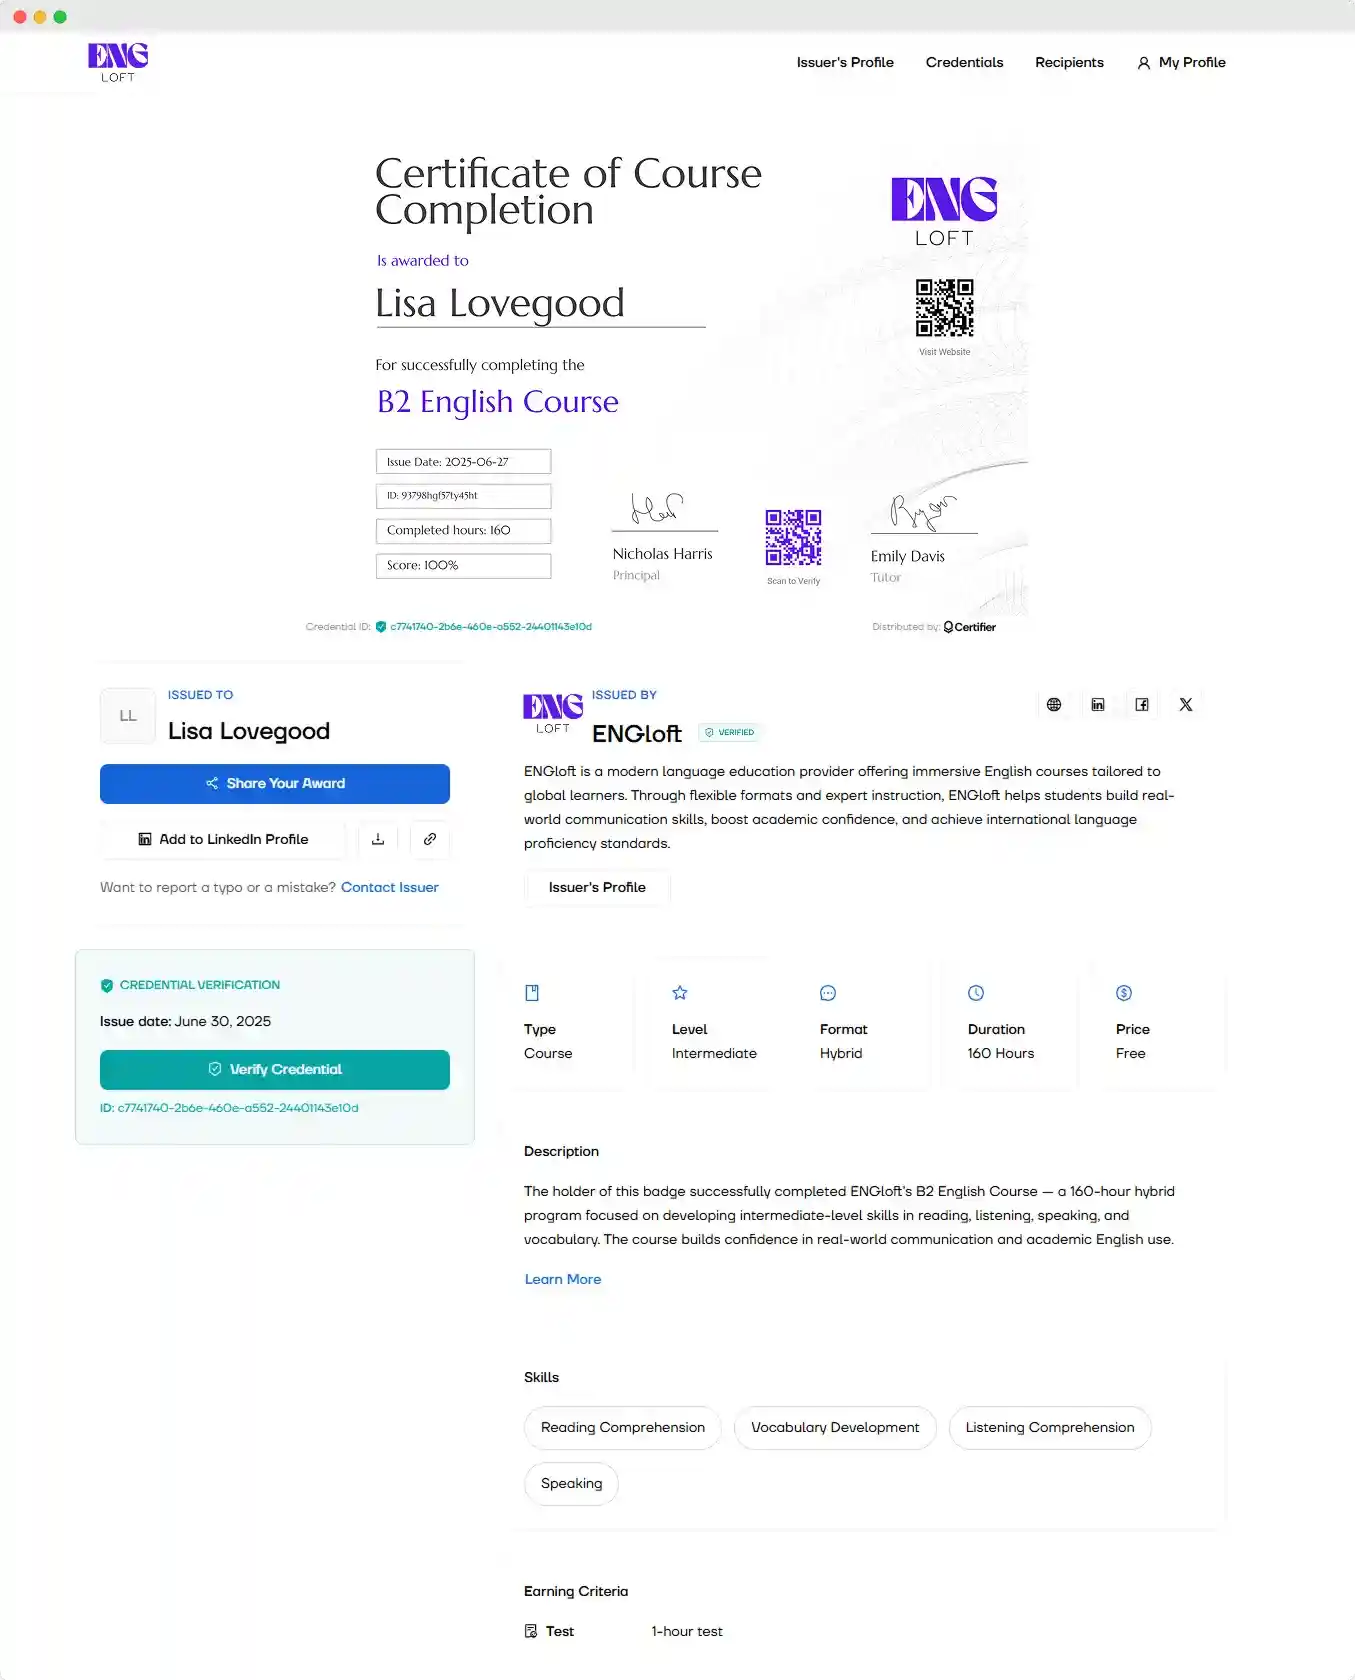
Both options, email sending and digital wallet, support your branding. You can include your logo, use your brand colors and customize the email text to match the tone of your course.
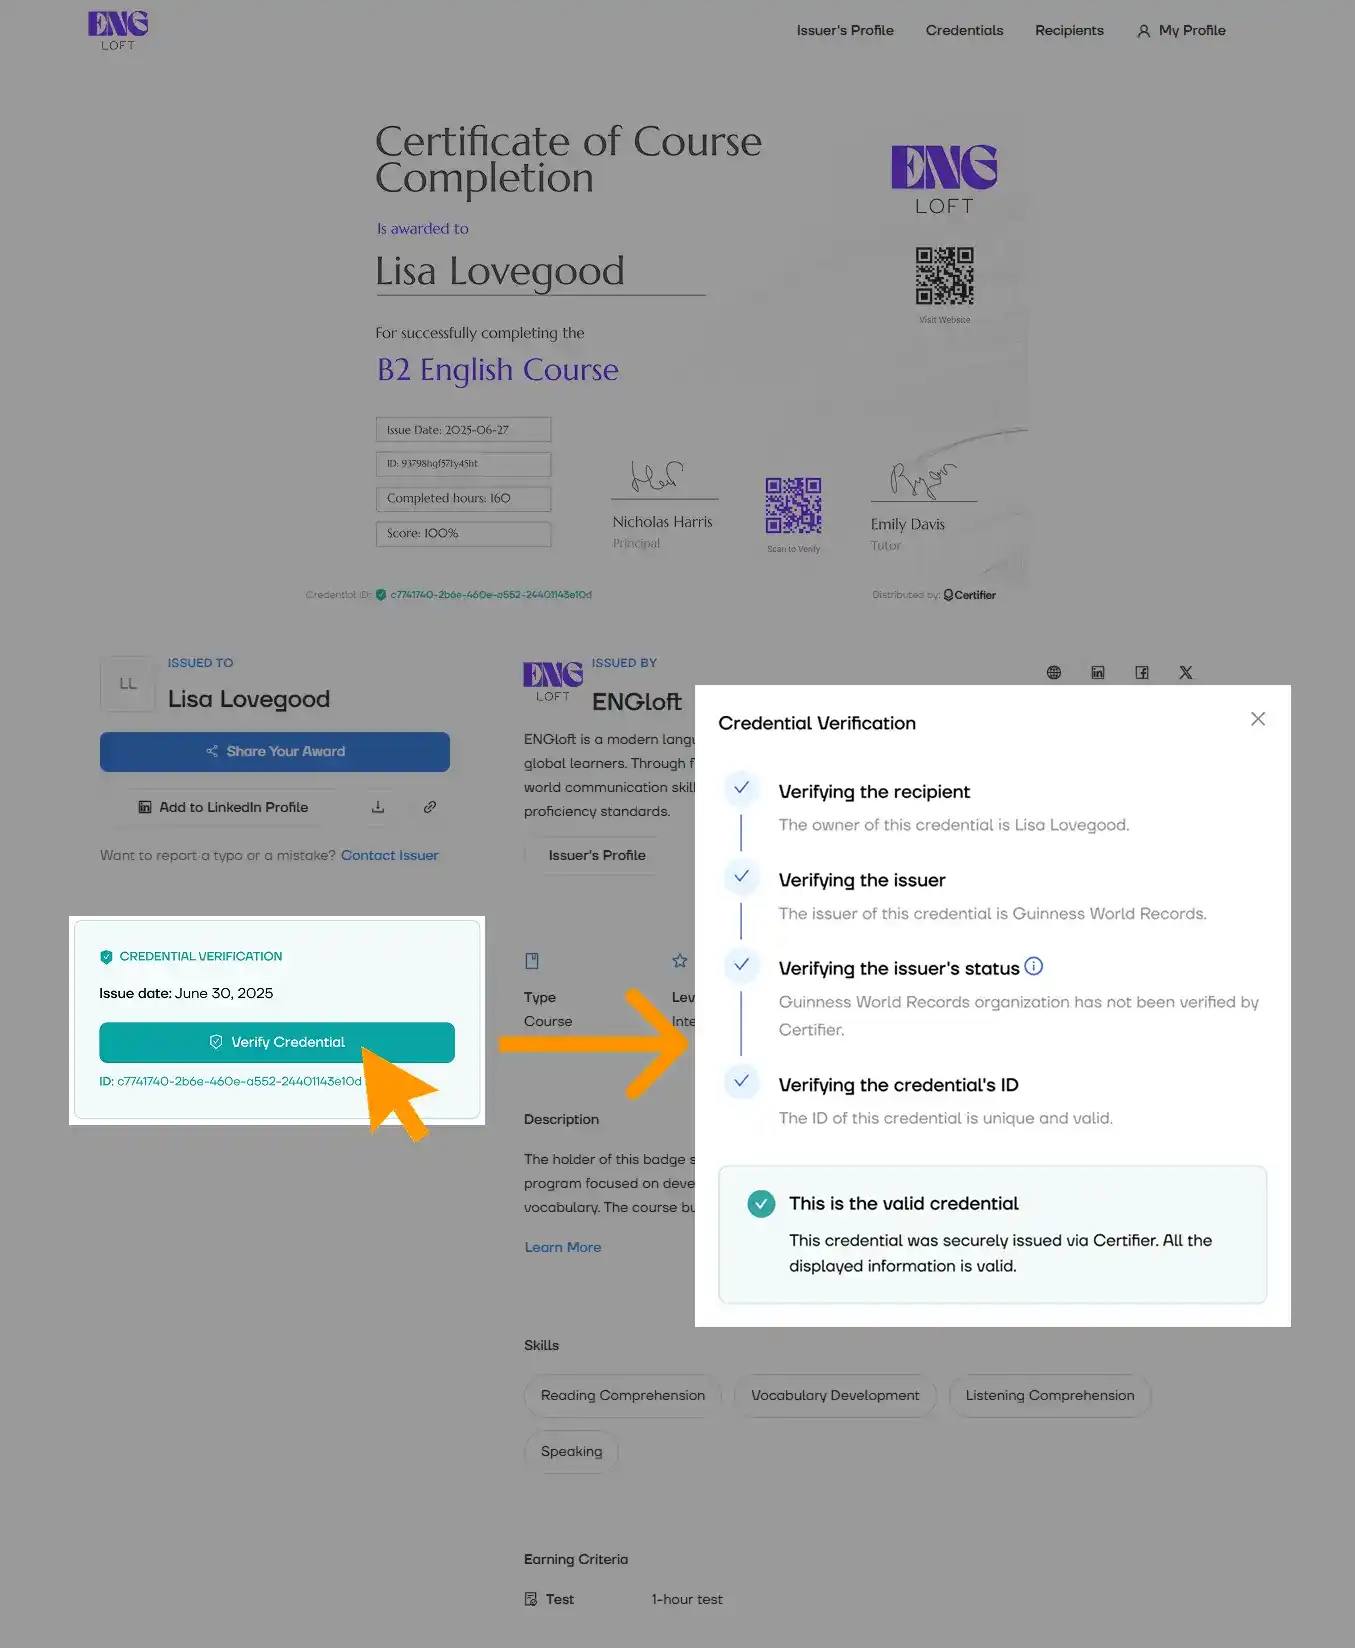
Also, anyone viewing the certificate can verify the Teachable certificate online: by scanning the QR code or with a one-click verification feature in the digital wallet.
Learners can also share their Teachable certificate of completion directly to LinkedIn and other social media. It’s a promotional opportunity. Every share on social media increases visibility for your course and attracts new sign-ups without paid ads.
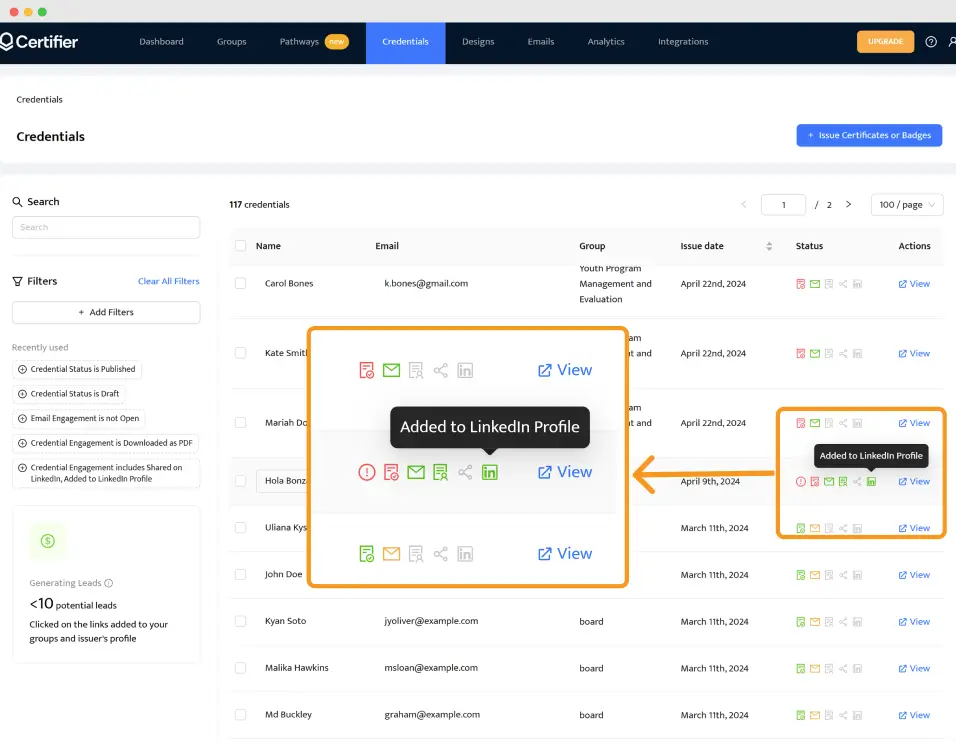
In contrast to Teachable, Certifier gives you full certificate management capabilities—view issuance status, filter by date or group, see who added credentials to LinkedIn and track how each certificate performs. It keeps you in the loop even when you've got hundreds of learners across multiple groups.
No Zapier? We’ve got a solution. If you don’t use Zapier for some reason, you can still issue branded Teachable certificates automatically outside of Teachable. Simply upload a CSV list of your students into Certifier directly and send personalized certificates in bulk from Certifier’s dashboard. Here’s how you can create certificates of completion and send them automatically:
How to create a certificate of completion inside Teachable?
If you’re ok with all the limitation that Teachable serves, you can create and issue a Teachable certificate of completion directly from your course settings. Here’s how to set it up in a few steps:
1. Go to your course
Open your course in the Teachable dashboard. In the left-hand menu, click Certificates.
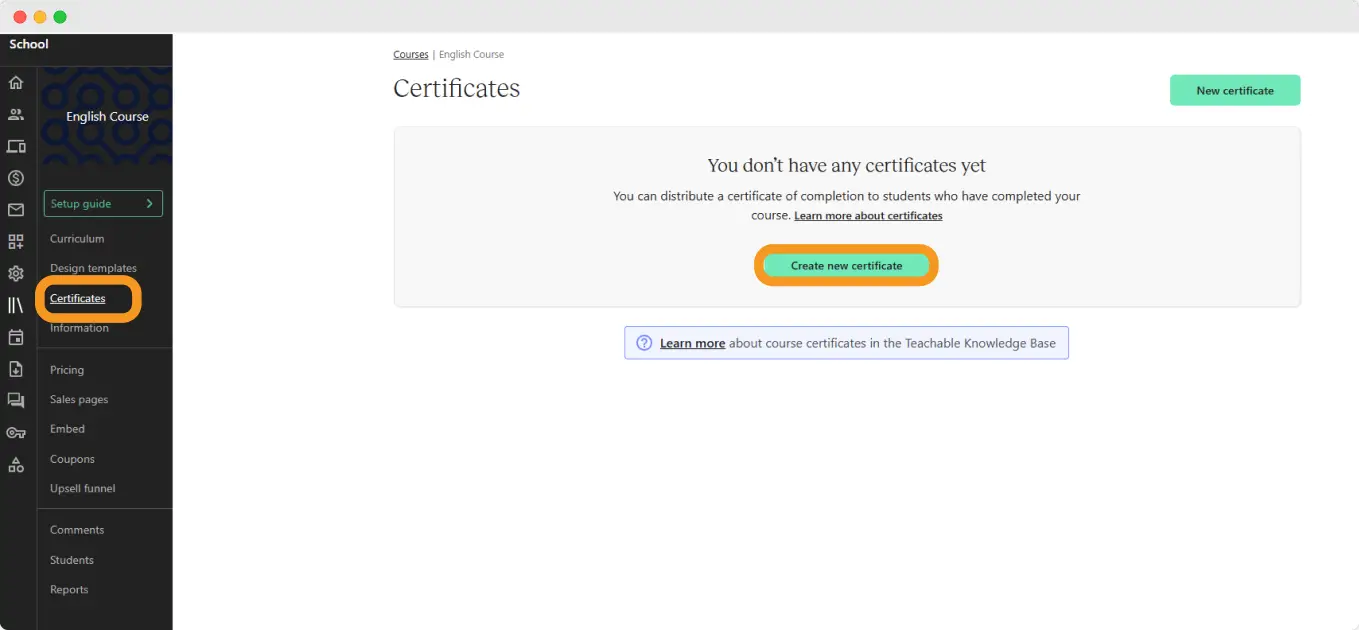
If it’s your first time, you’ll see a message saying “You don’t have any certificates yet.”
Click the green button to start.
Please note: Teachable certificates are only available on Pro plans and above.
2. Choose a template
Pick one of Teachable’s default templates or select “Create a custom certificate” if you know Liquid/HTML. Click Next to continue.
3. Customize your Teachable certificate template
Add your logo, edit the certificate title, add the recipient’s name, date, course name and signature. Teachable’s editor gives you a basic layout. Once you're done with editing a Teachable certificate template, hit Finish in the top right.
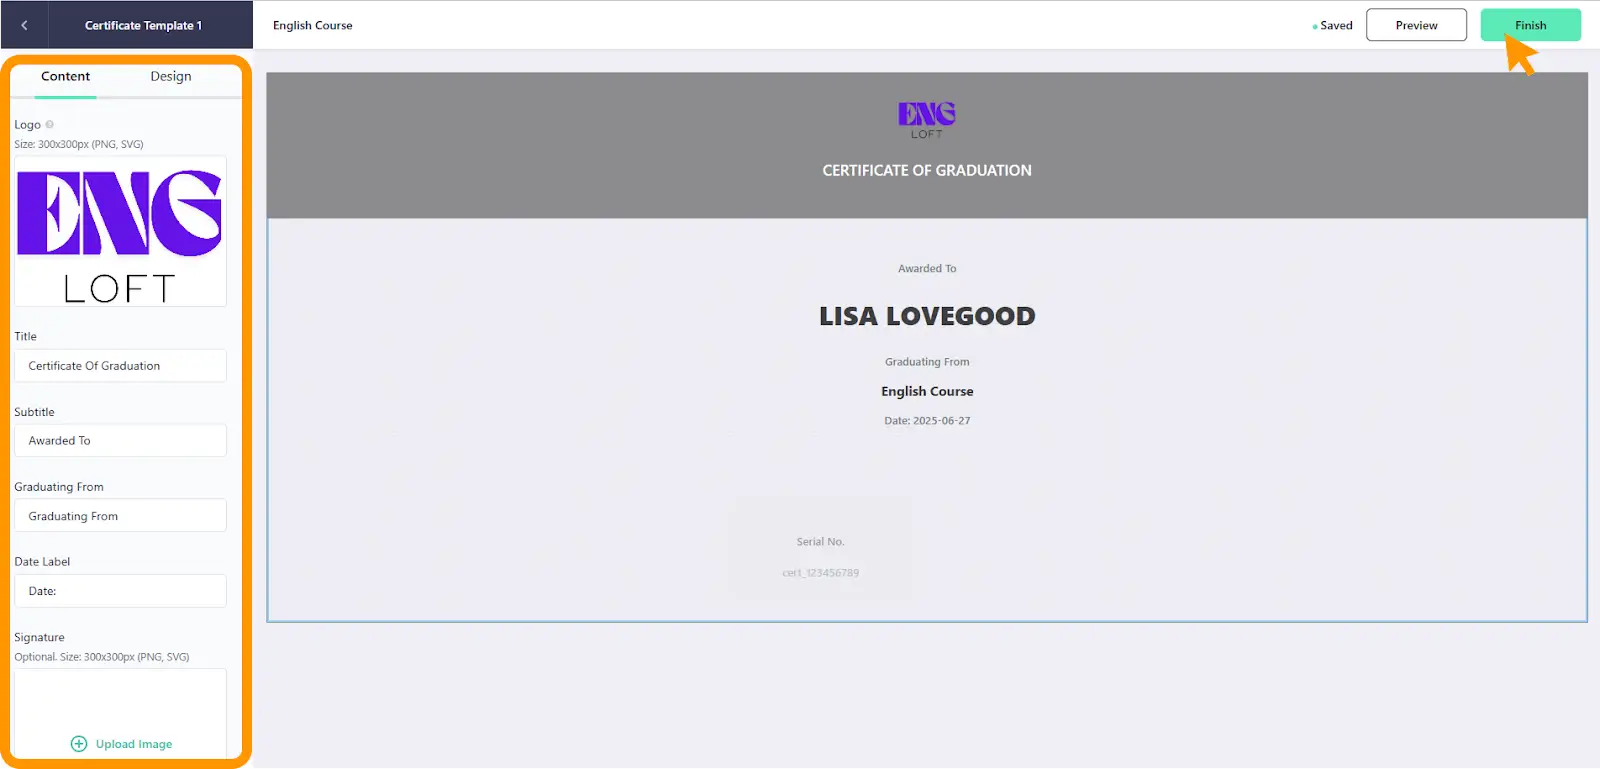
Your Teachable certificate of completion will now be automatically sent to students once they complete your course.
4. Manage your teachable certificate sample
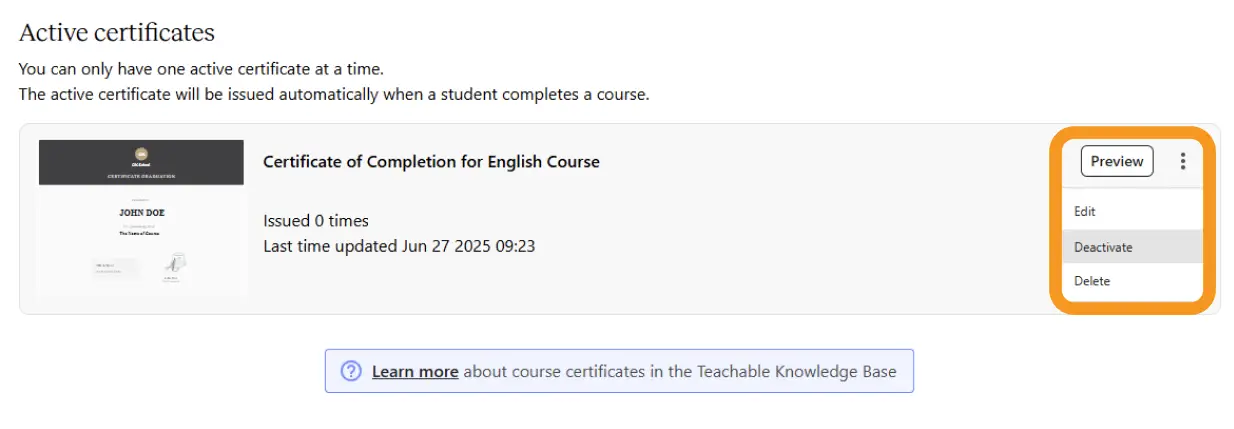
In the certificate dashboard, you can view all the certificates you’ve created and issued for a course in one place.
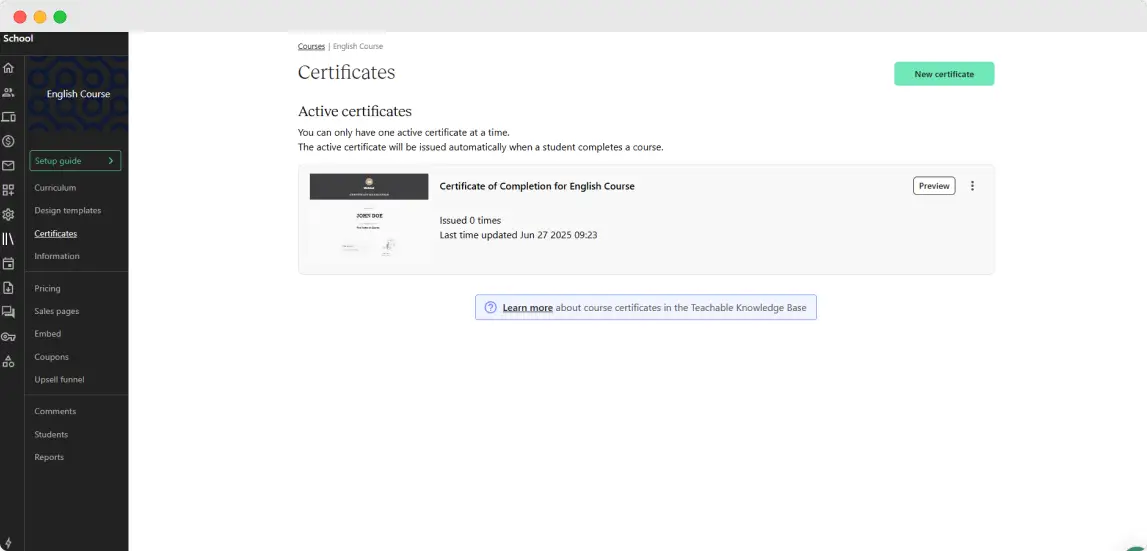
Use the three-dot menu next to any certificate to edit, deactivate or delete it as needed. Unfortunately, the certificate management features end here.
The process may seem fast and simple, but the reality is that Teachable doesn’t offer a professional, branded certificate experience.
If your course has hundreds of students, managing tasks like adding expiration dates, verification elements and sending branded certificate for Teachable can take not even hours, but business days.
Teachable certificate automation at its finest with Certifier
You can generate Teachable certificates using the platform’s native tool, but with one simple step, you can do much more. Teachable and Certifier work as a powerful duo, giving you everything you need to deliver branded, professional certificates that are true to the value of your course.
Through the Zapier Teachable integration, Certifier helps you turn a standard course completion into a standout post-course experience. You can automate delivery, track engagement, add your branding across email and wallet views and turn every certificate into a promotional tool through LinkedIn and social sharing.
The setup takes minutes—the benefits last much longer. Sign up for Certifier and start generating Teachable certificates.
FAQ on issuing Teachable certificates
Let’s learn more about generating Teachable certificate online.

- Product Management
- Customer Research
- Digital Credentials
- Product Strategy
- Design Systems
Product Manager
Uliana leads product management at Certifier, using her UI/UX background to explain platform features and help organizations maximize their credentialing capabilities.


