
Trusted by:
University of Southern California
Warner Bros.
Volvo
Amazon
Stanford University
September 09, 2026
15 min read
Discover the capabilities and limits of Smartsheet and Document Builder, with guidance on automating completion certificates, organizing records across employees and departments, and staying ahead of renewals. For easier management at scale, see how professional solutions can help with pre-built workflows, analytics, and separate workspaces.
Research with AI:
If you use Smartsheet to manage training and certification programs, you might run into scaling issues surprisingly quickly. This is especially true when you’re managing hundreds of credentials with different issue dates, expiry, and renewal rules across teams.
You need a reliable way to monitor necessary updates and track which certifications are active, expiring, or overdue. Fortunately, Smartsheet can handle much of this work internally.
Helper columns and date formulas can help you track status, while reminders flag upcoming renewals. You can also use reports to organize records by team or program. And on the Pro plan and up, Document Builder can map row data into PDF certificates to automate credential creation.
This guide shows how to put those pieces together and handle issuance with less manual work.
If your program needs more powerful features, we’ll also look at Certifier as an integration option with pre-built workflows and dedicated certificate tools.

Smartsheet comes with several built-in tools that help you capture employee or learner information automatically, organize certificate data, track credential lifecycles, and report on compliance.
A typical setup includes:

The master sheet: This is your primary database, which can store core learner details alongside certificate PDF attachments, numbers, issue dates, and other metadata you decide to keep.
Forms: They’re Smartsheet’s built-in tools for collecting information. Admins build a form linked to a master sheet, choosing columns like “Name” or “Date” as questions. Anyone with a link to the form can fill it out, and submissions automatically create populated rows in the sheet.
Reports: These are custom filters that include specific data from a master sheet without editing its layout. Admins create them choosing display criteria like "Show only expired certificates" or "Group by department." Team members can then open the report link for a tailored view.
The best part is that Smartsheet reports are bidirectional. Edits made in a report update the matching records in the master sheet, within viewer permissions.
But there’s one problem. The master sheet relies on a flat grid, which can be limiting. When one employee holds several credentials, each with its own metadata, you have to decide whether to:
a) Expand horizontally, adding more certification columns;
b) Expand vertically, creating separate rows.
With the wrong structure, your reporting, filtering, and automation will be harder to manage.
Smartsheet has free training matrix templates for general employee training, cross-training, and specific qualifications like health and safety.
You can also build your own by listing employees down the left as rows and placing courses, skills, or certifications across the top as columns.
Horizontal expansion like this is straightforward and gives you a clear, high-level overview of your team’s current certification status, including who has completed each assigned requirement, who needs updated training, and who is qualified for specific tasks. Take a look.
Employee | Product Training | Safety Training | Gdpr Training |
|---|---|---|---|
Mary | Complete | Complete | Complete |
John | In Progress | Due | Due |
Mike | Due | Due | In Progress |
Consider this option if most employees need the same set of standardized training modules, and you only need to track basic completion status.
Once you need to track more complex metadata, certificate automation and reporting will get more complicated.
If each employee requires several certifications — and each certification has its own certificate number, issue date, expiration date, and PDF attachment — you’ll have to add several columns for every credential.
Ultimately, you might end up with something like this:
Employee | Product Training | Hours | Number | Issued | Expires | Safety Training | ... | |
|---|---|---|---|---|---|---|---|---|
Mary | Complete | 20 | #000108 | Jan. 8, 2026 | Feb. 2, 2027 | Link | … | … |
Date-based reminders will also have to account for separate date columns, while reports would filter data spread across different fields.
You might then need to set up repetitive automation rules for each certificate, which adds more clutter and upkeep as a program scales.
Smartsheet also limits each sheet to 400 columns — with an additional 1,250 rows limit when reaching this column cap. While Enterprise large-scale sheets can hold more cells in table view, some reporting and automation features are still restricted above the standard limits.
Depending on how many certifications each employee can hold and how many attributes you track for each one, a horizontal layout can eventually become a hard scaling bottleneck.
If your sheet is getting too wide and you need to track more certificate details, switch to a vertical-style setup with one entry per certificate. Here, each employee name + certificate combination gets its own row in the sheet.
So, if one employee holds three credentials, you’d list them separately instead of cramming everything into one bloated record.
Employee | Certification | Status | Issued | Expires | Validity |
|---|---|---|---|---|---|
Mary | Product training | Complete | Jan. 8, 2026 | Feb. 2, 2027 | Valid |
Mary | Safety | Complete | Mar. 4, 2026 | Mar. 4, 2027 | Valid |
John | Product training | In Progress | – | – | – |
This architecture is perfect for complex tracking — for example, when requirements vary between employees or when each certificate carries unique recurring renewal rules. It also scales more cleanly for larger programs, where one person may hold several credentials.
You’ll also get more room to include detailed lists of meta data, including:
Employee contact information and ID,
Employee department or role,
Certificate number,
Credential validity,
PDF attachments.
🗒️ Tip: Individual records also make it easier to use forms and automations.
Once your certificate records have a consistent structure, Smartsheet is ready to handle the routine work.
A simple trigger → condition → action flow can automate several operational tasks: collecting records, updating statuses, prompting renewals, and generating documents.
Smartsheet forms are one of the easiest ways to cut admin work during data entry. Instead of entering certificate details by hand, you can let everyone provide the information without giving them access to the master sheet.
From the master sheet, go to Forms → Create form, then add the sheet columns you want people to complete and arrange them in the order they should appear. Mark essential fields as required and save the form. You can then share the link with employees or managers.
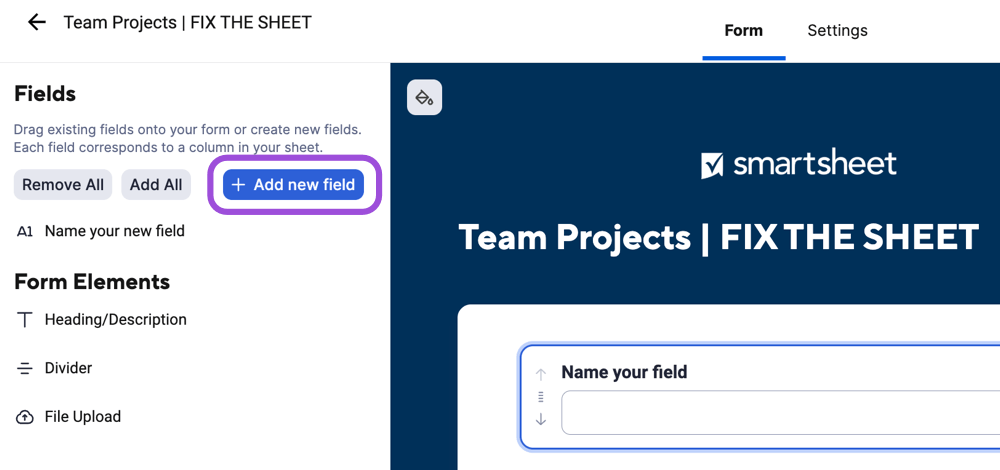
To fix inconsistent submissions from different teams, consider a few setup choices to standardize the data:
Mark only essential fields as required. In the form builder, select a field and switch on “Required.” This prevents submission until the person fills in the necessary information. Use this for information you need for your automation to run correctly — for example, an employee name or email if you can’t generate a credential without it.
Keep admin-controlled fields hidden. Ask employees only for details they should provide, such as name, email, or work ID. In the form builder, select fields like “Status” or “Issue Date” and enable “Hidden;” admins or automations can populate them later.
Standardize category values with dropdowns. For fields such as “Department” or “Certification Type,” edit the column properties. Choose “Dropdown List,” add the approved options, and restrict entries to those values. This prevents spelling variations from splitting the same category across reports.
Use forms only for new records. Since every form submission creates another row, you shouldn’t use them for updates; otherwise, you might end up with duplicate records.
Create and Send Digital Credentials

If you’re managing recurring training programs, you need to know which certificates are in progress, currently active, expired, or soon to expire — ideally without checking dates manually.
Smartsheet handles this with formulas and automations.
To track states that follow strict time rules, you can use a helper column with a formula. A helper column is a regular Smartsheet column that stores values calculated from other fields.
For certificate tracking, you can use one helper column to calculate the date when a certificate expires, and another to return either an “Active,” “Expiring soon,” or “Expired” status.
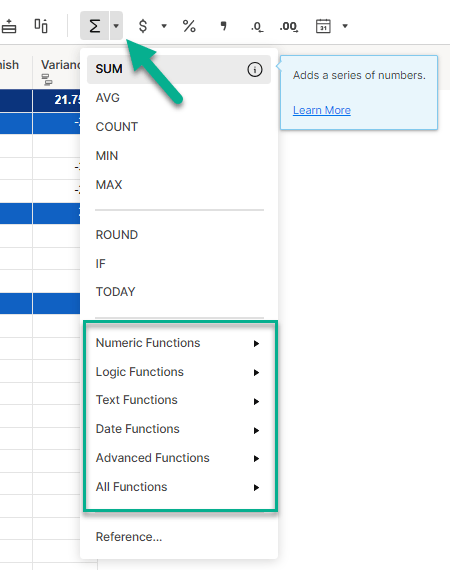
Suppose a certification always has the same validity period. You can calculate its expiry date from the issue date. For a certificate valid for one year, an “Expiration Date” column could use:
=DATE(YEAR([Issue Date]@row) + 1, MONTH([Issue Date]@row), DAY([Issue Date]@row))
Then, you can add a “Certificate Status” column that checks the “Issue Date” and “Expiration Date:”
=IF(ISBLANK([Issue Date]@row), "In Progress", IF(ISBLANK([Expiration Date]@row), "Active", IF([Expiration Date]@row < TODAY(), "Expired", IF([Expiration Date]@row <= TODAY() + 30, "Expiring Soon", "Active"))))
After testing each formula, right-click the cell and choose “Convert to Column Formula.” Smartsheet will run the same calculation for every row. To prevent accidental changes, open the column menu and choose “Hide Column.”
You can also use the helper column result for filtered searches. Create a filter or row report and set the condition to something like Certificate Status = Expired or Certificate Status = Expiring Soon.
🗒️ Note: If your formula uses TODAY(), Smartsheet will only refresh the function when the sheet updates and saves. If nobody regularly uses the sheet, consider an additional helper column that records the daily date change. This can refresh a date-dependent formula.
What if status depends on a person’s action rather than a formula?
You might want a team lead to mark an employee’s training course as passed, or an admin might prefer approving eligible learners directly.
If that’s the case, you can use an automation that monitors a field and updates another cell when the value changes.
To set this up, open your sheet and go to Automation → Create from scratch in the upper-left corner. Choose “When rows are changed” as your trigger, then select the column that records the event.
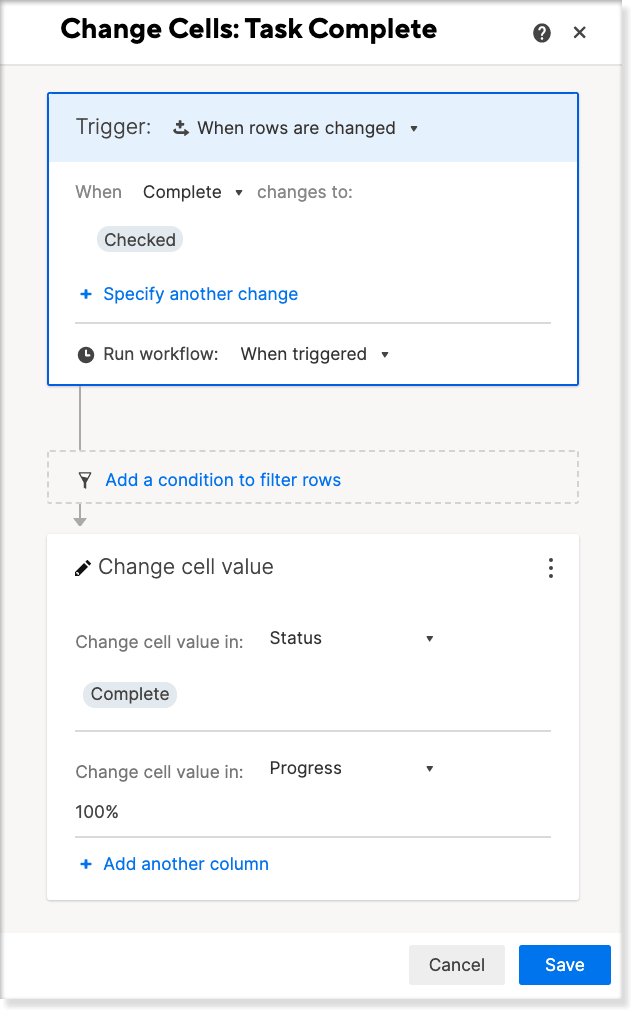
For a training program, this might be “Training Result;” for submitted certificates, it could be “Review Status.” You can also specify the exact value that launches the workflow, such as Training Result = Passed.
Next, add “Change cell value” as your action. Choose the target column you want Smartsheet to update and the exact status it should enter.
If the change means the learner is now fully qualified, you can use this updated field to prompt Document Builder to generate a certificate.
Once a certificate has a reliable expiration date, Smartsheet can use that field to calculate and send renewal reminders. Here’s how to set up this workflow, depending on your reminder schedule and who needs to be notified.
Create an automation from scratch and choose “When a date is reached.” In the trigger block, select your expiration-date column in the date field. Smartsheet checks the selected column daily for rows matching the trigger.
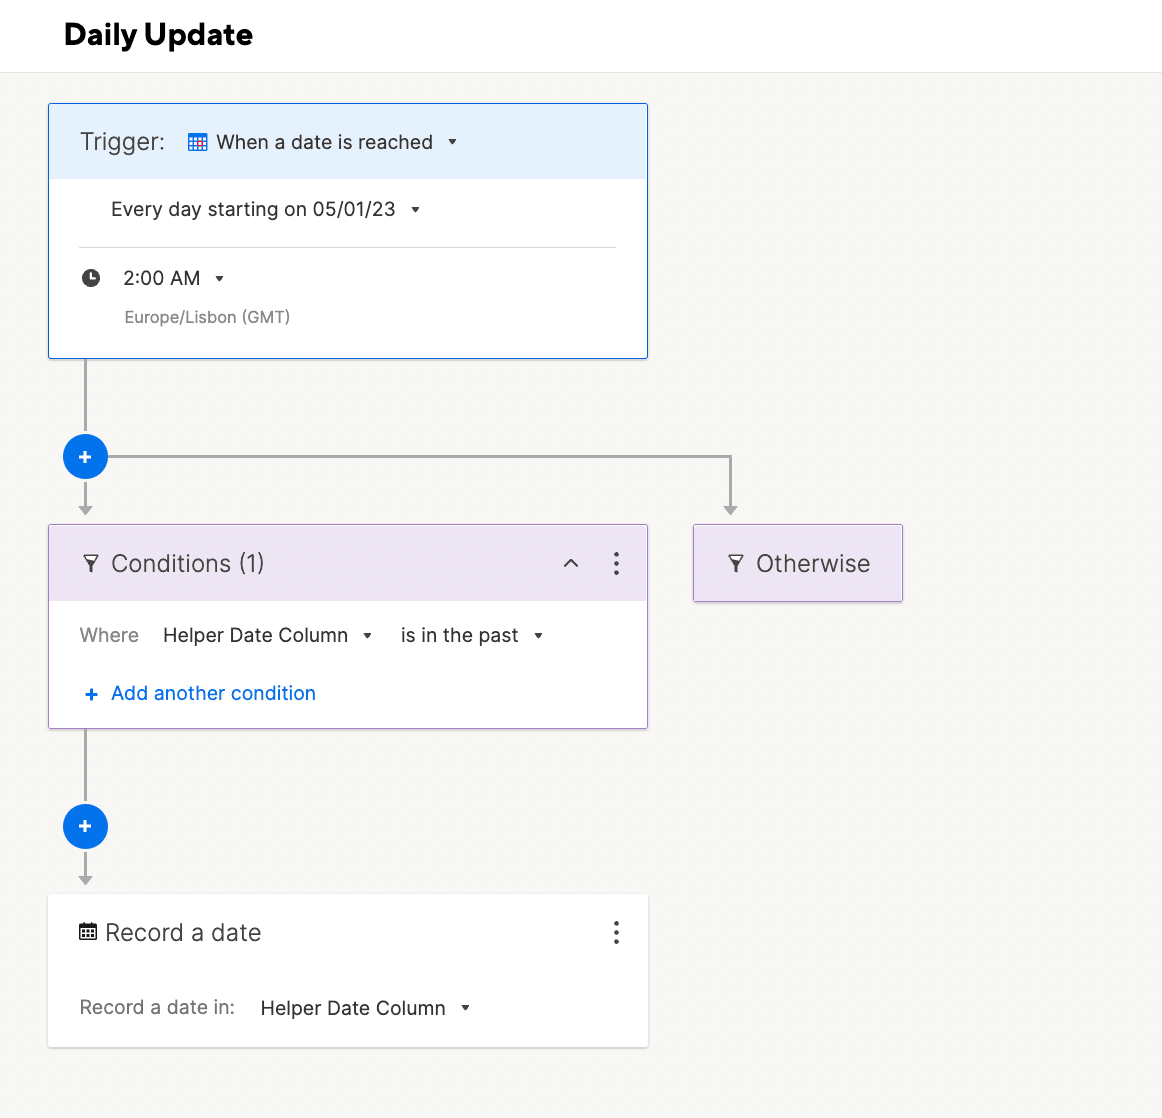
You can run the workflow on that date or a set number of days before/after.
Choose a notice window that gives you enough time to complete all renewal tasks. You might allow 90 days for complex renewals involving retraining or approvals, and 30 days for simple updates, for example.
Note that Smartsheet workflows only support one date trigger. To send multiple reminders at different intervals, you must build a separate workflow for each time window you need.
🗒️ Tip: As you build more automations, name them by both their timing and recipient — for example, 90 Days Before Expiry (Training Admin). This lets you instantly see what each workflow does without opening the rules.
Set recipients based on who needs to act on the renewal at this stage.
For example, you might route the 90-day alert to a training manager to coordinate classes, but route the 30-day and 7-day alerts directly to an employee who needs retraining.
If a single administrator manages all tasks, you can set them as the fixed recipient for all alerts. Otherwise, use a “Contact List” column to dynamically route the notification.
A staged reminder policy could look like this:
Time Before Expiry | Recipient | Followup Task |
|---|---|---|
90 days | Manager | Confirm renewal requirements and plan retraining |
60 days | Employee | Complete the new training, paperwork, or renewal steps |
30 days | Manager | Follow up on any incomplete renewals |
Expiry date | Admin | Update the record and handle any expired credential |
Ensure your contact columns contain valid email addresses so alerts deliver successfully. If you are notifying external individuals, check that your sheet and account automation permissions allow external notifications.
🗒️ Tip: If multiple renewals are due on the same day, Smartsheet will group the rows into a single summary email for the recipient to prevent inbox spam.
If you use multiple periodic reminders, you might want to skip subsequent notifications when a renewal is complete before the expiration date.
Use a condition block to ensure each workflow checks the latest status.
In the workflow builder, click “+” below the trigger and choose “Add a condition.” Select the “Renewal Status” column, then set the rule to “is not” and choose “Complete.”

🗒️ Tip: Date-triggered workflows scan your sheet daily, but empty cells will never trigger a notification. If a date field is blank, Smartsheet automatically skips that row.
Once a row updates to a qualifying status, you can trigger Document Builder to generate documents from Smartsheet data, creating personalized certificates for your recipients. This feature is available on paid plans.
The issuing and delivery workflow covers four major steps.
To avoid duplicate documents, trigger the certificate workflow using a clear, final eligibility field, such as Training Status = Complete or Attendance = Confirmed. Here’s how:
01Create workflow from scratch.
02Set the trigger block to “When rows are added or changed.”
03Select your “Eligibility Field,” choosing your specific column (e.g., “Training Status”) from the dropdown, then set it to “Changes to.”
04Enter or select the final qualifying value (e.g., “Complete”).
05Click the “+” icon below your trigger, select “Generate document,” and pick your mapped certificate template.
Prepare a fillable PDF certificate template using an external PDF editor of your choice, like Adobe or Canva.
Once the template is ready, upload it to Document Builder and map the sheet data you want to display on the certificate:
01Open Document Builder inside your sheet by right-clicking any row and selecting Generate Documents… → Create a new mapping.
02To upload the PDF, drag and drop your template directly into the Document Builder window.
03To map specific fields, drag only the sheet columns you want to display on the certificate (like recipient name and course title) to their matching PDF fields.
04Save changes so your Smartsheet workflows can use this map to generate certificates instantly.
Smartsheet will use the original PDF template name for every file unless you set a custom name.
To keep certificates organized, you can also add a filename column to your sheet and build each new certificate’s name from existing fields, like recipient and course title.
In the first column row, add a formula to combine existing fields, like:
=[Recipient Name]@row + " - " + [Course Title]@row
Apply the formula to the whole column so Smartsheet generates a filename for each row automatically. Then, in Document Builder, select the column as the output document name.
While Document Builder can generate and attach certificates to a row, you’ll need a secondary change-based workflow to handle external delivery.
This follow-up process monitors the sheet for new attachments and automatically emails the PDF to the specified recipient. Follow these steps:
01Create a new workflow from scratch.
02Set the trigger block to “When an attachment is added.”
03For the action, select “Send an alert.”
04Under recipients, choose “Send to contacts in a cell,” then select the column containing the learner’s email or contact.
05Click the three vertical dots at the bottom and check the box for “Include attachments” to ensure the PDF is sent with the email.
Remember that change-based alerts include only attachments added during the trigger event.
Also, links to attachments in automated emails expire after 14 days. If you send certificates to external recipients, ensure the automation settings allow external notifications.
Before rollout, run the full delivery flow with a test recipient. Check that every mapped field is correct and nothing is clipped or misaligned. Also confirm the PDF is attached to the email and opens without permission issues.
To recap, Smartsheet’s native features let you collect records, trigger certificate creation, and track renewals. While impressive, what if you want more advanced capabilities or a simpler workflow?
That’s where specialized credential platforms can streamline the process without complex formulas or workarounds.
Certifier is one such solution. It specializes in certificates, badges, and digital credentials tailored for everything from internal employee training to enterprise vendor compliance.
Edit in Certifier

You can connect Certifier to Smartsheet through our free native integration or through automation platforms like Zapier.
The integration uses new Smartsheet rows to issue and email custom credentials, marking each row as processed during the workflow and removing the extra PDF generation and attachment delivery steps.
Certifier also keeps all your issued credentials in one dashboard, where you can filter by design template, certificate status, expiry dates, and recipient engagement. This declutters your main Smartsheet record while upgrading your certificates with additional features.
Certificate Feature | Smartsheet | Certifier |
|---|---|---|
Credential format | Static PDF certificate | Digital certificate, badge, or credential hosted on a live wallet page |
Design process | Needs several tools, including Document Builder and an external PDF editor | Uses a drag-and-drop editor with free templates, custom fonts, backgrounds, and logos |
Recipient access | Recipients receive an emailed PDF they can download | Recipients can download, share, or request certificate changes through the login-free wallet page |
Sharing experience | No built-in sharing features | One-click sharing enables posting directly to socials without downloading files |
Third-party validation | No public credential verification | A unique verification page shows the issuer, credential ID, and current validity |
Live updates | No live certificate updates | Can edit expiry or recipient information on the live certificate without reissuing |
Credential analytics | No recipient activity tracking | Tracks email delivery, open rates, downloads, shares, and verification activity |
Certifier connects expiry and renewal directly to each credential, so you don’t need to build separate workflows.
When a certificate expires, the platform sends the recipient a reminder, flags the event in your dashboard, and marks the change on the live certificate.
For more issuance options, Certifier also uses certificate templates with dynamic fields.
You can create different templates for different programs and attach several designs. A qualified recipient can then receive a certificate alongside a badge, training record, assessment, or other supporting credential depending on your program requirements.
For enterprise setups, Certifier supports white-label portals, giving your external-facing credentials a consistent on-brand presentation. Other advanced features include custom SLA and DPA terms for procurement and compliance, plus multiple workspaces for separate departments or programs.
Select the perfect plan for your needs
Yes, Smartsheet can track renewals by department, as long as your sheet records which department each certified employee belongs to.
Add a “Department” column, then create reports that filter for upcoming or overdue renewals and group the results by department. The exact report setup depends on whether you use a training matrix or separate certificate rows.
Document Builder outputs static PDFs, so issued certificates cannot be changed or retracted.
What you can do is update the Smartsheet status column (e.g., to 'Revoked' or 'Expired') and delete the attachment. This lets your team know not to treat a specific credential as active.
For editable live credentials, try Certifier. You can delete issued certificates from your dashboard, and recipients lose access immediately. This deletion is irreversible.
Alternatively, you can use expiration dates. Once a certificate expires, you’ll see the status change, but the credential remains visible.
To handle repeat training without duplicating active certificates, create a new row. Keep each completion in its own row, but mark only the latest record as current.
Set the previous row to Current Record = No and the active row to Current Record = Yes, then filter reminders and reports to current records only. This keeps one active certificate per person without deleting their training history.
Use Certifier instead of Smartsheet’s Document Builder when your primary goal is issuing verifiable digital credentials. Unlike static PDFs, Certifier provides live verification pages for third parties and recipient analytics for your team.
It’s also a better fit if you want to simplify certificate design and apply consistent branding across credentials, delivery emails, and recipient pages.

- Content Strategy
- SEO & AEO/GEO strategy
- Conversion Rate Optimization
- Organic Growth
- Buyer Psychology
Head of Content
Vlad Melnic leads content at Certifier, bringing 10+ years of experience in SEO content marketing and conversion-focused content. His focus is turning complex product value into clear benefits.




 Most popular